Don't Be A Pirate

My Blinkies

Add Me On Facebook
Protected


Blogs I Stalk


Awards :-)


Find Me At

Favorite Stamps


Monday, May 30, 2011
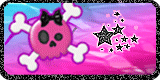
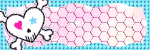
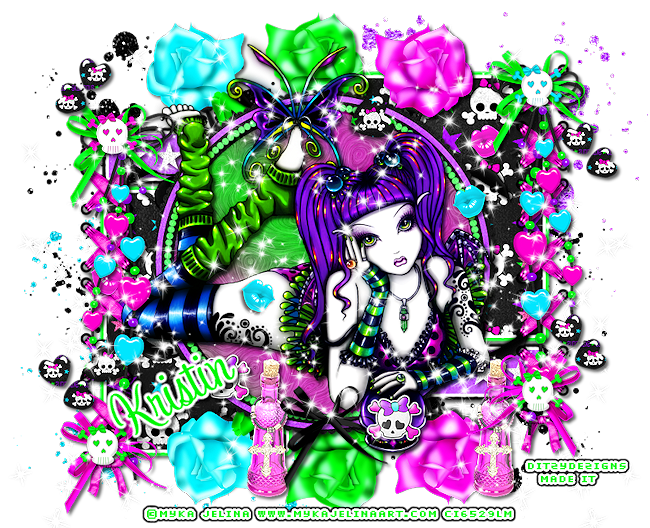
♥Skullicious PTU♥
**This tutorial was written & posted on May 30th 2011**
***Any resemblance to any other tutorial is purely coincidental & completely unintentional!!***
Here is what we will be making :
Supplies Needed :
Paint Shop Pro X2 (Any version should work)
Tube of choice - I used the amazing work of Myka Jelina, you can now purchase her work @ her own site. Myka Jelina Fantasy Art (License Required To Use Her Tubes)
Scrapkit - Skullicious By Toxic Desirez @ Scraps With Attitude
Template 120 By Kristin @ Toxic Desirez (Scroll about half way down on the page & her list of templates is on the left hand side. You want the link Templates 120-129)
Plugins Used :
Xero - Radiance (Optional)
Eye Candy 4 - Gradient Glow (Optional)
Eye Candy 5 - Texture - Swirl (Optional)
Eye Candy 5 - Impact - Gradient Glow (Optional)
Elements Used :
Papers 1, 3 & 11
Splat 1,2 & 3
Crossed Ribbon 1
Bottle
Hearts 1
Hearts 2
Beaded String
Sticker
Bow 1,2 & 5
Roses 1,3 & 4
Lips 1 & 2
Skull 1,3 & 4
Frame 2
Sparkles
Lets Begin :
Open template120.
Go to your layers pallet, delete the copyright , wordart & background layers.
Now go to Image, click Canvas Size @ set it to 800 X 650 Pixels (Don't worry we will crop it later)
Now in your layers pallet, click on your Black Rectangle 1 layer. Go to Selections, click Select All, then Selections again & click Float, then Selections again & click Defloat.
(From here down when these steps need to be used I will shorten it by saying "Selections - Select All - Float - Defloat" that way you will know that you have to go to Selections each time to use those commands)
Now open Paper 11, copy & paste it as a new layer onto your canvas, then go to Selections & click Invert. Now on your keyboard press your delete key 1 time.
Go back to Selections & click Select None.
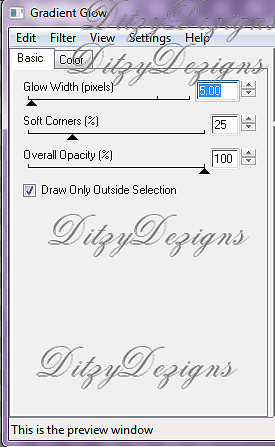
Apply a gradient glow & a drop shadow.
Now in your layers pallet, delete your original Black Rectangle 1 layer.
Now follow those same steps to do your Black Rectangle 2 layer.
Now in your layers pallet, click on Pink Rectangle 2 layer, Selections - Select All - Float - Defloat.
Now open Paper 3, copy & paste it as a new layer onto your canvas, then go to Selections & click Invert. Then on your keyboard press your delete key 1 time.
Go back to Selections & click Select None.
Now apply a gradient glow & a drop shadow.
In your layers pallet , delete your original Pink Rectangle 2 layer.
Now follow those same steps for your Pink Rectangle 1 layer.
Now click on your Pink Circle layer, go to Selections - Select All - Float - Defloat,
Now make a new raster layer,
Activate your flood fill tool by clicking on it, change your foreground color to #00f708 & your background color to #f020cc , Now click on your foreground color box, when it opens click on your Gradient tag. Set your Angel to 40 & Repeats 3 & click Ok.
Now using your flood fill tool, click inside the marching ants.
Once your circle is the color of your gradient, go to Selections & click Select None.
Now go to Effects, click Plugins, then click Eye Candy 5 - Texture - Then click Swirl. You can use my settings below or your own.
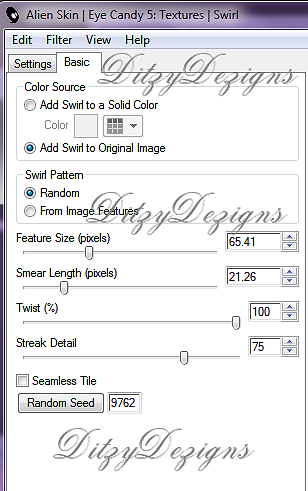
Click Ok.
Now delete your original Pink Circle.
In your layers pallet, click on your Black Circle layer. Go to Selections - Select All - Float - Defloat,
Open Paper 2, copy & paste it as a new layer onto your canvas ,then go to Selections & click Invert.
Then on your keyboard press your delete key 1 time.
Now go back to Selections & click Select None.
In your layers pallet delete your original Black Circle layer.
Now open Splat 1 element , copy & paste it as a new layer onto your canvas, then using your move tool position it to the top left corner of your template. Then in your layers pallet, move your Splat 1 layer down to so that it is the 2nd layer from the bottom.
Now in your layers pallet, right click on your Splat 1 layer & click Duplicate. Then go to Image & click Mirror, then Image again & click Flip. Your duplicated Splat 1 element should now be in the lower right corner of your template.
Now open your Splat 2 element, copy & paste it as a new layer onto your canvas, then position it to the top right corner of your template. If you need to move it down just above your Splat 1 layer in your layers pallet.
Open your Splat 3 element, copy & paste it as a new layer onto your canvas, then position it to the lower left corner of your template.
Open your Frame 2 element, copy & paste it as a new layer onto your canvas, then re-size it to 80%. Using your move tool position it center on top of your new black circle on your template.
Go to Adjust, click Sharpness then click Sharpen.
Apply a drop shadow.
Open your Skull 1 element, copy & paste it as a new layer onto your canvas, then re-size it to 25%. Position it to your liking.
Sharpen & apply a drop shadow.
Open elements Skull 3 & 4 and follow the same step you did for Skull 1 element.
Once you have Skull 4 placed go to your layers pallet & right click on your Skull 4 layer then click Duplicate. Then use your move tool to position it to your liking.
Open your Lips 2 element, copy & paste it as a new layer onto your canvas ,then re-size it to 25%. Use your move tool to position it to your liking.
Sharpen & apply a drop shadow.
Now go to your layers pallet, right click on your Lips 2 layer & click Duplicate. Position as desired.
Duplicate it a couple more times until you have the desired amount.
Now open your Lips 1 element and follow the same steps you did for Lips 2 element.
Open your Hearts 2 element, before your copy & paste it, crop it so that only the bottom heart is viewable. Then copy & paste it as a new layer onto your canvas, then re-size it to 25%. Position to your liking.
Sharpen & apply a drop shadow.
Go to your layers pallet & right click on your Hearts 2 layer & click Duplicate. Position to your liking.
Duplicate it a couple more times & spread them through out your tag.
Open your Rose 1 element, copy & paste it as a new layer onto your canvas, position it to the right side of your center circle & tube. Then in your layers pallet, move your Rose 1 layer down so that it is below both of your tube layers & center circle layers.
Now on your Rose 1 layer go to Effects, click Plugins , then click Xero, then click Radiance, you can either use my settings below or your own .
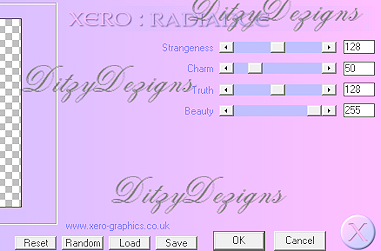
Click Ok.
Now apply a drop shadow.
Now open elements Roses 3 & 4 and follow the same steps.
Once you have all 3 roses placed onto your canvas, click on your top Rose layer & click Merge, then click Merge Down from the slide out menu.
Then right click on your merged Rose layer & click Duplicate. Go to Image & click Flip.
Use your move tool to adjust the position if needed.
Open Bow 5, copy & paste it as a new layer onto your canvas, then re-size it to 40%. Position your Bow 5 element to the upper left corner of your template.
Sharpen & apply a drop shadow.
Now open elements Bow 1 & 2 and follow the same steps you did for the Bow 5 element.
Now open Sticker 1 element, copy & paste it as a new layer onto your canvas, then re-size it to 30%. Position it to your liking.
Sharpen & apply a drop shadow.
Go to your layers pallet, right click on your Sticker layer & click Duplicate. Use your move tool to position your duplicated Sticker element to where you would like it.
Open your Beaded String 1 element, copy & paste it as a new layer onto your canvas, then re-size it to 80%. Now position it to the left side of your template towards the top.
Then in your layers pallet, move your Beaded String layer down so it is below your bow that is there.
Sharpen & apply a drop shadow.
Go back to your layers pallet, right click on your Beaded String layer & click Duplicate. Now go to Image & click Mirror.
Use your move tool to adjust the position of your duplicated Beaded String if needed.
Open Hearts 1 element, copy & paste it as a new layer onto your canvas, then re-size it to 35%. Position it to right corner of your template.
Sharpen & apply a drop shadow.
Now go to your layers pallet & right click on your Hearts 1 element, then click Duplicate. Go to Image & click Mirror.
Duplicate this element 3 more times for a total of 4 and position them around your tag.
Open your Bottle element, copy & paste it as a new layer onto your canvas, then position it at the bottom of your template on the left of your tube.
Sharpen & apply a drop shadow.
Now go to your layers pallet, right click on your Bottle layer, then click Duplicate. Now use your move tool to position your duplicated Bottle element to the right side of your tube.
Open your Sparkles element, copy & paste it as a new layer onto your canvas, then position your Sparkles to the top of your template.
Now go to your layers pallet, right click on your Sparkles layer & click Duplicate. Then go to Image & click Flip. You can adjust the position of your Sparkle elements using your move tool if you need to.
Now lets add a name to your tag, so activate your Text tool, set your Font, size & color.
Font I used :
Sweatheart Script Limited
Size : 65 Pixels
Color : #00f708
Then type out the name you want on your tag.
Once you have it placed on your tag where you want it, go to your layers pallet & right click on your name layer, then click Convert To Raster Layer.
Then go to Effects, click Plugins then click Eye Candy 4 - Gradient Glow. Set your settings to your liking & click Ok. (This step is optional, if you dont have Eye Candy 4.)
Now add your copyright & credit information, also remember to post your license # for any PTU artists that you have used. Also make sure you post your name as the designer of the tag. :-)
Now once you have everything on your tag that you want on it, go to your layers pallet & right click on any layer. Then click Merge, then click Merge Visible.
Now activate your crop tool, crop off any access canvas that we did not use.
Now re-size your tag to your desired size.
Once your tag is cropped & re-sized you might want to sharpen the tag as a whole. So go to Adjust, click Sharpness then click Sharpen.
All that is left is for you to save your tag in PNG format & your done!!
Thanks for trying my tutorial!!
♥Lets Play PTU♥
Here is what we will be making :
**This tutorial was written & posted on May 30th 2011**
***Any resemblance to any other tutorial is purely coincidental & completely unintentional!!***

Supplies Needed :
Paint Shop Pro X2 (Any version should work)
Scrapkit - Lets Play By ScrappingMar @ Scaps With Attitude
Mask Of Choice
Font Of Choice
Elements Used :
Papers 5 & 6
Elements -- 53, 57, 58, 18, 12, 54, 3, 49, 5, 23, 48, 47, 26,
Lets Play Word Art
Lets Begin -
Start by opening a new 800 X 650 transparent canvas. (Don't worry we will crop it later)
Open Element 47, copy & paste it as a new layer onto your canvas, then re-size it to 15%.
Now activate your magic wand tool, click inside both of your frames.
Go to Selections, Click Modify then click Expand.
Set your number of pixels to 5.00 & click Ok.
Now open Paper 6, copy & paste it as a new layer onto your canvas, then go to Selections & click Invert.
Now on your keyboard press your delete key 1 time.
Go to Selections & click Select None.
In your layers pallet, move your Paper 6 layer below your Element 47 (Frame) layer.
Now click on your element 47/frame layer, and go to Adjust, click Sharpness, then click Sharpen.
Then go to Effects, click 3D Effects, then click Drop Shadow. Set your settings to your liking & click Ok.
Open Element 5, copy & paste it as a new layer onto your canvas ,then re-size it to 10%. Use your move tool to position your element 5 to the right side of your frame.
Sharpen & apply a drop shadow.
Open Element 3, copy & paste it as a new layer onto your canvas ,then re-size it to 10%. Position it to the left side frame.
Sharpen & apply a drop shadow.
Open your Lets Play wordart, copy & paste it as a new layer, re-size it to 30%. Then position it above your frame.
Sharpen & apply a drop shadow.
Open Element 12, copy & paste it as a new layer onto your canvas, then re-size it to 10%. Now position it above your frame.
Sharpen & apply a drop shadow.
Open Element 58 - Copy & paste it as a new layer onto your canvas ,then re-size it to 10%, then re-size it again to 50%. Now position it to the frame on the right at the lower right corner.
Sharpen & apply a drop shadow.
Open Element 53, copy & paste it as a new layer onto your canvas, then re-size it to 10% then again to 50%. Now position it to the lower right corner and place it in front of your soccer ball element.
Sharpen & apply a drop shadow.
Open Element 26, copy & paste it as a new layer onto your canvas ,then re-size it to 10% then again to 70%. Position it to the right side as well.
Sharpen & apply a drop shadow.
Open Element 48, copy & paste it as a new layer onto your canvas, then re-size it to 10%, then re-size it again to 70%. Now go to Image & click Mirror. Then position it to the right side of your frames.
In your layers pallet move this layer below your soccer ball & car layers.
Open Element 23, copy & paste it as a new layer onto your canvas, then re-size it to 10%. Then re-size it again to 70%. Now position it to the left side.
Sharpen & apply a drop shadow.
Now open Element 49, copy & paste it as a new layer onto your canvas, then re-size it to 10% then re-size it again to 70%. Position it to the left side of your frames.
Sharpen & apply a drop shadow.
Open Element 54, copy & paste it as a new layer onto your canvas, then re-size it to 10% then again to 40%. Position it to the lower left corner and place it so that it looks like it is sitting on your rocking horse element.
Sharpen & apply a drop shadow.
Open Element 18, copy & paste it as a new layer onto your canvas, then re-size it to 10% then again to 70%. Go to Image, click Free Rotate set to Left 30.00 & click OK.
Now position it to your liking, then go to your layers pallet & move your Element 18 layer below your Hippo (Element 54) layer.
Sharpen & apply a drop shadow.
Open element 57 - Copy & paste it as a new layer onto your canvas, then re-size it to 10% then re-size it again to 40%. Position it to the lower left corner.
Sharpen & apply a drop shadow.
In your layers pallet, click on your very bottom layer,
Open Paper 5, copy & paste it as a new layer onto your canvas, now because this paper is soooo huge, you will need to re-size it several times, so what I did was re-size it to 65%, about 3 times, then I believe I re-sized it to 80%. You want it so that all 4 sides of the paper are visible within your canvas.
Then go to Layers, click Load/Save Mask, then from the slide out menu click Load Mask From Disk, once that window opens choose your mask of choice then click Load.
Once you mask has loaded on your canvas, go to your layers pallet, right click on your Mask layer & click Merge, then from the slide out menu click Merge Group. Now re-size your mask to 80%.
Now using your move tool position your mask to the left side of your frames. Then go to your layers pallet, right click on your mask layer & click Duplicate.
Then go to Image & click Mirror.
Use your move tool to adjust the position of your duplicated mask layer if needed.
Now click back up on your very top layer in your layers pallet.
Activate your text tool, set your font, size & color.
The font I used was :
Happy
Size : 70 Pixels
Color : I chose a different color from my tag for each letter in the name I used.
Then apply your name, then position it exactly where you want it on your tag, then go to your layers pallet, right click on your name layer then click Convert To Raster Layer.
Then go to Effects, click Plugins, then click Eye Candy 4 - Gradient Glow. Set your settings & click Ok.
Now apply a drop shadow to your name.
If you wish to give your text the glass effect,
Activate your magic wand tool, then click inside each letter in the name on your tag.
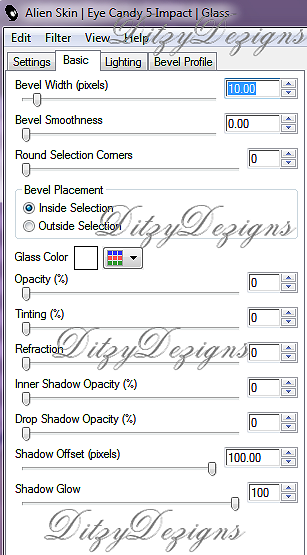
Then once all letters are selected go to Effects, click Plugins then click Eye Candy 5 - Impact - Glass, you can either use my settings below or your own :
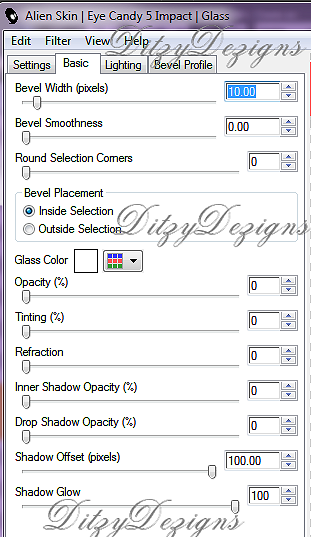
Click Ok.
Now with your letters still selected go to Adjust, click Add/Remove Noise, then click Add Noise. Set to Uniform, 40 & make sure your Monochrome box IS checked. Then click Ok.
Now go to Selections & click Select None.
Now add your copyright /credit information! (Important not to forget this part)
Once everything is on your tag placed where you want it, go to your layers pallet, right click on any layer,then click Merge, then from the slide out menu click Merge Visible.
Now activate your crop tool & crop off any access canvas that we did not use.
Once you have cropped your tag, you will want to re-size it.
Once your tag is re-sized, go to Adjust , click Sharpness, then click Sharpen. To give it that extra sharpen.
All that is left is for you to save your tag as a PNG file & your done!
Thanks for trying my tutorial!!
Sunday, May 29, 2011
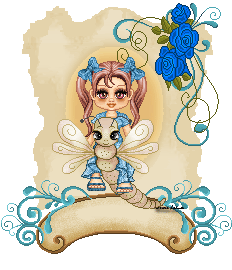
♥Neon Girl PTU♥
Here is what we are going to make :
**This tutorial was written & posted on May 29th 2011**
***Any resemblance to any other tutorial is purely coincidental & completely unintentional!!***

Supplies Needed :
Paint Shop Pro X2 (Any version should work)
Tube of choice - I used the adorable work of PinUp Toons, you can now purchase his work @ Creative Outlet Designs
Scrapkit called Missy By Butterfly Kisses @ Scraps From The Heart
Elements Used :
Lets Begin :
Start by opening a new 800 X 650 transparent canvas. (Don't worry we will crop it later)
Open Frame02, copy & paste it as a new layer onto your canvas, then re-size it to 40%.
Now activate your magic wand tool, click inside all 3 of the frames. Go to Selections, click Modify then click Expand from the slide out menu.
Now set your number of pixels to 5.00 & click Ok.
Open Paper05, copy & paste it as a new layer onto your canvas, then go to Selections & click Invert. Then on your keyboard press your delete key 1 time.
Keeping your frames selected, Open your tube of choice.
Copy & paste it as a new layer onto your canvas, then position it so that the head of the tube is within the frame on the left side. Once your happy with the position press your delete key 1 time.
Copy & paste your tube a second time, this time position it so the head is inside the frame on the right end. Once happy press your delete key 1 time.
Now go to Selections & click Select None.
Now go to your layers pallet, right click on your tube layer that is for the left frame. Then click Duplicate. Go to Adjust, click Blur then click Gaussian Blur, set to 5.00 & click Ok. Now change the blend mode to Overlay.
On your original tube layer change the blend mode to Luminance (L).
Now follow the same steps for the tube in the 3rd frame (to the right)
Now copy & paste your full tube again, position it in the center of the middle frame. Once happy with the position go to your layers pallet & right click on your full tube layer, then click Duplicate. Now move your duplicated tube layer below your frame layer but keeping it above your paper layer.
Now click back up on the top tube layer, activate your eraser tool & erase any part of the tube that goes past the bottom end of your frame.
You will also have to click on your tube layer you placed under your frame layer & erase the same parts that you did for the top tube layer.
Once you have all parts erased that need to be erased right click on your top tube layer, then click Duplicate. Now go to Adjust,click Blur then click Gaussian Blur from your slide out menu. Set to 5.00 & click Ok.
Now change your blend mode to Overlay.
Click on your 3rd full tube layer down, and apply a drop shadow.
Open Butterfly01, copy & paste it as a new layer onto your canvas, then re-size it to 30%. Go to Image & click Free Rotate set to Right 30.00 & click Ok.Now position your butterfly to the left top corner of your frame.
Sharpen & apply a drop shadow.
Go to your layers pallet, right click on your butterfly layer & click Duplicate. Now go to Image & click Mirror. Then use your move tool to adjust the position of your duplicated Butterfly element if needed.
Open Doodle02 element, copy & paste it as a new layer onto your canvas, then re-size it to 60%. Use your move tool & move it to the bottom of your frame and center it.
Sharpen & apply a drop shadow.
Open Doodle Flowers 01 - Copy & paste it as a new layer onto your canvas, then re-size to 25%. Use your move tool & position your doodle flower 01 to the right end of your Doodle02 element.
Sharpen & apply a drop shadow.
Now go to your layers pallet, right click on your Doodle Flower 01 layer & click Duplicate. Now go to Image & click Mirror.
Now use your move tool to adjust the position of your duplicated element so that it is at the end of your doodle02 element.
In your layers pallet click on the very last layer at the bottom,
Open Paint Splatter 2 - Copy & paste it as a new layer onto your canvas, then position it to the left side of your tube.
Open your Paint Splatter 1 element - Copy & paste it as a new layer onto your canvas, position it to the right side of your tube.
Open your Sparkles element - Copy & paste it as a new layer onto your canvas, then position it above your frame. Go to your layers pallet & right click on your Sparkles layer & click Duplicate. Now go to Image & click Flip.
Open your Heart02 element - Copy & paste it as a new layer onto your canvas, then re-size it to 30% , then re-size it again to 50%. Using your move tool position to your liking.
Go to your layers pallet & duplicate this element 3 times each time using your move tool to position where you would like each element.
Open your Hearts element - Copy & paste it as a new layer onto your canvas, then re-size it to 30%. Using your move tool position your Hearts element to the right side of your tube.
Sharpen & apply a drop shadow.
Go to your layers pallet & right click on your Hearts layer, then click Duplicate. Now go to Image & click Mirror. Adjust the position of your duplicated Hearts element with your move tool if needed.
Now in your layers pallet, click on your Splatter 1 layer,
Open Ribbon4 element, copy & paste it as a new layer onto your canvas, Go to Image & click Free Rotate set to Right 90.00 & click Ok.
Now re-size your Ribbon4 element to 65%. Using your move tool position your Ribbon4 element to the left side of your tag.
Go to your layers pallet & right click on your Ribbon 4 layer, then click Duplicate.
Now go to Image & click Mirror.
Use your move tool to adjust the position of your duplicated Ribbon 4 element if needed.
Now click on your text tool,
Set your font, size & color.
The font I used was :
Al Sandra
Size : 80 Pixels
Color : #000000 (Black)
Type out the name you wish to use. Now apply a drop shadow.
Also apply any copyright & credit information.
Once you are happy with the placement of all your elements, tubes, name & copyright information, go to your layers pallet & right click on any layer. Then click Merge, then from the slide out menu click Merge Visible.
Now activate your crop tool, crop off any access canvas that we did not use.
Now re-size your tag to your desired size.
Once you re-size go to Adjust, click Sharpness, then click Sharpen.
Now all that is left is to save your tag in PNG format & your DONE!
Thanks for trying my tutorial!!
♥Marine Air PTU♥
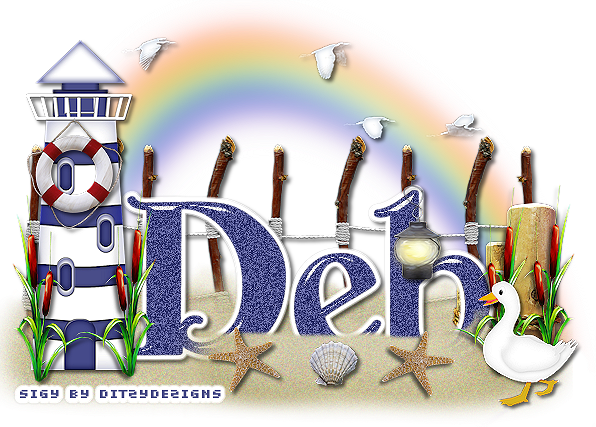
Here is what we are going to be making :
**This tutorial was written & posted on May 29th 2011**
***Any resemblance to any other tutorial is purely coincidental & completely unintentional!!***
Supplies Needed :
Paint Shop Pro X2 (Any version should work)
Scrapkit - Marine Air By HF-Projekte @ ButterflyBlush Designs
Plugins Used :
Eye Candy 4 - Gradient Glow
Eye Candy 5 Impact - Gradient Glow
Font Used :
2 Moulin Rouge DNA
Elements Used :
38, 31, 11, 5, 6, 16, 13, 32, 30, 4, 1, 33
Lets Begin :
Start by opening a new 800 X 650 transparent canvas. (Don't worry we will crop it later)
Now open Element 33, copy & paste it as a new layer onto your canvas, then re-size it to 30%. Then activate your move tool & position your element 33 to the left side of your canvas. Now go to your layers pallet & right click on your Element 33 layer, then click Duplicate. Now use your move tool to position your duplicated element to the right side of your canvas.
Now open Element 1, copy & paste it as a new layer onto your canvas, then re-size it to 30%. Then re-size it again to 85%. Position it to the left side of your canvas.
Go to Adjust, click Sharpness, then click Sharpen.
Apply a drop shadow. (Effects, click 3D Effects, then click Drop Shadow, chose your settings & click Ok)
Open Element 4, copy & paste it as a new layer onto your canvas, then re-size it to 15%. Using your move tool position it next to your element 1.
Sharpen & apply a drop shadow.
Now activate your text tool, set your font, size & color.
The font I used :
2 Moulin Rouge DNA
Size : 200 Pixels
Color : #494d89
Once you have the name you want on your tag typed out click Apply.
Then go to your layers pallet, right click on your name layer, then click Convert To Raster Layer.
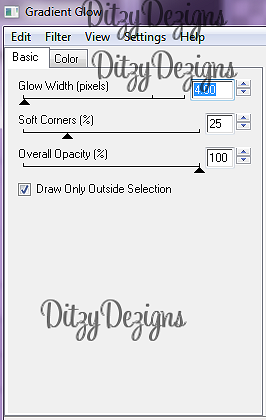
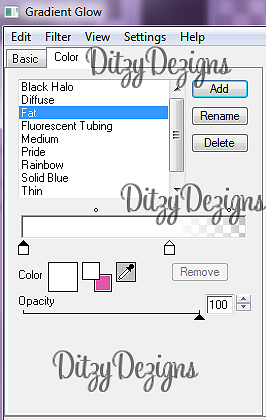
Now go to Effects, click Plugins, then click Eye Candy 4 - then choose Gradient Glow from the slide out menu. You can either use my settings below or your own :

Click Ok.
Now apply a drop shadow to your name.
Now activate your magic wand tool, & click inside each letter in the name you chose to use.
Once each letter is selected & has the "marching ants" around it, go to Effects, click Eye Candy 5 - Impact - then from the slide out menu click Glass.
Again you can use my settings below or your own :
Click Ok.
Still keeping your letters selected, go to Adjust, click Add/Remove Noise, then click Add Noise from the slide out menu, set to Uniform, 40 & make sure your Monochrome box IS checked and click Ok.
Now go to Selections & click Select None to deselect your letters.
Now in your layers pallet, right click on your Element 33 layer (the sand that is positioned to the right side of your canvas.)
Click Duplicate, use your move tool & move your duplicated sand up a little to cover the bottom edge of your name. If any parts are higher than you want it to be, just activate your eraser tool & erase any parts that you want removed.
Now open Element 30, copy & paste it as a new layer onto your canvas, then re-size it to 15%, then re-size it again to 85%. Now go to Image & click Mirror. Using your move tool position your Element 30 to the right end of your sand.
Sharpen & apply a drop shadow.
Open Element 32, copy & paste it as a new layer onto your canvas, then re-size it to 45%.
In your layers pallet, move your Element 32 layer down so that it is below all other layers. Now position your rainbow so that the left end of the rainbow is behind your light house & the right end is under your bird & sand.
Now activate your eraser tool & erase any part of your rainbow element that goes past the sand on the right end.
Now open Element 6, copy & paste it as a new layer onto your canvas, then re-size it to 15%. Using your move tool position your Element 6 to the left side. Now go to your layers pallet & right click on your Element 6 layer, then click Duplicate. Now go to Image & click Mirror. Use your move tool to position to the right side of your lighthouse element. Now duplicate your Element 6 layer again, this time move it by your duck element.
Sharpen & apply a drop shadow to all of your Element 6 layers.
Open Element 13, copy & paste it as a new layer onto your canvas, then re-size it to 10%, then re-size it again to 60%. Now position it using your move tool in front of your name on the sand.
Sharpen & apply a drop shadow.
Open Element 16, copy & paste it as a new layer onto your canvas, then re-size it to 10% then re-size it again to 40%. Use your move tool & position in front of the name on the sand.
Sharpen & apply a drop shadow.
Now open Element 5, copy & paste it as a new layer onto your canvas, then re-size it to 10%. Then re-size it again to 85%. Using your move tool position this element on one of the letters in the name.
Sharpen & apply a drop shadow.
Now open Element 11, copy & paste it as a new layer onto your canvas, then re-size it to 15%. Position it at the right end of your name.
Sharpen & apply a drop shadow.
Now in your layers pallet, duplicate your Element 6 layer again & place 1 on each side of your Element 11.
Open Element 31, copy & paste it as a new layer onto your canvas, then re-size it to 40%. Use your move tool & center it on your tag. Then go to your layers pallet & move your Element 31 layer down so it is directly above your Element 32 (rainbow) layer.
Sharpen & apply a drop shadow.
Now apply your copyright & credit information. (Its important not to forget this part)
Once you have everything added & where you want it placed on your tag, go to your layers pallet & right click on any layer, then click Merge, then from the slide out menu click Merge Visible.
Now activate your crop tool, crop off any access canvas that we did not use.
Now re-size your tag if needed.
Once your tag is re-sized, go to Adjust, click Sharpness, then click Sharpen.
All that is left is to save your new tag as a PNG file & you have completed this tutorial!!
Thanks for trying my tutorial!!
♥2 In Love PTU♥
Here is what we are going to be making :
**This tutorial was written & posted on May 29th 2011**
***Any resemblance to any other tutorial is purely coincidental & completely unintentional!!***
Supplies Needed :
Paint Shop Pro X2 (Any version should work)
Scrapkit 2 In Love By Polkadot Scraps @ Pimp My Tags With Scraps
Elements Used :
Elements 23,18,31,30,7,2,14,3,8,4,5,13,12,1,5
Paper 5
Lets Begin :
Open a new canvas 800 X 650 transparent.
Open Frame 1, copy & paste it as a new layer onto your canvas, then re-size it to 60%.
Activate your magic wand tool, click inside your frame1, go to Selections , click Modify then click Expand, set to 5.00 & click Ok.
Now open Paper 5, copy & paste it as a new layer onto your canvas ,then go to Selections & click Invert. Then on your keyboard press your delete key 1 time.
Go to Selections & click Select None.
In your layers pallet, move your Paper5 layer below your Frame2 layer.
Apply a drop shadow to your Frame 1 layer.
Now open Element 14, copy & paste as a new layer onto your canvas, then re-size it to 50%. Use your move tool position your Element 14 to the left side of your frame.
Go to Adjust, click Sharpness,then click Sharpen.
Apply a drop shadow.
Open Element 8, copy & paste it as a new layer onto your canvas ,then use your pick tool and adjust each side until your grass is even with the outside edges of your frame1 element on both sides.
Sharpen & apply a drop shadow.
Open element 12, copy & paste it as a new layer onto your canvas ,then re-size it to 40%. Go to Image & click Mirror. Position to the inside of your frame to the left. Go to your layers pallet and move your Element 12 layer down below your Element 8 layer.
Sharpen & apply a drop shadow.
Open Element 13, copy & paste it as a new layer onto your canvas ,then re-size it to 40%, Using your move tool position your Element 13 to the inside of your frame to the right.
Then go to your layers pallet, move your Element 13 layer down below your Element 8 layer.
Sharpen & apply a drop shadow.
Open Element 4, copy & paste it as a new layer onto your canvas ,then re-size it to 40%. Position to the inside of the frame.
Go to Effects, click Plugins then click Eye Candy 4 - Gradient Glow. Apply your settings & click Ok.
Apply a drop shadow.
Now open Element 3, copy & paste as a new layer onto your canvas ,then re-size to 30%.Position it using your move tool to the left side of your frame.
Sharpen & apply a drop shadow.
Go to your layers pallet, and move your Element 3 layer down below your Element 8 layer.
Open Element 2, copy & paste it as a new layer onto your canvas, then re-size it to 30%. Go to Image & click Mirror. Use your move tool & position to the left.
Go to your layers pallet & move your Element 2 layer below your Element 14 layer.
Sharpen & apply a drop shadow.
Open your Element 18 , copy & paste it as a new layer onto your canvas ,then re-size it to 40%. Using your move tool position your Element 18 to the lower left side of your frame.
Sharpen & apply a drop shadow.
Now go to your layers pallet & right click on your Element 18 layer, then click Duplicate. Go to Image & click Mirror. Use your move tool to adjust the position if needed.
Now go to your layers pallet & right click on your duplicated layer, then click Merge, then click Merge Down.
Now right click on your Merged layer & click Duplicate. Then go to Image & click Flip.
In your layers pallet move these layers below your paper layer.
Open Element 7, copy & paste it as a new layer onto your canvas, then re-size it to 20%. Use your move tool to position it to the center of your 2 Element 18.
Sharpen & apply a drop shadow.
Now go to your layers pallet & right click on your Element 7 layer, then click Duplicate. Now re-size your duplicated Element 7 layer to 50%. Then use your move tool to position your duplicated Element 7 to the right end of your Element 18. Now duplicate your Element 7 layer again and go to Image & click Mirror. Adjust the position to the left end of your Element 18.
Sharpen & apply a drop shadow to all of your Element 7 layers.
Now open Element 30, copy & paste as a new layer onto your canvas, then re-size to 50%. Position to your liking.
Now sharpen & apply a drop shadow.
In your layers pallet move your Element 30 layer below your Frame layer but keeping it above your paper layer.
Open Element 31, copy & paste it as a new layer onto your canvas, then re-size it to 50%.Position to left side. In layers pallet move your Element 31 layer below your paper layer.
Sharpen & apply a drop shadow.
Now activate your text tool, set your font, size & color :
The font I used is :
Shit Happens
Size : 80 Pixels
Color : #000000 (Black)
Once you have your name placed where you want it, go to your layers pallet & right click on your name layer,then click Convert To Raster Layer.
Now go to Effects, click Plugins - then Eye Candy 4 - Gradient Glow. Set your settings & click Ok.
Now apply a drop shadow to your name.
Add your copyright & credit information. (Important not to forget this part)
Once you have everything placed where you want it go to your layers pallet & right click on any layer, then click Merge, then click Merge Visible from the slide out menu.
Now activate your crop tool, and crop off any access canvas that we did not use.
Now re-size your tag.
Go to Adjust, click Sharpness then click Sharpen.
Now save your tag as PNG & your done!!
Thanks for trying my tutorial!!
♥Im So Cute PTU♥
Here is what we will be making :
**This tutorial was written & posted on May 29th 2011**
**Any resemblance to any other tutorial is purely coincidental & completely unintentional!***
Supplies Needed :
Paint Shop Pro X2 (Any version should work)
Tube Of Choice - I used the amazing work of Lady Mishka , Who is now selling her tubes at Scraps And The City. (License Required To Use!!)
Scrapkit - Cute Lil Emo By Toxic Desirez @ Scraps With Attitude
Template21 By Tall Chic @ TallChic D-Zines
Elements Used :
Diamond
Sparkles
Lips 1 & 2
String
Flower 1 & 2
Heart
Beaded String
Ribbon1
Barbed Wire
Barbed Heart
Bow 1
Brad
Bunny
Chrome Star
Dragon
Skull2
Splatter 1
Papers 1,2 & 7
Lets Begin :
Start by opening your template21
Then in your layers pallet, click on your bl rec layer, go to Selections, click Select All, then Selections again & click Float, then selections again & click Defloat,
(From here on I will just put Selections - Select All - Float - Defloat, and you will know that you have to go to Selections to click on that command )
Now open Paper 7, copy & paste it as a new layer onto your canvas ,then go to Selections & click Invert. Now on your keyboard press your delete key 1 time.
Go back to Selections & click Select None.
Delete your original bl rec layer from your layers pallet.
Then go to your layers pallet & click on your pur rec layer, Selections - Select All - Float - Defloat,
Open Paper2, copy & paste it as a new layer onto your canvas, go to Selections & click Invert. Then on your keyboard press your delete key 1 time.
Now go back to Selections & click Select None.
Now delete your original pur rec layer.
Apply a drop shaodw to your new paper 2 layer.
Now click on your rec layer, then go to Selections - Select All - Float - Defloat,
Open Paper 7, copy & paste it as a new layer onto your canvas ,then go to Selections & click Invert.
Now on your keyboard press your delete key 1 time.
Go back to Selections & click Select None.
Delete your original rec layer.
Then apply a drop shadow to your new paper 7 layer.
Now click on your c layer, then go to Selections, click Select All - Float - Defloat,
Open paper 1 , copy & paste it as a new layer onto your canvas, then go to Selections & click Invert.
Now on your keyboard press your delete key 1 time.
Now open your tube of choice, copy & paste it as a new layer onto your canvas, then center it within the marching ants. Once your happy with the placement, then press your delete key 1 time.
Now go to Selections & click Select None.
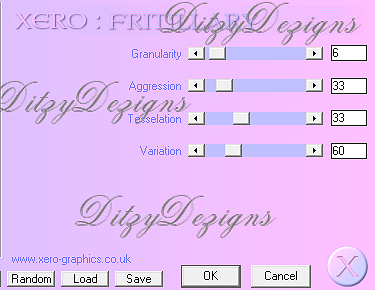
On your Paper 1 layer go to Effects, click Plugins then click Xero, then click Fritillary, you can use my settings below our your own :
Then click Ok.
Now delete your original c layer.
Go to your layers pallet, right click on your tube layer,then click Duplicate. Now go to Adjust , click Blur then click Gaussian Blur from the slide out menu, set to 5.00 & click Ok.
Now go to the top of your layers pallet & change your blend mode to Overlay.
Now click on your original tube layer & change the blend mode to Luminance (L)
Now click on your cz layer, go to Adjust, click Add/Remove Noise then click Add Noise from the slide out menu, set to Uniform, 75 & make sure the monochrome box IS checked & click Ok.
Now apply a drop shadow.
Now copy & paste your tube again, re-size it to 80%. Use your move tool to position it to the right side of your template. Go to your layers pallet, right click on your tube layer, then click Duplicate. Now go to Adjust, click Blur then click Gaussian Blur, set to 5.00 & click ok. Now go to the top of your layers pallet & change the blend mode to Overlay.
Now click on your original tube layer & apply a drop shadow.
Now click on your wordart layer,
Activate your magic wand tool, then click inside each letter of the word "Cute". Now make a new raster layer , then activate your flood fill tool, set your foreground #e059a9 Now click inside each letter.
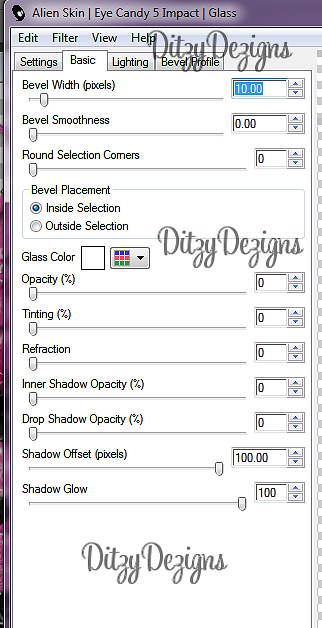
Now go to Effects, click Plugins, then click Eye Candy 5 Impact - Glass,
You can use my settings below or your own ,
Then click Ok.
Now go to Adjust, click Add/Remove Noise, then click Add Noise, Set to Uniform 40 and make sure the Monochrome box IS checked then click Ok.
Now go to Selections & click Select None.
Apply a drop shadow to the word art layer.
Now open your Splatter 1 element, copy & paste it as a new layer onto your canvas ,then re-size it to 70%. Using your move tool position your element to the upper left corner.
In your layers pallet move your Splatter 1 layer to the bottom of the layers pallet, under all the other layers.
Now right click on your Splatter 1 layer & click Duplicate, go to Image & click Mirror.
Now right click on your duplicated splatter 1 layer & click Merge then click Merge Down from the slide out menu.
Now duplicate your merged layer, then go to Image & click Flip.
Adjust the position if needed.
Click on your Paper 1 layer, (center circle) Now open your Sparkles element, copy & paste it as a new layer, now use your move tool to position your sparkles element to your liking.
Open your Skull 2 element, copy & paste it as a new layer onto your canvas ,then re-size it to 20%. Use your move tool to position your Skull2 element to your liking.
Now duplicate your Skull 2 element and place them around your tag to your liking.
Now go to Adjust, click Sharpness then click Sharpen.(Do this on each Skull2 layer)
Then apply a drop shadow to each Skull2 element.
Open your Dragon element, copy & paste it as a new layer onto your canvas , then re-size it to 20%. Use your move tool to position your dragon element to your liking.
Now go to your layers pallet & right click on your Dragon layer & click Duplicate. Now go to Image & click Mirror.
Adjust the position of your duplicated Dragon element if needed.
Sharpen & apply a drop shadow.
Open your Chrome Star layer, copy & paste it as a new layer onto your canvas ,then re-size it to 20%. Position it using your move tool to your liking.
Sharpen & apply a drop shadow.
Go to your layers pallet & right click on your Chrome Star layer, then click Duplicate. Using your move tool position your duplicated Chrome Star element to your liking.
Open your Bunny element, copy & paste it as a new layer onto your canvas ,then re-sized it to 25%. Use your move tool and position your bunny element to your liking.
Sharpen & apply a drop shadow.
Now open your Brad element, copy & paste it as a new layer onto your canvas ,then re-size it to 25%. Use your move tool & position it to your liking.
Now sharpen & apply a drop shadow.
Then go to your layers pallet & right click on your Brad layer, then click Duplicate. Now use your move tool to position your duplicated Brad layer to your liking. Now duplicate your Brad layer a few more times & place around your tag to your liking.
Now open your Bow 1 element, copy & paste it as a new layer onto your canvas ,then re-size it to 30%. Using your move tool position your Bow 1 element to the upper left corner of your template.
Sharpen & apply a drop shadow.
Now right click on your Bow 1 layer, and click Duplicate and move down on the left side.
Open your Barbed Heart element, copy & paste it as a new layer onto your canvas ,then re-size it to 20%. Use your move tool & position as desired.
Sharpen & apply a drop shadow.
Go to your layers pallet, right click on your Barbed Heart layer & click Duplicate. Position on your tag to your liking.
Now open your Barbed Wire element, copy & paste it as a new layer onto your canvas, then re-size it to 90%. Now use your move tool & position to the bottom of your tag. Then in your layers pallet move your Barbed Wire layer down below your word art layer.
Open Ribbon1 element, copy & paste it as a new layer onto your canvas, then re-size it to 85%. Now position towards the bottom.
Then in your layers pallet move your Ribbon 1 layer below your wordart layer.
Now open your Beaded String, copy & paste it as a new layer onto your canvas, now re-size it to 70%. Position it to the upper left corner.
Go to your layers pallet & move your Beaded String layer down below your Bow 1 layer.
Sharpen & apply a drop shadow.
Open your Heart element, copy & paste it as a new layer onto your canvas ,then re-size it to 70%. Position it to your liking.
Sharpen & apply a drop shadow.
Now go to your layers pallet & right click on your Heart layer, then click Duplicate. Use your move tool & position to your liking.
Now open your Flower 2 element, copy & paste it as a new layer onto your canvas, then re-size it to 25%. Use your move tool to position it to your liking.
Sharpen & apply a drop shadow.
Open your Flower 1 element, copy & paste it as a new layer onto your canvas, then re-size it to 20%. Position it next to your Flower 2 element.
Sharpen & apply a drop shadow.
Open your String element, copy & paste it as a new layer onto your canvas ,then position it to the top of your tag.
In your layers pallet move your String layer down so it is below your tube layers. (The tubes that are in the center circle)
Sharpen & apply a drop shadow.
Now click on your pixel layer, go to Effects, click Plugins then click Eye Candy 4, Gradient Glow.
You can use my settings below or your own :
Click Ok.
Apply a drop shadow.
Now open your Lips2 element, copy & paste it as a new layer onto your canvas ,then re-size it to 30%. Use your move tool & position your lips 2 element to your liking. Go to your layers pallet, right click on your Lips2 layer, and click Duplicate. Go to Image & click Mirror. Position to your liking.
Sharpen & apply a drop shadow to both of your lips2 elements.
Open your Lips 1 element, copy & paste it as a new layer onto your canvas ,then re-size it to 30%. Use your move tool to position to your liking. Go to your layers pallet, right click on your Lips1 layer, then click Duplicate. Now go to Image & click Mirror. Now position your duplicated Lips 1 element to your liking.
Sharpen & apply a drop shadow to both of your lips1 elements.
Open your Diamond, copy & paste it as a new layer onto your canvas, then re-size to 30%. Position to your liking.
Sharpen & apply a drop shadow.
Now go to your layers pallet,right click on your Diamond layer, and click Duplicate. Position to your liking. Now duplicate your Diamond layer again & position to your liking.
Now open your Sparkles again, copy & paste it as a new layer onto your canvas ,then position your sparkles to the top of your template, then in your layers pallet right click on your sparkles layer, then click Duplicate. Now go to Image and click Flip. Then duplicate your sparkles layer again this time go to Image & click Free Rotate set to Left 90.00 & click Ok. Go back to your layers pallet & duplicate this layer again, go to Image and click Mirror.
Use your eraser tool & erase any sparkles on your main tubes face that are in a bad place.
Now activate your text tool, type out the name you want on your tag.
The font I used is :
Gotica Bastard
Size : 85 Pixels
Color : #e059a9
Now go to your layers pallet & right click on your name layer then click Convert To Raster Layer.
Now go to effects & click Plugins then click Eye Candy 5 Impact - Gradient Glow. You can use my settings below or your own :
Click Ok.
Now apply a drop shadow.
Activate your magic wand & click inside each letter in your name, once all of the letters are selected go to Effects, click Plugins then click Eye Candy 5 - Impact - Glass, again you can use my settings below or your own :
Click Ok.
Now go to Adjust, click Add/Remove Noise, then click Add Noise set to Uniform 40.00 and make sure that the Monochrome box is checked. Then click Ok.
Now go to Selections & click Select None.
Now add all of your copyright & credit information! (Important not to forget this part!)
Once you are happy with your tag & the placement of everything , go to your layers pallet and right click on any layer, then click Merge, then from the slide out menu click Merge Visible.
Now activate your crop tool & crop off any access canvas that we did not use.
Now you may want to re-size your tag.
Once your tag is re-sized apply one final sharpen to your tag.
Now save your tag as PNG & you have completed this tutorial!!
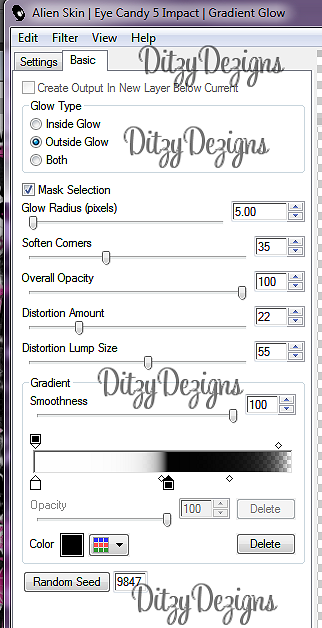
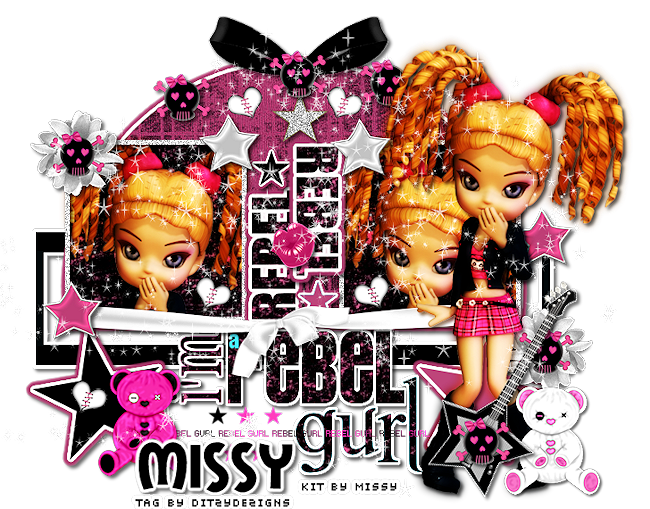
♥Rebel Yell PTU♥
Here is what we will be making :
**This tutorial was written & posted on May 29th 2011**
***Any resemblance to any other tutorial is purely coincidental & completely unintentional!!***
Supplies Needed :
Paint Shop Pro X2 (Any version should work)
Scrapkit : Rebel Gurl By Missy @ Pimp My Tags With Scraps
Template - missy_template369 - @ Divine Intentionz
Elements Used :
E60
E58
E59
E43
E46
E45
E1
E34
E69
E24
E5
P23
P7
Cookie
Lets Begin :
Start by opening your template missy_template369.
Go to Image, click Canvas Size and set to 800 X 650
Now in your layers pallet, delete the copyright & background layers.
Now in your layers pallet, click on your half circle layer, go to Selections, Select All, Selections again click Float, Selections again & click Defloat.
(From here down I will just say Selections - Select All - Float - Defloat, and you will know you have go to to Selections each time to click on those commands.)
Now open your P7, copy & paste it as a new layer onto your canvas, then go to Selections & click Invert. Now on your keyboard press your delete key 1 time.
Go to Selections & click Select None.
Now delete your original half circle layer.
Apply a gradient glow & a drop shadow to your new half circle layer.
Now click on your Frame back layer in your layers pallet, go to Selections, Select All - Float - Defloat ,
Now open P23, copy & paste it as a new layer onto your canvas, then go to Selections & click Invert .
On your keyboard press your delete key 1 time.
Now open your Cookie element, copy & paste it as a new layer onto your canvas, then re-size it to 65%. Using your move tool position your cookie where you want it within your marching ants.
Once happy , press your delete key 1 time.
Now go to Selections & click Select None.
In your layers pallet, right click on your Cookie layer, go to Adjust, click Blur , then click Gaussian Blur from the slide out menu. Set to 5.00 & click Ok.
Now go to the top of your layers pallet & change the blend mode to Overlay.
Now delete your original Frame layer.
In your layers pallet, move your frame back layer above both of your cookie layers.
Go to Adjust, click Add/Remove Noise, then click Add Noise from your slide out menu. Set to Uniform 100 and make sure your Monochrome box is checked, then click Ok.
Now follow those same steps for your other frame back layer.
In your layers pallet, click on your Wordart By Missy layer, Selections - Select All - Float - Defloat,
Open P23 copy & paste it as a new layer onto your canvas, then go to Selections - click Invert. Then on your keyboard press your delete key 1 time. Then go to Selections & click Select None.
Apply a gradient glow & drop shadow to this layer.
Also click on the Shadow layer for the wordart, and apply a drop shadow to that layer as well.
Click on your Rebel 2 layers, Selections - Select All - Float - Defloat ,
Open P23 copy & paste it as a new layer onto your canvas, then go to Selections & click Invert. Then on your keyboard press your delete key 1 time.
Go to Selections & click Select None.
Now apply a gradient glow & drop shadow.
Now follow those same steps for your other Rebel layer.
Now in your layers pallet, click on your Star layer, (the one at the bottom of the layers pallet)
Selections - Select All - Float - Defloat,
Then make a new raster layer,
Activate your flood fill tool, then set your foreground color too #be457a then click inside the marching ants with your flood fill tool.
Now go to Selections & click Select None.
Now do the same steps for your other Star layer, only this time flood fill with this color #000000 (black).
Also follow those same steps for the 2 star layers that are towards the top of your layers pallet.
Now copy & paste your Cookie element as a new layer, then re-size it to 65%. Using your move tool position your cookie to the right side of your template.
Go to your layers pallet, right click on your Cookie layer, then click Duplicate. Now go to Adjust, click Blur then from the slide out menu click Gaussian Blur , set to 5.00 & click Ok.
Now go to the top of your layers pallet & change the blend mode to Overlay.
Now click on your original cookie layer & apply a drop shadow.
Now open E5, copy & paste it as a new layer onto your canvas, then re-size it to 30%. Use your move tool to position your E5 to the center of your half circle.
Go to Adjust, click Sharpness,then click Sharpen.
Apply a drop shadow.
Open E59, Copy & paste it as a new layer onto your canvas, then re-size it to 25%, then re-size it again to 70%.Use your move tool & position your E59 to the left .
Sharpen & apply a drop shadow.
Now open E43, copy & paste it as a new layer onto your canvas, then re-size it to 40%. Go to Image, click Free Rotate set to Right 30.00 & click Ok. Now use your move tool & position this element next to your cookie.
Sharpen & apply a drop shadow.
Open E24, copy & paste it as a new layer onto your canvas, then re-size it to 15%. Use your move tool & position to the top left of the frame that is on the left.
Go to your layers pallet, right click on your E24 layer, then click Duplicate. Go to Image & click Mirror.
Position your duplicated E24 to the bottom right.
Sharpen & apply a drop shadow.
In your layers pallet move your duplicated E24 layer below both of your cookie layers.
Now open E1, copy & paste it as a new layer onto your canvas, then re-size it to 10%. Position it to your liking.
Sharpen & apply a drop shadow.
Go to your layers pallet & right click on your E1 layer & duplicate it. Use your move tool to position it to your liking. Duplicate this layer a few more times until you have as many as you want on your tag.
Now open E69, copy & paste it as a new layer onto your canvas ,then re-size it to 50%. Use your pick tool to adjust the length of your E69.
Now in your layers pallet, move your E69 layer below both of your cookie layers.
Sharpen & apply a drop shadow.
Open E46 , copy & paste it as a new layer onto your canvas, then re-size it to 10%. Position it using your move tool to your liking.
Sharpen & apply a drop shadow.
Now go to layers pallet & right click on your E46 layer, & click Duplicate. Now position your duplicated E46 to your liking.
Open E45, copy & paste as a new layer onto your canvas, then re-size it to 10%, then position it to the lower right side.
Sharpen & apply a drop shadow.
Go to your layers pallet, right click on your E45 layer & click Duplicate. Now position your duplicated element to your liking.
Now open E24, copy & paste it as a new layer onto your canvas, then re-size it to 10% , then re-size it again to 65%. Now position it to your liking.
Sharpen & apply a drop shadow.
Open E58, copy & paste it as a new layer onto your canvas, then re-size it to 20%. Position to the lower left side.
Sharpen & apply a drop shadow.
Open E60, copy & paste it as a new layer onto your canvas, then re-size to 5%.
Sharpen & apply a drop shadow.
Go to your layers pallet & right click on your E60 layer & click Duplicate. Do this a couple of times & position each heart (E60) to your liking around your tag.
Now if you have one apply a Sparkle brush to your design. IF you don't have one don't worry about it as it is optional!
Now activate your text tool, type out the name you wish to put on your tag.
The font I used was :
Mail Ray Stuff
Size : 70 Pixels
Color : #000000 (Black)
Once you have it where you wish to place it, go to your layers pallet & right click on your name layer then click Convert To Raster Layer.
Go to Effects, click Plug-ins then click Eye Candy 4 Gradient Glow, use the settings of your choice, and click Ok.
Apply a drop shadow.
Now apply all your copyright & credit information! (Important not to forget this part!!)
Once you have everything on your tag the way you want it, go to your layers pallet & right click on any layer then click Merge, then from the slide out menu click Merge Visible.
Now activate your crop tool & crop off any canvas that you did not use.
Now you may want to re-size your tag.
Once your tag is re-sized I like to apply one more sharpen to it. Go to Adjust, click Sharpness, then click Sharpen!
Now save your tag as a PNG & your done!!
Thank-You for trying my tutorial!!
Subscribe to:
Posts (Atom)
About Me
- DitzyDezigns
- New York, United States
- Hiya Everyone! My name is Ronney, I have 3 wonderful teenagers, and have been married to my husband for 20 years. I LOVE to design signatures, tags & avatars, I design with PSP, and have been designing for over 2 1/2 years. I will be not only designing signatures, tags & avatars but will also be writing & posting tutorials as well. I will also be making some templates to share with you all as well. So I hope you enjoy and can use everything I have available on my blog :-) If you ever try any of my tutorials,please send me your completed designs and I would love to showcase it here on my blog!
♥I CT For♥


Blog Hop

Today's Date

Favorite Stores

♥Forums♥


My Pixels


♥My Avatars♥