Don't Be A Pirate

My Blinkies

Add Me On Facebook
Protected


Blogs I Stalk


Awards :-)


Find Me At

Favorite Stamps


Thursday, March 8, 2012
♥Irish Luck (FTU)♥
**This tutorial was written & posted by DitzyDezigns**
***Any resemblance to any other tutorial is purely coincidental & completely unintentional!!!***
Here is what we will be making :
**You can click on the image to see it in its original size**
**You can click on the image to see it in its original size**

Supplies Needed :
Paint Shop Pro X4 (Any version should work)
Scrapkit : FTU Irish Luck @ Scraps By Crys
Plugins Used :
Eye Candy 4 Gradient Glow (Optional)
Font Used :
BorisBlack Bloxx (You can use any fat font you like)
Elements Used From Kit :
Element 1
Element27
Element 13
Element 24
Element 8
Element 11
Element 17
**Please note - I have included screen shots with all of my settings , you are welcome to use the same settings if you would like, or you can play around with them and get a better effect that you like more. The choice is always yours. If you are just beginning learning how to design signatures, and need more help, please do not hesitate to email me & I will answer any questions you may have.**
Lets Begin :
Start by going to File - then click New
I used a 800 x 650 transparent canvas. (Don't worry you will crop off any access canvas that you did not use, but this gives you plenty of room to work with.)
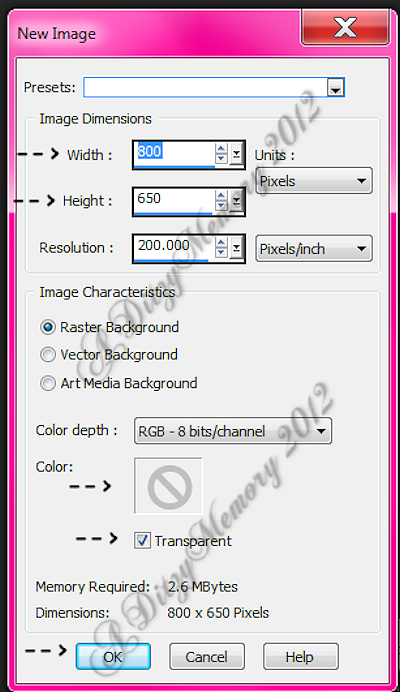
Once you click ok your new transparent canvas will open.
Now go to File & click Open -
Then go to where you have your scrapkit saved.
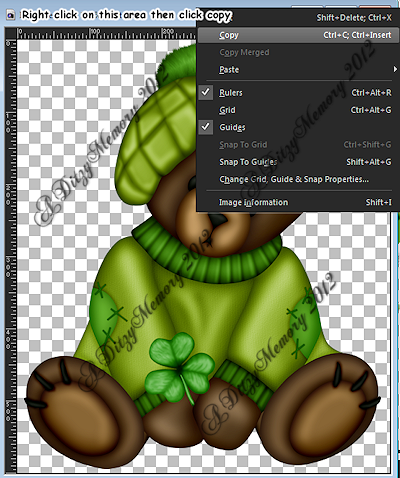
Find your Element 1 - then click on it - then click Open.
Once it opens - right click on the top bar of that canvas - then click Copy. (See screen shot below for location)
OR
You can just got to Image & click Copy -
Now go to your new transparent canvas - right click in the same area on that canvas - then click PASTE As New Layer.
OR
(You can go back to Image & click Paste As New Layer)
Which ever is easiest for you.:-)
Now your Element 1 (Bear) should be on your new transparent canvas.
Now go to Image - click Resize , when that menu opens it should look like mine below.
Set your Width to 50% then make sure that your set to "Percent" & that the "Resize all layers" is UNchecked.
*Take note of the comments on my screen shot - they should help you*
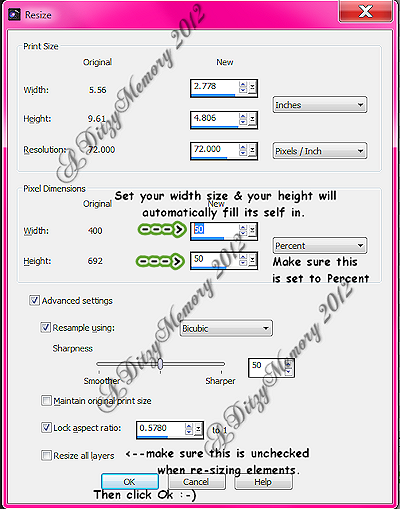
Then click Ok.
Then go to Image again - click Resize - this time change your Width & Height to 70% & click Ok.
Now your Element 1 should appear smaller to you. :-)
Now click on your Move Tool (See screen shot below for location of your Move Tool)
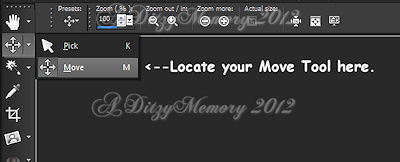
Now using your Move Tool - move your Element 1 (Bear) to the left side of your canvas.
Then go to Adjust - click Sharpness - then click Sharpen.
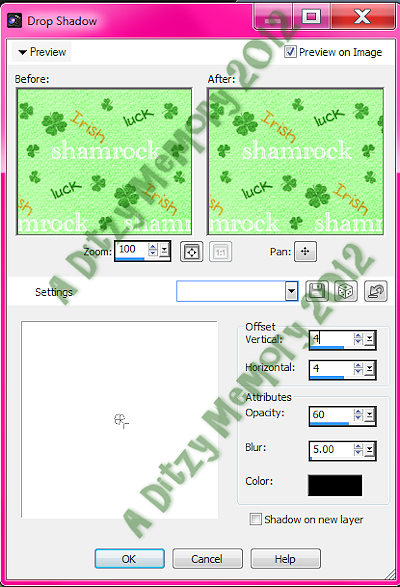
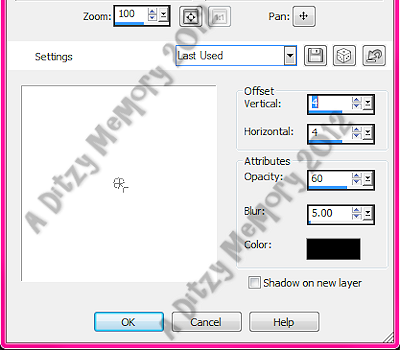
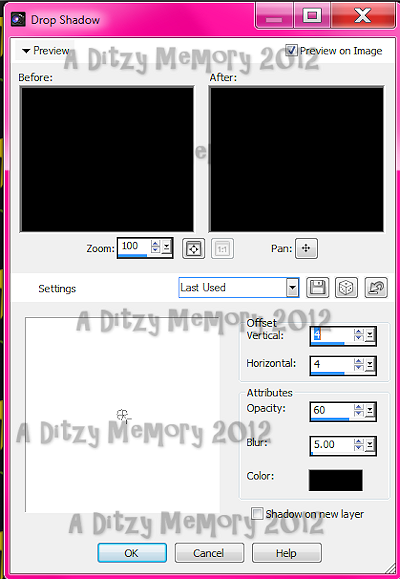
Now go to Effects - click 3D Effects - then click Drop Shadow
When that screen opens set your settings :
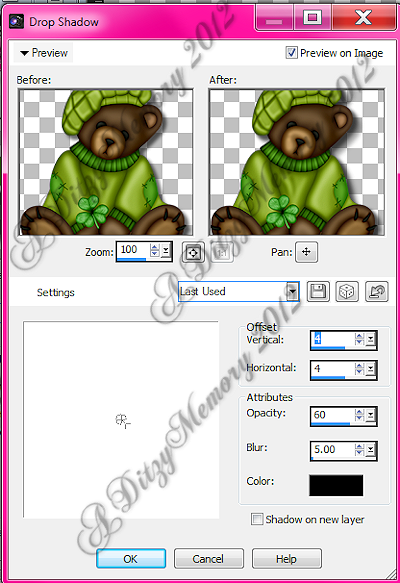
Then click Ok.
Now open your next element - which would be Element27 - Copy & paste it as a new layer onto your transparent canvas. (Use the screen shots above if needed.)
Now go to Image - click Resize - then re-size your Element 27 to 50%.
Now click on your Move Tool again & position your Element 27 to the left side of your transparent canvas.
Now go to your layers pallet (all the way over to the right of your psp.
Left click & HOLD on your Element 27 layer - then while still holding your left button down drag this layer down and place it below your Element 1 layer.
Now go to Adjust - click Sharpness - then click Sharpen.
Now go to Effects - click 3D Effects - then click Drop Shadow.
You are going to apply the exact same settings as you did for your Element 1 so all you have to do is click Ok.
Now open your Element 13 from your kit -
Copy & paste it as a new layer onto your transparent canvas - (revisit the screen shots above if you need to refresh your memory)
Now using your Move Tool again - position your Element 13 so that the left side of your Rainbow is covering your Element 1 (Bear) just a bit.
Go to your layers pallet - left click & HOLD on your Element 13 layer - now drag your Element 13 layer down so that it is under your Element 1 & Element 27 layers.
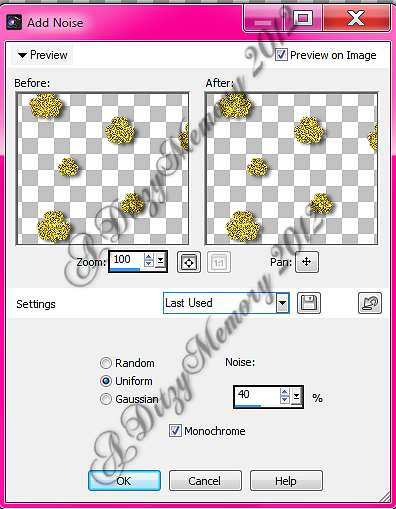
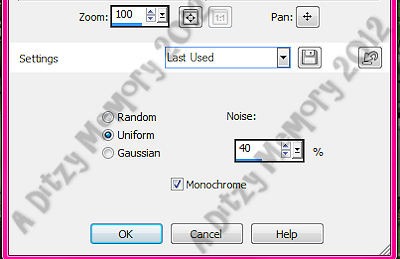
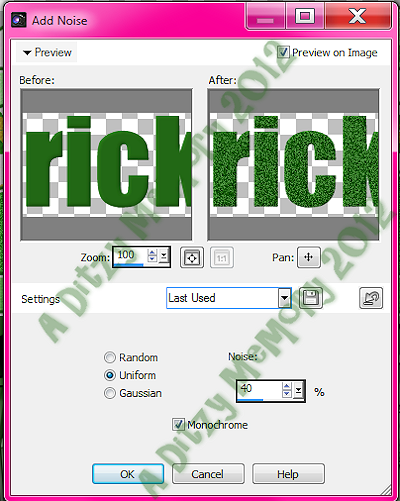
Now go to Adjust - click Add/Remove Noise - then click Add Noise from the slide out menu.
Set your settings - (You may use mine below if you would like)
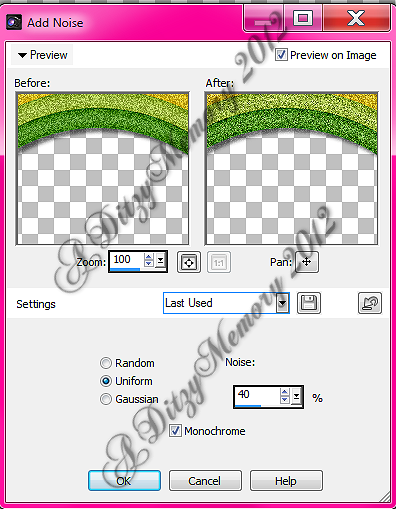
Then click Ok
Now go to Adjust - click Sharpness - then click Sharpen.
Now go to Effects - click 3D Effects - then click Drop Shadow. (You will use the same settings as you have been using so just click Ok)
Go to File - click Open - then Open your Element 24 -
Copy & paste it as a new layer onto your transparent canvas -
Then go to Image - click Resize - then change your Width to 50%. (Your height will change automatically)
Now go to Image - click Flip Horizontal
Now click on your Move Tool (If you don't still have it selected.
Then move your Element 24 to the right side of your Element 13.
Go to Adjust - click Sharpness - then click Sharpen.
Now go to Effects - click 3D Effects - then click Drop Shadow.
You again will use the exact same settings you have been using to all you have to do now is click OK.
Now go to File - click Open - then open your Element 8
Copy & paste it as a new layer onto your transparent canvas -
Go to Image - click Resize - then set your Width to 40%. (Remember the Height setting will adjust its self.)
Now using your Move Tool position your Element 8 to the right end of Element 13 (Rainbow)
Adjust - click Sharpness - then click Sharpen
Effects - 3D Effects - Drop Shadow (Exact same settings, so just click Ok)
Now go to your layers pallet -
Click on the very bottom layer in your layers pallet .
Now go to File - click Open, then open your Element 11.
Copy & paste it as a new layer onto your transparent canvas.
Now go to Image - click Resize - set your Width to 60%.
Now using your Move Tool position your Element 11 to the left side of your Rainbow element.
Go to Adjust - click Add/Remove Noise - then click Add Noise
Then click Ok.
Now go to Adjust - click Sharpness - then click Sharpen
Effects - 3D Effects - Drop Shadow
Again you will be using the exact same settings, so all you have to do is click Ok.
Now go to your layers pallet - right click on your Element 11 layer - then click Duplicate.
Then go to Image - click Flip Horizontal.
Now use your Move Tool to position your Duplicated Element 11 to the right side of your transparent canvas.
Go to File - click Open - now open your Element 17.
Copy & Paste it as a new layer onto your transparent canvas.
Using your Move Tool position your Element 17 to the right side of your transparent canvas.
Go to Adjust - click Sharpness - then click Sharpen
Effects - 3D Effects - then click Drop Shadow. (Use the same settings, so just click Ok.)
Go to your layers pallet - Left click & HOLD on your Element 17 layer.
Then drag that layer down so it is below your Element 11 layers. (Both of them)
Now still in your layers pallet - right click on your Element 17 layer - then click Duplicate.
Go to Image & click Flip Horizontal.
Now use your Move Tool to position your Duplicate Element 17 to the left side of your transparent canvas.
Now it is time to add your name.
Now click on your Text Tool - (Screen shot below shows you where to locate that tool.)
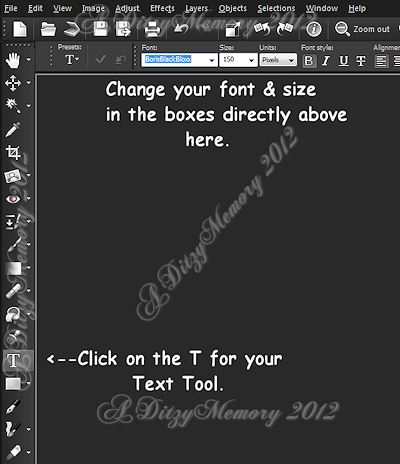
Once you click on your text tool - set your font - & size.
Then go to your Materials Pallet -(Screen shot below shows you what that looks like)
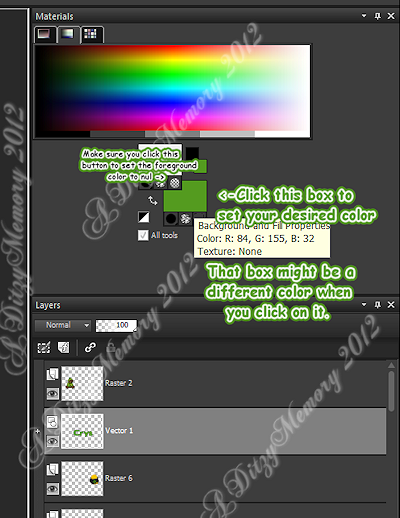
Once you click on your Background Color box (the bottom one as shown above)
The following window will then open :
This is where you either click on the color you would like, or if you know your color code you type that in the box that I highlighted in blue.
The color code for the color I used in my sample above is..... #549b20
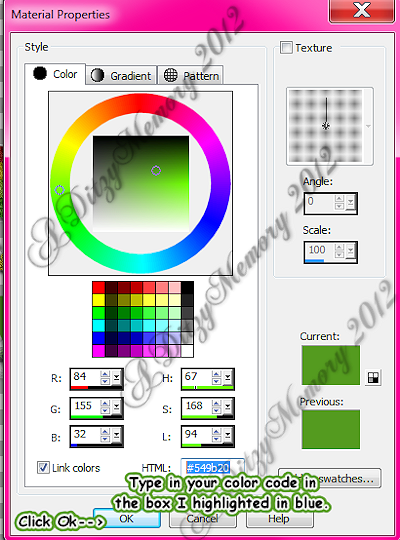
Then click Ok.
Now once you have all of your font settings & colors the way you want them -
Click any where on your canvas.
Then type out the name you would like.
When happy with it, click the accept check mark. (See screenshot below to see location of check mark.)

Now using your Move Tool position your Name so that it is between your Bear & Pot Of Gold element.
Then go to your layers pallet - right click on your Name layer - then click Convert To Raster Layer.
Then go to Effects - click Plugins - then from the slide out menu click Eye Candy 4 - then from the next slide out menu click Gradient Glow.
The screen shots below show you the settings that I used. Again you are welcome to use the same if you would like. Also be sure to see both screen shots so that you set the settings on your Basic tab & your Color tab.
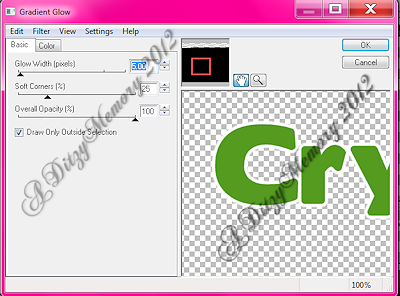
Before click Ok - click on your Color Tab
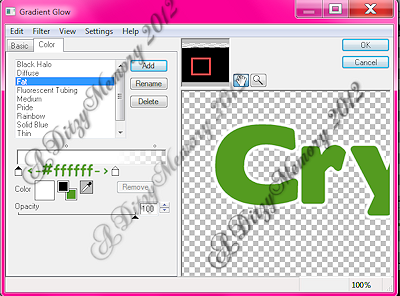
Now click OK.
Then in your Tools - click on your Magic Wand Tool - The screen shot below shows you the location of your Magic Wand Tool....
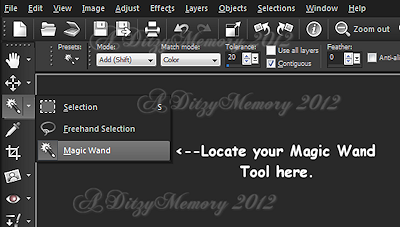
If you click the arrow you will then see the little menu that is on my screen shot.
Select (click on) your Magic Wand.
Now go to your canvas - click inside EACH letter in your name. Remember if you have any i's that you also click in the dot .
Now once all letters are selected - go to Effects - click 3D Effects - then click Inner Bevel -
*(Screen shot below shows you my settings, which you are welcome to use if you would like)*
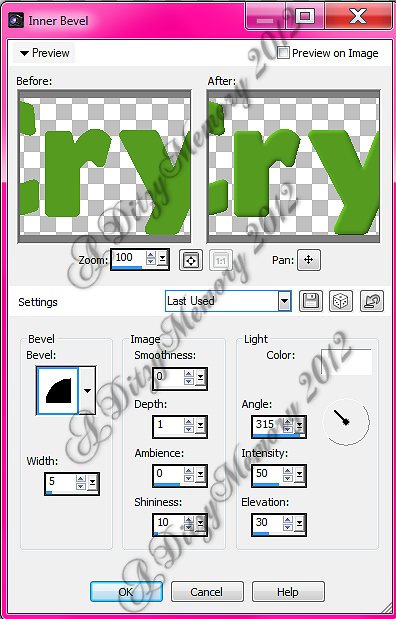
Then click Ok.
Now go to Selections - click Select None.
Now still on your Name layer -
Go to Effects - click 3D Effects - then click Drop Shadow.
You are going to use the same settings as you have used through-out this tutorial.

Click Ok.
Now once you are happy with the placing of your elements & name
You will want to add the fact that you made the tag.
So click on your text tool, then find a small font, Pixelette works good for this, set your size to between 10 -13 pixels. Then click on your canvas - type out what you would like to say, like "Tag Made By ------Your name" or what you would like."
I tag my work with the phrase "A Ditzy Memory 2012" but please don't use that because you aren't me & probably aren't ditzy like me either lol...So think of something original that suits you :-)
Once everything is in place -
Go to your layers pallet -
Right click on any layer - then click Merge - then from the slide out menu click Merge Visible.
This will convert all your layers into one single layer.
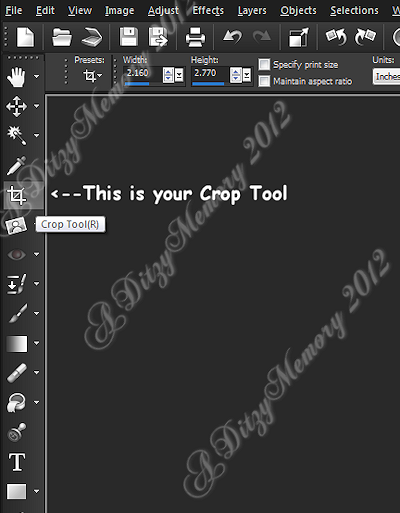
Now you will want to Crop off any access canvas that you did not use.
So go to your Tool pallet & click on your Crop tool - The screen shot below shows you where that is located & what the icon looks like...

Once you have your canvas cropped, you may or may not want to resize your signature as a whole.
If you should choose to resize it -
Go to Image - click Resize
Now once this window opens you will make some changes compared to what you used to resize your elements.
Screen shot below shows you where to make those changes :-)
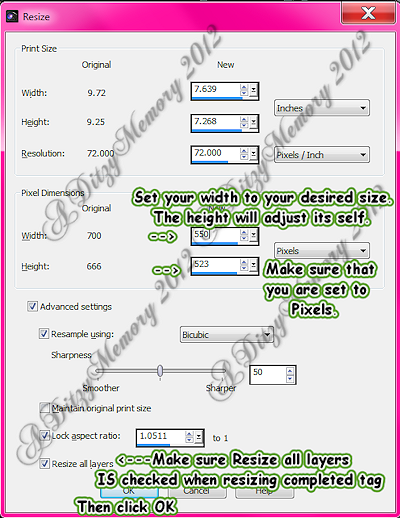
Once I resize a completed tag to a smaller size, I always do one more sharpen just to make it look nice & clear. Sometimes when you resize them smaller they tend to get a little blurry.
So if you would like to do this as well, do it the same way I had you do it with the elements.
Go to Adjust - click Sharpness - then click Sharpen.
Now all that is left is to save your tag.
Go to File - click Save As - then when your window opens, locate where you would like your tag to save on your computer - then click Save.
You have now completed this tutorial. If you have any questions please do not hesitate to email me.
Once you complete any tutorial posted on my blog I would love it if you would email me a copy of your design so that I may see it & display it on my blog as well :-)
♥
Wednesday, March 7, 2012
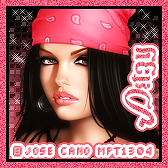
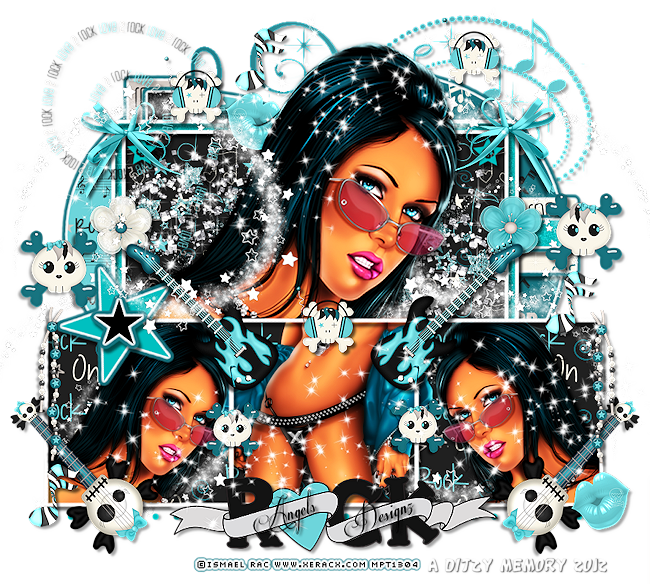
♥Rock On (PTU)♥
**This tutorial was written & posted by DitzyDezigns**
***Any resemblance to any other tutorial is purely coincidental & completed unintentional!***
Here is what we will be making :
Supplies Needed :
Paint Shop Pro X4 (Any version should work)
Tube Of Choice - I used the amazing work of Ismael Rac
(You will notice my license # is from MPT, which is no longer in business, but because that is where I purchased my tube, that is the license I have to use.)
Scrapkit - Rock On By Angels Designz
Template By CrazyCakesScraps
Plugins Used :
Eye Candy 5 Impact - Gradient Glow (Optional)
Font Used :
Respective
Elements Used :
Paper7
Paper8
Paper5
Paper4
Paper6
Paper1
Bow1
Guitar
Glitter Trail
Flower1
Flower2
Doodle2
Doodle1
Beaded String
Guitar2
Skull1
Wordart2
Skull2
Music Note
Lips
Sparkles1
Sparkles2
Lets Begin :
Start by opening your template -
Go to your layers pallet & delete the following layers :
Raster2
Words
Now still in your layers pallet -
Click on your Circle layer - Go to Selections - click Select All, then Selections again & click Float - then Selections again & click Defloat -
Now open Paper 7 - Copy & paste it as a new layer onto your template canvas. Then go to Selections - click Invert -
Now on your keyboard press your Delete key 1 time.
Go back to Selections & click Select None.
Now go to Effects - click Plugins - then click Eye Candy 5 Impact - Gradient Glow
*You are welcome to use my settings below or your own, the choice is always yours*
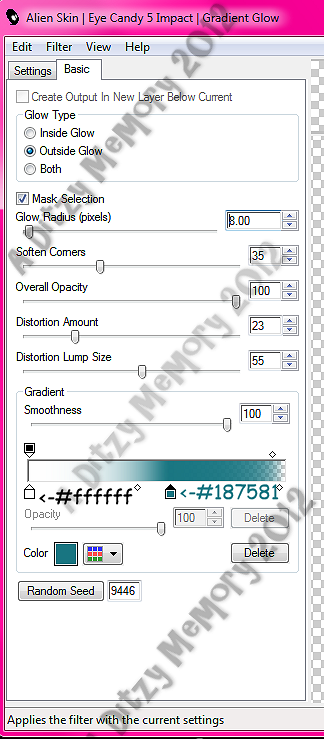
Then click OK.
Now go to Effects - click 3D Effects - then click Drop Shadow
*Again you are welcome to use my settings if you would like*
Then click Ok.
Now go to your layers pallet - right click on your original Circle layer - then click Delete.
Now for the request of your template layers you will follow the exact same steps above that you followed for your Circle layer - Each time you will use a different Paper. I will specify which Paper I used in case you would like to use the same one. If you would like to chose your own from the kit that is find as well.
The layers below are the only ones that you will follow the above steps to do :
Smaller Circle - Use Paper 8
Line - Use Paper 5
Line - Paper 4
*There are two line layers*
Once you have those layers completed , move onto the step below :
In your layers pallet - click on your Glitter Line layer -
Now go to Effects - click Plugins - then click Eye Candy 5 Impact - Drop Shadow
*You will use the exact same settings that you used above , so all you have to do is click Ok.*
Now go to Effects - click 3D Effects - Drop Shadow
*Again you will use the same settings you used above, so all you have to do is click Ok*
Now follow the same steps for your Glitterline2 layer that you used for your Glitterline layer
Now once you have completed your Glitterline2 layer - move onto the step below :
Now click on your Rectangle Layer - go to Selections - click Select All - then Selections again & click Float - then Selections again & click Defloat -
Open Paper 6 - Copy & paste it as a new layer onto your template canvas.
Then go to Selections - click Invert -
Then on your keyboard press your Delete key 1 time.
Then keep this Selected. (meaning do not Select None yet)
Now open your Mid Sized Tube of choice -
Copy & paste it onto your template canvas as a new layer -
Then using your Move Tool - position your Mid Size Tube to your liking. (You can use my tag for reference if you would like)
Now once you have your tube placed where you would like it, press your Delete key 1 more time.
Then go to Selections - click Select None.
Now go to your layers pallet - first right click on your Rectangle layer & click Delete.
Then still in your layers pallet - right click on your Mid Size Tube layer -
Click Duplicate.
Then go to Adjust - click Blur - then click Gaussian Blur from the slide out menu.
Set Radius to 3.00 & click Ok
Now go to your layers pallet & at the top change your Blend Mode from Normal to Overlay.
*Screen shot below shows your where this option is located*
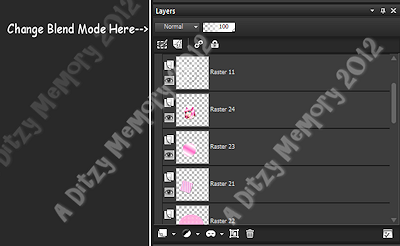

Once you have your Blend Mode set to Overlay on your duplicated tube layer, go to your Original tube layer (the one on the bottom)
Go to Effects - click 3D Effects - then click Drop Shadow.
Use the same settings you have been using, so all you have to do is click Ok.
Now in your layers pallet - click on your Frame layer - go to Effects - 3D Effects - Drop Shadow
Apply the exact same settings , so just click Ok.
Back to your layers pallet - click on your Frame2 layer - Apply the same Drop Shadow to that layer as well.
In your layers pallet - click on your FrameBackground layer - then go to Selections - Select All - Selections again - click Float - Selections again - click Defloat -
Open Paper1 - Copy & paste it as a new layer onto your template canvas - then go to Selections - click Invert -
Then on your keyboard press your Delete key 1 time.
*Do not deselect yet*
Now open a smaller version of your tube of choice - (must be same artist)
Copy & Paste your smaller tube as a new layer onto your template canvas - Using your Move Tool - position your tube to your liking. Once happy with placement - press your Delete key 1 time.
Now copy & paste your smaller tube as a new layer again - then position it to a different spot within your "marching ants" (See my tag for reference if needed)
Once happy with the 2nd tube - press your Delete key 1 time.
Now copy & paste your tube one more timeas a new layer - then use your Move Tool & position it again within your "marching ants" to a different spot than the last 2.
Once happy with placement - press your Delete key 1 final time.
Now go to Selections & click Select None.
Now go to your layers pallet - right click on your top smaller tube layer - then click Merge - then from the slide out menu click Merge Down.
Then right click on your newly Merged tube layer - then click Merge - then Merge Down.
*Now all 3 of your smaller tube layers should of become one layer*
Now right click on your Merged layer - then click Duplicate
On your Duplicated Smaller Tube layer - go to Adjust - Blur - Gaussian Blur -
Make sure your Radius is still set to 3.00 & click Ok.
Now at the top of your layers pallet - change your Blend Mode from Normal to Overlay again.
Then on your Original Merged tube layer - apply the same Drop Shadow settings you have been using.
Now back in your layers pallet -
Click on your Frames layer - Now apply the exact same Drop Shadow settings you have been using through-out this tutorial .
Back in your layers pallet - apply the same Drop Shadow to BOTH of your
Star Skull layers.
Star Skull layers.
Back in your layers pallet - click on your Star layer -
Go to Effects - Plugins - Eye Candy 5 Impact - Gradient Glow
*Using the exact same settings as before, so just click Ok*
*Now apply a Drop Shadow using the exact same settings you have been using.*
Now back in your layers pallet - click on your lilstar layer -
Apply your Eye Candy 5 Impact - Gradient Glow settings & your Drop Shadow.
*Again using the exact same settings you have used through-out this tutorial*
Now lets start adding some Elements :
Open your Bow1 element - Copy & paste it as a new layer onto your template canvas - then re-size it to 35%. Using your Move Tool position your Bow1 element to the upper left corner of your template.
Now go to Adjust - click Sharpness - Sharpen (You will Sharpen all elements that you use)
Then go to Effects - 3D Effects - Drop Shadow
***Note these settings are a bit different, so see the screen shot below***
**You will also use the settings below for ALL of your remaining elements**
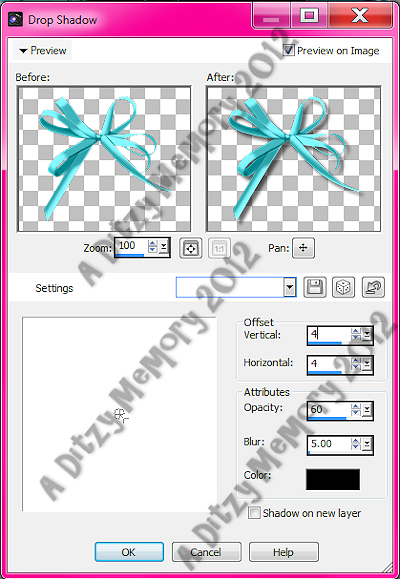
Then click Ok.
Now go to your layers pallet - right click on your Bow 1 layer - then click Duplicate.
Go to Image - click Flip Horizontal
Now using your Move Tool - position your duplicated Bow 1 element to the right upper corner of your Template.
Now open your Guitar element - Copy & paste it as a new layer onto your template canvas - then re-size it to 40%.
Using your Move Tool position your Guitar element to the lower left side of your template. (See my tag for preference if you would like)
Then go to Adjust - Sharpness - Sharpen
Effects - 3D Effects - Drop Shadow (same settings, so just click Ok)
Now go to your layers pallet - right click on your Guitar layer - then click Duplicate.
Go to Image - click Flip Horizontal - Then using your Move Tool position your Duplicated Guitar to the right side of your template. (Placing it across from your original Guitar element)
Now open your Glitter Trail element - Copy & Paste it as a new layer onto your template canvas.
Now using your Move Tool - position your Glitter Trail element over your Mid Sized tube, towards the top.
Adjust - Sharpness - Sharpen
Effects - 3D Effects - Drop Shadow.(Same settings, so just click Ok)
Now go to your layers pallet - Move your Glitter Trail layer down so that it is directly below your Mid Sized Tube only! Make sure it remains above your Paper 6 layers.
Now if needed use your Move tool to adjust the position of your Glitter Trail once it is placed behind your tube, be careful not to disturb your tube. So make sure your clicking on your Glitter Trail element at the farthest distance from your actual tube.IF you do end up moving your tube layer on accident, just hit your undo button one time until it is back where it was prior to moving it.
**If it is easier, you can go to your layers pallet & click the eye next to both of your Mid Sized tube layers - this will hide them while you set up your Glitter Trail element. Then once you have them the way you would like them, you can unclick the eye's next to your Mid Size Tube layers and that will make your tubes reappear. :-) **
Now go back to your layers pallet - right click on your Glitter Trail layer - then click Duplicate.
Now go to Image - click Flip Horizontal. Using your Move Tool - position your Duplicated Glitter Trail to the right side of your frame area.
Now in your layers pallet - click on the very first layer in your layers pallet @ the top.
Open your Flower 1 element - Copy & Paste it as a new layer onto your template canvas - then re-size it to 30%. Now using your Move Tool position your Flower 1 element to the right side of your template to your liking.
Now go to Adjust - Sharpness - Sharpen
Effects - 3D Effects - Drop Shadow (same settings, so just click Ok)
Now open your Flower 2 element - Copy & Paste it as a new layer onto your template canvas - then re-size it to 30%. Using your Move Tool position your Flower 2 element to the left side of your template to your liking.
Adjust - Sharpness - Sharpen
Effects - 3D Effects - Drop Shadow (same settings as before, so click Ok)
Open your Doodle 2 element - Copy & paste it as a new layer onto your template canvas - then using your Move Tool position it to your liking. I posted mine at the bottom approximately center with the template.
Adjust - Sharpness - Sharpen
Effects - 3D Effects - Drop Shadow (same settings, so just click Ok)
Now open your Doodle 1 element - Copy & paste it as a new layer onto your template canvas - using your Move Tool position your Doodle 1 element to your liking.
Adjust - Sharpness - Sharpen
Effects - 3D Effects - Drop Shadow
Open your Beaded String element - Copy & paste it as a new layer onto your template canvas - then re-size i to 35%. Using your Move Tool position your Beaded String element to the upper Left corner of your template.
Adjust - Sharpness - Sharpen
Effects - 3D Effects - Drop Shadow (same settings)
Now go to your layers pallet - right click on your Beaded String layer - click Duplicate.
Go to Image - click Flip Horizontal - then use your Move Tool to position your Duplicated Beaded String element to the right upper corner of your template.
Open Guitar 2 element - Copy & paste it as a new layer onto your template canvas - then re-size it to 35%. Using your Move Tool position your Guitar2 element to the top of your 3 tubes frame.
Adjust - Sharpness - Sharpen
Effects - 3D Effects - Drop Shadow (same settings)
Now go to your layers pallet - right click on your Guitar 2 layer - then click Duplicate. Then go to Image - click Flip Horizontal. Use your Move Tool and position your duplicated Guitar 2 element to your liking.
Open your Skull 1 element - Copy & Paste it as a new layer onto your template canvas - then re-size it to 25%. Using your Move Tool position your Skull 1 element to your liking.
Adjust - Sharpness - Sharpen
Effects -3D Effects - Drop Shadow (same settings)
Now go to your layers pallet - right click on your Skull 1 layer - click Duplicate. Then using your Move Tool position to your liking. If you would like you can continue to Duplicate this element til you have as many as you would like on your tag.
Open your Wordart 2 - Copy & Paste it as a new layer onto your template canvas - then using your Move Tool position it to your liking.
Adjust - Sharpness - Sharpen
Effects - 3D Effects - Drop Shadow (same settings)
Open your Skull 2 element - Copy & Paste it as a new layer onto your template canvas - then re-size it to 25%. Using your move tool position it to your liking.
Adjust - Sharpness - Sharpen
Effects - 3D Effects - Drop Shadow (same settings)
Open your Music Note element - copy & paste it as a new layer onto your template canvas - then re-size it to 25%. Using your Move Tool position your Music Note element to your liking.
Adjust - Sharpness - Sharpen
Effects - 3D Effects - Drop Shadow (same settings)
Go to your layers pallet - right click on your Music Note layer - then click Duplicate. Use your Move Tool to adjust the position to your liking.
You may duplicate it again if you would like.
Open your Lips element - Copy & paste it as a new layer onto your template canvas - then re-size it to 20%. Using your Move Tool position your Lips element to your liking.
Adjust - Sharpness - Sharpen
Effects - 3D Effects - Drop Shadow (same settings)
Go to your layers pallet - right click on your Lips layer - click Duplicate. Now go to Image - click Flip Horizontal - use your Move Tool to adjust the position of your duplicated Lips element to your liking.
Now open your Sparkles 1 & Sparkles 2 elements - Copy & paste them as new layers onto your template canvas - position them to your liking.
Adjust - Sharpness - Sharpen (do this for both)
Do not add a drop shadow to your sparkles as it will darken them.
You can duplicate both of your Sparkles elements - and position them around your tag til you have the look you want.
Now add your name.
The settings I used are :
Font : Respective
Size : 35 Pixels
Foreground Color : Set to nul
Background Color : #ffffff
Once your happy with the placement of your name - go to your layers pallet - right click on your name layer - then click Convert To Raster Layer.
Then go to Effects - 3D Effects - Drop Shadow
Apply the same settings that you have been using for all of your elements.
Now add your Copyright & License information. **VERY IMPORTANT**
Also make sure you put your watermark on your tag as the designer :-)
Once you are happy with everything -
Go to your layers pallet - right click on any layer - then click Merge - then click Merge Visible.
Now if needed you can crop off any access canvas around your tag that you did not use. Be careful not to crop to closely to your elements, papers, name & copyright info.
Now you may or may not need to re-size your completed tag - this all depends on where you will be using your tag and what that websites current size guidelines are. So re-size according to what you will need. (Remember that your copyright/license information must remain readable at ALL times)
Once you have re-sized your tag - be sure to apply one final Sharpen.
Then all that is left is to save your tag as a PNG file & you have completed this tutorial.
**I would love to see anything you have made using ANY of my tutorials, so please send them to me @ ronneyprice@yahoo.com I would love to display them on my blog :-) **
Sunday, March 4, 2012
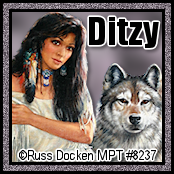
♥St.Patricks Girl (PTU)♥
**This tutorial was written & posted by DitzyDezigns**
Any resemblance to any other tutorial is purely coincidental & completely unintentional!!
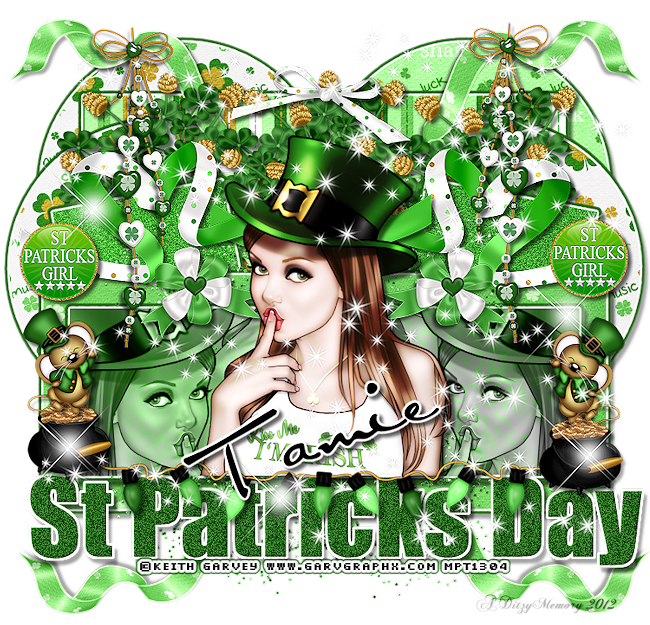
Here is what we will be making :
Supplies Needed :
Paint Shop Pro X4 (Any version should work)
Tube Of Choice - I used the amazing work of Keith Garvey @ PTE
*My tube was purchased when he was at MPT that is the reason for the MPT license*
Scrapkit - St.Patricks Girl By Tamie @ Addictive Pleasures
Temp183 - By Tamie @ Addictive Templates
Font Used :
Al Sandra
Plugins Used :
Eye Candy 5 Impact - Gradient Glow (Optional)
Eye Candy 4 Gradient Glow (Optional)
Xero - Radiance (Optional)
Elements Used :
P3
P5
P9
P6
P2
Lights
Glitter
CloverFlowers
Pot Of Gold
Mouse
Beads
Button 2
Bow
Ribbon
Ribbon3
Bow3
Sparkles
Lets Begin :
Start by opening your Temp183 By Addictive Templates.
Go to your layers pallet & delete the following layers :
Credit
Background
Now in your layers pallet -
Click on your Raster 5 layer - Go to Selections - click Select All - go back to Selections - click Float - then back to Selections & click Defloat -
Now open P3 - Copy & paste it as a new layer onto your template canvas. Then go to Selections & click Invert.
Then on your keyboard press your Delete key 1 time.
Go back to Selections & click Select None.
Now go to Effects - click Plugins - then click Eye Candy 5 Impact - then click Gradient Glow from the slide out menu.
*You are welcome to use my settings below/thru out this tutorial, or you can chose your own, the choice is always yours*
I have also posted the color codes for each color.
Then click Ok.
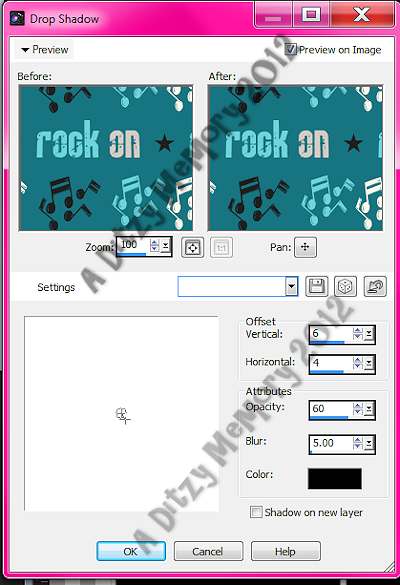
Now go to Effects - click 3D Effects - then click Drop Shadow
Then click Ok.
Now go back to your layers pallet & delete your Original Raster 5 layer.
Then still in your layers pallet - click on your Copy Of Raster 5 layer - Follow the exact same steps above for this layer. This time I used P5 for my paper.
Don't forget to apply the Gradient Glow & Drop Shadow.
Now in your layers pallet - Click on your Raster 6 layer - Selections - Select All - Float - Defloat -
Open P9 - Copy & paste it as a new layer onto your template canvas.
Now go to Selections - click Invert.
Then on your keyboard press your Delete key 1 time.
Back to Selections & click Select None.
Go to Effects - Plugins - Eye Candy 5 Impact - Gradient Glow
*Apply same settings you used previously - so just click Ok*
Now go back to Effects - 3D Effects - Drop Shadow
*You want to use the same settings you used above - so just click Ok.*
Now go to your layers pallet - delete your Original Raster 6 layer.
Now in your layers pallet - click on your Raster 3 layer - Selections - Select All - Float - Defloat -
Open P5 - Copy & paste it as a new layer onto your template canvas - then go to Selections - click Invert.
Now on your keyboard press your Delete key 1 time.
Back to Selections & click Select None.
Go to Effects - Plugins - Eye Candy 5 Impact - Gradient Glow
*Same settings - so just click Ok*
Go to Effects - 3D Effects - Drop Shadow
*Same settings - so just click Ok*
Now go back to your layers pallet - delete your original Raster 3 layer.
Now back in your layers pallet - click on your Copy Of Raster 3 layer - then follow the same steps that you did for your Raster 3 layer for this layer. Don't forget to include the Gradient Glow & Drop Shadow, and to also delete your Original Copy Of Raster 3 layer when you are done.
Back to your layers pallet - Click on Raster 4 - Selections - Select All - Float - Defloat -
Open P6 - Copy & paste it as a new layer onto your template canvas. Then go back to Selections - click Invert - then on your keyboard press your Delete key 1 time.
Back to Selections - click Select None.
Now apply the exact same Gradient Glow & Drop Shadow that you have been for your other layers.
Go to your layers pallet - delete your Original Raster 4 layer.
Still in your layers pallet - click on your Raster 7 layer - Go to Selections - Select All - Float - Defloat -
Open P7 - Copy & paste it as a new layer onto your template canvas - then go to Selections - click Invert - then on your keyboard press your Delete key 1 time.
Go back to Selections & click Select None.
Now go to Adjust - click Add/Remove Noise - then click Add Noise
Click Ok.
Now apply your Eye Candy 5 Impact - Gradient Glow (Same settings - so just click Ok.)
Then apply your Drop Shadow - (Same settings - so just click Ok)
Now go to your layers pallet - delete your Original Raster 7 layer.
Then click on your Copy Of Raster 7 layer - and follow the exact same steps for this layer as you did for your Raster 7 layer. Do not forget to Add Noise, then your Gradient Glow & Drop Shadow.
Then delete your Original Copy Of Raster 7 layer.
In your layers pallet - click on your Raster 2 layer - Selections - Select All - Float - Defloat -
Open your P2 - Copy & paste it as a new layer onto your template canvas.
Then go to Selections - click Invert.
Then on your keyboard press your Delete key 1 time.
Now go back to Selections & click Select None.
Then go to Effects - Plugins - Eye Candy 5 Impact - Gradient Glow (Same settings - so just click Ok)
Then Effects - 3D Effects - Drop Shadow (Same settings - so just click Ok)
Then go to your layers pallet & delete your Original Raster 2 layer.
Now click on your Copy Of Raster 2 layer - and then follow the same steps you followed for your Raster 2 layer above. Do not forget to apply your Gradient Glow & Drop Shadow.
Then make sure you delete your Original Copy Of Raster 2 layer.
Now still in your layers pallet - click on your Raster 8 layer - Selections - Select All - Float - Defloat -
Then make a New Raster Layer -
Go to your Materials Pallet (Color)
Set your Foreground Color to #ffffff
Set your Background Color to #236816
Then back to your Materials Pallet - click on your Foreground Color box - when it opens click on your Gradient Tab. Then click on the color box in the top left corner. Find your Foreground & Background Color box - click on it.
Then set your settings as follows (or to your liking)
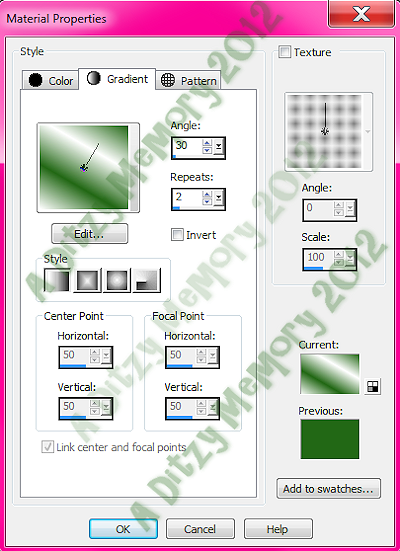
Then click Ok.
Now in your Tools - click on your Flood Fill Tool - it looks like a Paint Bucket -
Then using your Flood Fill tool - click inside your "marching ants". This will fill that area with your Gradient Color.
Then keep this selected -
Open your mid sized tube of choice - Copy & paste it as a new layer - position it to your liking. Then go to Selections - click Invert - then on your keyboard press your Delete key 1 time.
DO NOT Deselect yet!
Now copy & paste your tube again - this time positioning it in another spot - then once happy with the position - press your Delete key 1 time.
DO NOT Deselect Yet!
Copy & Paste your tube again - this time positioning it in a different spot as well.
Then press your Delete key 1 time.
Now go to Selections & click Select None. :-)
Now in your layers pallet - right click on your top (3rd) tube layer - click Merge - then click Merge Down from the slide out menu. Then right click on the Merged layer - click Merge Down again. What this will do is Merge all 3 of your tube layers into 1.
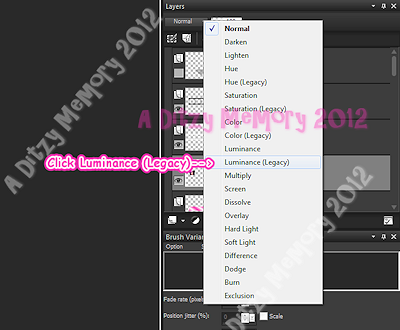
Once you have your tube layers Merged into 1 - go to the top of your Layers Pallet - change the Blend Mode from Normal to Luminance (Legacy)
*I have provided screen shots below as to were this option is located*

Now in your layers pallet - click on your Gradient Filled layer - then go to Effects - Plugins - Eye Candy 5 Impact - Gradient Glow. (Apply the same settings as before - so just click Ok.)
Then still on your Gradient Filled layer - go to Effects - 3D Effects - Drop Shadow
Apply the same settings as before - so just click Ok.
Now click on your Raster 9 layer - then activate your Magic Wand - then click inside each letter in your word art . (St.Patricks Day)
Now go to Effects - click 3D Effects - then click Inner Bevel
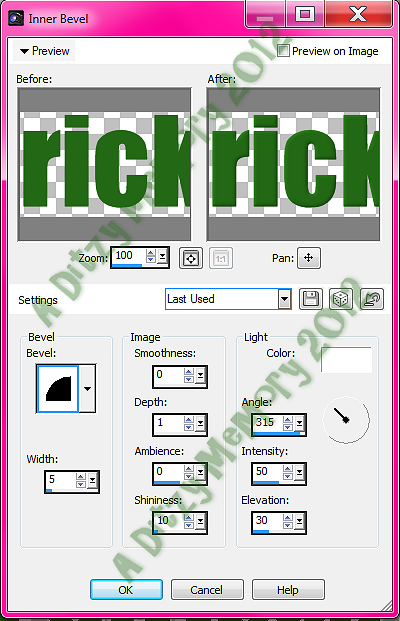
Then click Ok.
Now go to Adjust - click Add/Remove Noise - Add Noise
Then click Ok
Then go to Selections & click Select None.
Now in your layers pallet - click on your Raster 10 layer - Then go to Effects - click 3D Effects - Drop Shadow.
Use the same settings as before - so just click Ok.
Now open your larger tube of choice - Copy & paste it as a new layer - if needed re-size to an acceptable size.
Then using your Move Tool - position your larger tube to the center of your template.
Then go to your layers pallet - move your Larger Tube layer down so that it is just below your Raster 9 layer (Wordart) (See my tag for reference if needed)
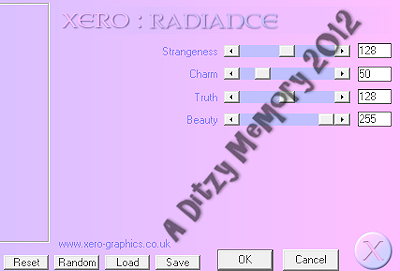
Now still on your large tube layer - go to Effects - click Plugins - then click Xero - then click Radiance from the slide out menu -

Then click Ok.
Now go to Effects - click 3D Effects - then click Drop Shadow. Applying the same settings you used before - so just click Ok.
Lets Add Some Elements :
Open your Lights element - Copy & paste it as a new layer onto your template canvas - then re-size it to 80%. Using your Move Tool position your Lights element to the bottom of your Large Tube.
Now go to Adjust - click Sharpness - then click Sharpen
Then go to Effects - 3D Effects - Drop Shadow (Use the same settings for your elements)
Now click Ok.
Now open your Glitter element - Copy & paste it as a new layer onto your template canvas - then using your Move Tool position it to the center of your template.
Adjust - Sharpness - Sharpen
Do not apply a drop shadow to this element.
Now in your layers pallet - Move your Glitter element layer down so that it is directly below your Merged Tubes layer.
Now in your layers pallet - click on your top layer -
Open your CloverFlower element - Copy & paste it as a new layer onto your template canvas - then re-size it to 50%. Using your Move Tool position your CloverFlower element to the center of your Template. (See my tag for reference if needed) You want to place it about where the hat on your Large Tube is.
Adjust - Sharpness - Sharpen
Effects - 3D Effects - Drop Shadow (Same settings - so just click Ok)
Now go to your layers pallet - Move your Clover Flower layer down so that it is below BOTH of your P7 layers.
Now right click on your Clover Flowers layer - then click Duplicate. Use your Move Tool to position your Duplicated CloverFlowers element to the left side of the one in the center.
Then go back to your layers pallet - right click on your Duplicated CloverFlowers element layer - then click Duplicate. Now using your Move Tool move your 2nd Duplicated CloverFlowers element to the right side of the one in the center.
Now in your layers pallet - click on the very top layer in your layers pallet -
Open your Pot Of Gold element - Copy & paste it as a new layer onto your template canvas - then re-size it to 35%. Using your Move Tool position your Pot Of Gold element to the lower left of your tag.
Adjust- Sharpness - Sharpen
Effects - 3D Effects - Drop Shadow (Using the same settings - so just click Ok.)
Now go to your layers pallet - right click on your Pot Of Gold element layer - then click Duplicate. Then using your Move Tool - position your duplicated Pot Of Gold element to the right lower side of your Template.
Now open your Mouse element - Copy & Paste it as a new layer onto your template canvas - then re-size it to 35%. Using your Move Tool position your Mouse element so that it appears to be standing on your Pot Of Gold element on the left side of your tag.
Adjust - Sharpness - Sharpen
Effects - 3D Effects - Drop Shadow (Same settings - so just click Ok)
Now go to your layers pallet - right click on your Mouse element layer - then click Duplicate -. Now go to Image & click Flip Horizontal. Then use your Move Tool to position your Duplicated Mouse element to the Pot Of Gold element on the right side of your Template.
Open your Beads element - Copy & paste it as a new layer onto your template canvas - then re-size it to 65%. Using your Move Tool position your Beads element to the top left side of your template.
Adjust - Sharpness - Sharpen
Effects - 3D Effects - Drop Shadow (Applying the same settings - so just click Ok)
Now go to your layers pallet - right click on your Beads element layer - then click Duplicate. Now go to Image - click Flip Horizontal. Using your Move Tool - Position your Duplicated Beads element to the right side of your Template.
Open your Button 2 element - Copy & Paste it as a new layer onto your template canvas - then re-size it to 65%. Using your Move Tool position your Button2 element to the left side of your template.
Adjust - Sharpness - Sharpen
Effects - 3D Effects - Drop Shadow (Same settings - so just click Ok)
Now go to your layers pallet - right click on your Button2 element layer - then click Duplicate. Now using your Move Tool - position your Duplicated Button2 element to the right side of your template to your liking.
Now open your Bow element - Copy & Paste it as a new layer onto your template canvas - then re-size it to 80%. Using your Move Tool position your Bow to the top of your template somewhere in the center area.
Adjust - Sharpness - Sharpen
Effects - 3D Effects - Drop Shadow (same settings - so just click Ok)
Now open your Ribbon element - Copy & paste it as a new layer onto your template canvas - then using your Move Tool - position your Ribbon to your liking.
Adjust - Sharpness - Sharpen
Effects - 3D Effects - Drop Shadow (same settings - click Ok)
Now open your Ribbon 3 element - Copy & paste it as a new layer onto your template canvas - then using your Move Tool - position your Ribbon 3 element to the upper left of your Template.
Adjust - Sharpness - Sharpen
Effects - 3D Effects - Drop Shadow (same settings - so just click Ok)
Now go to your layers pallet - Move your Ribbon 3 layer down so that it is the 7th layer from the bottom of your layers pallet.
Then right click on your Ribbon3 layer - click Duplicate. Go to Image - click Flip Horizontal.Now using your Move Tool position your duplicated Ribbon 3 to the upper right area of your template.
Now go back to your layers pallet - right click on your Duplicated Ribbon 3 layer - then click Merge - then from the slide out menu click Merge Down.
Then right click on your newly Merged Ribbon 3 layer - click Duplicate.
Then go to Image - click Flip Vertical.
Now using your Move Tool - position your Vertical Ribbon 3 element towards the bottom of your template. (See my tag for reference if needed)
Now in your Layers Pallet - click on your very top layer in your layers pallet -
Open your Bow3 element - Copy & paste it as a new layer onto your template - then re-size it to 45%. Using your Move Tool position your Bow 3 element to the left side of your Large Tube.
Adjust - Sharpness - Sharpen
Effects - 3D Effects - Drop Shadow (Same settings as before - so just click Ok)
Now go to your layers pallet - right click on your Bow3 element layer - then click Duplicate. Now go to Image - click Flip Horizontal. Then use your Move Tool to position your Duplicated Bow3 to the right side of your Large Tube.
Now open your Sparkles of choice - Copy & paste them as a new layer onto your template canvas - then using your Move Tool position your Sparkles to your liking.
Adjust - Sharpness - Sharpen
Do not apply a Drop Shadow to your Sparkles element as it will make them appear dark.
If you would like more Sparkles then all you have to do is duplicate & position as many times as you would like. :-)
Now it is time to add your name. The settings I used are below :
Font : Al Sandra
Size : 85 Pixels
Background Color : #000000
Foreground Color : Set to nul
Once happy with the placement of your name - go to your layers pallet - then right click on your name layer - then click Convert To Raster Layer.
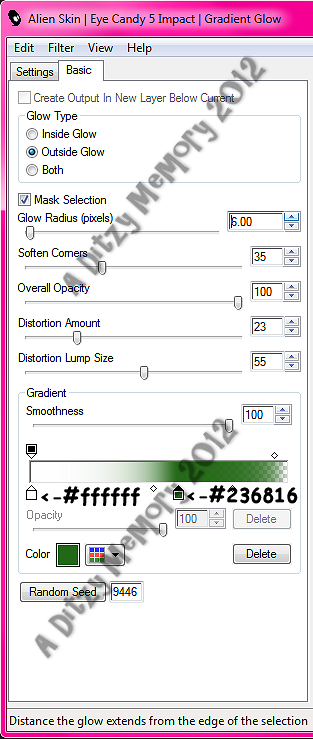
Now go to Effects - click Plugins - then click Eye Candy 4 Gradient Glow
Settings Tab:
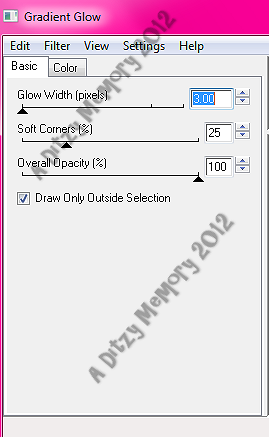
Color Tab :
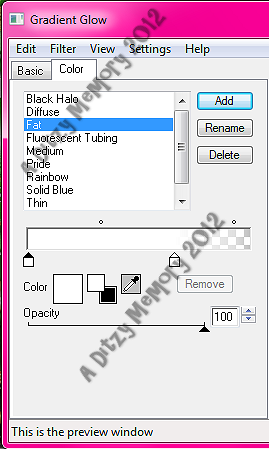
Then click Ok.
Now apply your Drop Shadow (using the same settings you have been using)
Now add any copyright/credit information. Do not forget to include your license #.
Once you are happy with everything on your new tag - go to your layers pallet - right click on any layer - then click Merge - then click Merge Visible.
Then if you need to you can crop off any access canvas around your tag that you did not use.
If you would like you can re-size your tag if needed. This all depends on where you will be using it and what the size guidelines are for that particular website.
If you do re-size your tag - be sure to apply one final Sharpen . (Adjust - Sharpness - Sharpen)
This helps it stay crisp looking. I feel if I re-size something it then appears blurry so I always Sharpen when I re-size something smaller :-)
Now all that is left is to save your tag as a PNG file & you have completed this tutorial!!♥
**Thank-you for trying my tutorials - Once you complete a tutorial I would love to see the outcome , if you could please email me your tag (and your website if you have one) I would be honored to display it on my blog. You can email me @ ronneyprice@yahoo.com ♥**
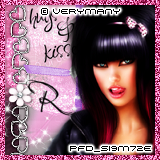
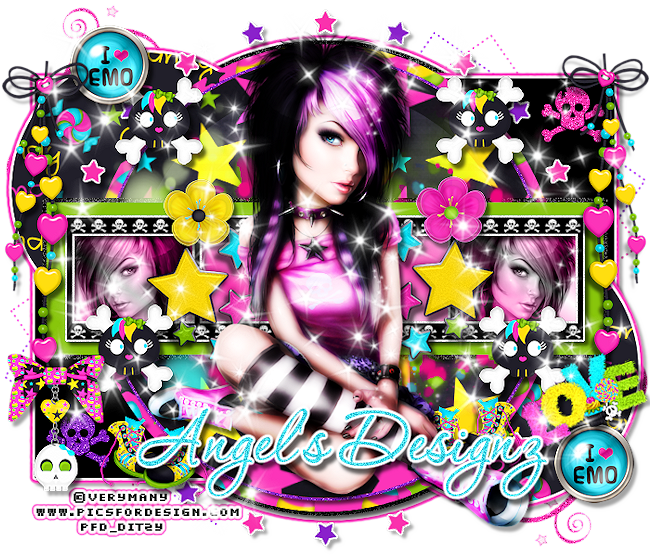
♥Emo Candy (PTU)♥
**This tutorial was written & posted by DitzyDezigns**
Any resemblance to any other tutorial is purely coincidental & completely unintentional!**
Here is what we will be making :
Supplies Needed :
Paint Shop Pro X4 - (Any version should work)
Tube Of Choice - I used EMOlution_2 by Verymany @ PFD
Scrapkit - Emo Candy By Angel's Designz
Template2 By Kristin & Ash Misfits Blog
Font Used :
P22 Corinthia
Plugins Used :
Eye Candy 5 Impact - Gradient Glow (Optional)
Eye Candy 4 Gradient Glow (Optional)
Xero - Radiance (Optional)
Elements Used :
Paper 1
Paper 2
Paper 11
Paper 10
Ele1
Skull
BeadString
Brad
Flower1
Flower2
Sneakers
Wordart1
Stars
Bow&Skull
Sparkles
Lets Begin :
Start by opening your Template2 -
Go to your layers pallet & delete the following layers :
Credit
Background
Now still in your layers pallet - click on your Rectangle layer -
Go to Effects - click Plugins - then click Eye Candy 5 Impact - then click Gradient Glow
**You are welcome to use my settings below or your own , the choice is yours**
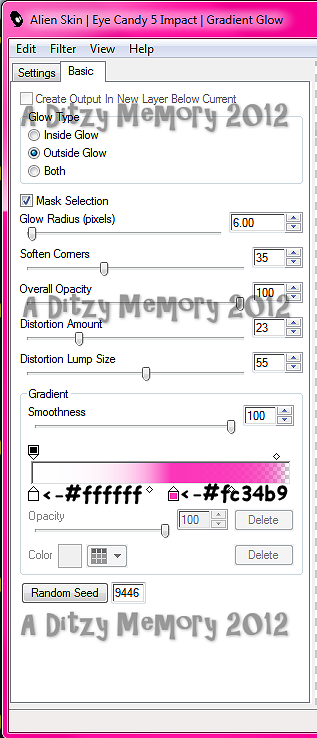
Then click Ok.
Now go to Effects - 3D Effects - Drop Shadow
Then click Ok.
Now go back to your layers pallet -
Click on your Left Circle layer - Go to Selections - click Select All - back to Selections - click Float - then back to Selections - click Defloat -
Now open your Paper 1 - Copy & paste it as a new layer onto your template canvas. Then go to Selections & click Invert.
Then on your keyboard - press your Delete key 1 time.
Go back to Selections & click Select None.
Now go to Effects - click Plugins - Eye Candy 5 Impact - Gradient Glow.
You are going to use the same settings you used above so just click Ok.
Now go to Effects - 3D Effects - Drop Shadow (Use the same settings as you used about) so just click Ok.
Now go to your layers pallet & delete your Original Left Circle layer.
Then still in your layers pallet - click on your Right Circle layer & follow the exact same steps above that you used for your Left Circle layer. (You can choose to use the same paper like I did or you can change it. Again the choice is always yours :-)
Once you finish your Right Circle layer - go back to your layers pallet - click on your Star Backs Layer - then go to Effects - 3D Effects - Drop Shadow
*Use the same settings you have been using - so just click Ok*
Now back in your layers pallet - click on your Circle 1 layer - Go to Selections - click Select All - back to Selections - click Float - back to Selections click Defloat -
Now open Paper 2 - Copy & paste it as a new layer onto your template canvas. Now go back to Selections - click Invert. Then on your keyboard press your Delete key 1 time.
Go back to Selections & click Select None.
Now for this layer we are only going to add a Drop Shadow. So go to Effects - 3D Effects - Drop Shadow. Use the same settings - so click Ok.
Go to your layers pallet - delete your original Circle 1 layer.
Still in your layers pallet - click on your Raster 1 layer - then go to Effects - Plugins - Eye Candy 5 Impact - Gradient Glow - same settings you have been using so click Ok.
Now back to Effects - 3D Effects - Drop Shadow. Same settings - click Ok.
Back to your layers pallet - click on your Circle 2 layer -
Go to Selections - click Select All - Selections - click Float - Selections - click Defloat -
Now open Paper 11 - Copy & paste it as a new layer onto your template canvas.
Now go back to Selections - click Invert -
Then on your keyboard press your Delete key 1 time.
Go back to Selections & click Select None.
Effects - 3D Effects - Drop Shadow (Same settings - so click Ok)
Now go back to your layers pallet & delete your Original Circle 2 layer.
In your layers pallet - click on your Rectangle layer - go to Selections - Select All - Float - Defloat -
Open Paper10 - Copy & paste it as a new layer onto your template canvas - then go back to Selections - click Invert - then on your keyboard press your Delete key 1 time.
Then go back to Selections & click Select None.
Now go to Adjust - click Add/Remove Noise - then click Add Noise
*Again you are welcome to use my settings below or your own*

Then click Ok.
Now go back to your layers pallet & delete your Original Rectangle layer.
In your layers pallet - click on your Glitter Rectangle layer - then go to Effects - 3D Effects - Drop Shadow. Apply the same settings - so click OK.
In your layers pallet - click on your FilmStrip Back 1 layer - Selections - Select All - Float - Defloat -
Now open your tube of choice - Copy & paste it as a new layer onto your template canvas.
Now re-size your tube to your liking. (I re-sized mine to 65% twice.)
Then using your Move Tool - position your tube in the first frame on the left side of your film strip.
Now go to Selections - click Invert - then on your keyboard press your delete key 1 time.
(Keep your FilmStrip Back Selected)
Copy & paste your tube again - re-size it to the same size you used for your first one - now using your Move Tool position this tube to the right end of your filmstrip.
Then hit your Delete key 1 time.
Now go to Selections - click Select None.
Go to your layers pallet - right click on your top tube layer -then click Merge - then from the slide out menu click Merge Down.
Once both of your tube layers become one - go to the top of your layers pallet & change the Blend Mode from Normal to Luminance (Legacy)
*Below is a screen shot of where to locate this option*
Now go back to your layers pallet - click on your Filmstrip Back 2 layer - then go to Effects - 3D Effects - Drop Shadow (same settings - so click Ok)
Now copy & paste your full tube as a new layer onto your template canvas & position it to the center of your filmstrip.
Once you are happy with your tubes placement - go to Effects - Plugins - click on Xero - then from the slide out menu click Radiance.
*Again you are welcome to use my settings or play around with them to get another effect you like better*
Now click Ok.
Still on your full tube layer - go to Effects - 3D Effects - Drop Shadow
Use the same settings you have been using - click Ok.
Now lets start adding some elements :
*You can place these wherever you would like - you can also re-size them differently if you chose to. I only put what I used as a guide for you. You are welcome to use them if you wish, or make it your own :-)*
Open Ele1 - Copy & paste it as a new layer onto your template canvas - then using your Move Tool position it center with your Full Tube.
Then go to your layers pallet - move your Ele1 layer down so it is directly below your Full Tube layer.
Now in your layers pallet - click on your top layer -
Then open your Skull element - Copy & paste it as a new layer onto your template canvas. Then re-size it to 30% - then re-size it again to 80%.
Then using your Move Tool position it to your liking. (You may use my tag as a guide if you would like.)
Once happy with the placement - go to Adjust - click Sharpness - then click Sharpen.
Then go to Effects - 3D Effects - Drop Shadow
*Using the same settings - click Ok*
Now go to your layers pallet - right click on your Skull element layer - then click Duplicate. Then using your Move Tool - position your Duplicated Skull element to your liking.
Then go back to your layers pallet - and duplicate your Skull element again - positioning it to your liking as well. Then duplicate it one more time - so that you have a total of 4 Skull elements. Position each to your liking.
Open your BeadString element - Copy & paste it as a new layer onto your template canvas - then re-size it to 80% , then re-size it again to 80%.
Now using your Move Tool - position your BeadString element to the upper left side of your template. (or to a spot of your choosing)
Now go to Adjust - Sharpness - Sharpen
Effects - 3D Effects - Drop Shadow. (Same settings as above - so click Ok)
Now go to your layers pallet - right click on your BeadString element layer - then click Duplicate.
Now go to Image - click Flip Horizontal - then using your Move Tool - position your Duplicated BeadString element to the upper right of your template.
Open your Brad element - Copy & paste it as a new layer onto your template canvas - then re-size it to 30%. Using your Move Tool - position it to your liking.
Adjust - Sharpness - Sharpen
Effects - 3D Effects - Drop Shadow. (Same settings - just click Ok)
Now go to your layers pallet - right click on your Brad element layer - then click Duplicate.
Now use your Move Tool to position your duplicated Brad element to your liking.
Open your Flower 1 element - Copy & paste it as a new layer onto your template canvas - then re-size it to 25%. Using your Move Tool to position it to your liking.
Adjust - Sharpness - Sharpen
Effects - 3D Effects - Drop Shadow (Same settings as above so just click Ok)
Now open your Flower 2 element - Copy & paste it as a new layer onto your template canvas . Then re-size it to 25%. Using your Move Tool position your Flower 2 element to your liking.
Adjust - Sharpness - Sharpen
Effects - 3D Effects - Drop Shadow (same settings as above so just click ok)
Open your Sneakers element - Copy & paste it as a new layer onto your template canvas . Then re-size it to 25%.
Now go to Image - click Free Rotate - set your settings to your liking. (Mine are below)
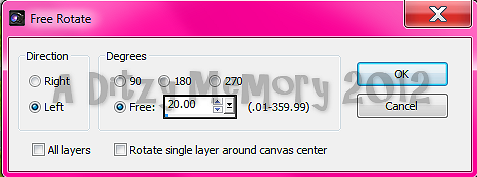
Click Ok.
Now using your Move Tool position your Wordart1 element to your liking.
Adjust - Sharpness - Sharpen
Effects - 3D Effects - Drop Shadow (Same settings as before - so just click Ok)
Open your Stars element - Copy & paste it as a new layer onto your template canvas - then re-size it to 50%.
Using your Move Tool - position your Stars element to the right side of your Full Tube.
Then go to your layers pallet - move your Stars element layer down so it is directly below your full tube layer.
Now go to Adjust - Sharpness - Sharpen
Effects - 3D Effects - Drop Shadow (Same settings - just click Ok)
Back to your layers pallet - right click on your Stars element layer - then click Duplicate.
Now go to Image - click Flip Horizontal. Then using your Move Tool - position your duplicated Stars element to the Left side of your full tube.
Now in your layers pallet - click on your very top layer again -
Open your Bow & Skull element - Copy & paste it as a new layer onto your template canvas - then re-size it to 30%. Using your Move Tool position it to your liking.
Adjust - Sharpness - Sharpen
Effects - 3D Effects - Drop Shadow (same settings as before - so just click Ok)
Lastly open your Sparkles element - Copy & paste it as a new layer onto your template canvas - then using your Move Tool position your Sparkles element to the bottom of your tag.
Adjust - Sharpness - Sharpen
*Do not add a drop shadow to this element*
Now go to your layers pallet - right click on your Sparkles element layer - then click Duplicate. Using your Move Tool position your Duplicated Sparkles element to the middle of your tag. (Be careful as to not cover your Tubes face with the sparkles.)
Now go back to your layers pallet again - right click on your Duplicated Sparkles element layer - then click Duplicate. Now using your Move Tool again, position your 3rd Sparkles element towards the top of your tag. Again being careful not to cover your tubes face.
Now once you are happy with the placement of all of your elements - it is time to add your name & all copyright/license information.
For my name I used the following settings :
Font : P22 Corinthia
Size : 125 Pixels (This size will depend on the length of your name)
Background Color : #44def2
Foreground Color : Set to nul
Once you have your name where you like it - go to your layers pallet - right click on your name layer - then click Convert To Raster Layer.
Then go to Adjust - Add/Remove Noise - then click Add Noise
*My settings for this are below as well*
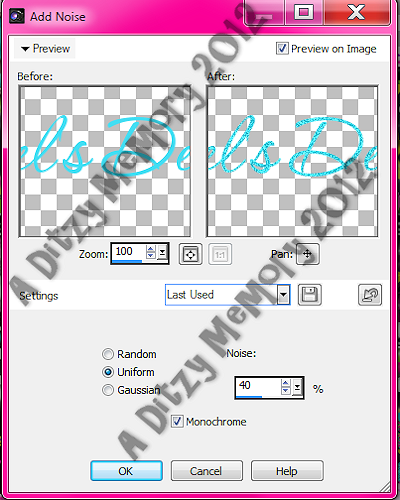
Then click Ok.
Now go to Effects - click Plugins - then click Eye Candy 4 - Gradient Glow
*My settings for this plugin are below - again you are welcome to use them - or you can play with the settings to get your own effect - the choice is yours*
First is the Settings Tab -
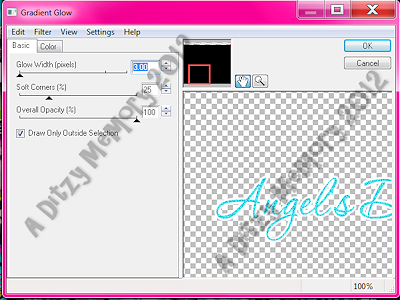
Now click on your Colors Tab :
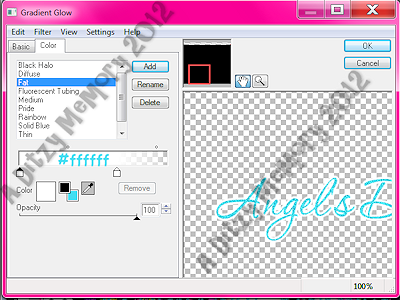
Then click Ok.
Now go to Effects - 3D Effects - Drop Shadow
Using the same settings so just click Ok.
Please double check to make sure you have added your copyright/license info.
Once that is done - and you are happy with everything - go to your layers pallet - right click on any layer - then click Merge - then click Merge Visible from the slide out menu.
Once you have Merged all layers - you may or may not want to re-size your tag. This depends on where you will be using your tag & what size restrictions that particular website has.
If you choose to re-size your tag - before to Sharpen your tag one final time. (Adjust - Sharpness - Sharpen)
It just keeps it looking crisp :-)
I find it to be a bit blurry once you re-size the completed tag.
Once you have your tag re-sized & Sharpened all that is left to do is to save your tag as a PNG file & you have completed this tutorial!! ♥
**If you try any of my tutorials, please send me a copy of the tag you made using the tutorial so that I can display it on my blog :-) **
Subscribe to:
Posts (Atom)
About Me
- DitzyDezigns
- New York, United States
- Hiya Everyone! My name is Ronney, I have 3 wonderful teenagers, and have been married to my husband for 20 years. I LOVE to design signatures, tags & avatars, I design with PSP, and have been designing for over 2 1/2 years. I will be not only designing signatures, tags & avatars but will also be writing & posting tutorials as well. I will also be making some templates to share with you all as well. So I hope you enjoy and can use everything I have available on my blog :-) If you ever try any of my tutorials,please send me your completed designs and I would love to showcase it here on my blog!
♥I CT For♥


Blog Hop

Today's Date

Favorite Stores

♥Forums♥


My Pixels


♥My Avatars♥