♥Ditzy's TOU♥
All of the tutorials written by me are of my own Ditzy imagination.
Do NOT copy or alter them in ANY way.
Do NOT copy & paste the tutorials to any website, forum or group.
Do NOT claim them as your own.
If you would like to show or share my tutorial do so by using a link to bring your members to my blog. However if you do please send me a courtesy email so that I know my tutorials are being used according to my TOU. Also if you would please send me a link to where you will be posting my link.
If you have done any of my tutorials I would LOVE to see the outcome of what you have made, so please email me OR you can leave me a link in my shout box so that I can see what you have made and display it on my blog for others to enjoy as well.
Other than that please have fun,and I hope that you enjoy all my tutorials!
Email me @ DitzyDezigns@hotmail.com
Email Me
I would love to see what you have made using any of my tutorials, so please feel free to email me at the address below.
DitzyDezigns@hotmail.com
Add Me On Facebook
Pages
Powered by Blogger.
Sunday, March 4, 2012
♥Emo Candy (PTU)♥
**This tutorial was written & posted by DitzyDezigns**
Any resemblance to any other tutorial is purely coincidental & completely unintentional!**
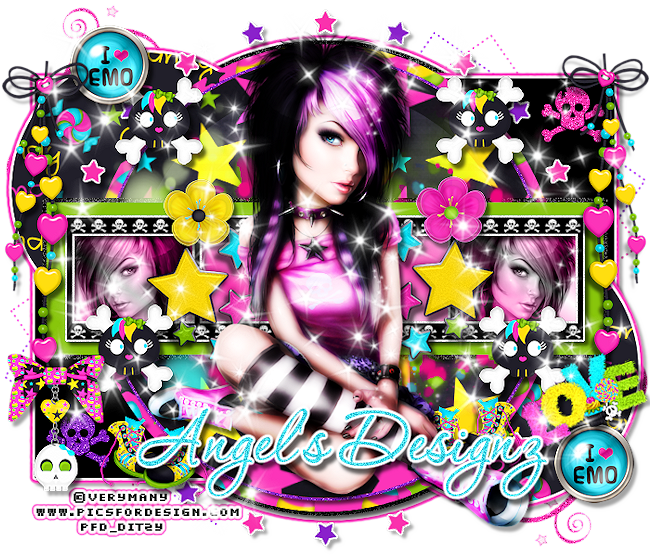
Here is what we will be making :
Supplies Needed :
Paint Shop Pro X4 - (Any version should work)
Tube Of Choice - I used EMOlution_2 by Verymany @ PFD
Scrapkit - Emo Candy By Angel's Designz
Template2 By Kristin & Ash Misfits Blog
Font Used :
P22 Corinthia
Plugins Used :
Eye Candy 5 Impact - Gradient Glow (Optional)
Eye Candy 4 Gradient Glow (Optional)
Xero - Radiance (Optional)
Elements Used :
Paper 1
Paper 2
Paper 11
Paper 10
Ele1
Skull
BeadString
Brad
Flower1
Flower2
Sneakers
Wordart1
Stars
Bow&Skull
Sparkles
Lets Begin :
Start by opening your Template2 -
Go to your layers pallet & delete the following layers :
Credit
Background
Now still in your layers pallet - click on your Rectangle layer -
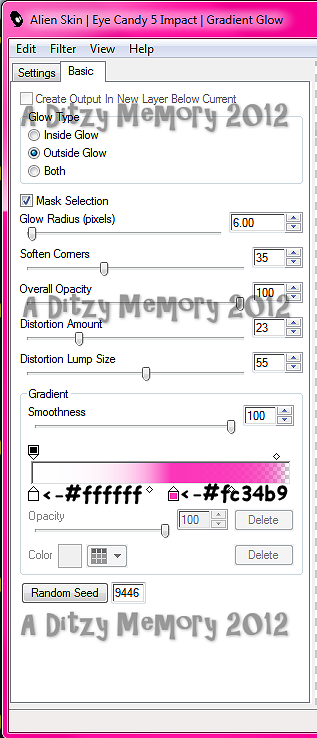
Go to Effects - click Plugins - then click Eye Candy 5 Impact - then click Gradient Glow
**You are welcome to use my settings below or your own , the choice is yours**
Then click Ok.
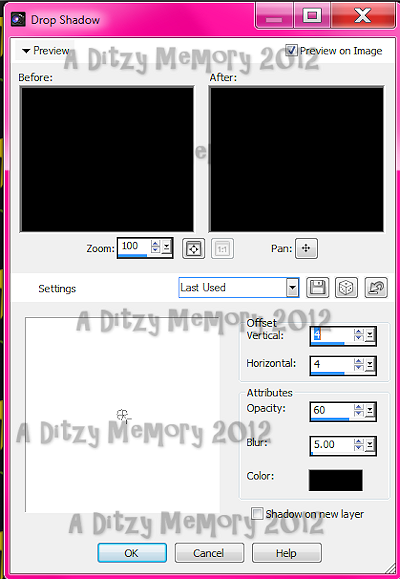
Now go to Effects - 3D Effects - Drop Shadow
Then click Ok.
Now go back to your layers pallet -
Click on your Left Circle layer - Go to Selections - click Select All - back to Selections - click Float - then back to Selections - click Defloat -
Now open your Paper 1 - Copy & paste it as a new layer onto your template canvas. Then go to Selections & click Invert.
Then on your keyboard - press your Delete key 1 time.
Go back to Selections & click Select None.
Now go to Effects - click Plugins - Eye Candy 5 Impact - Gradient Glow.
You are going to use the same settings you used above so just click Ok.
Now go to Effects - 3D Effects - Drop Shadow (Use the same settings as you used about) so just click Ok.
Now go to your layers pallet & delete your Original Left Circle layer.
Then still in your layers pallet - click on your Right Circle layer & follow the exact same steps above that you used for your Left Circle layer. (You can choose to use the same paper like I did or you can change it. Again the choice is always yours :-)
Once you finish your Right Circle layer - go back to your layers pallet - click on your Star Backs Layer - then go to Effects - 3D Effects - Drop Shadow
*Use the same settings you have been using - so just click Ok*
Now back in your layers pallet - click on your Circle 1 layer - Go to Selections - click Select All - back to Selections - click Float - back to Selections click Defloat -
Now open Paper 2 - Copy & paste it as a new layer onto your template canvas. Now go back to Selections - click Invert. Then on your keyboard press your Delete key 1 time.
Go back to Selections & click Select None.
Now for this layer we are only going to add a Drop Shadow. So go to Effects - 3D Effects - Drop Shadow. Use the same settings - so click Ok.
Go to your layers pallet - delete your original Circle 1 layer.
Still in your layers pallet - click on your Raster 1 layer - then go to Effects - Plugins - Eye Candy 5 Impact - Gradient Glow - same settings you have been using so click Ok.
Now back to Effects - 3D Effects - Drop Shadow. Same settings - click Ok.
Back to your layers pallet - click on your Circle 2 layer -
Go to Selections - click Select All - Selections - click Float - Selections - click Defloat -
Now open Paper 11 - Copy & paste it as a new layer onto your template canvas.
Now go back to Selections - click Invert -
Then on your keyboard press your Delete key 1 time.
Go back to Selections & click Select None.
Effects - 3D Effects - Drop Shadow (Same settings - so click Ok)
Now go back to your layers pallet & delete your Original Circle 2 layer.
In your layers pallet - click on your Rectangle layer - go to Selections - Select All - Float - Defloat -
Open Paper10 - Copy & paste it as a new layer onto your template canvas - then go back to Selections - click Invert - then on your keyboard press your Delete key 1 time.
Then go back to Selections & click Select None.
Now go to Adjust - click Add/Remove Noise - then click Add Noise
*Again you are welcome to use my settings below or your own*
Then click Ok.
Now go back to your layers pallet & delete your Original Rectangle layer.
In your layers pallet - click on your Glitter Rectangle layer - then go to Effects - 3D Effects - Drop Shadow. Apply the same settings - so click OK.
In your layers pallet - click on your FilmStrip Back 1 layer - Selections - Select All - Float - Defloat -
Now open your tube of choice - Copy & paste it as a new layer onto your template canvas.
Now re-size your tube to your liking. (I re-sized mine to 65% twice.)
Then using your Move Tool - position your tube in the first frame on the left side of your film strip.
Now go to Selections - click Invert - then on your keyboard press your delete key 1 time.
(Keep your FilmStrip Back Selected)
Copy & paste your tube again - re-size it to the same size you used for your first one - now using your Move Tool position this tube to the right end of your filmstrip.
Then hit your Delete key 1 time.
Now go to Selections - click Select None.
Go to your layers pallet - right click on your top tube layer -then click Merge - then from the slide out menu click Merge Down.
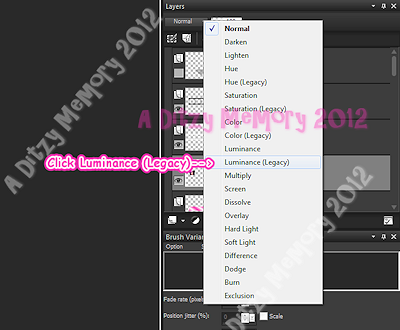
Once both of your tube layers become one - go to the top of your layers pallet & change the Blend Mode from Normal to Luminance (Legacy)
*Below is a screen shot of where to locate this option*
Now go back to your layers pallet - click on your Filmstrip Back 2 layer - then go to Effects - 3D Effects - Drop Shadow (same settings - so click Ok)
Now copy & paste your full tube as a new layer onto your template canvas & position it to the center of your filmstrip.
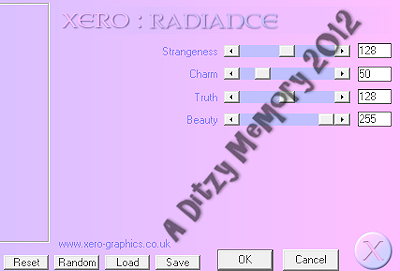
Once you are happy with your tubes placement - go to Effects - Plugins - click on Xero - then from the slide out menu click Radiance.
*Again you are welcome to use my settings or play around with them to get another effect you like better*
Now click Ok.
Still on your full tube layer - go to Effects - 3D Effects - Drop Shadow
Use the same settings you have been using - click Ok.
Now lets start adding some elements :
*You can place these wherever you would like - you can also re-size them differently if you chose to. I only put what I used as a guide for you. You are welcome to use them if you wish, or make it your own :-)*
Open Ele1 - Copy & paste it as a new layer onto your template canvas - then using your Move Tool position it center with your Full Tube.
Then go to your layers pallet - move your Ele1 layer down so it is directly below your Full Tube layer.
Now in your layers pallet - click on your top layer -
Then open your Skull element - Copy & paste it as a new layer onto your template canvas. Then re-size it to 30% - then re-size it again to 80%.
Then using your Move Tool position it to your liking. (You may use my tag as a guide if you would like.)
Once happy with the placement - go to Adjust - click Sharpness - then click Sharpen.
Then go to Effects - 3D Effects - Drop Shadow
*Using the same settings - click Ok*
Now go to your layers pallet - right click on your Skull element layer - then click Duplicate. Then using your Move Tool - position your Duplicated Skull element to your liking.
Then go back to your layers pallet - and duplicate your Skull element again - positioning it to your liking as well. Then duplicate it one more time - so that you have a total of 4 Skull elements. Position each to your liking.
Open your BeadString element - Copy & paste it as a new layer onto your template canvas - then re-size it to 80% , then re-size it again to 80%.
Now using your Move Tool - position your BeadString element to the upper left side of your template. (or to a spot of your choosing)
Now go to Adjust - Sharpness - Sharpen
Effects - 3D Effects - Drop Shadow. (Same settings as above - so click Ok)
Now go to your layers pallet - right click on your BeadString element layer - then click Duplicate.
Now go to Image - click Flip Horizontal - then using your Move Tool - position your Duplicated BeadString element to the upper right of your template.
Open your Brad element - Copy & paste it as a new layer onto your template canvas - then re-size it to 30%. Using your Move Tool - position it to your liking.
Adjust - Sharpness - Sharpen
Effects - 3D Effects - Drop Shadow. (Same settings - just click Ok)
Now go to your layers pallet - right click on your Brad element layer - then click Duplicate.
Now use your Move Tool to position your duplicated Brad element to your liking.
Open your Flower 1 element - Copy & paste it as a new layer onto your template canvas - then re-size it to 25%. Using your Move Tool to position it to your liking.
Adjust - Sharpness - Sharpen
Effects - 3D Effects - Drop Shadow (Same settings as above so just click Ok)
Now open your Flower 2 element - Copy & paste it as a new layer onto your template canvas . Then re-size it to 25%. Using your Move Tool position your Flower 2 element to your liking.
Adjust - Sharpness - Sharpen
Effects - 3D Effects - Drop Shadow (same settings as above so just click ok)
Open your Sneakers element - Copy & paste it as a new layer onto your template canvas . Then re-size it to 25%.
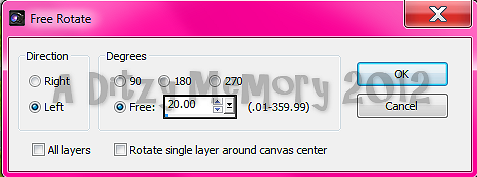
Now go to Image - click Free Rotate - set your settings to your liking. (Mine are below)
Click Ok.
Now using your Move Tool position your Wordart1 element to your liking.
Adjust - Sharpness - Sharpen
Effects - 3D Effects - Drop Shadow (Same settings as before - so just click Ok)
Open your Stars element - Copy & paste it as a new layer onto your template canvas - then re-size it to 50%.
Using your Move Tool - position your Stars element to the right side of your Full Tube.
Then go to your layers pallet - move your Stars element layer down so it is directly below your full tube layer.
Now go to Adjust - Sharpness - Sharpen
Effects - 3D Effects - Drop Shadow (Same settings - just click Ok)
Back to your layers pallet - right click on your Stars element layer - then click Duplicate.
Now go to Image - click Flip Horizontal. Then using your Move Tool - position your duplicated Stars element to the Left side of your full tube.
Now in your layers pallet - click on your very top layer again -
Open your Bow & Skull element - Copy & paste it as a new layer onto your template canvas - then re-size it to 30%. Using your Move Tool position it to your liking.
Adjust - Sharpness - Sharpen
Effects - 3D Effects - Drop Shadow (same settings as before - so just click Ok)
Lastly open your Sparkles element - Copy & paste it as a new layer onto your template canvas - then using your Move Tool position your Sparkles element to the bottom of your tag.
Adjust - Sharpness - Sharpen
*Do not add a drop shadow to this element*
Now go to your layers pallet - right click on your Sparkles element layer - then click Duplicate. Using your Move Tool position your Duplicated Sparkles element to the middle of your tag. (Be careful as to not cover your Tubes face with the sparkles.)
Now go back to your layers pallet again - right click on your Duplicated Sparkles element layer - then click Duplicate. Now using your Move Tool again, position your 3rd Sparkles element towards the top of your tag. Again being careful not to cover your tubes face.
Now once you are happy with the placement of all of your elements - it is time to add your name & all copyright/license information.
For my name I used the following settings :
Font : P22 Corinthia
Size : 125 Pixels (This size will depend on the length of your name)
Background Color : #44def2
Foreground Color : Set to nul
Once you have your name where you like it - go to your layers pallet - right click on your name layer - then click Convert To Raster Layer.
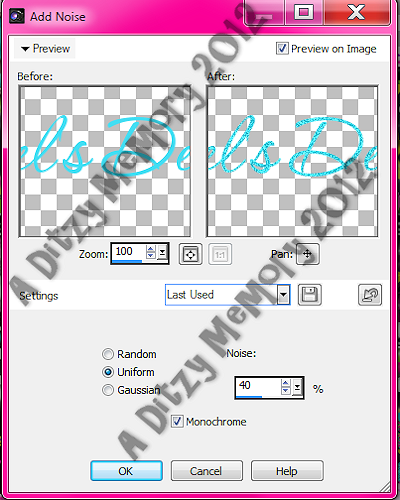
Then go to Adjust - Add/Remove Noise - then click Add Noise
*My settings for this are below as well*
Then click Ok.
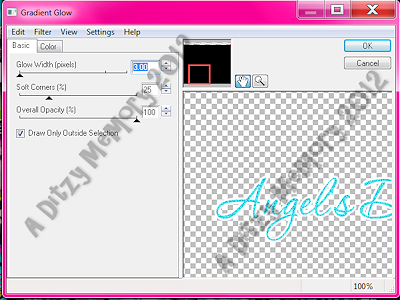
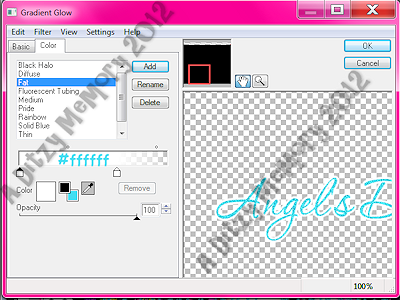
Now go to Effects - click Plugins - then click Eye Candy 4 - Gradient Glow
*My settings for this plugin are below - again you are welcome to use them - or you can play with the settings to get your own effect - the choice is yours*
First is the Settings Tab -
Now click on your Colors Tab :
Then click Ok.
Now go to Effects - 3D Effects - Drop Shadow
Using the same settings so just click Ok.
Please double check to make sure you have added your copyright/license info.
Once that is done - and you are happy with everything - go to your layers pallet - right click on any layer - then click Merge - then click Merge Visible from the slide out menu.
Once you have Merged all layers - you may or may not want to re-size your tag. This depends on where you will be using your tag & what size restrictions that particular website has.
If you choose to re-size your tag - before to Sharpen your tag one final time. (Adjust - Sharpness - Sharpen)
It just keeps it looking crisp :-)
I find it to be a bit blurry once you re-size the completed tag.
Once you have your tag re-sized & Sharpened all that is left to do is to save your tag as a PNG file & you have completed this tutorial!! ♥
**If you try any of my tutorials, please send me a copy of the tag you made using the tutorial so that I can display it on my blog :-) **
Subscribe to:
Post Comments (Atom)
About Me

- DitzyDezigns
- New York, United States
- Hiya Everyone! My name is Ronney, I have 3 wonderful teenagers, and have been married to my husband for 20 years. I LOVE to design signatures, tags & avatars, I design with PSP, and have been designing for over 2 1/2 years. I will be not only designing signatures, tags & avatars but will also be writing & posting tutorials as well. I will also be making some templates to share with you all as well. So I hope you enjoy and can use everything I have available on my blog :-) If you ever try any of my tutorials,please send me your completed designs and I would love to showcase it here on my blog!
Labels
- Addictive Pleasures Tuts (35)
- Angel's Designz Tuts (10)
- Animated (26)
- Announcements (2)
- Awards (2)
- Beginner (17)
- Butterfly Blush Tuts (8)
- Cool Scraps Digital (2)
- Creative Intentionz (2)
- Creative Scraps By Crys (19)
- Ditzys Scrapkits (1)
- Forum Sets (1)
- FTU (6)
- Intermediate Level Tuts (3)
- Peekaboo Land (1)
- Peekaboo Land PTU (4)
- Peekaboo Land Tuts (1)
- Pimp My Tags With Scraps Tuts (14)
- PTU (131)
- Scappin Dollars Tuts (1)
- Scrappin Dollars Tuts (7)
- Scraps From The Heart Tuts (3)
- Scraps With Attitude (27)
- Tammy's Scraps (8)
- Updates (1)
- Wickedly Ditzy Scraps (1)






0 comments:
Post a Comment