♥Ditzy's TOU♥
All of the tutorials written by me are of my own Ditzy imagination.
Do NOT copy or alter them in ANY way.
Do NOT copy & paste the tutorials to any website, forum or group.
Do NOT claim them as your own.
If you would like to show or share my tutorial do so by using a link to bring your members to my blog. However if you do please send me a courtesy email so that I know my tutorials are being used according to my TOU. Also if you would please send me a link to where you will be posting my link.
If you have done any of my tutorials I would LOVE to see the outcome of what you have made, so please email me OR you can leave me a link in my shout box so that I can see what you have made and display it on my blog for others to enjoy as well.
Other than that please have fun,and I hope that you enjoy all my tutorials!
Email me @ DitzyDezigns@hotmail.com
Email Me
I would love to see what you have made using any of my tutorials, so please feel free to email me at the address below.
DitzyDezigns@hotmail.com
Add Me On Facebook
Pages
Powered by Blogger.
Friday, March 2, 2012
♥Irish Girl (PTU)♥
***This tutorial was written & posted by Ditzy Dezigns. Any resemblance to any other tutorial is purely coincidental & completely unintentional!!***
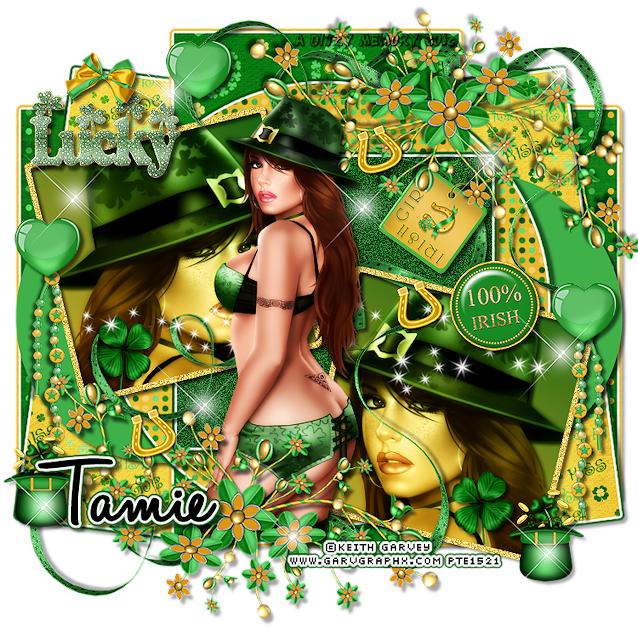
Here is what we will be making :
Supplies Needed
Paint Shop Pro X4 (Any version should work)
Tube Of Choice - I am using the amazing artwork of the very talented Keith Garvey. You can purchase his work at PTE
Scrapkit : Irish Girl By Tamie @ Addictive Pleasures
Temp 184 By Tamie @ Addictive Pleasure Templates (Please note that the template link is different than the scrapkit link)
Font Used :
Halo Handletters
Plugins Used :
Eye Candy 5 Impact - Gradient Glow (Optional)
Elements Used :
P7
P8
P6
P2
Flowers
Lucky
Heart2
Ribbon3
Tag2
4LeafClover
Bow2
Horseshoe
Beads
Button2
Hat
Sparkles
Sparkle
Lets Begin :
Open your Temp184 -
Now go to your layers pallet & delete the following layers :
Raster 1
Background
Now still in your layers pallet - click on your Copy Of Raster 9 layer -
Go to Selections - click Select All - Float - Defloat-
Now open P7 - Copy & paste as a new layer onto your template. Then position your paper so that the area within your marching ants is covered by your paper. Then got o Selections - click Invert - then on your keyboard press your Delete key 1 time.
Go to Selections & click Select None.
Now go back to your layers pallet & delete your original Copy Of Raster 9 layer.
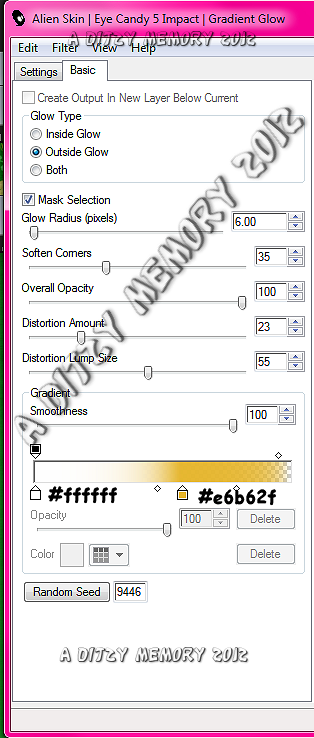
Now in your layers pallet - click on your P7 layer - go to Effects - click Plugins - then click Eye Candy 5 Impact - then click Gradient Glow -
(You can use my settings below or your own, the choice is always yours)
I have also included the color codes for the colors I chose to use.
Now click Ok.
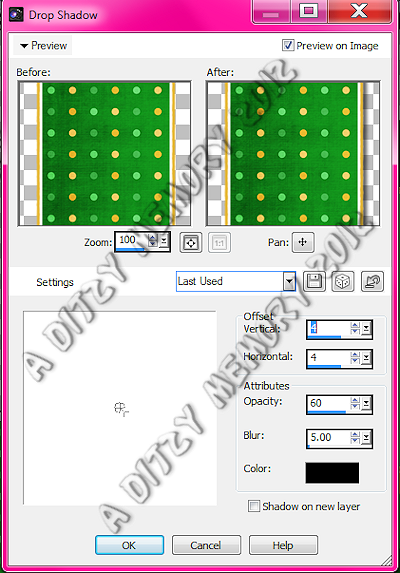
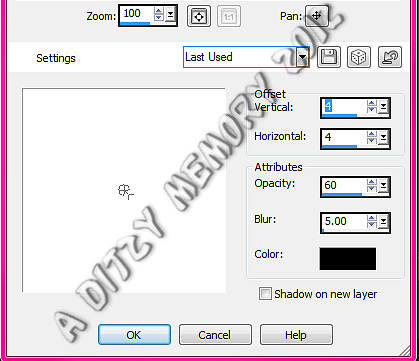
Now still on your P7 layer - go to Effects - click 3D Effects - then click Drop Shadow
(Again you are welcome to use my settings below or your own)
Now click Ok.
Back in your layers pallet - click on your Raster 9 layer - then follow the same steps that you followed for the Copy Of Raster 9 layer.
Use the same Eye Candy 5 Impact - Gradient Glow
&
Drop Shadow settings.
Back to your layers pallet - click on your Raster 4 layer -
Go to Selections - click Select All - Float - Defloat -
Open P8 - Copy & paste it as a new layer onto your template canvas.
Now reposition if needed.
Go to Selections - click Invert - then on your keyboard press your Delete key 1 time.
Go back to Selections & click Select None.
Go back to your layers pallet & delete your original Raster 4 layer.
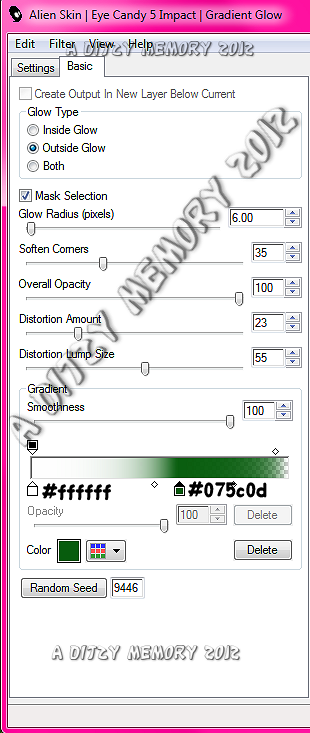
Now on your P8 layer - go to Effects - click Plugins - then click Eye Candy 5 Impact - then click Gradient Glow
This time change your 2nd color to #075c0d (This is repeated for you again on the screen shot below)
Then click Ok.
Now still on your P8 layer - go to Effects - click 3D Effects - Drop Shadow
*Use the same settings as before*
Then click Ok.
Now in your layers pallet - click on your Raster 5 layer - Go to Selections - Select All - Float - Defloat -
Open P6 - Copy & paste it as a new layer onto your canvas - then position if needed.
Then go to Selections - Invert - then on your keyboard - press your Delete key 1 time.
Go to Selections - click Select None.
Back to your layers pallet - delete your original Raster 5 layer.
Now back on your P6 layer - go to Effects - click Plugins - Eye Candy 5 Impact - Gradient Glow -
*Pay attention to the color change for your 2nd Color*
Then click Ok.
Then go to Effects - click 3D Effects - then click Drop Shadow
Apply the same settings that you use previously.
Then click Ok.
Now back to your layers pallet - click on your Raster 2 layer -
Go to Selections - Select All - Float - Defloat -
Open P2 - Copy & paste it as a new layer onto your template canvas.
Position if needed - now go to Selections - click Invert - then on your keyboard press your Delete key 1 time.
Go to Selections - click Select None.
Go to your layers pallet & delete your original Raster 5 layer.
Then on your P2 layer - go to Effects - Plugins - Eye Candy 5 Impact - Gradient Glow
*Note that the 2nd color code has changed again*
Then click Ok.
Now go to Effects - click 3D Effects - then click Drop Shadow
*Use the same settings as before*
Then click Ok.
Now in your layers pallet - click on your Raster 8 layer -
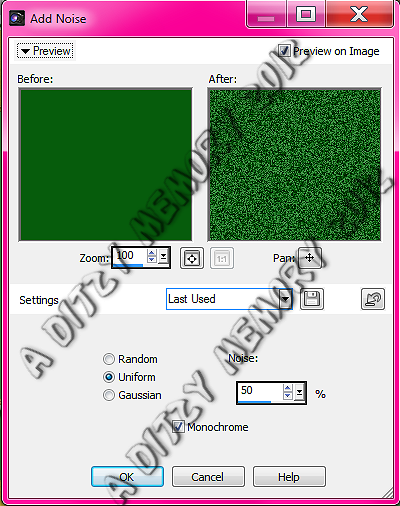
Go to Adjust - click Add/Remove Noise - then click Add Noise
*You can use my settings below or your own, its up to you*
Then click Ok.
Go to Effects - Plugins - Eye Candy 5 Impact - Gradient Glow
Then click Ok.
Now go to Effects - click 3D Effects - Drop Shadow
*Use same settings as before*
Click Ok.
Now in your layers pallet - click on your Raster 6 layer -
Go to Selections - click Select All - Float - Defloat -
Now make a New Raster Layer
Go to your Materials Pallet -
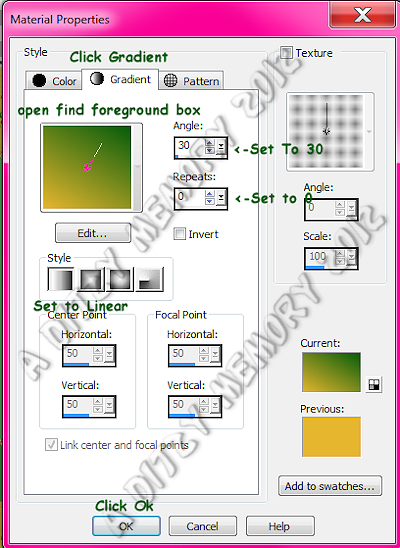
Set your Foreground color & background color to your liking. (OR you are welcome to use the colors I used, which are included in the screen shot below)
Now still in your Materials Pallet - click on your Foreground Color box -
Once it opens, Click on Gradient Tab -
Now when that menu opens, click on the top color , find the Foreground/Background color box -
Then set the settings as they are below (or you can play around with it til you get something you like better)
Then click Ok.
Now in your Tools Pallet - select your Flood Fill Tool
Now on your template - using your Flood Fill Tool - click within your "marching ants" area.
Now keep this Selected -
Open your mid size tube of choice -
Copy & paste it onto your template canvas - then using your Move Tool - position it within your "marching ants" area until you are happy with it.
Once happy go to Selections - click Invert - then on your keyboard press your Delete key 1 time.
Now go back to Selections & click Select None.
Now in your layers pallet -
Right click on your Tube layer - then click Duplicate.
Now on your duplicated tube layer - go to Adjust - click Blur - then click Gaussian Blur
Set to 3.00 & click Ok.
Now in your layers pallet - at the top - change your Blend Mode from Normal to Overlay.
Then in your layers pallet - click on your original tube layer (the bottom one) and now change the Blend Mode to Luminance (L).
Now still on your original tube layer - go to Effects - click 3D Effects - Drop Shadow.
Apply same settings that you have been using. So click Ok.
Now in your layers pallet - click on your Raster 7 layer - then go to Effects - 3D Effects - Drop Shadow
Apply the same settings you have been using. So click Ok.
Now back to your layers pallet -
Click on your Copy Of Raster 6 layer - follow the exact same steps that you followed for your original Raster 6 layer.
Including your Flood Fill, & tube steps.
Once you are done with your Copy Of Raster 6 layer - go back to your layers pallet - click on your Copy Of Raster 7 layer - apply a Drop Shadow to that just as you did to the original Raster 7 layer.
Now let's start adding our Elements -
Open your Flowers element - Copy & paste it as a new layer onto your template canvas.
Then re-size it to 80%.
Position it using your Move Tool to your liking.
Once you are happy with the placement, go to Adjust - click Sharpness - then click Sharpen
Now go to Effects - 3D Effects - then click Drop Shadow
*You will be using the same settings as you have been using through-out designing your template*
Then click Ok.
Now go to your layers pallet - right click on your Flowers layer - then click Duplicate - Now go to Image - click Flip Vertical- then click Image - then click Flip Horizontal, then position your duplicated Flower element to the top right corner of your template.
Now open your Lucky element - Copy & paste it as new layer onto your canvas - then re-size it to 40%. Using your Move Tool position it to your liking.
Then Adjust - Sharpness - Sharpen
Effects - 3D Effects - Drop Shadow (Same settings as before)
Open your Heart2 element - Copy & paste it as a new layer onto your template canvas - then re-size it to 40%. Using your Move Tool position your Heart2 element to your liking.
Adjust - Sharpness - Sharpen
Effects - 3D Effects - Drop Shadow
Now open your Ribbon3 element - Copy & paste it as a new layer onto your canvas - then using your Move Tool - position your Ribbon3 element to your liking.
Adjust - Sharpness - Sharpen
Effects - 3D Effects - Drop Shadow
Now go to your layers pallet - right click on your Ribbon3 layer - click Duplicate. Using your Move Tool position your duplicated Ribbon 3 element to your liking.
Now duplicate your Ribbon3 one more time & position that to your liking as well.
Now open your Tag 2 element - Copy & paste it as a new layer onto your template canvas - now re-size it to 40%. Use your Move Tool to position to your liking.
Adjust - Sharpness - Sharpen
Then go to Effects - 3D Effects - Drop Shadow (Same settings as before)
Now open your 4LeafClover element - Copy & paste it as a new layer onto your template canvas - then re-size it to 40%, then using your Move Tool position to your liking.
Adjust - Sharpness - Sharpen
Effects - 3D Effects - Drop Shadow (same settings as before)
Now go to your layers pallet - right click on your 4LeafClover layer - then click Duplicate. Then position your duplicated element to your liking as well.
Open your Bow2 element - Copy & paste it as a new layer onto your template canvas - then re-size it to 40% then re-size it again to 65%. Using your Move Tool again position to your liking.
Adjust - Sharpness - Sharpen
Effects - 3D Effects - Drop Shadow (same settings)
Open your Horseshoe element - Copy & paste it as a new layer onto your template canvas - then re-size it to 40%, then re-size it again to 50%. Using your Move Tool position it to your liking.
Adjust - Sharpness - Sharpen
Effects - 3D Effects - Drop Shadow
Now open your Beads element - Copy & paste it as a new layer onto your template canvas - then re-size it to 50%. Using your Move Tool position to your liking.
Adjust - Sharpness - Sharpen
Effects - 3D Effects - Drop Shadow
Now open your Button2 element - Copy & paste it as a new layer onto your template canvas - then re-size it to 50%. Using your Move Tool position it to your liking.
Adjust - Sharpness - Sharpen
Effects - 3D Effects - Drop Shadow
Open your Hat element - Copy & Paste it as a new layer onto your template canvas - then re-size it to 40%. Using your Move Tool position it to your liking.
Adjust - Sharpness - Sharpen
Effects - 3D Effects - Drop Shadow
Go to your layers pallet - right click on your Hat layer - then click Duplicate. Now use your Move Tool again & position your duplicated Hat element to your liking.
Open your Sparkles element - Copy & paste it as a new layer onto your template canvas - Using your Move Tool position to your liking.
Adjust - Sharpness - Sharpen
Do not apply drop shadow.
Lastly open your Sparkle element - Copy & paste it as a new layer onto your template canvas - then using your Move Tool position it where you would like it.
Adjust - Sharpness - Sharpen.
Now go to your layers pallet - right click on your Sparkle layer - then click Duplicate - use your Move Tool to position your duplicated Sparkle element to your liking.
Go back to your layers pallet - continue to duplicate your Sparkle layer & move each one to a different area on your tag.
Now add your name :
The settings I used are below :
Font : Halo Handletter
Size : 125 Pixels (You may want to adjust the size depending on the length of your name)
Background Color : #000000
Foreground Color - set to nul
If you would like you can add a gradient glow to your name - just use the same settings you used on your template layers - only change the top setting from 6.00 to 5.00
Now make sure that you add the copyright information & your license #.
Once you have everything the way you would like it on your new tag, go to your layers pallet - right click on any layer - then click Merge - then from the slide out menu click Merge Visible.
Now you may or may not need to re-size your tag - if you do re-size it, do one final Sharpen on it, just to keep it looking bright.
(Adjust - Sharpness - Sharpen)
Now all that is left is to save your tag & you have completed this tutorial!!♥
Thank-you for trying my tutorial, I would LOVE to see what your results are - if you could please send them to my email I would be honored to put it on my blog. :-)
You can email me @ ronneyprice@yahoo.com
Subscribe to:
Post Comments (Atom)
About Me

- DitzyDezigns
- New York, United States
- Hiya Everyone! My name is Ronney, I have 3 wonderful teenagers, and have been married to my husband for 20 years. I LOVE to design signatures, tags & avatars, I design with PSP, and have been designing for over 2 1/2 years. I will be not only designing signatures, tags & avatars but will also be writing & posting tutorials as well. I will also be making some templates to share with you all as well. So I hope you enjoy and can use everything I have available on my blog :-) If you ever try any of my tutorials,please send me your completed designs and I would love to showcase it here on my blog!
Labels
- Addictive Pleasures Tuts (35)
- Angel's Designz Tuts (10)
- Animated (26)
- Announcements (2)
- Awards (2)
- Beginner (17)
- Butterfly Blush Tuts (8)
- Cool Scraps Digital (2)
- Creative Intentionz (2)
- Creative Scraps By Crys (19)
- Ditzys Scrapkits (1)
- Forum Sets (1)
- FTU (6)
- Intermediate Level Tuts (3)
- Peekaboo Land (1)
- Peekaboo Land PTU (4)
- Peekaboo Land Tuts (1)
- Pimp My Tags With Scraps Tuts (14)
- PTU (131)
- Scappin Dollars Tuts (1)
- Scrappin Dollars Tuts (7)
- Scraps From The Heart Tuts (3)
- Scraps With Attitude (27)
- Tammy's Scraps (8)
- Updates (1)
- Wickedly Ditzy Scraps (1)





0 comments:
Post a Comment