♥Ditzy's TOU♥
All of the tutorials written by me are of my own Ditzy imagination.
Do NOT copy or alter them in ANY way.
Do NOT copy & paste the tutorials to any website, forum or group.
Do NOT claim them as your own.
If you would like to show or share my tutorial do so by using a link to bring your members to my blog. However if you do please send me a courtesy email so that I know my tutorials are being used according to my TOU. Also if you would please send me a link to where you will be posting my link.
If you have done any of my tutorials I would LOVE to see the outcome of what you have made, so please email me OR you can leave me a link in my shout box so that I can see what you have made and display it on my blog for others to enjoy as well.
Other than that please have fun,and I hope that you enjoy all my tutorials!
Email me @ DitzyDezigns@hotmail.com
Email Me
I would love to see what you have made using any of my tutorials, so please feel free to email me at the address below.
DitzyDezigns@hotmail.com
Add Me On Facebook
Pages
Powered by Blogger.
Thursday, March 8, 2012
♥Irish Luck (FTU)♥
**This tutorial was written & posted by DitzyDezigns**
***Any resemblance to any other tutorial is purely coincidental & completely unintentional!!!***
Here is what we will be making :
**You can click on the image to see it in its original size**
**You can click on the image to see it in its original size**
Supplies Needed :
Paint Shop Pro X4 (Any version should work)
Scrapkit : FTU Irish Luck @ Scraps By Crys
Plugins Used :
Eye Candy 4 Gradient Glow (Optional)
Font Used :
BorisBlack Bloxx (You can use any fat font you like)
Elements Used From Kit :
Element 1
Element27
Element 13
Element 24
Element 8
Element 11
Element 17
**Please note - I have included screen shots with all of my settings , you are welcome to use the same settings if you would like, or you can play around with them and get a better effect that you like more. The choice is always yours. If you are just beginning learning how to design signatures, and need more help, please do not hesitate to email me & I will answer any questions you may have.**
Lets Begin :
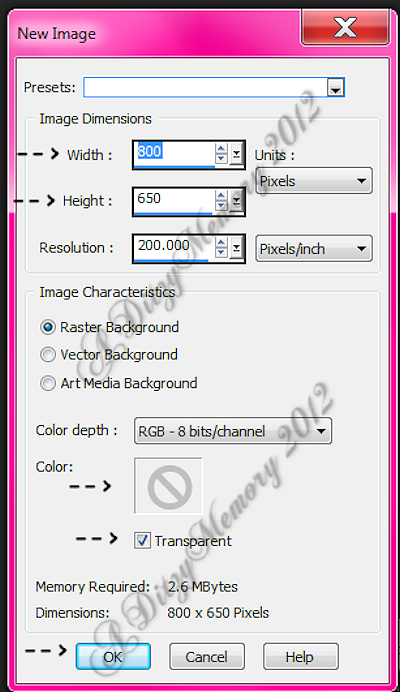
Start by going to File - then click New
I used a 800 x 650 transparent canvas. (Don't worry you will crop off any access canvas that you did not use, but this gives you plenty of room to work with.)
Once you click ok your new transparent canvas will open.
Now go to File & click Open -
Then go to where you have your scrapkit saved.
Find your Element 1 - then click on it - then click Open.
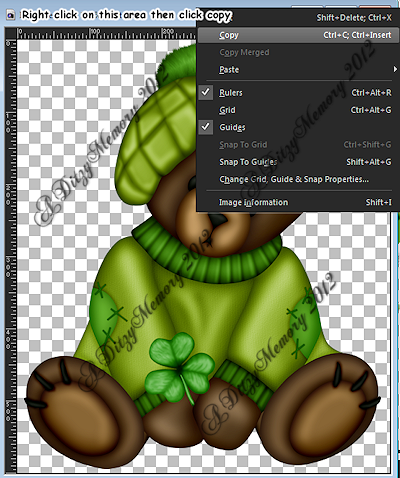
Once it opens - right click on the top bar of that canvas - then click Copy. (See screen shot below for location)
OR
You can just got to Image & click Copy -
Now go to your new transparent canvas - right click in the same area on that canvas - then click PASTE As New Layer.
OR
(You can go back to Image & click Paste As New Layer)
Which ever is easiest for you.:-)
Now your Element 1 (Bear) should be on your new transparent canvas.
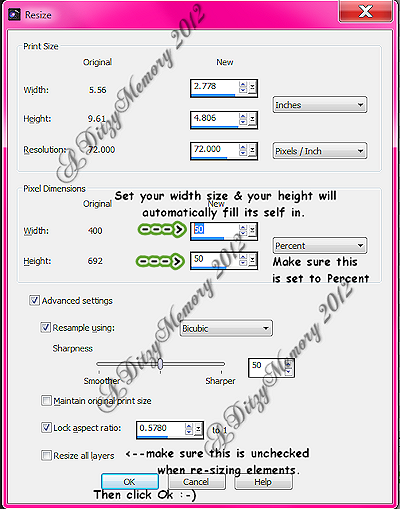
Now go to Image - click Resize , when that menu opens it should look like mine below.
Set your Width to 50% then make sure that your set to "Percent" & that the "Resize all layers" is UNchecked.
*Take note of the comments on my screen shot - they should help you*
Then click Ok.
Then go to Image again - click Resize - this time change your Width & Height to 70% & click Ok.
Now your Element 1 should appear smaller to you. :-)
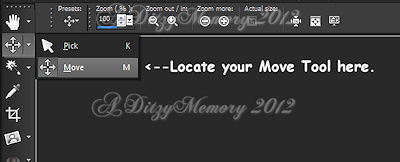
Now click on your Move Tool (See screen shot below for location of your Move Tool)
Now using your Move Tool - move your Element 1 (Bear) to the left side of your canvas.
Then go to Adjust - click Sharpness - then click Sharpen.
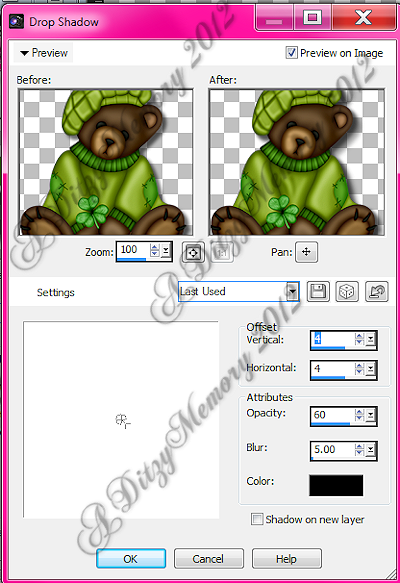
Now go to Effects - click 3D Effects - then click Drop Shadow
When that screen opens set your settings :
Then click Ok.
Now open your next element - which would be Element27 - Copy & paste it as a new layer onto your transparent canvas. (Use the screen shots above if needed.)
Now go to Image - click Resize - then re-size your Element 27 to 50%.
Now click on your Move Tool again & position your Element 27 to the left side of your transparent canvas.
Now go to your layers pallet (all the way over to the right of your psp.
Left click & HOLD on your Element 27 layer - then while still holding your left button down drag this layer down and place it below your Element 1 layer.
Now go to Adjust - click Sharpness - then click Sharpen.
Now go to Effects - click 3D Effects - then click Drop Shadow.
You are going to apply the exact same settings as you did for your Element 1 so all you have to do is click Ok.
Now open your Element 13 from your kit -
Copy & paste it as a new layer onto your transparent canvas - (revisit the screen shots above if you need to refresh your memory)
Now using your Move Tool again - position your Element 13 so that the left side of your Rainbow is covering your Element 1 (Bear) just a bit.
Go to your layers pallet - left click & HOLD on your Element 13 layer - now drag your Element 13 layer down so that it is under your Element 1 & Element 27 layers.
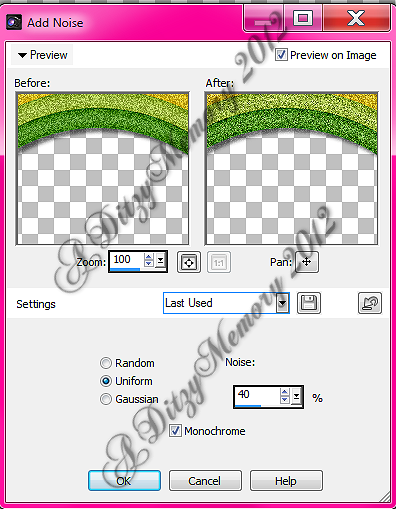
Now go to Adjust - click Add/Remove Noise - then click Add Noise from the slide out menu.
Set your settings - (You may use mine below if you would like)
Then click Ok
Now go to Adjust - click Sharpness - then click Sharpen.
Now go to Effects - click 3D Effects - then click Drop Shadow. (You will use the same settings as you have been using so just click Ok)
Go to File - click Open - then Open your Element 24 -
Copy & paste it as a new layer onto your transparent canvas -
Then go to Image - click Resize - then change your Width to 50%. (Your height will change automatically)
Now go to Image - click Flip Horizontal
Now click on your Move Tool (If you don't still have it selected.
Then move your Element 24 to the right side of your Element 13.
Go to Adjust - click Sharpness - then click Sharpen.
Now go to Effects - click 3D Effects - then click Drop Shadow.
You again will use the exact same settings you have been using to all you have to do now is click OK.
Now go to File - click Open - then open your Element 8
Copy & paste it as a new layer onto your transparent canvas -
Go to Image - click Resize - then set your Width to 40%. (Remember the Height setting will adjust its self.)
Now using your Move Tool position your Element 8 to the right end of Element 13 (Rainbow)
Adjust - click Sharpness - then click Sharpen
Effects - 3D Effects - Drop Shadow (Exact same settings, so just click Ok)
Now go to your layers pallet -
Click on the very bottom layer in your layers pallet .
Now go to File - click Open, then open your Element 11.
Copy & paste it as a new layer onto your transparent canvas.
Now go to Image - click Resize - set your Width to 60%.
Now using your Move Tool position your Element 11 to the left side of your Rainbow element.
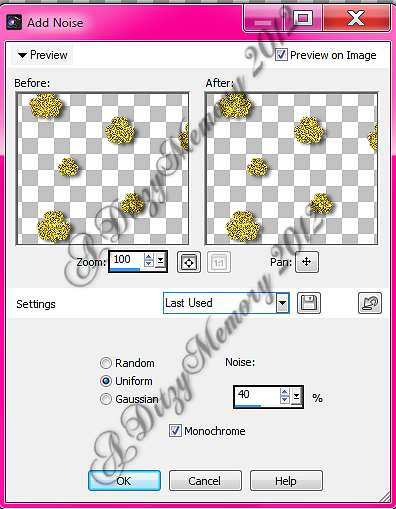
Go to Adjust - click Add/Remove Noise - then click Add Noise
Then click Ok.
Now go to Adjust - click Sharpness - then click Sharpen
Effects - 3D Effects - Drop Shadow
Again you will be using the exact same settings, so all you have to do is click Ok.
Now go to your layers pallet - right click on your Element 11 layer - then click Duplicate.
Then go to Image - click Flip Horizontal.
Now use your Move Tool to position your Duplicated Element 11 to the right side of your transparent canvas.
Go to File - click Open - now open your Element 17.
Copy & Paste it as a new layer onto your transparent canvas.
Using your Move Tool position your Element 17 to the right side of your transparent canvas.
Go to Adjust - click Sharpness - then click Sharpen
Effects - 3D Effects - then click Drop Shadow. (Use the same settings, so just click Ok.)
Go to your layers pallet - Left click & HOLD on your Element 17 layer.
Then drag that layer down so it is below your Element 11 layers. (Both of them)
Now still in your layers pallet - right click on your Element 17 layer - then click Duplicate.
Go to Image & click Flip Horizontal.
Now use your Move Tool to position your Duplicate Element 17 to the left side of your transparent canvas.
Now it is time to add your name.
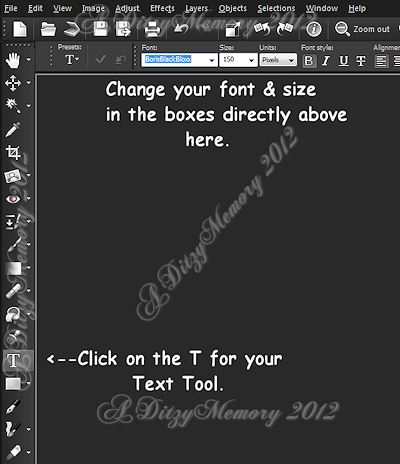
Now click on your Text Tool - (Screen shot below shows you where to locate that tool.)
Once you click on your text tool - set your font - & size.
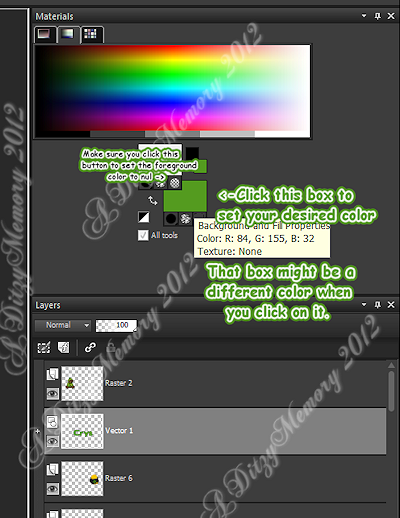
Then go to your Materials Pallet -(Screen shot below shows you what that looks like)
Once you click on your Background Color box (the bottom one as shown above)
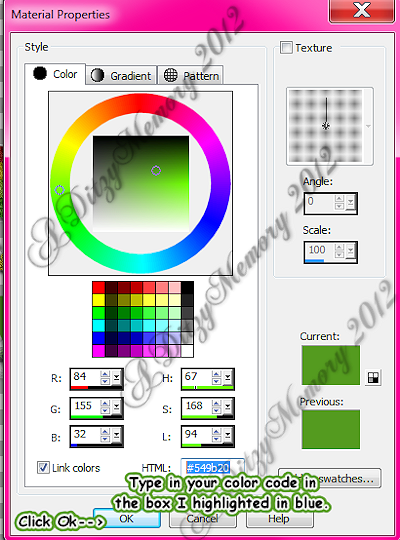
The following window will then open :
This is where you either click on the color you would like, or if you know your color code you type that in the box that I highlighted in blue.
The color code for the color I used in my sample above is..... #549b20
Then click Ok.
Now once you have all of your font settings & colors the way you want them -
Click any where on your canvas.
Then type out the name you would like.
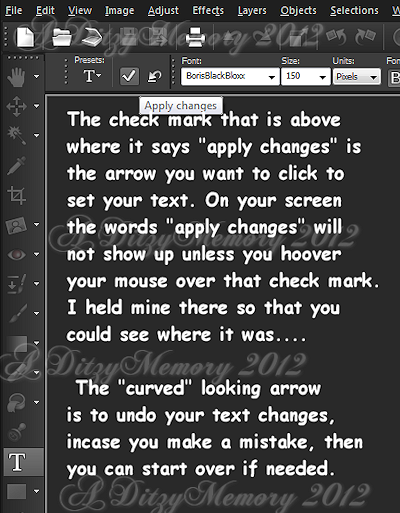
When happy with it, click the accept check mark. (See screenshot below to see location of check mark.)
Now using your Move Tool position your Name so that it is between your Bear & Pot Of Gold element.
Then go to your layers pallet - right click on your Name layer - then click Convert To Raster Layer.
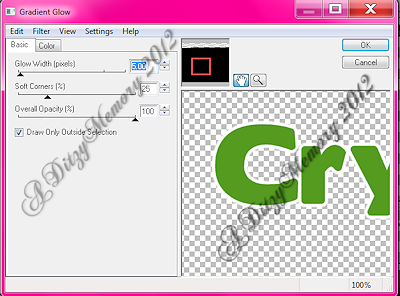
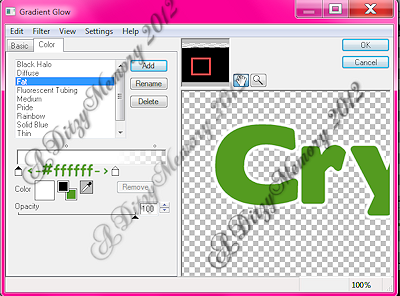
Then go to Effects - click Plugins - then from the slide out menu click Eye Candy 4 - then from the next slide out menu click Gradient Glow.
The screen shots below show you the settings that I used. Again you are welcome to use the same if you would like. Also be sure to see both screen shots so that you set the settings on your Basic tab & your Color tab.
Before click Ok - click on your Color Tab
Now click OK.
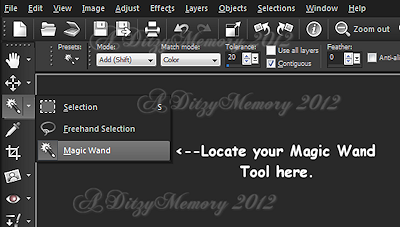
Then in your Tools - click on your Magic Wand Tool - The screen shot below shows you the location of your Magic Wand Tool....
If you click the arrow you will then see the little menu that is on my screen shot.
Select (click on) your Magic Wand.
Now go to your canvas - click inside EACH letter in your name. Remember if you have any i's that you also click in the dot .
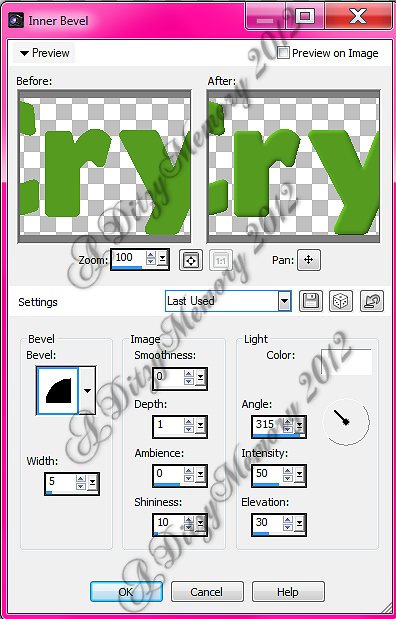
Now once all letters are selected - go to Effects - click 3D Effects - then click Inner Bevel -
*(Screen shot below shows you my settings, which you are welcome to use if you would like)*
Then click Ok.
Now go to Selections - click Select None.
Now still on your Name layer -
Go to Effects - click 3D Effects - then click Drop Shadow.
You are going to use the same settings as you have used through-out this tutorial.
Click Ok.
Now once you are happy with the placing of your elements & name
You will want to add the fact that you made the tag.
So click on your text tool, then find a small font, Pixelette works good for this, set your size to between 10 -13 pixels. Then click on your canvas - type out what you would like to say, like "Tag Made By ------Your name" or what you would like."
I tag my work with the phrase "A Ditzy Memory 2012" but please don't use that because you aren't me & probably aren't ditzy like me either lol...So think of something original that suits you :-)
Once everything is in place -
Go to your layers pallet -
Right click on any layer - then click Merge - then from the slide out menu click Merge Visible.
This will convert all your layers into one single layer.
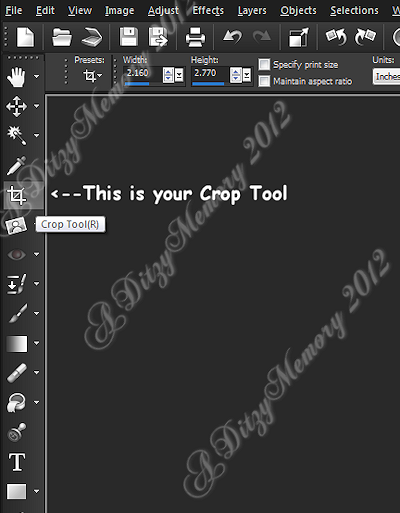
Now you will want to Crop off any access canvas that you did not use.
So go to your Tool pallet & click on your Crop tool - The screen shot below shows you where that is located & what the icon looks like...
Once you have your canvas cropped, you may or may not want to resize your signature as a whole.
If you should choose to resize it -
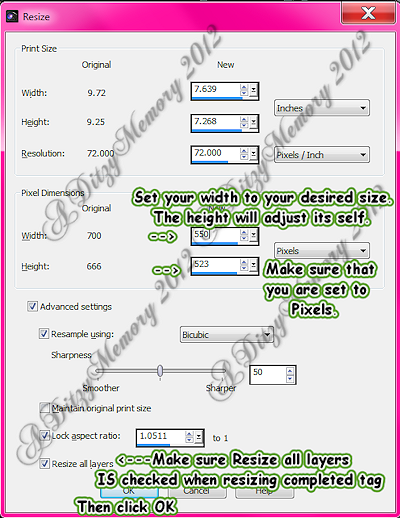
Go to Image - click Resize
Now once this window opens you will make some changes compared to what you used to resize your elements.
Screen shot below shows you where to make those changes :-)
Once I resize a completed tag to a smaller size, I always do one more sharpen just to make it look nice & clear. Sometimes when you resize them smaller they tend to get a little blurry.
So if you would like to do this as well, do it the same way I had you do it with the elements.
Go to Adjust - click Sharpness - then click Sharpen.
Now all that is left is to save your tag.
Go to File - click Save As - then when your window opens, locate where you would like your tag to save on your computer - then click Save.
You have now completed this tutorial. If you have any questions please do not hesitate to email me.
Once you complete any tutorial posted on my blog I would love it if you would email me a copy of your design so that I may see it & display it on my blog as well :-)
♥
Subscribe to:
Post Comments (Atom)
About Me

- DitzyDezigns
- New York, United States
- Hiya Everyone! My name is Ronney, I have 3 wonderful teenagers, and have been married to my husband for 20 years. I LOVE to design signatures, tags & avatars, I design with PSP, and have been designing for over 2 1/2 years. I will be not only designing signatures, tags & avatars but will also be writing & posting tutorials as well. I will also be making some templates to share with you all as well. So I hope you enjoy and can use everything I have available on my blog :-) If you ever try any of my tutorials,please send me your completed designs and I would love to showcase it here on my blog!
Labels
- Addictive Pleasures Tuts (35)
- Angel's Designz Tuts (10)
- Animated (26)
- Announcements (2)
- Awards (2)
- Beginner (17)
- Butterfly Blush Tuts (8)
- Cool Scraps Digital (2)
- Creative Intentionz (2)
- Creative Scraps By Crys (19)
- Ditzys Scrapkits (1)
- Forum Sets (1)
- FTU (6)
- Intermediate Level Tuts (3)
- Peekaboo Land (1)
- Peekaboo Land PTU (4)
- Peekaboo Land Tuts (1)
- Pimp My Tags With Scraps Tuts (14)
- PTU (131)
- Scappin Dollars Tuts (1)
- Scrappin Dollars Tuts (7)
- Scraps From The Heart Tuts (3)
- Scraps With Attitude (27)
- Tammy's Scraps (8)
- Updates (1)
- Wickedly Ditzy Scraps (1)







0 comments:
Post a Comment