Don't Be A Pirate

My Blinkies

Add Me On Facebook
Protected


Blogs I Stalk


Awards :-)


Find Me At

Favorite Stamps


Monday, June 20, 2011
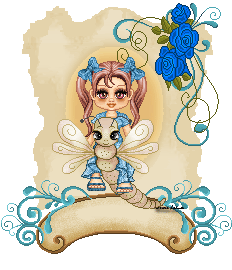
♥Tequila PTU♥
**This tutorial was written & posted by DitzyDezigns on June 20th 2011**
***Any resemblance to any other tutorial is purely coincidental & completely unintentional!!***
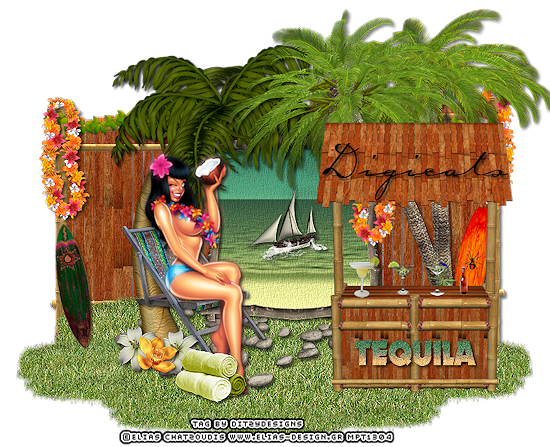
Supplies Needed :
Paint Shop Pro X2 (Any version should work)
Tube of choice - I used the amazing work of Elias Chatzoudis. I purchased my tube when he was at MPT, but you can now purchase his work at PTE.
Scrapkit - Tequila By Digicats @ Butterfly Blush Designs
Elements Used :
Lei
Cervesa
TikiBar
Tequila
Flowers 03 & 04
Pebbles
Sail Boat
Towels
Surf Boards
Palm Tree 01 & 02
Panel
Frame 03
Leaves
Deck Chair
Drink 01 & 02
Margarita
Paper 6
Lets Being :
Start by opening a new 800 X 650 transparent canvas. (Don't worry we will crop it later.)
Open your Panel element - Copy & paste it as a new layer onto your canvas ,then re-size it to 50%. Position in the center of your canvas.
Go to Adjust, click Sharpness then click Sharpen.
Go to Effects, click 3D Effects, then click Drop Shadow. Set your settings to your liking & click ok.
Open Frame 5 - Copy & paste it as a new layer onto your canvas ,then re-size it to 65%. Position your Frame center on your Panel element.
Activate your magic wand, then click inside your frame.
Go to Selections, click Modify, then click Expand, set the number of pixels to 6 & click Ok.
Open your Paper 06 - copy & paste it as a new layer onto your canvas ,then re-size it to 65%.
Now position your paper so that the sand, water & sky are where you like it within your frame.
Go back to Selections & click Invert, then on your keyboard press your delete key 1 time.
Go back to Selections & click Select None.
Now in your layers pallet, move your Paper 06 layer below your frame 5 layer.
Now click on your Frame 5 layer & Sharpen, then apply a drop shadow.
Open your Leaves element - Copy & paste it as a new layer onto your canvas ,then re-size it to 30%.
Position your leaves element along the top left of your Panel element . Go to your layers pallet & right click on your Leaves layer, then click Duplicate. Now use your move tool & position your duplicated Leaves element to the right side of your Panel.
Now sharpen & apply a drop shadow to both of your Leaves elements.
Go to your layers pallet & make a new Raster Layer.
Click on your tube tool, find your grass tube that should of came with your PSP. Now left click on your canvas & place your grass where you would like it. You can play around with the size & the location until you are happy with it.
Open your Palm Tree 02 element - Copy & paste it as a new layer onto your canvas ,then re-size it to 65%. Position it to the right end of your frame. Make sure that in your layers pallet that your Palm Tree 02 layer is below your frame & paper layer.
Now right click on your Palm Tree 02 layer & click Duplicate. Now in your layers pallet, move your duplicated Palm Tree 02 layer above your frame & paper layers.
On your duplicated Palm Tree layer, go to Adjust, click Sharpness then click Sharpen.
Then go to your bottom Palm Tree 02 layer & apply a drop shadow.
Open your Deck Chair element - Copy & paste it as a new layer onto your canvas ,then re-size it to 40%. Position it to the left side of your frame.
Sharpen & apply a drop shadow.
Open the tube of your choice, copy & paste it as a new layer. (I chose a tube that looked to be in the sitting pose, to make it easier to place in the chair.) If needed re-size your tube.
Now position your tube so that she appears to be sitting in the chair.
Go to your layers pallet, right click on your Tube layer & click Duplicate. On the duplicated tube layer go to Adjust, click Blur, then click Gaussian Blur, set it to 5.00 & click Ok.
Now click on your original tube layer & apply a drop shadow.
Open your Palm Tree 01 element - Copy & paste it as a new layer onto your canvas ,then re-size it to 70%. Position it to the right side of your frame.
Sharpen & apply a drop shadow.
Open your Surf Board element - before you copy & paste it, activate your crop tool & crop off all the boards except for the first one. Now copy & paste that one surfboard as a new layer onto your canvas ,then re-size to a size of your liking,position, then sharpen & apply a drop shadow.
Now go back to your Surfboard element canvas, and click your undo button 1 time. Now all 4 surfboards should be visible. Now crop off all the surfboards except for the 2nd board. (or one of your choosing).
Copy & paste it as a new layer onto your canvas, re-size to your liking, and position as desired.
Open your Towels element - Copy & paste it as a new layer onto your canvas, then re-size it to 30%. Position your Towels element to the side of your deck chair element.
Sharpen & apply a drop shadow.
Open your Sailboat element - Copy & paste it as a new layer onto your canvas, then re-size it to 20%. Now position your Sailboat inside your frame, so that it appears to be on the water.
Sharpen & apply a slight drop shadow.
Open your Pebbles element - Copy & paste it as a new layer onto your canvas ,then re-size it to 80%. Position the Pebble element to your liking.
Sharpen & apply a slight drop shadow.
Open your Flower 04 element - Copy & paste it as a new layer onto your canvas, then re-size it to 15%. Position it to your liking.
Sharpen & apply a drop shadow.
Go to your layers pallet, right click on your Flower 04 layer & click Duplicate. Position to your liking.
Open your Flower 03 element - Copy & paste it as a new layer onto your canvas, then re-size it to 15%. Now position it in the middle of your two Flower 04 elements.
Sharpen & apply a drop shadow.
Open your Tiki Bar element - Copy & paste it as a new layer onto your canvas, then re-size it to 50%. Position it to the right side of your frame.
Sharpen & apply a drop shadow.
Open your Tequila element - Copy & paste it as a new layer onto your canvas ,then re-size it to 30%. Position it where you would like it.
Sharpen & apply a drop shadow.
Open your Cervesa element - Copy & paste it as a new layer onto your canvas, then re-size it to 10%. Position it on your Tiki Bar element .
Sharpen & apply a slight drop shadow.
Open your Drink 01 element - Copy & paste it as a new layer onto your canvas, then re-size it to 10%. Position it on your Tiki bar.
Sharpen & apply a slight drop shadow.
Open your Drink 02 element - follow the same steps you did for your Drink 01 element.
Open your Margarita element - follow the same steps as you did for your Drink 01 & Drink 02 elements.
Open your Lei element - Copy & paste it as a new layer onto your canvas, then re-size it to 30%.
Go to Image, then click Free Rotate, set to Left 90.00 & click Ok.
Position to the left end of your Panel element.
Go to your layers pallet, right click on your Lei layer, click Duplicate.
Now in your layers pallet, move your Duplicated Lei layer below your Panel layer.
Activate your eraser tool, erase part of the Lei element so that it appears to be hanging on your Panels post.
Now add your name.
Font I used is called :
Carpenter Script ES
Size : 80 Pixels
Color : #000000 (Black)
Add your copyright & credit information.
Once you are happy with the placement of your elements & text, go to your layers pallet & right click on any layer, then click Merge ,then click Merge Visible.
Now crop your tag.
Once your tag is cropped you may want to re-size it. Once your tag is re-sized you can sharpen it one more time.
Now all that is left is to save your tag as PNG file & you have completed this tutorial!♥
Subscribe to:
Post Comments (Atom)
About Me
- DitzyDezigns
- New York, United States
- Hiya Everyone! My name is Ronney, I have 3 wonderful teenagers, and have been married to my husband for 20 years. I LOVE to design signatures, tags & avatars, I design with PSP, and have been designing for over 2 1/2 years. I will be not only designing signatures, tags & avatars but will also be writing & posting tutorials as well. I will also be making some templates to share with you all as well. So I hope you enjoy and can use everything I have available on my blog :-) If you ever try any of my tutorials,please send me your completed designs and I would love to showcase it here on my blog!
♥I CT For♥


Blog Hop

Today's Date

Favorite Stores

♥Forums♥


My Pixels


♥My Avatars♥


0 comments:
Post a Comment