♥Ditzy's TOU♥
All of the tutorials written by me are of my own Ditzy imagination.
Do NOT copy or alter them in ANY way.
Do NOT copy & paste the tutorials to any website, forum or group.
Do NOT claim them as your own.
If you would like to show or share my tutorial do so by using a link to bring your members to my blog. However if you do please send me a courtesy email so that I know my tutorials are being used according to my TOU. Also if you would please send me a link to where you will be posting my link.
If you have done any of my tutorials I would LOVE to see the outcome of what you have made, so please email me OR you can leave me a link in my shout box so that I can see what you have made and display it on my blog for others to enjoy as well.
Other than that please have fun,and I hope that you enjoy all my tutorials!
Email me @ DitzyDezigns@hotmail.com
Email Me
I would love to see what you have made using any of my tutorials, so please feel free to email me at the address below.
DitzyDezigns@hotmail.com
Add Me On Facebook
Blog Archive
-
▼
2011
(152)
-
▼
June
(25)
- ♦Miss Independence Set PTU♦
- ♥Animated Elias Avatar PTU♥
- ♥Black Rose Signature PTU♥
- ♥I'M Back!!♥
- ♥Happy Independence Day PTU♥
- ♥Beautiful Graduate PTU♥
- ♥A Loving Mother PTU♥
- ♥Tequila PTU♥
- ♥Dark Secrets PTU♥
- ♥CandyGirl PTU♥
- ♥Sorry♥
- ♥USA Girl PTU♥
- ♥Sexy Lil Devil PTU♥
- ♥Beach Daze PTU♥
- ♥Memories Floating By PTU♥
- ♥Summers Breeze PTU♥
- ♥Silly Little Hippos PTU♥
- ♥Toxic Candy PTU♥
- ♥My Wishing Well FTU♥
- ♥Congrats Class 2011 PTU♥
- ♥Punks Is Not Dead PTU♥
- ♥PSP It's My Drug PTU♥
- ♥PSP Addict PTU♥
- Blog Award!! YAY!!
- ♥Best Summer Ever PTU♥
-
▼
June
(25)
Pages
Powered by Blogger.
Sunday, June 19, 2011
♥CandyGirl PTU♥
**This tutorial was written & posted on June 19th 2011**
***Any resemblance to any other tutorial is purely coincidental & completely unintentional!!***
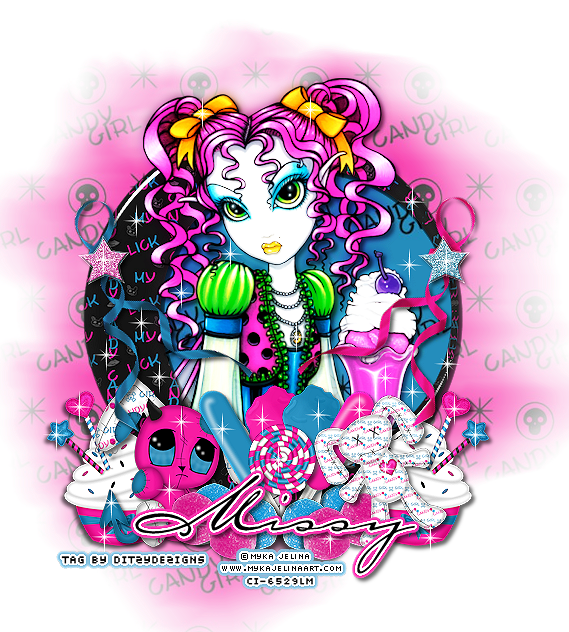
Here is what we will be making :
Supplies Needed :
Paint Shop Pro X2 (Any version should work)
Tube of choice : I used the amazing work of Myka Jelina, I purchased her work when she was at CILM, she is now selling her work independently HERE
Scrapkit : CandyGirl By Missy @ PMTWS
Mask Of Choice
Plugins Used :
Eye Candy 5 Impact - Glass (Optional)
Eye Candy 4 Gradient Glow (Optional)
Elements Used :
59,58,60,57,24,10,11,8,3,32,7,36,35,4,21
Papers 4 & 5
Lets Begin :
Start by opening a new 800 X 650 transparent canvas.
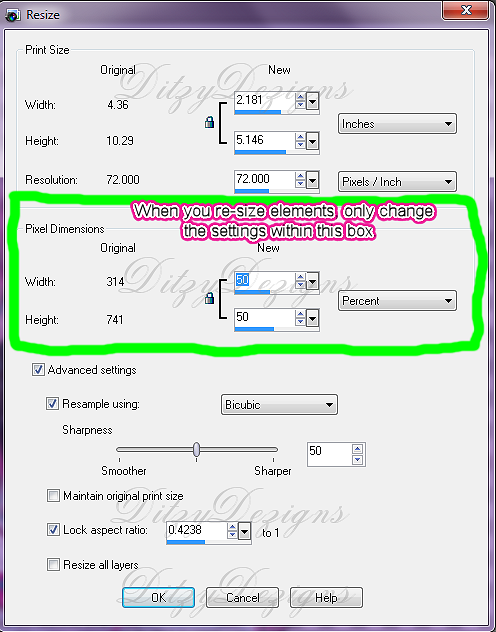
Open Element 32 - Copy & paste it as a new layer onto your canvas ,re-size it to 50%. (To re-size your element, go to Image, click Re-size, then the screen below will open. Change your settings accordingly.)
Click Ok
Now using your move tool, center your frame (element 32) on your canvas.
Now activate your magic wand tool - Click inside your frame. (element 32)
Go to Selections - Click Modify, then click Expand - Set to 12 & click Ok.
Open Paper_5 - Copy & paste it as a new layer onto your canvas, then re-size it to 80%. Now go to Selections & click Invert. Then on your keyboard press your delete key 1 time.
Go to Selections & click Select None.
In your layers pallet, move your Paper_5 layer below your Element 32 layer.
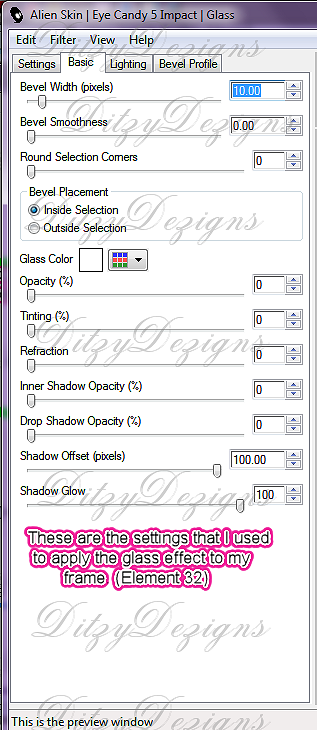
Now click on your Element 32 layer & go to Effects - Click Plugins - then click Eye Candy 5 Impact - Glass
You can use my settings below or your own :
Click Ok.
Now go to Adjust, click Sharpness then click Sharpen.
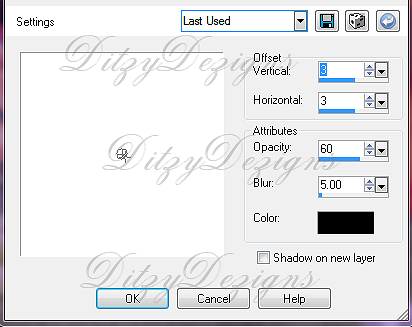
Go to Effects - 3D Effects - Drop Shadow - (You can use your own settings or mine below)
Click Ok.
Open your tube of choice - Copy & paste it as a new layer onto your canvas, then re-size if needed. (I did not need to re-size my tube)
Center your tube with your frame. You will have parts of your tube that overlap your frame as well. That is ok as we are going to fix it.
Now once your tube is centered with your frame, go to your layers pallet & right click on your tube layer, then move your duplicated tube layer below your frame layer but keeping it above the paper layer.
Now in your layers pallet, click on the top tube layer. (the original one)
Activate your Eraser Tool - begin erasing the parts of your tube that overlap your frame only at the bottom.
Once you have erased the parts from the top layer, you must click on the bottom tube layer (the one under your frame layer) & erase the same parts as you did for the top tube layer.
Once you are happy with your tube, go to your Original tube layer. (The one on the top of your layers pallet) right click, then click Duplicate. Now go to Adjust, click Blur, then Gaussian Blur, set to 5.00 & click Ok.
Now change your Blend Mode to Overlay.
Then on your 3rd tube layer down, apply the same drop shadow that you did for your frame.
Open Element 3 - Copy & paste it as a new layer, then re-size it to 20%. Now position your Element 3 to the left side of your frame.
Sharpen & apply a drop shadow.
Open Element 21 - Copy & Paste it as a new layer onto your canvas ,then re-size it to 25%. Position this element to the left of your Element 3 (cupcake)
Sharpen & apply a drop shadow.
Open Element 35 - Copy & paste it as a new layer onto your canvas ,then re-size it to 20% & position it to your liking.
Sharpen & apply a drop shadow.
Open Element 36 - Copy & paste it as a new layer onto your canvas ,then re-size it to 20%. Position it nexgt to Element 35.
Sharpen & apply a drop shadow.
In your layers pallet, right click on your Element 36 layer, then click Merge, then click Merge Down.
Now right click on your merged layer & click Duplicate. Go to Image & click Mirror.
Adjust the position if needed.
Open Element 40 - Copy & paste it as a new layer onto your canvas ,then re-size it to 20%.
Position as desired .
Sharpen & apply a drop shadow.
Open Element 11 - Copy & paste it as a new layer onto your canvas, Then re-size it to 20%.
Position to your liking.
Sharpen & apply a drop shadow.
Open Element 7 - Copy & paste it as a new layer onto your canvas, then re-size it to 20%. Go to Image, click Free Rotate set to Right 30.00 & click Ok.
Position to your liking.
Sharpen & apply a drop shadow.
Open Element 8 - Copy & paste it as a new layer onto your canvas, then re-size it to 20%. Go to Image, click Free Rotate set to Left 30.00 & click Ok.
Position to your liking.
Sharpen & apply a drop shadow.
In your layers pallet, right click on your duplicated merged layer (the gumdrops) & click Duplicate. Then duplicate it 2 more times, Position where they are needed to fill in gaps.
Open Element 24 - Copy & paste it as a new layer onto your canvas ,then re-size it to 15%. Position to your liking.
Sharpen & apply a drop shadow.
Open Element 57 - Copy & paste it as a new layer onto your canvas, then re-size it to 30%. Go to Image, click Free Rotate set to Left 30.00 & click Ok.
Position on the left side of your frame (element 32)
Sharpen & apply a drop shadow.
Open Element 58 - Copy & paste it as a new layer onto your canvas ,then re-size it to 30%.
Image - Free Rotate set to Right 30.00 & click Ok.
Position on the left side of your frame.
Sharpen & apply a drop shadow.
Open Element 59 - Copy & paste as a new layer onto your canvas ,then re-size to 10%. Position to the left side & place on Element 58.
Sharpen & apply a drop shadow.
Open Element 60 - Follow the same step only this time position it to the right on Element 57.
Now make a new raster layer.
Use your Sparkles brush & place Sparkles around on your tag.
In your layers pallet, click on the very last layer.
Open Paper 4 - Copy & paste it as a new layer onto your canvas ,then re-size it to 80%.
Go to Layers, click Load/Save Mask, then click Load Mask From Disk. Now select a mask of choice.
Click Load.
In your layers pallet, right click on your mask layer, then click Merge, then click Merge Group.
Now re-size your mask layer if needed.
Activate your text tool, set your font, size & color.
Font : Carpenter Script ES
Size : 80 Pixels
Color : #000000 (Black)
Type out your name & click Apply.
Position your name to your liking.
Go to your layers pallet, right click on your name layer & click Convert To Raster Layer.
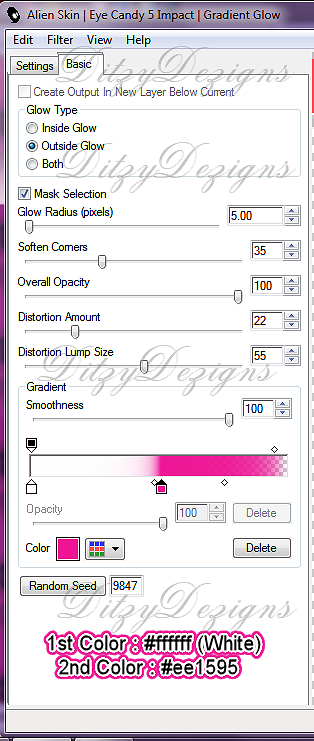
Go to Effects, click Plugins, then click Eye Candy 5 Impact - Gradient Glow.
Again you can either use my settings below or your own :
Click Ok.
Now apply a drop shadow to your name.
Add your copyright & credit information in a small pixel font.
I used Pixelette
Size : 12
Color : #000000 (Black)
Once you are happy with the placement of all your elements & texts, go to your layers pallet, right click on any layer & click Merge, then click Merge Visible .
Now activate your crop tool & crop off any access canvas that you did not use.
Now re-size your tag.
Then go to Adjust, click Sharpness, then click Sharpen.
Save your tag as a PNG file & you have completed this tutorial!!♥
Subscribe to:
Post Comments (Atom)
About Me

- DitzyDezigns
- New York, United States
- Hiya Everyone! My name is Ronney, I have 3 wonderful teenagers, and have been married to my husband for 20 years. I LOVE to design signatures, tags & avatars, I design with PSP, and have been designing for over 2 1/2 years. I will be not only designing signatures, tags & avatars but will also be writing & posting tutorials as well. I will also be making some templates to share with you all as well. So I hope you enjoy and can use everything I have available on my blog :-) If you ever try any of my tutorials,please send me your completed designs and I would love to showcase it here on my blog!
Labels
- Addictive Pleasures Tuts (35)
- Angel's Designz Tuts (10)
- Animated (26)
- Announcements (2)
- Awards (2)
- Beginner (17)
- Butterfly Blush Tuts (8)
- Cool Scraps Digital (2)
- Creative Intentionz (2)
- Creative Scraps By Crys (19)
- Ditzys Scrapkits (1)
- Forum Sets (1)
- FTU (6)
- Intermediate Level Tuts (3)
- Peekaboo Land (1)
- Peekaboo Land PTU (4)
- Peekaboo Land Tuts (1)
- Pimp My Tags With Scraps Tuts (14)
- PTU (131)
- Scappin Dollars Tuts (1)
- Scrappin Dollars Tuts (7)
- Scraps From The Heart Tuts (3)
- Scraps With Attitude (27)
- Tammy's Scraps (8)
- Updates (1)
- Wickedly Ditzy Scraps (1)




0 comments:
Post a Comment