♥Ditzy's TOU♥
All of the tutorials written by me are of my own Ditzy imagination.
Do NOT copy or alter them in ANY way.
Do NOT copy & paste the tutorials to any website, forum or group.
Do NOT claim them as your own.
If you would like to show or share my tutorial do so by using a link to bring your members to my blog. However if you do please send me a courtesy email so that I know my tutorials are being used according to my TOU. Also if you would please send me a link to where you will be posting my link.
If you have done any of my tutorials I would LOVE to see the outcome of what you have made, so please email me OR you can leave me a link in my shout box so that I can see what you have made and display it on my blog for others to enjoy as well.
Other than that please have fun,and I hope that you enjoy all my tutorials!
Email me @ DitzyDezigns@hotmail.com
Email Me
I would love to see what you have made using any of my tutorials, so please feel free to email me at the address below.
DitzyDezigns@hotmail.com
Add Me On Facebook
Blog Archive
-
▼
2011
(152)
-
▼
June
(25)
- ♦Miss Independence Set PTU♦
- ♥Animated Elias Avatar PTU♥
- ♥Black Rose Signature PTU♥
- ♥I'M Back!!♥
- ♥Happy Independence Day PTU♥
- ♥Beautiful Graduate PTU♥
- ♥A Loving Mother PTU♥
- ♥Tequila PTU♥
- ♥Dark Secrets PTU♥
- ♥CandyGirl PTU♥
- ♥Sorry♥
- ♥USA Girl PTU♥
- ♥Sexy Lil Devil PTU♥
- ♥Beach Daze PTU♥
- ♥Memories Floating By PTU♥
- ♥Summers Breeze PTU♥
- ♥Silly Little Hippos PTU♥
- ♥Toxic Candy PTU♥
- ♥My Wishing Well FTU♥
- ♥Congrats Class 2011 PTU♥
- ♥Punks Is Not Dead PTU♥
- ♥PSP It's My Drug PTU♥
- ♥PSP Addict PTU♥
- Blog Award!! YAY!!
- ♥Best Summer Ever PTU♥
-
▼
June
(25)
Pages
Powered by Blogger.
Sunday, June 5, 2011
♥My Wishing Well FTU♥
**This tutorial was written & posted on June 5th 2011**
This tutorial was written for those who are just beginning to work with Paint Shop Pro. If you have any questions or need any help, please do not hesitate to contact me & I will be glad to help you. You can email me at the address on the left side. :-)
Supplies Needed :
Paint Shop Pro X2 (Any version should work)
Scrapkit - I'm Like A Bird Part.01 FTU @ Digital Crea (Yes it is in a scrapkit store, however it is FREE, so all you have to do is make an account & then you can download the kit for free with no purchase necessary :-)
Plugins Used (ALL OPTIONAL)
(I personally have not tested these links, I just googled then & this is what came up.Please make sure you read before you download anything.)
Eye Candy 5 Impact - Glass (Free Download)
Eye Candy 4000 - Gradient Glow (Free Download)
Elements Used :
(Please note that these elements are not listed in any specific order, however if you would like to open all of the needed elements at one time so that you don't have to keep going to your folder every time you need a new elements, just click your yellow folder at the top fo your psp, then when the menu opens, click on the first element you need to open, now before you click the next element, press & hold down your Ctrl key while you click each remaining element that you need. Then once all of your elements that you need to use for this siggy are all selected, then click Open. Now each element will open on right after the other :-)
2, 07, 18, 4, 11, 12 & 1
Lets Begin :
Start by going to the top of your Paint Shop Pro (psp) , then click on the White piece of paper :
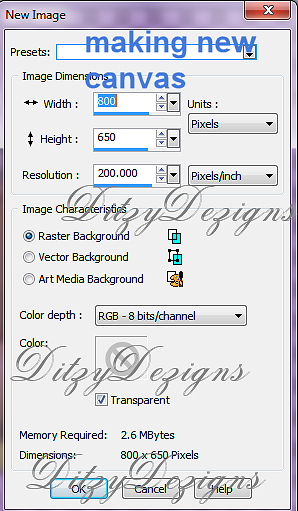
Now this New Image menu will open :
Click Ok
Now go to the top of your psp & click on the yellow folder icon :
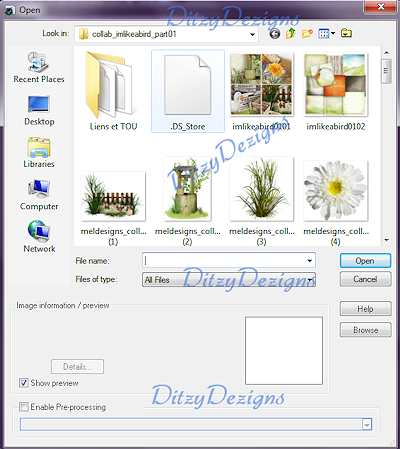
Now this window will open (you will have to go to where ever it is that you saved your FTU kit at)
Now click on the first element you need which is Element 2. Then click Open
Click Ok.
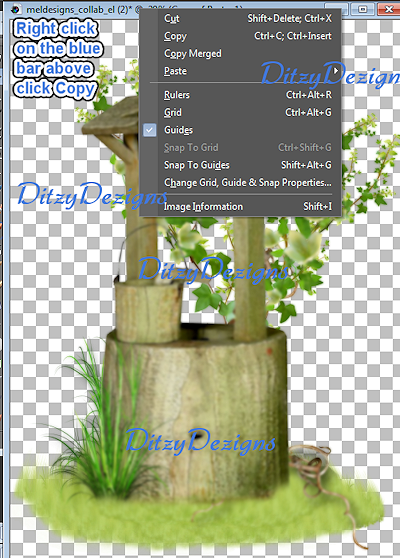
Now right click on the blue bar on your element canvas & click Copy :
Now go to your blank canvas, Right click on the blue area & click Paste - Then from the slide out menu click Paste As New Layer -
Now you will see your element pasted on your blank canvas.
Now go to Image & click ReSize
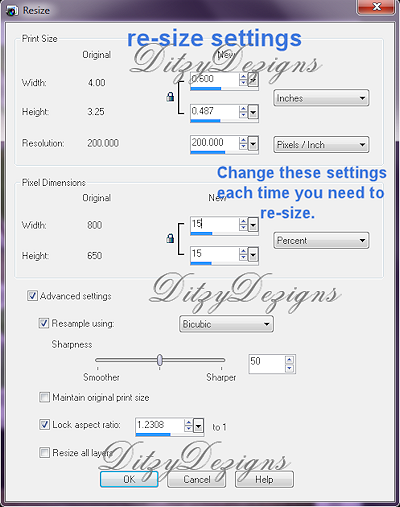
Now this menu will open, You want to re-size your element 2 to 15%
Now click Ok.
Use your move tool & move your Element 2 to the left side of your canvas.
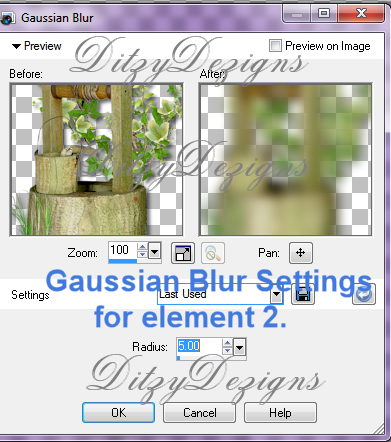
Now while still on your duplicated layer, got o Adjust, click Blur, then click Gaussian Blur :
Set your Radius to 5.00 & Click Ok.
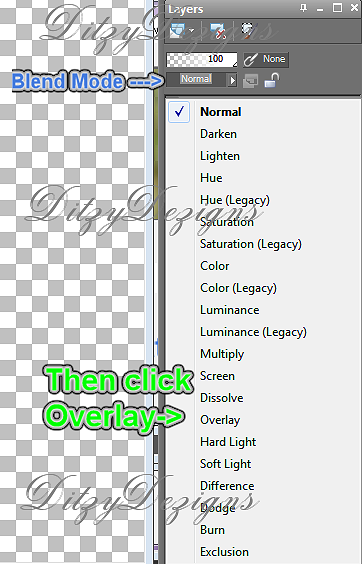
Now go back to your layers pallet, make sure you are still on your duplicated Element 2 layer, & change the Blend Mode to Overlay. (Screen shot below shows location)
Click where it says "Normal" then a drop down menu will appear, then click "Overlay"
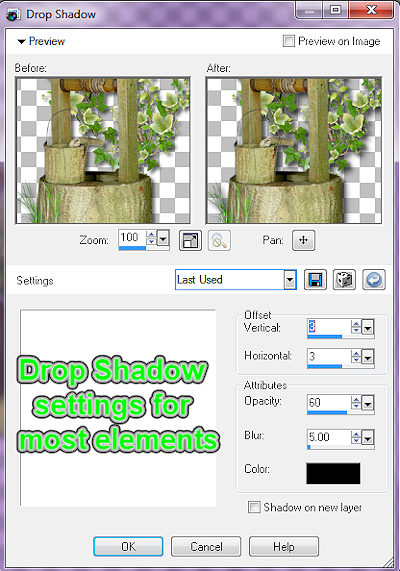
Now in your layers pallet, click on your original Element 2 layer, go to Effects, click 3D Effects, then click Drop Shadow. Apply the settings below or play around with the settings & see what you like.
Now click Ok.
(These drop shadow settings are the settings I will use through out the whole tutorial, except where stated otherwise. So when you see "Apply Drop Shadow" then just use the same settings you used with this element :-)
Go back to your layers pallet & click on the very top layer,
Now go over to your tools, and click on your Text Tool, Set your Font, Size & Color :
For this you can use any font , size or color that you wish to. What is below is just what I used but you by no means "have" to use my settings. You can do whatever you want it's your siggy :-)
The font I used is : 2 Moulin Rouge DNA
The size I used is : 125 Pixels
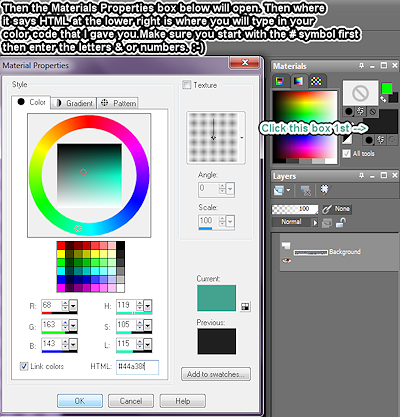
The color I used is : #44a38f
Now in this next screen shot it will show you where to set your color for your text.
Click the square color box where I put "Click This Box First -->" Then the Materials Properties will open, & then where it says "HTML" you will enter the color I posted above, make sure that you begin with the # symbol, then type in the numbers & letters that I have in the code above :-) Then click Ok.
To set your font go to the top of your psp after you click your text tool, and you can click on your font menu & it will drop down with all the fonts you have.
Then directly to the right of your fonts is the size box, just type in what size you want. (Depending on what font you do use will decide what size you need your font so just play around with it until you are happy)
Then for the color you go over to the right side of your psp & you will see your Materials box, click on your background color - set it to the color of your choice.
(Make sure you close off the foreground color by clicking the circle with a line diagonally threw it.
Now in your text box, type out the name you want on your tag, then click Apply.
Now we place your name where you want it on your canvas. Now we are going to add a few more elements then come back to the name.
Open Element 11 (the second one its an orange ribbon), copy & paste it as a new layer onto your canvas (Just like you did for Element 2) Now re-size your Element 11 to 30%. (Remember the re-size screen shot above & that you only have to change the width & height of your pixel dimensions area, make sure you are set to percent as well.)
Once your Element 11 is re-sized, click on your move tool, now move your Element 11 (orange ribbon) so that it is center with your name.
Go to your layers pallet, click on your Element 11 layer , while holding down your left mouse button drag your Element 11 layer down so it is below your name & element 2 layers.
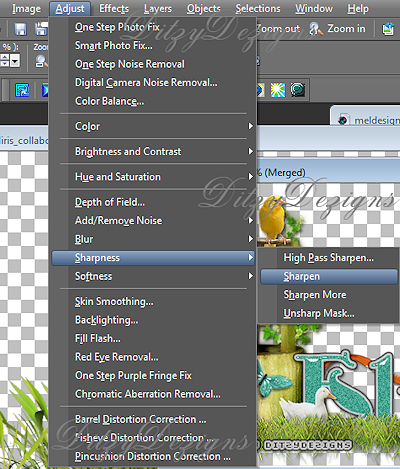
Go to Adjust, click Sharpness then click Sharpen from the slide out menu. (Screen shots below show you the location of these commands)
(For the remainder of the tutorial when I use the word "Sharpen" just remember to go to Adjust , click Sharpness then click Sharpen as I won't explain the location every time. :-)
Once you have sharpened your Element 11 , you will want to apply a drop shadow. (Remember the screen shot above & where to locate this effect :-)
Open Element 12, copy & paste it as a new layer onto your canvas, then re-size your Element 12 to 15%.
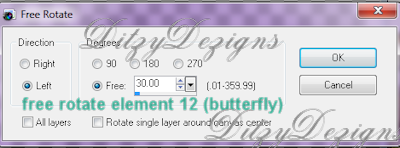
Now go to Image & click Free Rotate -Set it to Left 30.00 & click Ok (See screen shot below)
Now use your move tool again to position your butterfly (Element 12) above your name on your canvas.
Sharpen & apply a drop shadow.
Go to your layers pallet & right click on your Element 12 (butterfly) layer :
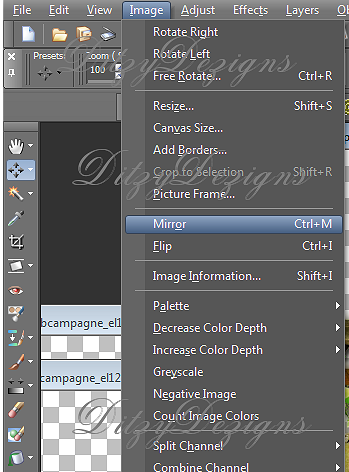
Now while on your duplicated layer, go to Image, then click Mirror.
Now your duplicated butterfly will be on the opposite side of your original butterfly.
Use your move tool & position your duplicated butterfly where you would like it on your canvas.
I placed mine on the base of the well house.
(Because we sharpened & applied a drop shadow to our original butterfly layer we do not need to do it again because our duplicated butterfly is already done. :-)
Open Element 14, copy & paste it as a new layer onto your canvas ,then re-size it to 10% & click Ok.
Now open your re-size menu again & re-size your Element 14 again this time to 60%.
Now go to Image, & click Mirror.
Use your move tool & position your duck (element 14) where you want him to be.
I placed mine to the right of my well house.
Sharpen & apply a drop shadow.
Open Element 18 (3 yellow birds) .
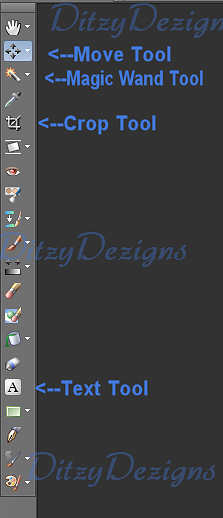
Click on your Crop tool, now crop this element so that only the yellow bird on the left is the only bird showing.
Once you have it cropped, copy & paste it as a new layer onto your canvas.
Now re-size it to 20%.
Use your move tool & position your yellow bird to your liking.
I put mine on top of my well house.
Now once you are happy with placement of your yellow bird, Sharpen & apply a drop shadow.
Then go to your layers pallet, right click on your yellow bird layer, then click Duplicate.
Go to Image & click Mirror.
Now using your move tool again, position your duplicated yellow bird to your liking. I placed mine at the right end of my name.
Open Element 07 - copy & paste it as a new layer onto your canvas, then re-size it to 25%.
Using your move tool, move your grass to the left & place it directly in front of your well house element. (See my tag for placement if you need to)
Now once you have your first section of grass placed, go to your layers pallet, right click on your Element 07 (Grass) layer then click Duplicate. Using your move tool click on your duplicated element 07 & move it to the right slightly but make sure the end of your first Element 07 & the end of the duplicated Element 07 are still touching.
Continue to duplicated your Element 07 layer until you have a total of 7 layers of grass.
Making sure you position each one with your move tool. (Again look at my tag for reference if you need to.)
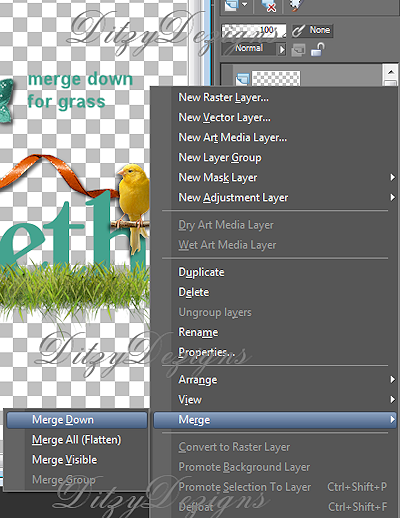
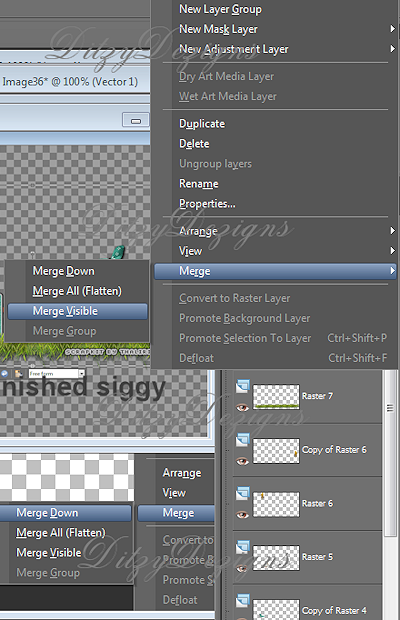
Now once you have all of your grass elements placed in a straight line across the bottom of your well house element & your name go to your layers pallet, & right click on the very TOP grass layer. Then click Merge, then from the slide out menu click Merge Down.
Continue to right click & click Merge - Merge Down until ALL 7 of your grass layers become 1 (ONE) layer.
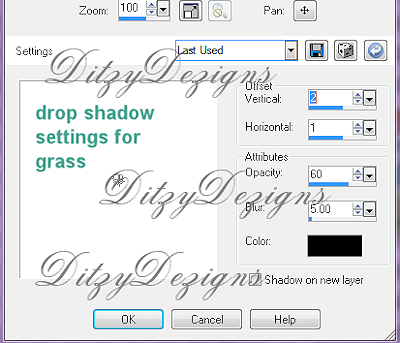
Now on your merged grass layer sharpen & apply a drop shadow.
The drop shadow you want to apply to your merged grass layer is a bit different setting :
Click Ok.
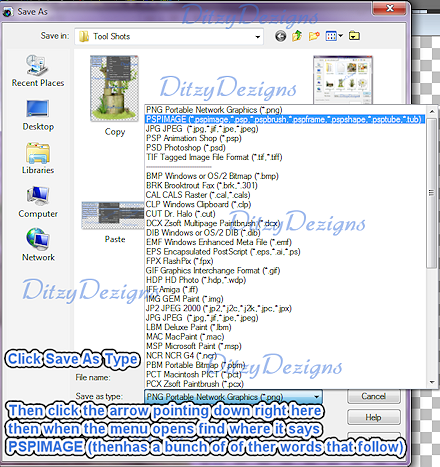
Now if you are going to want to make this signature for other people besides your self, you will want to save here. So go to File, click Save As, then when your window opens make sure you set it to PSP file.
Be sure to save your tag somewhere that you will remember :-)
Once you have your file name set, & your save as type set to psp, click Save.
Now we will continue finishing up our siggy :
In your layers pallet, right click on your name layer, then click Convert To Raster Layer.
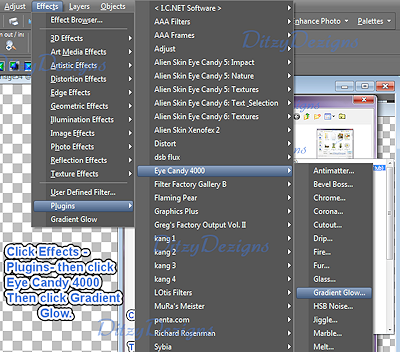
Then go to Effects, Scroll down & click Plugins, then from the slide out menu click Eye Candy 4000
Then you will see this window open :
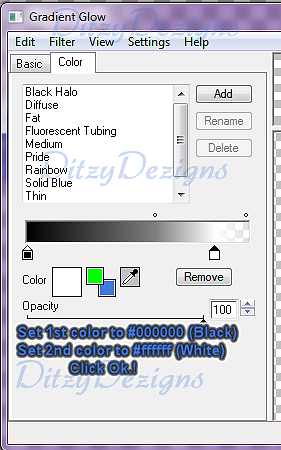
Click on your Basic Tab if it isn't already on that one : set your settings
Now click on your Color Tab : (Set your colors)
Now click Ok.
Apply a drop shadow to your name using the following settings (or settings of your choice)
(Don't mind the element pictured in the preview window, or the writing I put on it about it being the drop shadow settings for your elements. I use the same drop shadow setting for my name as I do for my elements. Its just my personal preference is all.But again you can set them to whatever you like.)
Click Ok.
Now activate your magic wand tool - (Use the screen shot at the beginning to see where the magic wand tool is located if you need to.)
Now using your magic wand, click inside each of the letters of the name you chose to use. (keep in mind that depending on what font you used you may not have to click in each letter, if the letters are connect like in a cursive font you may only have to click the first letter to have them all selected.
You want the marching ants around each letter)
Only do this next part if you have Eye Candy 5 - Impact - Glass
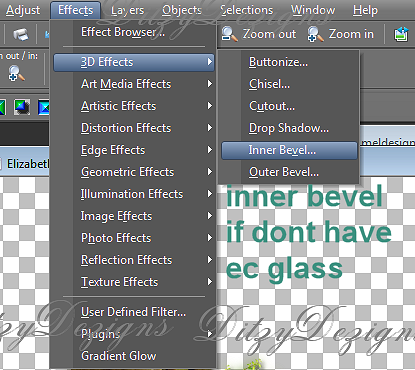
** If you do not have Eye Candy 5 -Impact - Glass, skip this part & go down to where it says "Inner Bevel"**
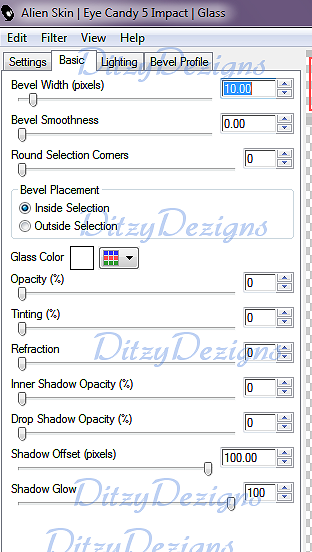
Once all of your letters have been selected , go to Effects, click Plugins, then find your Eye Candy 5 Impact , click on it, then on the slide out menu click Glass. Apply the settings below, or use your own settings :
(The color I have mine set to is #ffffff (white)
Click Ok.
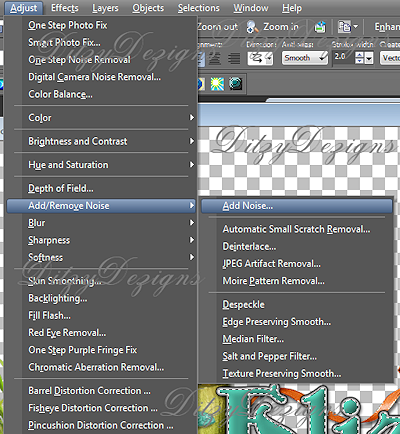
Now keeping your letters selected, go to Adjust, click Add/Remove Noise , then from the slide out menu click Add Noise :
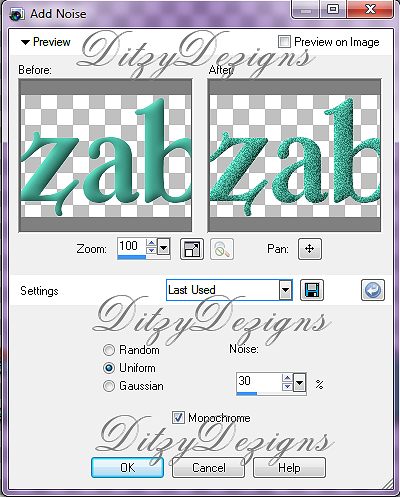
Now this menu will open :
(You can use the same settings as I did or you can play around with it & come up with your own, its up to you :-)
Now click Ok.
Then go to Selections & click Select None.
**Inner Bevel**
If you don't have Eye Candy 5 Impact - Glass , follow these steps :
Once you have all of the letters in your name selected (click inside each letter with your magic wand)
Go to Effects, click 3D Effects, then click Inner Bevel
Now this menu will open up, set your settings like mine below or choose your own settings :
Click Ok.
Now go to Adjust, click Add/Remove Noise, then click Add Noise :
Now this menu will open (Again you can use my settings or your own ) :
Then click Ok.
Go to Selections & click Select None.
Now you will want to apply your credit information
So first you will click on your text tool to activate it, click on your canvas to open your text box, then set your font, color & size .
For your credit information you do not want a huge font or a really bright color, as you want the focus of your tag to be your actual design.
So for my credit info I always use the following :
Font : Pixelette
Size : 10 or 13 Pixels
Color : Medium Gray or Black.
Plug I also apply a gradient glow like I did to the name just because it helps make it clearer to read. Your credit or copyright information must always be readable at ALL times.
For this siggy you will want to post the credit for the designer of the scrapkit. So for this kit you would put something like "Scrapkit By Thaliris Designs.
Then you always want to put your name on it as the designer as your siggy as well.
For example I put "Siggy By DitzyDezigns" on mine. I use the exact same font for this as I do for my credit information.
Now once you have all of your elements, & texts on your siggy go to your layers pallet & right click on any layer, then click Merge, then from the slide out menu click Merge Visible.
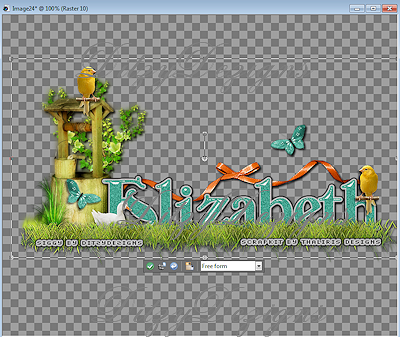
Now click on your crop tool and crop off any access canvas that we did not use.
Then click the green check mark when you have it the way you want it, or you can press enter on your keyboard.
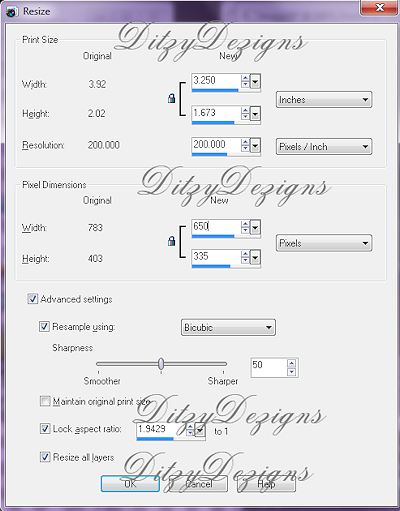
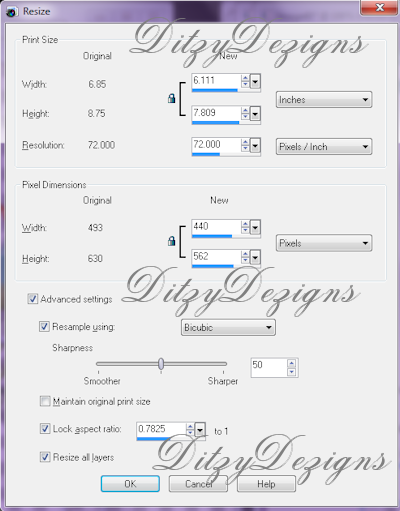
Now you will want to re-size your tag, this re-size will depend on where you are going to be using your signature. For mine because I am posting it on my blog as well I re-sized it to 650, but if you are going to be using it on cafemom, then the standard size for that is 440.
See the screen shots below as the setting for re-sizing your completed siggy are different than re-sizing your elements.
These settings are to re-size your siggy to use on a blog or a forum -
Make sure you change it from Percent to Pixels
& that you click the box next too "Re-size all layers"
These settings are to re-size your siggy to use on Cafemom -
Click Ok.
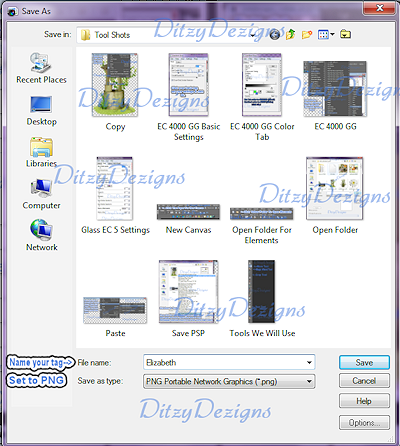
Now all that is left is to save your completed siggy as a PNG file:
That's it! You have completed this tutorial!!
Again if you have ANY questions or need help please do not hesitate to email me!
Thanks for trying my tutorial!!
Subscribe to:
Post Comments (Atom)
About Me

- DitzyDezigns
- New York, United States
- Hiya Everyone! My name is Ronney, I have 3 wonderful teenagers, and have been married to my husband for 20 years. I LOVE to design signatures, tags & avatars, I design with PSP, and have been designing for over 2 1/2 years. I will be not only designing signatures, tags & avatars but will also be writing & posting tutorials as well. I will also be making some templates to share with you all as well. So I hope you enjoy and can use everything I have available on my blog :-) If you ever try any of my tutorials,please send me your completed designs and I would love to showcase it here on my blog!
Labels
- Addictive Pleasures Tuts (35)
- Angel's Designz Tuts (10)
- Animated (26)
- Announcements (2)
- Awards (2)
- Beginner (17)
- Butterfly Blush Tuts (8)
- Cool Scraps Digital (2)
- Creative Intentionz (2)
- Creative Scraps By Crys (19)
- Ditzys Scrapkits (1)
- Forum Sets (1)
- FTU (6)
- Intermediate Level Tuts (3)
- Peekaboo Land (1)
- Peekaboo Land PTU (4)
- Peekaboo Land Tuts (1)
- Pimp My Tags With Scraps Tuts (14)
- PTU (131)
- Scappin Dollars Tuts (1)
- Scrappin Dollars Tuts (7)
- Scraps From The Heart Tuts (3)
- Scraps With Attitude (27)
- Tammy's Scraps (8)
- Updates (1)
- Wickedly Ditzy Scraps (1)












0 comments:
Post a Comment