♥Ditzy's TOU♥
All of the tutorials written by me are of my own Ditzy imagination.
Do NOT copy or alter them in ANY way.
Do NOT copy & paste the tutorials to any website, forum or group.
Do NOT claim them as your own.
If you would like to show or share my tutorial do so by using a link to bring your members to my blog. However if you do please send me a courtesy email so that I know my tutorials are being used according to my TOU. Also if you would please send me a link to where you will be posting my link.
If you have done any of my tutorials I would LOVE to see the outcome of what you have made, so please email me OR you can leave me a link in my shout box so that I can see what you have made and display it on my blog for others to enjoy as well.
Other than that please have fun,and I hope that you enjoy all my tutorials!
Email me @ DitzyDezigns@hotmail.com
Email Me
I would love to see what you have made using any of my tutorials, so please feel free to email me at the address below.
DitzyDezigns@hotmail.com
Add Me On Facebook
Blog Archive
-
▼
2011
(152)
-
▼
April
(27)
- ♥Sweet Love PTU (Animated)♥
- ♥Kawaii Gurl PTU**
- ♥Standing Ovation PTU♥
- ♥Haterz PTU♥
- ♥A Sweet Escape PTU (Animated)♥
- ♥You Are Perfect PTU♥
- ♥Chirpy PTU♥
- ♥Have A Perfect Birthday PTU (Animated)♥
- ♥Fantasy Land PTU♥
- ♥Summer Breeze PTU♥
- ♥Tropical Breeze PTU♥
- ♥Emo Princess PTU♥
- ♥Certified Cuteness PTU♥
- **Easter Bop FTU**
- **A Fairytale PTU**
- ♥Easter Garden Tea Party PTU♥
- ♥Fantasy PTU♥
- ♥Happy Easter FTU♥
- ♥Happy Easter PTU♥
- ♥Somewhere Over The Rainbow PTU♥
- ♥Enchanted PTU♥
- ♥Bunny Hop PTU♥
- ♥Sweet Pea PTU♥
- ♥Punk Star PTU♥
- ♥Easter Fun PTU♥
- ♥Candy Girl Forum Set PTU♥
- ♥Candy Girl Tag PTU♥
-
▼
April
(27)
Pages
Powered by Blogger.
Monday, April 18, 2011
**A Fairytale PTU**
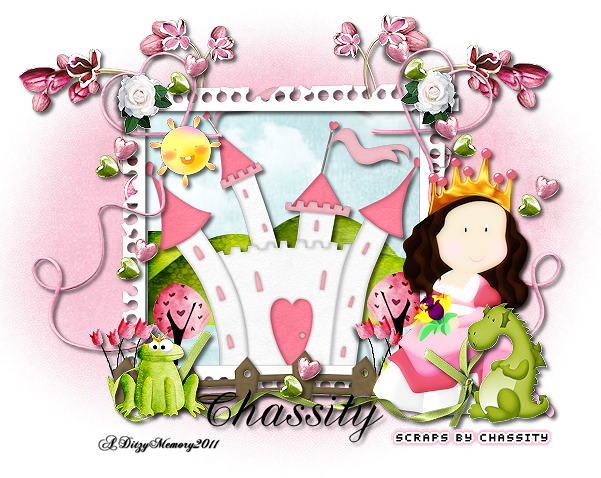
Here is what we will be making :
**Please remember that all of my tutorials are written using my own Ditzy noggin, any resemblance to any other tutorial is purely coincidental & completely unintentional**
Supplies Needed :
PaintShop Pro X2 (Any version should work)
Scrapkit A Fairytale By PolkaDot Scraps @ Pimp My Tags W/Scraps
Mask Of Choice
Font Of Choice
(Font I used is : Artegio - Size : 50 Pixels - Color : Black #000000)
Elements Used :
Paper 2
Paper 4
Frame 6
Element 2
Element 11
Element 8
Element 14
Element 13
Element 3
Element 10
Element 25
Element 15
Element 30
Element 5
Element 17
Element 29
Element39
Lets Begin :
Open a new 800 x 650 canvas (transparent) Don't worry we will crop it later :-)
Now Open Paper 4, copy & paste it as a new layer onto your canvas , then go to Layers, and click Load/Save Mask then on the slide out menu click Load Mask From Disk. Then choose a mask of your choice and click Ok.
Now in your layers pallet, right click on your mask layer and click Merge, then on the slide out menu click Merge Group.
Now go to Image, click Re-size & re-size your mask layer to 85% & click Ok. (See screen shot below)
Click Ok.
Now lets open Frame 6,copy & paste as a new layer onto your canvas, then re-size it to 65%.
Using your move tool position your frame 6 in the middle of your mask. Now activate your magic wand tool, and click on the inside of your frame.
Then go to Selections, and click Modify, then from the slide out menu clicked Expand and set your number of pixels to 5 then click Ok.
Now open Paper 2, copy & paste it as a new layer onto your canvas, then go to Selections and click Invert, then on your keyboard press your delete key ONE time.
Now go to your layers pallet and move your Paper 2 layer BELOW your frame layer but leave it above your mask layer.
Then on your keyboard again, press your Ctrl & D key to deselect.
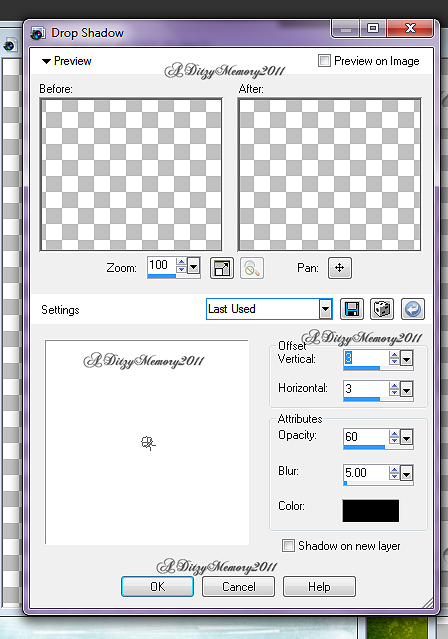
Apply a drop shadow. You can either use my settings below or your own settings its your choice.
(To apply a drop shadow go to Effects, and click 3D effects, then click Drop Shadow)
Click Ok.
Now open Element 2, copy & paste it as a new layer onto your canvas, then re-size it to 50%.
Now position your Element 2 in the middle of your frame.
Now in your layers pallet move your Element 2 layer down so that it is just below your frame 6 layer but keeping it above your Paper 2 layer.
Apply a drop shadow to your Element 2.
Lets open Element 11 now, copy & paste it as a new layer onto your canvas, then Re-size it to 30%.
In your layers pallet move your Element 11 layer below your frame & castle layers ,but make sure you keep it above your Paper 2 layer.
Now active your pick tool (See screen shot for location if you are not sure where it is located)
Now carefully adjust each side until it is even with the inside edges of your frame.
Once you have it the way you want it then apply a drop shadow.
Now open Element 8, copy & paste it as a new layer onto your canvas, then re-size it to 20%, now using your move tool position it next to the left side of your castle.
In your layers pallet move this layer below your frame & castle layers. Then right click on your Element 8 layer and click Duplicate. Then go to Image and click Mirror.
Then use your move tool to position exactly where you would like them.
Apply a drop shadow to both of your Element 8 layers.
Now open your Element 14, copy & paste it as a new layer onto your canvas, then re-size it to 70%.
Using your move tool position your element 14 in from of the bottom part of your frame.
Apply a drop shadow.
Now open Element 13, copy & paste it as a new layer onto your canvas, then re-size it to 30%.
Using your move tool again position your element 13 at the end of your fence on the left side.
Then in your layers pallet move your element 13 layer so it is below your fence layer but above your frame layer. Then right click on your Element 13 layer, then click Duplicate.
Use your move tool to move your duplicated Element 13 slightly to the right.
Then in your layers pallet, on the duplicated Element 13 layer right click then click Merge, then on the slide out menu click Merge Down.
Then on the Merged layer, right click again, and click Duplicate, then go to Image, and click Mirror. Now position this element so that it is on the right side of your castle.
Open Element 3, then copy & paste it as a new layer onto your canvas, then re-size it to 45%. Using your move tool position it to the bottom right corner of your frame.
Now in your layers pallet right click on your Element 3 layer, then click Duplicate. Now go to Adjust, click Blur, then click Gaussian Blur. Set to 3.00 then click Ok.
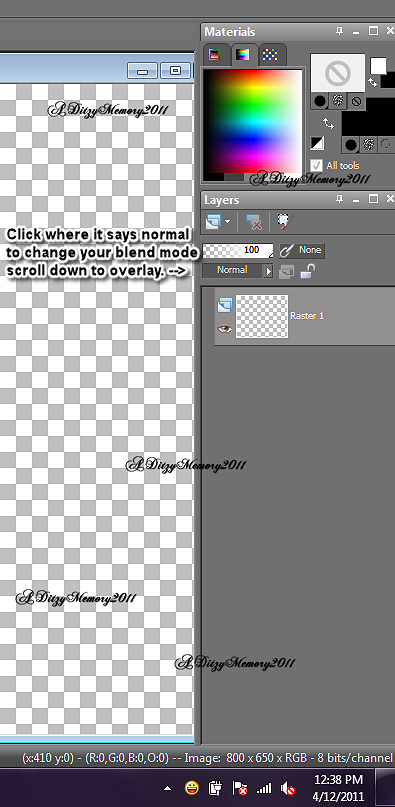
Now at the top of your layers pallet change your Blend Mode to Overlay. (See screen shot)
Now in your layers pallet click on your bottom Element 3 layer and apply a drop shadow.
Now open Element 10, copy & paste as a new layer onto your canvas ,then re-size it to 30%. Using your move tool position your element 10 to the left corner of your fence.
Go to Adjust, click Sharpness, then click Sharpen.
Apply a drop shadow.
Open Element 25 , copy & paste it as a new layer onto your canvas, then re-size it to 20%. Now position it to the right corner of your frame and cover the staple with this element.
In your layers pallet, right click on your Element 25 layer and click Duplicate. Then go to Image, and click Mirror.
Now position your duplicated element 25 layer so that it covers the staples on the frame that are on the left side.
Now for both of your Element 25 layers go to Adjust, click Sharpness, then click Sharpen.
Apply a drop shadow to both layers as well.
Open Element 15, copy & paste it as a new layer onto your canvas, then re-size it to 50%.
Use your move tool to position it to the left of your frame.
In your layers pallet right click on your Element 15 layer, then click Duplicate, then go to Image and click Mirror. Now use your move tool to position exactly where you would like it.
Then apply a drop shadow to BOTH of your Element 15 layers.
Now open your Element 30 layer, and copy & paste it as a new layer onto your canvas and re-size it to 20%.
Using your move tool position your Element 30 at the upper left corner of your frame.
Now go to Adjust, click Sharpness and then click Sharpen.
Apply a drop shadow.
Open Element 5, copy & paste it as a new layer onto your canvas, then re-size it to 20%.
Now position it using your move tool so that it is on the right side of your queen element.
Go to Adjust, click Sharpness then click Sharpen.
Apply a drop shadow.
Now open Element 17, copy & paste it as a new layer onto your canvas, then re-size it to 65%.
Using your move tool once again position your Element 17 in front of your frog ,fence and queen elements.
Now in your layers pallet move your Element 17 layer so that it is below your frog layer but keeping it above your fence & queen layers.
Apply a drop shadow.
Now open your Element 29 , copy & paste it as a new layer onto your canvas, then position it at the upper left corner of your frame.
Now in your layers pallet move your Element 29 layer down so that it is directly above your mask layer.
Then right click on your Element 29 layer and click Duplicate.
Then go to Image, and click Mirror.
Then using your move tool to position either of your Element 29 layers as you would like them.
Apply a drop shadow to BOTH of your Element 29 layers.
Open your Element 39, copy & paste it as a new layer, then re-size it to 40%.
Then go to Adjust, click Sharpness then click Sharpen.
Apply a drop shadow.
Now, in your layers pallet, right click on your Element 39 layer, then click Duplicate. Now use your move tool to position your duplicated element 39 where you would like it on your tag.
Then go back to the layers pallet and right click on your duplicated Element 39 layer, click Duplicate again and position it on your tag where you desire.
Continue to follow that step until you have as many as you would like.
Now is time to add your name, copyright & credit information.
Once you have your name add, make sure you apply a drop shadow as it makes the name pop out more.
Then once everything is the way you want it to me, go to your layers pallet and right click on any layer, then click Merge, then on the slide out menu click Merge Visible.
Now activate your crop tool, and crop off any access canvas that we did not use.Be careful not to crop to close to your tag as you don't want to remove any of your tag , name or copyright/credit information.
Once you have your tag cropped, go to Image and click Re-size, now you want to re-size your tag in the Pixels setting, so where you had it to "Percent" earlier, change that to Pixels. Then type in your desired size.
Also make sure that before you click ok you have checked "Resize All Layers". Then click Ok.
Once re-sized I like to sharpen my final tag, so if you would like to do that go to Adjust, click Sharpness, then click Sharpen.
Now save your tag as PNG!
Congrats you have finished my tutorial! As always I would LOVE to see what you have made using my tutorials, so please feel free to email them to me at the addy below :-)
EMAIL : aditzymemory@yahoo.com
((HUGS))
Ditzy♥
Subscribe to:
Post Comments (Atom)
About Me

- DitzyDezigns
- New York, United States
- Hiya Everyone! My name is Ronney, I have 3 wonderful teenagers, and have been married to my husband for 20 years. I LOVE to design signatures, tags & avatars, I design with PSP, and have been designing for over 2 1/2 years. I will be not only designing signatures, tags & avatars but will also be writing & posting tutorials as well. I will also be making some templates to share with you all as well. So I hope you enjoy and can use everything I have available on my blog :-) If you ever try any of my tutorials,please send me your completed designs and I would love to showcase it here on my blog!
Labels
- Addictive Pleasures Tuts (35)
- Angel's Designz Tuts (10)
- Animated (26)
- Announcements (2)
- Awards (2)
- Beginner (17)
- Butterfly Blush Tuts (8)
- Cool Scraps Digital (2)
- Creative Intentionz (2)
- Creative Scraps By Crys (19)
- Ditzys Scrapkits (1)
- Forum Sets (1)
- FTU (6)
- Intermediate Level Tuts (3)
- Peekaboo Land (1)
- Peekaboo Land PTU (4)
- Peekaboo Land Tuts (1)
- Pimp My Tags With Scraps Tuts (14)
- PTU (131)
- Scappin Dollars Tuts (1)
- Scrappin Dollars Tuts (7)
- Scraps From The Heart Tuts (3)
- Scraps With Attitude (27)
- Tammy's Scraps (8)
- Updates (1)
- Wickedly Ditzy Scraps (1)


1 comments:
I completely LOVE this tut and taggie! sooooo cute!!!! :)
Post a Comment