♥Ditzy's TOU♥
All of the tutorials written by me are of my own Ditzy imagination.
Do NOT copy or alter them in ANY way.
Do NOT copy & paste the tutorials to any website, forum or group.
Do NOT claim them as your own.
If you would like to show or share my tutorial do so by using a link to bring your members to my blog. However if you do please send me a courtesy email so that I know my tutorials are being used according to my TOU. Also if you would please send me a link to where you will be posting my link.
If you have done any of my tutorials I would LOVE to see the outcome of what you have made, so please email me OR you can leave me a link in my shout box so that I can see what you have made and display it on my blog for others to enjoy as well.
Other than that please have fun,and I hope that you enjoy all my tutorials!
Email me @ DitzyDezigns@hotmail.com
Email Me
I would love to see what you have made using any of my tutorials, so please feel free to email me at the address below.
DitzyDezigns@hotmail.com
Add Me On Facebook
Blog Archive
-
▼
2011
(152)
-
▼
April
(27)
- ♥Sweet Love PTU (Animated)♥
- ♥Kawaii Gurl PTU**
- ♥Standing Ovation PTU♥
- ♥Haterz PTU♥
- ♥A Sweet Escape PTU (Animated)♥
- ♥You Are Perfect PTU♥
- ♥Chirpy PTU♥
- ♥Have A Perfect Birthday PTU (Animated)♥
- ♥Fantasy Land PTU♥
- ♥Summer Breeze PTU♥
- ♥Tropical Breeze PTU♥
- ♥Emo Princess PTU♥
- ♥Certified Cuteness PTU♥
- **Easter Bop FTU**
- **A Fairytale PTU**
- ♥Easter Garden Tea Party PTU♥
- ♥Fantasy PTU♥
- ♥Happy Easter FTU♥
- ♥Happy Easter PTU♥
- ♥Somewhere Over The Rainbow PTU♥
- ♥Enchanted PTU♥
- ♥Bunny Hop PTU♥
- ♥Sweet Pea PTU♥
- ♥Punk Star PTU♥
- ♥Easter Fun PTU♥
- ♥Candy Girl Forum Set PTU♥
- ♥Candy Girl Tag PTU♥
-
▼
April
(27)
Pages
Powered by Blogger.
Wednesday, April 27, 2011
♥Haterz PTU♥
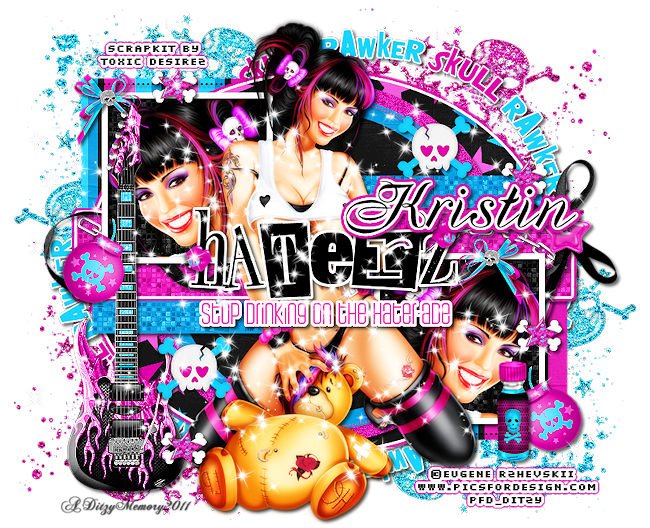
Here is what we will be making :
**Please remember that all of my tutorials are written using my own Ditzy noggin, any resemblance to any other tutorial is purely coincidental & unintentional!**
Supplies Needed :
PaintShop Pro X2 (Any version should work)
Tube Of Choice : I used the amazing work of Eugene Rzhevskii @ Pics For Design
Scrapkit : Skull Rawker by Toxic Desirez @ Scraps With Attitude
Template376 : by Missy @ Divine Intentionz
Plug-ins :
Eye Candy 5 Impact - Gradient Glow
Xero - Fritillary
Elements Used :
(These are not in an specific order)
Paper 1, 26, 5, 2, & 21
Chain
Bow3
Guitar1
Lips
Bomb
Wordart 2
Splatter 2
Splatter1
Star & Crossbones
Skull2
Button1
Bottle
Ribbon
Sparkles2
Note : So that I do not have to explain it each time I use the words Sharpen, & Apply drop shadow, I am gonna explain how to do those two things before starting the tutorial.-
To sharpen : Go to Adjust, click Sharpness, then click Sharpen
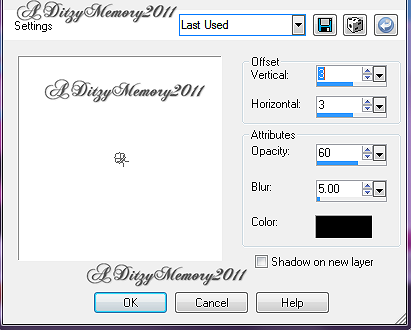
To apply a drop shadow : Go to Effects, click 3D Effects, then click Drop Shadow. (You can use your own settings for this effect or mine it makes no difference to me :-) I have included a screen shot of my drop shadow settings. I will post that screen shot below :
If you have any questions on any of my tutorials please feel free to email me and I will help you the best that I can :-) My email address can be found at the end of this tutorial.
Lets Begin :
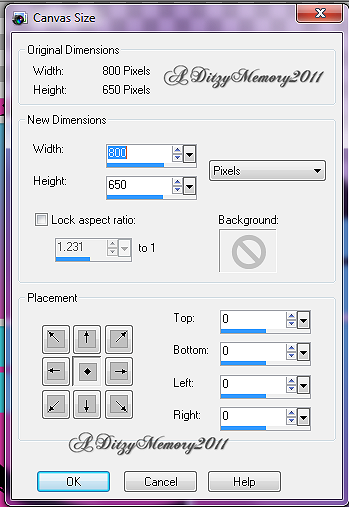
Lets start with opening our template. Once your template is open go to Image, click Canvas Size and change the size to Width 800 & Height 650 (See screen shot below)
Click Ok.
Now in your layers pallet, delete the copyright layer. (Please make sure you have left Missy a thank-you for the template when you download it )
Now in your layers pallet, click on your Oval layer, go to Selections, click Select all, then Selections again and click Float, Selections again and click Defloat.
Now open Paper 21, copy & paste it as a new layer onto your canvas ,then go to Selections and click Invert.
Now on your keyboard, press your delete key ONE time.
Now also on your keyboard press your Ctrl & D keys to deselect.
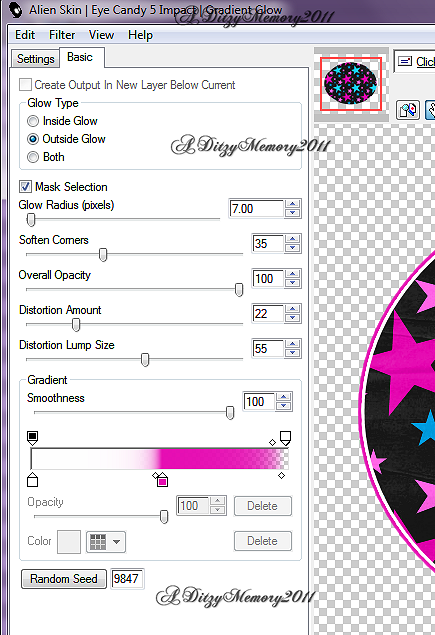
Now go to Effects, click Plug-ins - Eye Candy 5 Impact - Gradient Glow
Again you can use my settings below or use your own settings, these are just a suggestion and my own personal preference :-)
Click Ok.
Now go back to your layers pallet and delete your original Oval layer.
Now in your layers pallet, click on your Circle 1 layer, then go to Selections, click Select All, then Selections and click Float, then Selections again and click Defloat.
Now open Paper 2, copy & paste it as a new layer onto your canvas , go to Selections, and click Invert.
Now on your keyboard press your delete key ONE time.
Still using your keyboard press your Ctrl & D keys to deselect.
Now go to Adjust, click Add/Remove Noise then click Add Noise, set to Uniform , 50, and make sure your Monochrome box is checked and click Ok.
Now delete your original Circle 1 layer.
Now in your layers pallet click on your Circle 2 layer, go to Selections, click Select all, then Selections again and click Float, then Selections and click Defloat.
Now open Paper 5, copy & paste it as a new layer onto your canvas ,then go to Selections and click Invert, then press your delete key on your keyboard ONE time.
Use your Ctrl & D keys to deselect.
Now delete your original Circle 2 layer.
Now click on Circle 3 layer, go to Selections and click Select All, then Selections again and click Float, then Selections again Defloat.
Open Paper 1- copy & paste as a new layer, go to Selections and click Invert.
Then on your keyboard press the delete key ONE time.
Now use your Ctrl & D key to deselect.
Now delete your original Circle 3 layer.
Click on Shape 2 layer, go to Selections and click Select All, then Selections again click Float, then Selections and click Defloat.
Open Paper 26, copy & paste it as a new layer onto your canvas ,then go to Selections and click Invert.
Press delete on your keyboard ONE time.
Now delete your original Shape 2 layer.
Now follow the exact same steps you followed for your Shape 2 layer, to do your Shape 1 layer.
Once you have your Shape 1 layer completed,
Click on your Rectangle layer, go to Selections, click Select All, then Selections again and click Float, then Selections again and click Defloat.
Now open Paper 2, copy & paste it as a new layer onto your canvas , then go to Selections and click Invert.
Then on your keyboard press your delete key ONE time.
Also on your keyboard use your Ctrl & D keys to deselect.
Delete your original Rectangle layer.
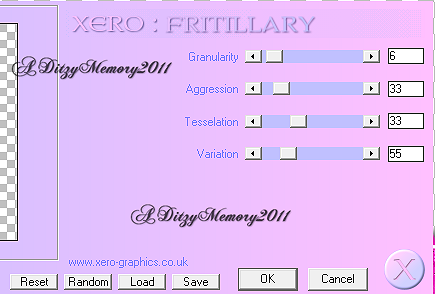
Now go to Effects, click Plug-ins then click Xero > Fritillary
You can either use my settings below and set your own settings,
Click Ok.
Now in your layers pallet click on your Raster 1 layer, go to Selections, click Select All, then Selections and click Float, then go to Selections and click Defloat.
Open Paper 5, copy & paste it as a new layer onto your canvas ,go to Selections and click Invert.
Then press your delete key ONE time.
Use your Ctrl & D keys to deselect.
Go to Effects - Plug-ins - Xero - Fritillary (Again you can use my settings below or your own)
Click Ok.
Now click on your Frame 1 Back layer, go to Selections, click Select All, then Selections and click Float, then Selections again and click Defloat.
Open Paper 1, copy & paste it as a new layer onto your canvas ,then go to Selections and click Invert.
On your keyboard press your Delete key ONE time.
Now apply your Xero Plugin effect on this layer as well.
Now lets open our tube, copy & paste it as a new layer onto your canvas, I re-sized mine to 65%. Your size may vary depending on the tube you have chosen to use.
Once you have the size you want, position the head of your tube inside your frame area.
Now press your Delete key on your keyboard.
Ctrl & D to deselect.
Now in your layers pallet, right click on your tube layer, click Duplicate, then go to Adjust,and click Blur, then click Gaussian Blur from the slide out menu. Set to 3.00 and click Ok.
Now change your Blend Mode to Overlay .
On your original (bottom) tube layer apply a drop shadow.
Now follow all of the steps you followed for your Frame 1 Back and do your Frame 2 Back the exact same way.
Now go to your "wordart by me" layer, and right click on it, click Merge, then click Merge Down. Continue right click and merge-merge down until the following layers become one :
Wordart by me
wordart back
Raster 1 Shadow 1
Then when you have those 3 layers into one layer, rename that layer "Wordart" apply a drop shadow.
Now in your layers pallet click on the very top layer,
Now open your tube again, copy & paste it as a new layer onto your canvas ,then re-size it to 65% then re-size it again to 65%.(remember your re-size setting may vary depending on the tube you are using)
Using your move tool, move your tube so that it is in the middle of your tag (or wherever it is you want to place it :-)
Now in your layers pallet, move your full tube layer down below your merged wordart layer.
On your tube layer, right click and click Duplicate, then go to Adjust, click Blur, then click Gaussian Blur from the slide out menu. Set to 3.00 and click Ok.
Now change the Blend Mode to Overlay.
On your original full tube layer apply a drop shadow.
Now lets start adding some elements :
Open your Bow3 element, copy & paste as a new layer onto your canvas ,then re-size it to 20%.
Using your move tool and position your Bow3 at the upper left corner of your left frame.
Sharpen & apply a drop shadow.
Now in your layers pallet, right click on your Bow3 layer and click Duplicate, then go to Image and click Mirror. Now using your move tool move your duplicated Bow3 element to your right sided frame.
Open your Chain element, copy & paste it as a new layer onto your canvas ,then in your layers pallet move your change layer down so it is below your full tube & wordart layers.
Sharpen & apply a drop shadow.
Now open your Ribbon element, copy & paste it as a new layer onto your canvas ,then in your layers pallet move your Ribbon layer below your tube & frame layers.
Apply a drop shadow.
Now open your Bomb element, copy & paste it as a new layer onto your canvas ,then re-size it to 20%. Using your move tool, move your Bomb element to the lower right corner of your tag.
Sharpen & apply a drop shadow.
In your layers pallet right click on your Bomb layer, and click Duplicate. Now go to Image and click Mirror.
Position your duplicated bomb to the left end of your tag towards the middle. (See my tag for reference)
Now open your Lips element, copy & paste it as a new layer onto your canvas ,then re-size it to 20%. Position your lips element so it is on one end of your wordart. Now in your layers pallet right click on your Lips layer and click Duplicate. Now go to Image and click Mirror. Position as well on your wordart.
Open Button 1, copy & paste it as a new layer onto your canvas ,then re-size it to 25%. Use your move tool and move your button 1 over to the right so it is on top of your black bow (in the middle)
Sharpen & apply a drop shadow.
Now click on the last layer in your layers pallet,
Open your Wordart 2 element, copy & paste it as a new layer. Position it the way you would like it to show.
Apply a drop shadow.
Now open your Bottle element, copy & paste it as a new layer onto your canvas ,then re-size it to 25%. Position it using your move tool to the lower right side of your tag.
Sharpen & apply a drop shadow.
Open your Guitar 1 element, copy & paste it as a new layer onto your canvas ,then position it using you rmove tool to the left side of your tag.
Apply a drop shadow.
In your layers pallet move your Guitar 1 layer down so it is under your left sided Bomb.
Open your Skull2 element, copy & paste it as a new layer onto your canvas ,then re-size it to 25%. Then re-size it again to 80%. Use your move tool and position it on the right side of your tag.
In your layers pallet right click on your Skull2 layer and click Duplicate.
Now go to Image and click Mirror.
Use your move tool to position your duplicated Skull 2 element where you would like it on the left side of your tag.
Sharpen & apply a drop shadow to BOTH of your Skull 2 elements.
Open your Star & Crossbones, copy & paste it as a new layer onto your canvas ,then re-size it to 15%. Use your move tool and position your element to the upper left of your tag.
Sharpen & apply a drop shadow.
In your layers pallet, duplicate your Star & Crossbones 3 times for a total of 4 layers.Use your move tool and position each duplicated element where you would like them on your tag.
Now lets open your Splatter 2 element, copy & paste it as a new layer onto your canvas, then position it to the left of your tag, then in your layers pallet move your Splatter 2 layer down so it is at the bottom of your layers pallet.
Now open your Splatter 1, copy & paste it as a new layer onto your canvas ,then move it to the upper right corner of your tag.
In your layers pallet move your Splatter 1 layer down so that it is just above your Splatter 2 layer.
Now right click on your Splatter 1 layer and click Duplicate. Then go to Image and click Mirror, then Image again and click Flip. Position again if needed.
Also in your layers pallet right click on your Splatter 2 layer, click Duplicate. Then go to Image and click Mirror, then Image again and click Flip.
Now merge all 4 of your splatter layers together into 1 layer.
Finally lets open our Sparkles 2 layer, copy & paste as a new layer onto your canvas, then position at the bottom of your tag, then in your layers pallet right click on your Sparkles 2 layer and click Duplicate. Then go to Image and click Flip. Then back to your layers pallet and right click on your duplicated sparkles2 layer and click Duplicate again, then go to Image and click Flip again. Now you should have 3 sparkle2 layers that should cover the top, middle and bottom of your tag.
Now it is time to add your name :
Font I used : Artegio
Size : 80
Color: #000000 (Black)
Then apply the same gradient glow that you used for your template.
Apply a drop shadow to your name.
Now add your copyright/credit information.
Once you have everything on your tag that you would like, go to your layers pallet and right click on any layer, click Merge then click Merge Visible. (If there are any layers below your main tag layer go ahead and delete those now.)
Then once you have merged your layers, you will want to crop your tag. So activate your crop tool and crop off any access canvas that we did not use.
Now re-size your tag.
Once your tag is re-sized go to Adjust, click Sharpness and then click Sharpen.
Save as PNG!!
Thanks so much for trying my tutorial, I hope it was easy for you to follow. I would LOVE to see what you have made using this or any of my tutorials, so please email me and include a copy of your tag. I would be honored to post it on my blog for everyone to see :-)
Email : aditzymemory@yahoo.com
((HUGS))
Ditzy♥
Subscribe to:
Post Comments (Atom)
About Me

- DitzyDezigns
- New York, United States
- Hiya Everyone! My name is Ronney, I have 3 wonderful teenagers, and have been married to my husband for 20 years. I LOVE to design signatures, tags & avatars, I design with PSP, and have been designing for over 2 1/2 years. I will be not only designing signatures, tags & avatars but will also be writing & posting tutorials as well. I will also be making some templates to share with you all as well. So I hope you enjoy and can use everything I have available on my blog :-) If you ever try any of my tutorials,please send me your completed designs and I would love to showcase it here on my blog!
Labels
- Addictive Pleasures Tuts (35)
- Angel's Designz Tuts (10)
- Animated (26)
- Announcements (2)
- Awards (2)
- Beginner (17)
- Butterfly Blush Tuts (8)
- Cool Scraps Digital (2)
- Creative Intentionz (2)
- Creative Scraps By Crys (19)
- Ditzys Scrapkits (1)
- Forum Sets (1)
- FTU (6)
- Intermediate Level Tuts (3)
- Peekaboo Land (1)
- Peekaboo Land PTU (4)
- Peekaboo Land Tuts (1)
- Pimp My Tags With Scraps Tuts (14)
- PTU (131)
- Scappin Dollars Tuts (1)
- Scrappin Dollars Tuts (7)
- Scraps From The Heart Tuts (3)
- Scraps With Attitude (27)
- Tammy's Scraps (8)
- Updates (1)
- Wickedly Ditzy Scraps (1)




0 comments:
Post a Comment