♥Ditzy's TOU♥
All of the tutorials written by me are of my own Ditzy imagination.
Do NOT copy or alter them in ANY way.
Do NOT copy & paste the tutorials to any website, forum or group.
Do NOT claim them as your own.
If you would like to show or share my tutorial do so by using a link to bring your members to my blog. However if you do please send me a courtesy email so that I know my tutorials are being used according to my TOU. Also if you would please send me a link to where you will be posting my link.
If you have done any of my tutorials I would LOVE to see the outcome of what you have made, so please email me OR you can leave me a link in my shout box so that I can see what you have made and display it on my blog for others to enjoy as well.
Other than that please have fun,and I hope that you enjoy all my tutorials!
Email me @ DitzyDezigns@hotmail.com
Email Me
I would love to see what you have made using any of my tutorials, so please feel free to email me at the address below.
DitzyDezigns@hotmail.com
Add Me On Facebook
Blog Archive
-
▼
2011
(152)
-
▼
April
(27)
- ♥Sweet Love PTU (Animated)♥
- ♥Kawaii Gurl PTU**
- ♥Standing Ovation PTU♥
- ♥Haterz PTU♥
- ♥A Sweet Escape PTU (Animated)♥
- ♥You Are Perfect PTU♥
- ♥Chirpy PTU♥
- ♥Have A Perfect Birthday PTU (Animated)♥
- ♥Fantasy Land PTU♥
- ♥Summer Breeze PTU♥
- ♥Tropical Breeze PTU♥
- ♥Emo Princess PTU♥
- ♥Certified Cuteness PTU♥
- **Easter Bop FTU**
- **A Fairytale PTU**
- ♥Easter Garden Tea Party PTU♥
- ♥Fantasy PTU♥
- ♥Happy Easter FTU♥
- ♥Happy Easter PTU♥
- ♥Somewhere Over The Rainbow PTU♥
- ♥Enchanted PTU♥
- ♥Bunny Hop PTU♥
- ♥Sweet Pea PTU♥
- ♥Punk Star PTU♥
- ♥Easter Fun PTU♥
- ♥Candy Girl Forum Set PTU♥
- ♥Candy Girl Tag PTU♥
-
▼
April
(27)
Pages
Powered by Blogger.
Sunday, April 17, 2011
♥Easter Garden Tea Party PTU♥
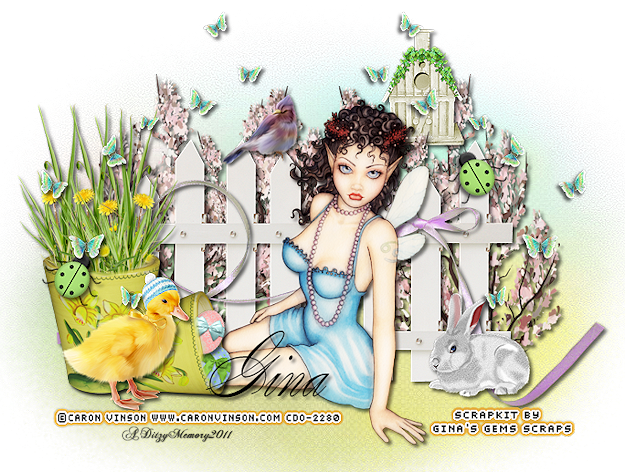
Here is what we will be making :
**Please keep in mind that my tutorials are written using my own Ditzy noggin, any resemblance to any other tutorial is purely coincidental and completely unintentional!!**
Supplies Needed :
PaintShop Pro X2 (Any version should work)
Tube Of Choice, I am using the amazing work of Caron Vinson. You must have a license to use her work. She is now available at CDO.
Scrapkit By Gina's Gems Called Easter Garden Tea Party & You can purchase it @ Butterfly Blush Designs
Mask Of Choice
Font Of Choice- I used Splendid ES - Size 72 Pixels - Color- Black (#000000)
Elements From Kit Used :
Paper 15
Picket Fence
Pink Flower Bushes
Ribbon 2
Flower Pots
Duckling 1
Dandelion Patch
Lady Bug 3
Bird House
Butterfly Trail
Cardinal
Easter Egg 2
Easter Egg 5
**HINTS**
To Re-size :
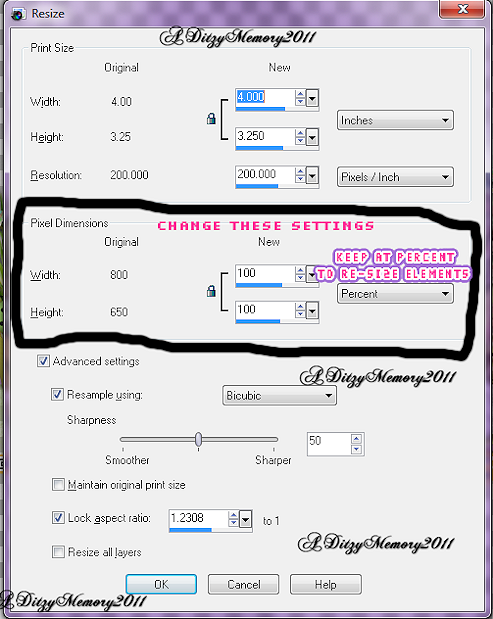
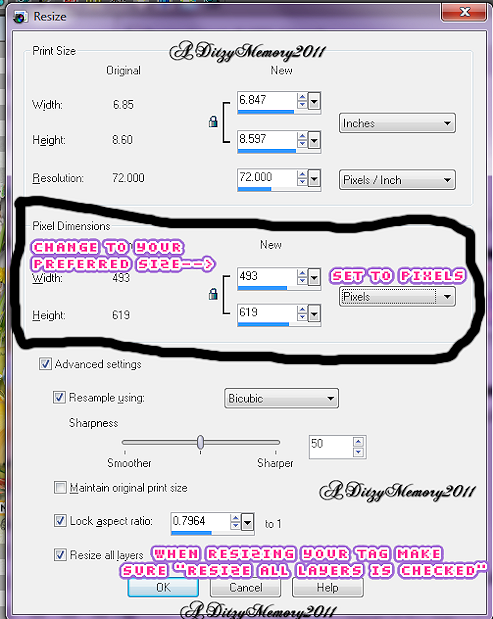
Go to Image, click Re-size, set your settings :-)
Screen shot for re-sizing elements
Screen shot for re-sizing your completed tag :-)
To Apply A Drop Shadow :
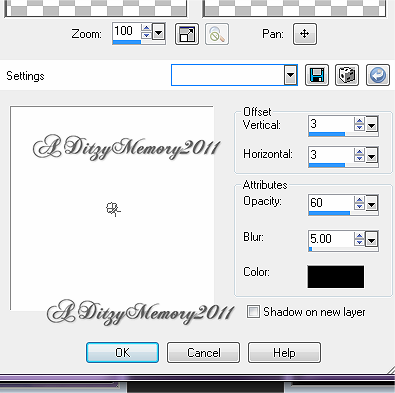
Go to Effects, click 3D Effects, then click Drop Shadow. Here are my Drop Shadow settings :
To Move A Layer In Your Layer Pallet :
Using your mouse, left click and hold on the layer you want to move, then drag it up or drag it down depending on where you want it, when you have it where you want it, then release your left mouse button :-)
Lets Begin :
Start with making a new 800 x 650 transparent canvas .
We are gonna start with our Mask first, so you will want to open Paper 15 (or a paper of your choice) and copy & paste it as a new layer onto your canvas, then go to Layers, and click Load/Save Mask, then on the slide out menu click Load Mask From Disk.
Then find the mask you would like to use, and click Ok.
In your layers pallet again, right click on your Mask layer, then click Merge, then on the slide out menu click Merge Group. :-)
Now open your Picket Fence element, copy & paste it as a new layer onto your canvas, then re-size it to 65%.
Go to Adjust, click Sharpness, then click Sharpen.
Now open your Pink Flower Bush element, copy & paste it as a new layer, now re-size it to 65%.
In your layers pallet, move your Pink Flower Bush layer BELOW your Picket Fence layer.
Now right click on your Pink Flower Bush layer, and click Duplicate, then go to Image, and click Mirror.
Now apply a drop shadow to BOTH of your Pink Flower Bush layers. (see hint above for how to apply a drop shadow :-)
Now open your Ribbon 2 element, copy & paste as a new layer onto your canvas. Now I did not re-size mine, but if you would like to you may.
Now apply a drop shadow to your Ribbon 2 element.
Open your Flower Pots element, copy & paste it as a new layer onto your canvas, now re-size it to 25%. Using your move tool position your Flower Pots element to the left side of your Picket Fence.
Now go to Adjust, click Sharpness, then click Sharpen.
Apply a drop shadow.
Now open your Duckling 1 element, copy & paste it as a new layer onto your canvas, then re-size it to 25%.
Using your move tool again position your Duckling in front of your Flower Posts element.
Now go to Adjust, click Sharpness, then click Sharpen.
Apply drop shadow.
Now open your Dandelion Patch element, copy & paste it as a new layer onto your canvas, then re-size it to 50%.
Now go back to your layers pallet, and right click on your Flower Pots element, then click Duplicate, now click on your Dandelion Patch layer, and move it so that it is between the two Flower Pots layers.
Now on your canvas, using your move tool, move your Dandelion Patch so it looks like it is coming out of your Flower Pots (See my tag above if needed for reference)
Now activate your Eraser Tool, and make sure that in your layers pallet you are on your TOP Flower Pots layer, and erase part of the Flower Pots so it makes it look like the Dandelion is growing out from the Flower Pots.
Now in your layers pallet again, right click on your Dandelion Patch layer and click Duplicate, then on your canvas, using your move tool, slide your duplicated Dandelion Patch over a little as we are going to try and fill the Flower Pots with the Dandelion Patches.
Now in your layers pallet, right click on your duplicated Dandelion Patch layer, and click Duplicate again. Now again using your move tool slide your second duplicated Dandelion Patch over to fill more space.
Continue to do this until you have enough Dandelion Patches to fill the top of your Flower Pots.
Now keep in mind, that depending on where you move all of your Dandelion Patches to you MAY have to click on your bottom Flower Pots layer and then go back to your canvas and erase parts of that Flower Pot as well so that all your Dandelion Patches appear to be on the inside of your pots.
You should have approx 4 layers of the Dandelion Patches, but if you have more that is ok too, you still follow the same step. Now in your layers pallet, right click on your top Dandelion Patch layer, then click Merge, then click Merge Down. Follow that same step until ALL of your Dandelion Patch layers become ONE.
Once they are all one layer apply a drop shadow.
Now open your Bunny 3 element, copy & paste it as a new layer, then re-size it to 20%. Then go to Image, and click Mirror. Then using your move tool move your bunny so that it is at the right end of your Picket Fence.
Now go to Adjust, click Sharpness, then click Sharpen.
Apply drop shadow.
Now open your Lady Bug 3 element, copy & paste it as a new layer onto your canvas, then re-size it to 20%.
Go to Image, and click Free Rotate, set it to Right 30.00 and click Ok.
Using your move tool to position your Ladybug where you would like it. Once it is where you would like it, go to your layers pallet and right click on your LadyBug 3 element layer, then click Duplicate. Now go to Image, and click Mirror. Then take your move tool and move your Duplicated LadyBug3 element and position it where you would like it.
Now for both of your LadyBug 3 layers, go to Adjust, click Sharpness, then click Sharpen.
Then apply a drop shadow to both LadyBug elements.
Now open your Bird House element, copy & paste it as a new layer, then re-size it to 30%.
Use your move tool and move your Bird House to the top right of your Picket Fence.
Now in your layers pallet, Move your Bird House layer down so that it is above your two Pink Flower Blush layers.
Then go to Adjust, click Sharpness, then click Sharpen.
Apply a drop shadow.
Now open your Butterfly Trail element. Copy & paste it as a new layer, then re-size it to 50%.
Using your move tool move your Butterfly Trail to the left of your tag.
In your layers pallet right click on your Butterfly Trail layer and then click Duplicate, then go to Image, then click Mirror.
On both of your Butterfly Trail layers go to Adjust, click Sharpness, then click Sharpen.
Apply a drop shadow to BOTH Butterfly Trail elements.
Now lets open our Cardinal element, copy & paste it as a new layer onto your canvas, then re-size it to 25%. Use your move tool to position it on top of your Picket Fence.
Go to Adjust, click Sharpness, then click Sharpen.
Apply a drop shadow.
Open your Easter Egg 2 element, copy & paste it as a new layer onto your canvas, then re-size it to 10%, Now go over to your layers pallet and move your Easter Egg 2 layer down so that it is between the 2 Flower Pots layers. Then with your move tool back on your canvas, move your Easter Egg 2 so that it appearing to be coming out of your Flower Pots. (The one laying down)
Now on the top Flower Pots layer, get your eraser tool and erase parts of your lower Flower Pot so it looks like your egg is inside the pot.
On your Easter Egg 2 layer, go to Image and click Free Rotate, set to Right 20.00 and click Ok.
Go to Adjust, click Sharpness, then click Sharpen.
Apply a drop shadow.
Open your Easter Egg 5, now follow the same steps you took for your Easter Egg 2 element. You may have to erase a bit more the bottom pot so your egg appears the way you want it too.
Now open your tube of choice. Copy & paste it as a new layer onto your canvas, if you are using the same tube I am (if you are make sure you have a license to do so.) re-size it to 75%. (If you are not using the same tube, just re-size your tube to what ever looks good to you, there is nothing set in stone.)
Then I took my tube and positioned it using my move tool in front of my Picket Fence.
Then in my layers pallet I moved my tube layer down so that it was under both of my Flower Pots layers.
Then in the layers pallet I right clicked on my tube layer, then I click Duplicate. Then on the Duplicated layer I went to Adjust, and click Blur, then clicked Gaussian Blur, I set it to 3.00 and clicked Ok.
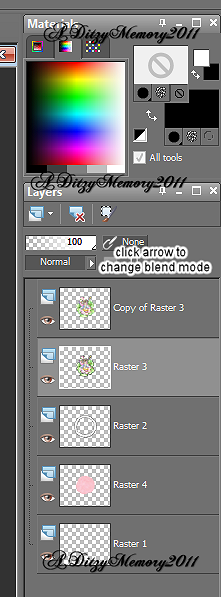
Then I changed my Blend Mode to Overlay (See screen shot below to locate where to change your blend mode , dont pay attention to my layers as this screen shot is from another tutorial but the location of the "change blend mode" button is the same place.)
Once you have your blend mode changed, click on your bottom tube layer and apply a drop shadow just to that layer.
Now lets add the name you would like on your tag.(If you like the font I used the name for it is at the top under "Supplies Needed".
You will want to make sure you add ALL of your copyright information at this time along with any credit for the person who made this beautiful kit :-)
Now once you have all of that important stuff included, you will want to merge your layers.
So go to your layers pallet, and right click on any layer, then click Merge, then on the slide out menu click Merge Visible.
Once all of your layers are merged, you may want to re-size your tag, depending on your personal preference and where you will be using your tag.
Once you have your layers merged and your tag re-sized (if you chose to) go to Adjust, and click Sharpness, then click Sharpen.
Now save your tag as a PNG & your done!!
Congrats on completing my tutorial! As always I would LOVE to see anything you have made from any of my tutorials. So please email me and make sure you include the tag you made so that I can display it on my blog!
Email me @ aditzymemory@yahoo.com
((HUGS))
Ditzy♥
Subscribe to:
Post Comments (Atom)
About Me

- DitzyDezigns
- New York, United States
- Hiya Everyone! My name is Ronney, I have 3 wonderful teenagers, and have been married to my husband for 20 years. I LOVE to design signatures, tags & avatars, I design with PSP, and have been designing for over 2 1/2 years. I will be not only designing signatures, tags & avatars but will also be writing & posting tutorials as well. I will also be making some templates to share with you all as well. So I hope you enjoy and can use everything I have available on my blog :-) If you ever try any of my tutorials,please send me your completed designs and I would love to showcase it here on my blog!
Labels
- Addictive Pleasures Tuts (35)
- Angel's Designz Tuts (10)
- Animated (26)
- Announcements (2)
- Awards (2)
- Beginner (17)
- Butterfly Blush Tuts (8)
- Cool Scraps Digital (2)
- Creative Intentionz (2)
- Creative Scraps By Crys (19)
- Ditzys Scrapkits (1)
- Forum Sets (1)
- FTU (6)
- Intermediate Level Tuts (3)
- Peekaboo Land (1)
- Peekaboo Land PTU (4)
- Peekaboo Land Tuts (1)
- Pimp My Tags With Scraps Tuts (14)
- PTU (131)
- Scappin Dollars Tuts (1)
- Scrappin Dollars Tuts (7)
- Scraps From The Heart Tuts (3)
- Scraps With Attitude (27)
- Tammy's Scraps (8)
- Updates (1)
- Wickedly Ditzy Scraps (1)




0 comments:
Post a Comment