♥Ditzy's TOU♥
All of the tutorials written by me are of my own Ditzy imagination.
Do NOT copy or alter them in ANY way.
Do NOT copy & paste the tutorials to any website, forum or group.
Do NOT claim them as your own.
If you would like to show or share my tutorial do so by using a link to bring your members to my blog. However if you do please send me a courtesy email so that I know my tutorials are being used according to my TOU. Also if you would please send me a link to where you will be posting my link.
If you have done any of my tutorials I would LOVE to see the outcome of what you have made, so please email me OR you can leave me a link in my shout box so that I can see what you have made and display it on my blog for others to enjoy as well.
Other than that please have fun,and I hope that you enjoy all my tutorials!
Email me @ DitzyDezigns@hotmail.com
Email Me
I would love to see what you have made using any of my tutorials, so please feel free to email me at the address below.
DitzyDezigns@hotmail.com
Add Me On Facebook
Blog Archive
-
▼
2011
(152)
-
▼
April
(27)
- ♥Sweet Love PTU (Animated)♥
- ♥Kawaii Gurl PTU**
- ♥Standing Ovation PTU♥
- ♥Haterz PTU♥
- ♥A Sweet Escape PTU (Animated)♥
- ♥You Are Perfect PTU♥
- ♥Chirpy PTU♥
- ♥Have A Perfect Birthday PTU (Animated)♥
- ♥Fantasy Land PTU♥
- ♥Summer Breeze PTU♥
- ♥Tropical Breeze PTU♥
- ♥Emo Princess PTU♥
- ♥Certified Cuteness PTU♥
- **Easter Bop FTU**
- **A Fairytale PTU**
- ♥Easter Garden Tea Party PTU♥
- ♥Fantasy PTU♥
- ♥Happy Easter FTU♥
- ♥Happy Easter PTU♥
- ♥Somewhere Over The Rainbow PTU♥
- ♥Enchanted PTU♥
- ♥Bunny Hop PTU♥
- ♥Sweet Pea PTU♥
- ♥Punk Star PTU♥
- ♥Easter Fun PTU♥
- ♥Candy Girl Forum Set PTU♥
- ♥Candy Girl Tag PTU♥
-
▼
April
(27)
Pages
Powered by Blogger.
Thursday, April 28, 2011
♥Standing Ovation PTU♥
Here is what we are going to make :
**Please remember that all of my tutorials are made using my own Ditzy noggin , any resemblance to any other tutorial is purely coincidental & unintentional!**
Supplies Needed :
PaintShop Pro X2 (Any version should work)
Tube of choice : I used the amazing work of Ismael Rac. (I purchased my tube from AMI, but since that has closed Ismael Rac sells his tubes @ his own store, XeracX (license IS required)
Scrapkit : Pink Desire by Missy @ Scraps With Attitude
Template 379 from Missy @ Divine Intentionz
Font of choice : I used HomeRun Script
Size: 100 Pixels
Color: #ff2996
Plug-ins (Optional)
Eye Candy 5 - Impact - Gradient Glow
Xero - Fritillary
Elements Used :
Elements 26, 24 ,23 ,50, 63, 51, 6, 12, 81, 18, 5, 8 ,11 ,46 ,38
Papers 1, 4, & 10
Lets Begin :
Open your template379. Go to Image, click Canvas Size and set your Width to 800 and your Height to 650
Click Ok.
Now in your layers pallet, delete your copyright layer from your template. (Please make sure that you have left Missy some luv on your blog for downloading/using her template!)
Now in your layers pallet, click on your Square layer to make it active, then go to Selections, click Select All, go to Selections again and click Float, then Selections again and click Defloat.
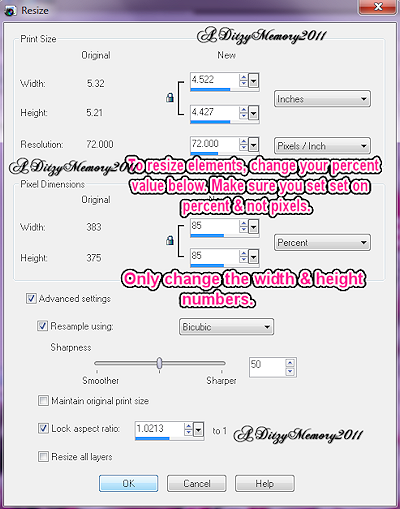
Now open Paper 1, copy & paste it as a new layer onto your canvas ,then re-size your paper to 85%.
Now go to Selections and click Invert.
On your keyboard press your Delete key ONE time.
Use your Ctrl & D keys to deselect. (Or you can go to Selections & click Select None)
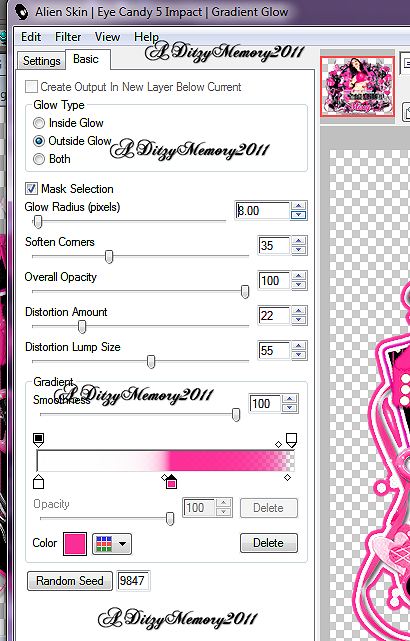
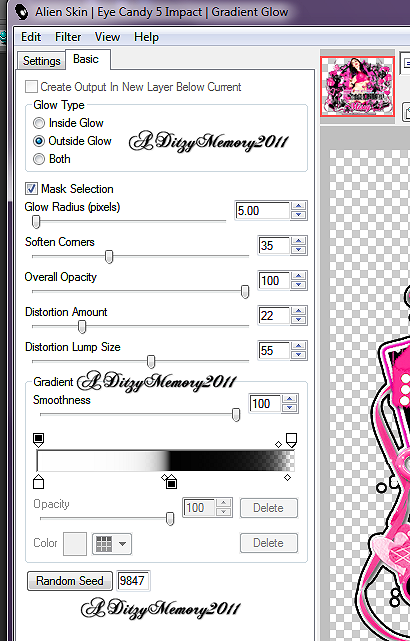
Now go to Effects, click Plug-ins, then click your Eye Candy 5 Impact then choose Gradient Glow from the slide out menu. You can use either my settings below or your own. But I wanted to give you an idea of what they should look like.
Click Ok
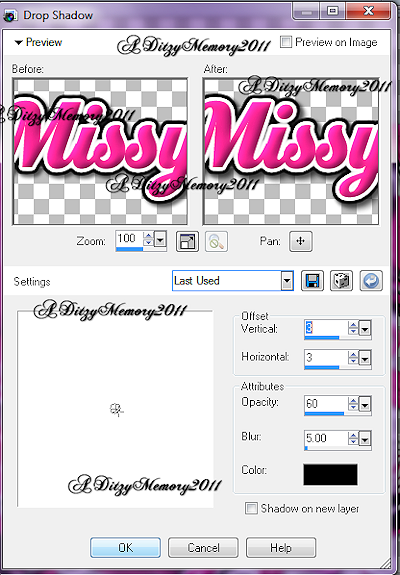
Now apply a drop shadow.
(To apply a drop shadow go to Effects, click 3D Effects, then click Drop Shadow) You can use my settings below or use your own,
Click Ok.
Now in your layers pallet, delete your original Square layer.
Now in your layers pallet click on your Large Circle layer, go to Selections, click Select All, then Selections again and click Float, then Selections again and click Defloat.
Now Open Paper4, copy & paste it as a new layer onto your canvas , then go to Selections and click Invert.
Now on your keyboard press your Delete key ONE time.
Use Ctrl & D to deselect.
Apply the same Gradient Glow that you did for the Square layer above and click Ok.
Now apply a drop shadow.
In your layers pallet delete your original Large Circle layer.
Now in your layers pallet click on your Square 1 layer, go to Selections, click Select All, then Selections again and click Float, then Selections again and click Defloat.
Open your Paper1, copy & paste it as a new layer onto your canvas ,then re-size it to 85%.
Go to Selections and click Invert, then on your keyboard press your Delete key ONE time.
Now use Ctrl & D keys on your keyboard to deselect.
Now add the same Gradient Glow that we added to the other layers.
Apply a drop shadow.
Now in your layers pallet delete your original Square 1 layer.
In your layers pallet click on your Square 2 layer, go to Selections, click Select All, then Selections again and click Float, then Selections again and click Defloat.
Open Paper10, copy & paste it as a new layer onto your canvas, then go to Selections and click Invert. On your key board press your Delete key ONE time.
Now Ctrl & D to deselect.
Go to your layers pallet and delete your original Square 2 layer.
Apply your Gradient Glow & drop shadow now.
In your layers pallet, click on your Large Circle 2, Go to Selections , click Select All, then Selections again and click Float, then Selections again and click Defloat.
Now make a new Raster Layer, then activate your Flood Fill tool (paint bucket) and set your color to black.Then click inside your selected area.
Now use Ctrl & D to deselect.
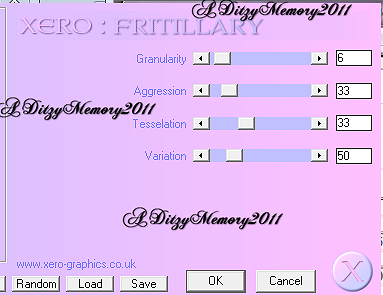
Now go to Effects, click Plug-ins, then click Xero then Fritillary, again you can use my settings below or your own.
Click Ok.
Now delete your original Large Circle 2 layer.
In your layers pallet click on your Large Circle 3 layer, go to Selections and click Select All, then Selections again and click Float, then Selections again and click Defloat.
Now make a new Raster Layer, and activate your Flood Fill tool (paint bucket) and set your color to #fe38b1, then click inside your selected area.
Now use Ctrl & D to deselect.
Then go to Effects, click Plug-ins and then Xero, then Fritillary and apply the same settings as we used above.
Now delete your original Large Circle 3 layer.
Now click on your Large Circle 4 in your layers pallet and apply a drop shadow.
Now in your layers pallet click on your Small Circle layer, go to Selections and click Select All, then go to Selections again and click Float, then Selections again and click Defloat.
Now open your Paper 1, copy & paste it as a new layer onto your canvas, then re-size it to 70%. Go to Selections and click Invert.
Then on your keyboard press your Delete key ONE time.
Now apply a drop shadow.
In your layers pallet delete your original Small Circle Layer.
Now in your layers pallet, click on your TOP wordart layer to make it active, then apply a drop shadow.
Now lets open our tube , copy & paste it as a new layer onto your canvas ,then position it in the middle of your tag. Go to your layers pallet and move your tube layer down so that it is below your wordart layers.
Now activate your eraser tool and erase the bottom part of your tube that goes back your white circle layer .
Now in your layers pallet, right click on your tube layer, go to Adjust, click Blur, then click Gaussian Blur from the slide out menu.
Set to 3.00 and click Ok.
Now change your Blend Mode to Overlay.
In your layers pallet click on your bottom tube layer (which would be your original tube) and apply a drop shadow.
Now open Element 38, copy & paste it as a new layer onto your canvas ,then re-size it to 85%. Using your move tool position your element 38 at the bottom of your tag.
Apply a drop shadow.
Now open Element 46, copy & paste it as a new layer onto your canvas, then re-size it to 10%.
Go to Adjust, click Sharpness then click Sharpen from the slide out menu.
Use your move tool and position your Element 46 to the upper left corner of your tag.
Apply a drop shadow.
Now in your layers pallet, right click on your Element 46 layer,then click Duplicate, then go to Image and click Mirror.
Using your move tool position your duplicated element 46 layer to the right side.
Now open Element 1, copy & paste it as a new layer onto your canvas ,then re-size it to 10%.
Using your move tool , move your Element 1 to the left side of your tag.
Now go to Adjust, click Sharpness, then click Sharpen.
Apply a drop shadow.
In your layers pallet, right click on your Element 1 layer, click Duplicate, then go to Image and click Mirror.
Now using your move tool, move your duplicated Element 1 layer to the right side of your tag and place it where you would like it.
Now lets open Element 8, copy & paste it as a new layer onto your canvas, then re-size it to 10%.
Use your move tool and position it on the left side of your tag.
Go to Adjust, click Sharpness, then click Sharpen.
Apply a drop shadow.
Go to your layers pallet, right click on your Element 8 layer, then click Duplicate, then go to Image and click Mirror. Now use your move tool to adjust the position so that it is on the right end somewhere in the middle.
Now open Element 5, copy & paste as a new layer onto your canvas, then re-size it to 75%. Use your move tool to position your element 5 to the bottom of your tag.
Apply a drop shadow.
Now open Element 18, copy & paste it as a new layer onto your canvas, then re-size it to 25%. Use your move tool and move your element 18 to the upper right side of your tag. Go to Adjust, click Sharpness then click Sharpen.
Apply a drop shadow.
In your layers pallet right click on your Element 18 layer and click Duplicate, then go to Image and click Mirror.
Now using your move tool again position your Element 18 to the left side of your tag and place it where you want it.
Now open your Element 52, copy & paste it as a new layer onto your canvas, then re-size it to 20%.
Use your move tool and position your element 52 to the top left corner by your Element 46 image, then in your layers pallet, move your Element 52 layer down so it is directly below your Element 46 layer.
Go to Adjust, click Sharpness, then click Sharpen.
Apply a drop shadow.
Go to your layers pallet and right click on your Element 52 layer, then click Duplicate, then go to Image and click Mirror. Use your move tool to position it on the right where your element 46 is.
In your layers pallet again move your duplicated Element 52 layer below your right sided element 46 layer.
Now open your Element 12, copy & paste it as a new layer onto your canvas ,then re-size it to 50%.
Using your move tool, move your Element 12 image to the left of your tag.
Now in your layers pallet, right click on your Element 12 layer and click Duplicate. Now go to Image and click Mirror. Use your move tool to adjust the position of your duplicated element if you need to.
Go to Adjust, click Sharpness then click Sharpen.
& apply a drop shadow. (Make sure you sharpen & apply a drop shadow to both of your Element 12 layers)
Now open your Element 6, copy & paste it as a new layer, then re-size it to 50%.
Using your move tool , move your Element 6 to the left of your tag, make sure you arent covering your black hearts we just added. Now go to your layers pallet and right click on your Element 6 layer, click Duplicate. Now go to Image and click Mirror.
Go to Adjust, click Sharpness then click Sharpen.
Apply a drop shadow. (Do this for both of your Element 6 layers)
Now open your Element 50, copy & paste it as a new layer, re-size it to 15%.
Go to Image and click Free Rotate, set to Right , 30.00 and click Ok.
Now position on your tag where you would like it.
Go to Adjust, click Sharpness, then click Sharpen.
Apply a drop shadow.
Now open your Element 51 , copy & paste it as a new layer onto your canvas ,then re-size it to 20%. Use your move tool and position your element 51 image to the left side of your tag.
In your layers pallet, move your Element 51 layer down so that it is below your Small Circle layer.
(You want the stick of your element to be hidden by the small circle layeR)
Now go to Adjust, click Sharpness then click Sharpen.
Apply a drop shadow.
Go to your layers pallet and right click on your Element 51 layer, click Duplicate. Now go to Image and click Mirror. Position more if you need to.
Now open your Element 63, copy & paste as a new layer onto your canvas ,then re-size it to 75%. Using your move tool position your element 63 to the left side of your tag, then in your layers pallet, move your element 63 layer down to the bottom so it is the last layer in your pallet. (Unless you are using a white background, then make it your second layer from the bottom :-)
Now right click on your Element 63 layer, click Duplicate, then go to Image and click Mirror.
Postion as needed.
For both of your Element 63 layers, go to Adjust, click Sharpness then click Sharpen, and
Apply a drop shadow to both .
Now open Element 26, copy & paste it as a new layer onto your canvas ,then re-size it to 10%.
Use your move tool and position it on the right side of your tag.
Go to Adjust, click Sharpness then click Sharpen.
Apply a drop shadow.
In your layers pallet, right click on your Element 26 layer and click Duplicate. Now to go Image and click Mirror. Now position your element where you would like it.
Now go to your layers pallet again and right click on your Element 26 layer and click Duplicate again, position where you want it. Duplicate your Element 26 layer 1 more time so that you have a total of 4 on your tag and place them threw out your tag.
Now open your Elements 23 & 24. Copy & paste them as a new layer onto your canvas, re-size Element 23 to 15%, and position to the bottom of your tag. Now re-size your Element 24 to 10%, and position them so that your Element 24 is on top of your Element 23. Now go to your layers pallet and right click on your Element 24 layer, then click Merge, then click Merge Down from the slide out menu.
Now go to Effects, click 3D Effects, and click Inner Bevel.
You can either use my settings below or make your own.
Click Ok.
Now to go Adjust, click Sharpness then click Sharpen.
Apply a drop shadow.
Now in your layers pallet, right click on your merged flower layer (Elements 23&24) and click Duplicate, position as desired,then duplicate it again and position as desired. You should now have a total of 4 merged flower layers.
I add some sparkle at this point, however I used a brush and can not remember where I got it from so I can not supply that for you, but if you go to google and do a search for psp sparkle brushes Im sure you will be able to find some :-)
Now it is time to add the name you would like on your tag :
Font : HomeRun Script
Size : 100 Pixels
Color : #ff2996
Once you have your name placed where you want it, go to your layer pallet and right click on your name layer, then click Convert Layer To Raster.
Now go to Effects, click 3D Effects then click Inner Bevel. (Settings below or use your own :-)
Click Ok.
Now go to Effects, click Plug-ins and then find your Eye Candy 5 Impact, and click on Gradient Glow. The settings I used for my name are different than the ones I used for my shapes in my template. So I am posting a screen shot of the settings I used for my font.
Click Ok.
Now apply a drop shadow to your name layer.
Add your copyright/credit information
Now once you have everything on your tag that you want there, go to your layers pallet and right click on any layer, then click Merge, then click Merge Visible from the slide out menu.
Now activate your crop tool and crop off any access canvas that we did not use. Careful not to crop to closely to your tag. If you make a mistake just hit your undo button and try it again.
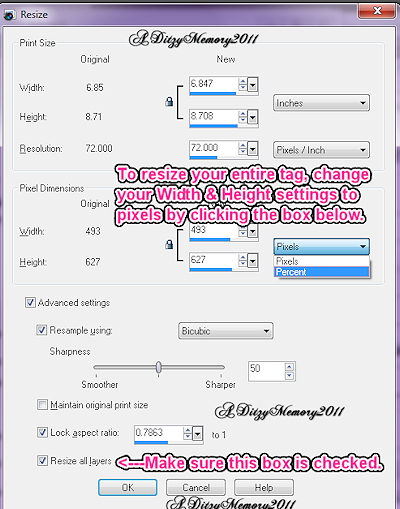
Now you may or may not need to re-size your tag, if you do now is the time to do that.
Click Ok.
Now to go Adjust, click Sharpness then click Sharpen.
Save as PNG!!!
Thats it!
Thanks for trying my tutorial, if you have any questions please feel free to email me. Also if you would kindly send me anything you make using any of my tutorials I would LOVE to see them, and display them on my blog!
Email : aditzymemory@yahoo.com
((HUGS))
Ditzy♥
Subscribe to:
Post Comments (Atom)
About Me

- DitzyDezigns
- New York, United States
- Hiya Everyone! My name is Ronney, I have 3 wonderful teenagers, and have been married to my husband for 20 years. I LOVE to design signatures, tags & avatars, I design with PSP, and have been designing for over 2 1/2 years. I will be not only designing signatures, tags & avatars but will also be writing & posting tutorials as well. I will also be making some templates to share with you all as well. So I hope you enjoy and can use everything I have available on my blog :-) If you ever try any of my tutorials,please send me your completed designs and I would love to showcase it here on my blog!
Labels
- Addictive Pleasures Tuts (35)
- Angel's Designz Tuts (10)
- Animated (26)
- Announcements (2)
- Awards (2)
- Beginner (17)
- Butterfly Blush Tuts (8)
- Cool Scraps Digital (2)
- Creative Intentionz (2)
- Creative Scraps By Crys (19)
- Ditzys Scrapkits (1)
- Forum Sets (1)
- FTU (6)
- Intermediate Level Tuts (3)
- Peekaboo Land (1)
- Peekaboo Land PTU (4)
- Peekaboo Land Tuts (1)
- Pimp My Tags With Scraps Tuts (14)
- PTU (131)
- Scappin Dollars Tuts (1)
- Scrappin Dollars Tuts (7)
- Scraps From The Heart Tuts (3)
- Scraps With Attitude (27)
- Tammy's Scraps (8)
- Updates (1)
- Wickedly Ditzy Scraps (1)





0 comments:
Post a Comment