♥Ditzy's TOU♥
All of the tutorials written by me are of my own Ditzy imagination.
Do NOT copy or alter them in ANY way.
Do NOT copy & paste the tutorials to any website, forum or group.
Do NOT claim them as your own.
If you would like to show or share my tutorial do so by using a link to bring your members to my blog. However if you do please send me a courtesy email so that I know my tutorials are being used according to my TOU. Also if you would please send me a link to where you will be posting my link.
If you have done any of my tutorials I would LOVE to see the outcome of what you have made, so please email me OR you can leave me a link in my shout box so that I can see what you have made and display it on my blog for others to enjoy as well.
Other than that please have fun,and I hope that you enjoy all my tutorials!
Email me @ DitzyDezigns@hotmail.com
Email Me
I would love to see what you have made using any of my tutorials, so please feel free to email me at the address below.
DitzyDezigns@hotmail.com
Add Me On Facebook
Blog Archive
-
▼
2011
(152)
-
▼
April
(27)
- ♥Sweet Love PTU (Animated)♥
- ♥Kawaii Gurl PTU**
- ♥Standing Ovation PTU♥
- ♥Haterz PTU♥
- ♥A Sweet Escape PTU (Animated)♥
- ♥You Are Perfect PTU♥
- ♥Chirpy PTU♥
- ♥Have A Perfect Birthday PTU (Animated)♥
- ♥Fantasy Land PTU♥
- ♥Summer Breeze PTU♥
- ♥Tropical Breeze PTU♥
- ♥Emo Princess PTU♥
- ♥Certified Cuteness PTU♥
- **Easter Bop FTU**
- **A Fairytale PTU**
- ♥Easter Garden Tea Party PTU♥
- ♥Fantasy PTU♥
- ♥Happy Easter FTU♥
- ♥Happy Easter PTU♥
- ♥Somewhere Over The Rainbow PTU♥
- ♥Enchanted PTU♥
- ♥Bunny Hop PTU♥
- ♥Sweet Pea PTU♥
- ♥Punk Star PTU♥
- ♥Easter Fun PTU♥
- ♥Candy Girl Forum Set PTU♥
- ♥Candy Girl Tag PTU♥
-
▼
April
(27)
Pages
Powered by Blogger.
Sunday, April 17, 2011
♥Fantasy PTU♥
Here is what we will be making :
**Please remember that my tutorials are written from my own Ditzy noggin, any resemblance to any other tutorial is purely coincidental & unintentional**
Supplies Needed :
PaintShop Pro X2 (Any version should work)
Animation Shop
Scrapkit is called Fantasy which you can purchase @ Pimp My Tags W/Scraps
Eye Candy 4 : Gradient Glow
Font : Happy Size : 50 - Color :#bf1e76
Elements Used :
Papers 2 & 9
Frame 6
Element 1
Element 5
Element 3
Element 2
Element 18
Element 10
Element 7
Element 24
Element 25
Element 28
Element 29
Element 38
Element 14
Element 20
Lets Begin :
Open a new 800 x 650 canvas transparent (Don't worry we can crop it later)
Open Frame 6, copy & paste it as a new layer onto your canvas, re-size it to 50%.
(To re-size something , you can do it one of two ways, you can either go to Image, click on "Re-size" OR you can use the Shift & S keys on your keyboard. Hold your shift key and press your s key and it will bring up your re-size menu as well.)
Now activate your magic wand, click anywhere on the inside of your frame. (make sure your frame layer is selected in your layers pallet.)
Now go to Selections, click Modify, then click Expand, set your Number Of Pixels to 5, and click Ok.
Now go to Layers & click on New Raster Layer.
Now open Paper 2, copy & paste it "INTO SELECTION".
In your layers pallet move your Paper 2 layer below your frame layer. (To move a layer just left click and hold on the layer you want to move, and drag it down or up whichever the case my be. Once you have it where you want it let go of your left mouse button)
Now go to Selections and click Select None.
Now in your layers pallet click on your Frame 6 layer, and then go to Effects, click 3D Effects, then click Add Drop Shadow. Set your settings to your choice and click ok.
Now open Element 1, copy & paste it as a new layer onto your canvas, then re-size it to 30%.
In your layers pallet move your Element 1 layer below your frame layer but above your paper2 layer.
Now open Element 5, copy & paste it as a new layer onto your canvas, then re-size it to 40%. Using your move tool position your Element 5 to the right side of your frame.
Go to Adjust, click Sharpness, then click Sharpen.
Apply a drop shadow.
Now open Element 3, copy & paste it as a new layer onto your canvas, then re-size it to 35%. Using your move tool position your Element 3 to the right side of your frame.
Open Element 2, copy & paste it as a new layer onto your canvas, re-size it to 40%, now using your move tool move this element2 over to the left and place it so that it appears to be sitting on the Element 3 (pink mushroom).
Now in your layers pallet, right click on your Element 2 layer, then click Duplicate, now go to Adjust, click Blur, then click Gaussian Blur, set your setting to 3.00 and click Ok.
Then change your Blend Mode to Overlay.
Now on your original Element 2 layer (the bottom one) apply a drop shadow.
Now open Element 18. Copy & paste it as a new layer onto your canvas, then re-size it to 65%. Use your move tool and position it behind Element 5 (mushroom house). Also make sure that your Element 5 (mushroom house) layer is above your Element 18 (orange tree) layer, and also make sure that it is below your paper & frame layer.
Now go to Adjust, click Sharpness, then click Sharpen.
Apply drop shadow.
In your layers pallet click on the very last layer (it should be blank)
Now open Paper 9, copy & paste it as a new layer, then go to Layers, click Load/Save Mask, then click Load Mask From Disk. Choose your mask of choice, and click Ok.
In your layers pallet again, right click on your Mask layer, then click Merge, then on the slide out menu click Merge Group.
Now re-size your mask to 80%.
Now lets open Element 10, copy & paste it as a new layer onto your canvas, then re-size it to 50%.
Go to your layers pallet and right click on your Element 10 layer, then click Duplicate, then go to Image, and click Mirror.
Now if you need to use your move tool and adjust the position of both your Element 10 images.
Now open Element 7, copy & paste it as a new layer onto your canvas, then re-size it to 20%. Now go to your layers pallet and right click on your Element 7 layer then click Duplicate.
Go to Image, and click Mirror. Using your move tool again adjust the position if you need to,
Then in your layers pallet again, right click on your duplicated Element 7 layer, So you should now have 3 layers of the Element 7 image. Use your move tool to position them where you want them.
For all 3 element 7 layers go Adjust , click Sharpness, then click Sharpen.
Apply a drop shadow to all those layers as well.
Now open your Element 24 , Copy & paste as a new layer onto your canvas, then re-size it to 45%.
Go to Image, then click Free Rotate, then set it to Right 30.00 and click ok.
Now in your layers pallet move this layer just above your mask layer.
Now lets open element 28. Copy & paste it as a new layer, then re-size it to 30%. Using your move tool position it on the right corner of your frame.
Go to Adjust, click Sharpness, then click Sharpen.
Apply a drop shadow as well.
Now go to your layers pallet, and right click on your element 28 layer and click Duplicate, then go to Image, and click Mirror and use your move tool again and position it on the left corner of your frame.
Lets open our element 29, Copy & paste as a new layer onto your canvas, re-size it to 50%. Use your move tool to position where you would like it.
Go to your layers pallet and move your element 29 layer down so it is under your Mushroom on the left and the Mushroom house on the right.
Go to Adjust, click Sharpness, then click Sharpen.
Apply a drop shadow.
Now open Element 38, BEFORE you copy & paste it go to Image, click Free Rotate, set it to Right 90.00 and click ok.
Now copy & paste as a new layer onto your canvas, then re-size it to 35%. In your layers pallet move your element 38 layer down in your layer pallet so that it is below your mushrooms.
Now right click on your element 38 layer and click Duplicate, then use your move tool and slide the Duplicated layer over to the right.
Now open your Element 14, copy & paste it as a new layer, then re-size it to 40%. Again using your move tool position your element 14 to the left.
Now in your layers pallet move your element 14 layer down so that it is under your fairy that looks like it is sitting, Now right click on your element 14 layer then click duplicate, then go to Image, and click Mirror.
Now go to Adjust, click Sharpness, then click Sharpen.
Apply a drop shadow.
Open element 20, copy & paste it as a new layer, then re-size it to 25%. Now using your move tool again position this element so that it is on top of Element 38. Now in your layers pallet right click on your Element 20 layer and click Duplicate, then using your move tool move the duplicated element to the right.
Do this until you have 6 layers of your Element 20.
Once you have all 6 layers positioned where you want them, right click on your top element 20 layer, then click Merge, then click Merge Down, continue to right click on the top element 20 layer and click Merge ,then Merge Down until all 6 element 20 layers become ONE.
Once they are all one layer go to Adjust, click Sharpness, then click Sharpen.
Apply a drop shadow.
Now copy & paste element 20 again, re-size it to 25%, then using your move tool position it at the top in the middle of your frame.
Go to Adjust, click Sharpness, then click Sharpen.
Apply drop shadow.
Open Element 34, copy & paste as a new layer, then re-size it to 20%, then position it where you would like it. Then in your layers pallet, right click on your element 34 layer, and click Duplicate.
Then go to Image, and click Mirror. Position it with your move tool if you need to.
Go to Adjust, click Sharpness, and then Sharpen. (Both element 34 layers)
Apply drop shadow to both element 34 layers.
Now you can add your name, I used the font Happy - Size : 50 - Color #bf1e76
Once you have your name the way you would like it. Go to your layers pallet, right click on your name layer and click Convert To Raster Layer.
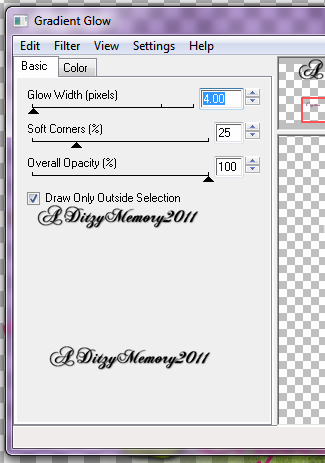
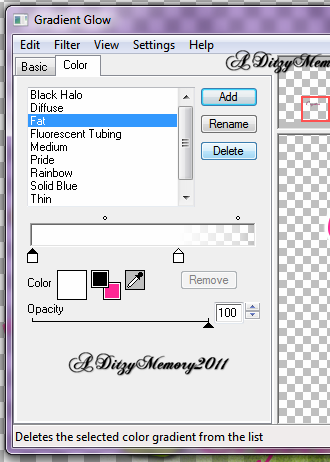
Go to Effects, click Plug-ins, then find your Eye Candy 4, then click on Gradient Glow, and you can either apply the settings like I have below or you can make your own gradient glow effect that you like. The choice is totally yours :-)
Basic Tab Settings :
Now in your layers pallet, make sure you on your name layer (click your name layer if you are not on it), then activate your Magic Wand tool, and click inside EACH letter in the name that you used for your tag.
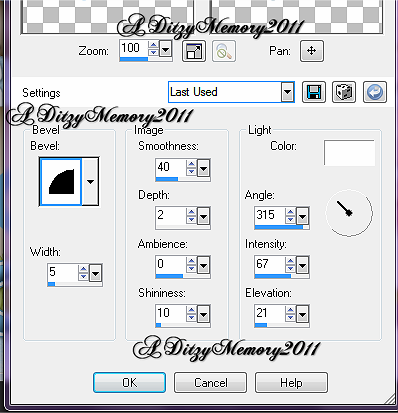
Once all letters are selected go to Effects, click 3D Effects, then click Inner Bevel, you can use my settings below or you can set your own Inner Bevel Settings, then choice is yours.
(Yours will show you the preview on top but I cropped mine off so that it wouldn't take up as much room, so just wanted to let you know that you aren't missing any settings on the top :-)
Apply a drop shadow to all those layers as well.
Now open your Element 24 , Copy & paste as a new layer onto your canvas, then re-size it to 45%.
Go to Image, then click Free Rotate, then set it to Right 30.00 and click ok.
Now in your layers pallet move this layer just above your mask layer.
Now lets open element 28. Copy & paste it as a new layer, then re-size it to 30%. Using your move tool position it on the right corner of your frame.
Go to Adjust, click Sharpness, then click Sharpen.
Apply a drop shadow as well.
Now go to your layers pallet, and right click on your element 28 layer and click Duplicate, then go to Image, and click Mirror and use your move tool again and position it on the left corner of your frame.
Lets open our element 29, Copy & paste as a new layer onto your canvas, re-size it to 50%. Use your move tool to position where you would like it.
Go to your layers pallet and move your element 29 layer down so it is under your Mushroom on the left and the Mushroom house on the right.
Go to Adjust, click Sharpness, then click Sharpen.
Apply a drop shadow.
Now open Element 38, BEFORE you copy & paste it go to Image, click Free Rotate, set it to Right 90.00 and click ok.
Now copy & paste as a new layer onto your canvas, then re-size it to 35%. In your layers pallet move your element 38 layer down in your layer pallet so that it is below your mushrooms.
Now right click on your element 38 layer and click Duplicate, then use your move tool and slide the Duplicated layer over to the right.
Now open your Element 14, copy & paste it as a new layer, then re-size it to 40%. Again using your move tool position your element 14 to the left.
Now in your layers pallet move your element 14 layer down so that it is under your fairy that looks like it is sitting, Now right click on your element 14 layer then click duplicate, then go to Image, and click Mirror.
Now go to Adjust, click Sharpness, then click Sharpen.
Apply a drop shadow.
Open element 20, copy & paste it as a new layer, then re-size it to 25%. Now using your move tool again position this element so that it is on top of Element 38. Now in your layers pallet right click on your Element 20 layer and click Duplicate, then using your move tool move the duplicated element to the right.
Do this until you have 6 layers of your Element 20.
Once you have all 6 layers positioned where you want them, right click on your top element 20 layer, then click Merge, then click Merge Down, continue to right click on the top element 20 layer and click Merge ,then Merge Down until all 6 element 20 layers become ONE.
Once they are all one layer go to Adjust, click Sharpness, then click Sharpen.
Apply a drop shadow.
Now copy & paste element 20 again, re-size it to 25%, then using your move tool position it at the top in the middle of your frame.
Go to Adjust, click Sharpness, then click Sharpen.
Apply drop shadow.
Open Element 34, copy & paste as a new layer, then re-size it to 20%, then position it where you would like it. Then in your layers pallet, right click on your element 34 layer, and click Duplicate.
Then go to Image, and click Mirror. Position it with your move tool if you need to.
Go to Adjust, click Sharpness, and then Sharpen. (Both element 34 layers)
Apply drop shadow to both element 34 layers.
Now you can add your name, I used the font Happy - Size : 50 - Color #bf1e76
Once you have your name the way you would like it. Go to your layers pallet, right click on your name layer and click Convert To Raster Layer.
Go to Effects, click Plug-ins, then find your Eye Candy 4, then click on Gradient Glow, and you can either apply the settings like I have below or you can make your own gradient glow effect that you like. The choice is totally yours :-)
Basic Tab Settings :
Color Tag Settings :
Now in your layers pallet, make sure you on your name layer (click your name layer if you are not on it), then activate your Magic Wand tool, and click inside EACH letter in the name that you used for your tag.
Once all letters are selected go to Effects, click 3D Effects, then click Inner Bevel, you can use my settings below or you can set your own Inner Bevel Settings, then choice is yours.
My Inner Bevel Settings :
Now to deselect your letters you can either use your Ctrl & D keys on your keyboard, or you can go to Selections and click Select None.
Making sure you name layer is still activated in your layers pallet, go to Effects, click 3D Effects and then click Drop Shadow.
Now make sure that you also add any and ALL copyright & credit information to your tag!
Once you have everything added that you would like to add & that you NEED to add :-) you will want to merge your layers, so right click on any layer in your layers pallet, then click Merge, then click Merge Visible.
Once your layers are Merged you will want to Crop your tag, so get your group tool out and crop off any of the unused canvas. Make sure not to get to close to your design. If you do , DO NOT PANIC lol, just hit your undo button and try it again :-)
Now you may or may not want to re-size your tag it all depends on where you are going to be using it and your own personal preference. But if you would like to re-size your tag, you can do this one of two ways, you can use your "Shift & S" keys on your keyboard and your re-size menu will pop up, OR you can go to Image, then click Re-size :-) Either way will bring up your re-size menu. Set it to your liking, then click Ok.
Now I always like to sharpen my completed tag. So I go to Adjust, then click Sharpness, then click Sharpen.
Now save it as a PNG!!!
Congrats! You have finished the tutorial!
As always I would LOVE to see and display anything that you make using any of my tutorials, so please make sure you email me and include the design you made from my tutorial.
You can email me @ aditzymemory@yahoo.com
((HUGS))
Ditzy♥
Subscribe to:
Post Comments (Atom)
About Me

- DitzyDezigns
- New York, United States
- Hiya Everyone! My name is Ronney, I have 3 wonderful teenagers, and have been married to my husband for 20 years. I LOVE to design signatures, tags & avatars, I design with PSP, and have been designing for over 2 1/2 years. I will be not only designing signatures, tags & avatars but will also be writing & posting tutorials as well. I will also be making some templates to share with you all as well. So I hope you enjoy and can use everything I have available on my blog :-) If you ever try any of my tutorials,please send me your completed designs and I would love to showcase it here on my blog!
Labels
- Addictive Pleasures Tuts (35)
- Angel's Designz Tuts (10)
- Animated (26)
- Announcements (2)
- Awards (2)
- Beginner (17)
- Butterfly Blush Tuts (8)
- Cool Scraps Digital (2)
- Creative Intentionz (2)
- Creative Scraps By Crys (19)
- Ditzys Scrapkits (1)
- Forum Sets (1)
- FTU (6)
- Intermediate Level Tuts (3)
- Peekaboo Land (1)
- Peekaboo Land PTU (4)
- Peekaboo Land Tuts (1)
- Pimp My Tags With Scraps Tuts (14)
- PTU (131)
- Scappin Dollars Tuts (1)
- Scrappin Dollars Tuts (7)
- Scraps From The Heart Tuts (3)
- Scraps With Attitude (27)
- Tammy's Scraps (8)
- Updates (1)
- Wickedly Ditzy Scraps (1)


0 comments:
Post a Comment