♥Ditzy's TOU♥
All of the tutorials written by me are of my own Ditzy imagination.
Do NOT copy or alter them in ANY way.
Do NOT copy & paste the tutorials to any website, forum or group.
Do NOT claim them as your own.
If you would like to show or share my tutorial do so by using a link to bring your members to my blog. However if you do please send me a courtesy email so that I know my tutorials are being used according to my TOU. Also if you would please send me a link to where you will be posting my link.
If you have done any of my tutorials I would LOVE to see the outcome of what you have made, so please email me OR you can leave me a link in my shout box so that I can see what you have made and display it on my blog for others to enjoy as well.
Other than that please have fun,and I hope that you enjoy all my tutorials!
Email me @ DitzyDezigns@hotmail.com
Email Me
I would love to see what you have made using any of my tutorials, so please feel free to email me at the address below.
DitzyDezigns@hotmail.com
Add Me On Facebook
Blog Archive
-
▼
2011
(152)
-
▼
October
(15)
- ♥Autumn Bouquet PTU♥
- ♥Trick Or Treat PTU♥
- ♥Autumn Colors PTU♥
- ♥Shades Of November PTU♥
- ♥Good Witch Or Bad Witch PTU♥
- ♥Happy Halloween PTU♥
- ♥Bubble Bubble PTU♥
- ♥Brewing Up Some Fun PTU♥
- ♥Spooky Sweet PTU♥
- ♥FYI♥
- ♥Emo Witch PTU♥
- ♥This Is Halloween♥ PTU
- ♥Let It Be Captured PTU♥
- ♥Finding Neverland PTU♥
- ♥Jaggedy Lantern FTU (Animated)♥
-
▼
October
(15)
Pages
Powered by Blogger.
Thursday, October 27, 2011
♥Trick Or Treat PTU♥
**This tutorial was written & posted by Ditzy Dezigns on October 26th 2011**
***Any resemblance to any other tutorial is purely coincidental & completely unintentional!!***
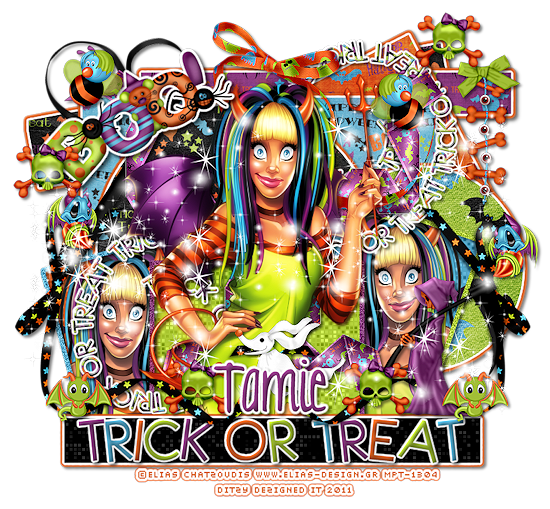
Here is what we will be making :
Supplies Needed :
Paint Shop Pro X2 (Any version should work)
Tube Of Choice - I used Elias Chatzoudis @ PTE
(I purchased my tube when he was at MPT that is why my MPT # is on this tag)
Scrapkit - Trick Or Treat By Tamie @ Addictive Pleasures
Template - Temp 10 By Tamie @ Addictive Pleasures Templates
Plugins Used :
Eye Candy 4000 - Gradient Glow (Optional)
Eye Candy 5 Impact - Gradient Glow (Optional)
Xero - Fritillary (Optional)
Font Used :
KG Love You Through It
Elements Used :
P5
P10
P8
P9
P11
P2
Ribbon
Text 2
Boo
Reaper
Demon
Ghost Dog
Dangler
Bug
Bee
Ribbon Bow
Ribbon Bow 2
Ribbon 3
Skull
Sparkles
Lets Begin :
Start by opening your Temp110 -
Go to Image - Canvas Size - set to 800 X 800 . (Don't worry you will crop & re-size at the end of the tutorial)
Now go to your layers pallet - delete the following layers :
Raster 1 (Credit layer)
Background
Now in your layers pallet - click on your Raster 7 layer - go to Selections - click Select All, then back to Selections - click Float - then back to Selections - click Defloat -
Open P11 - Copy & paste it as a new layer onto your canvas - then go to Selections - click Invert - now on your keyboard press your Delete key 1 time. Now go to Selections & click Select None.
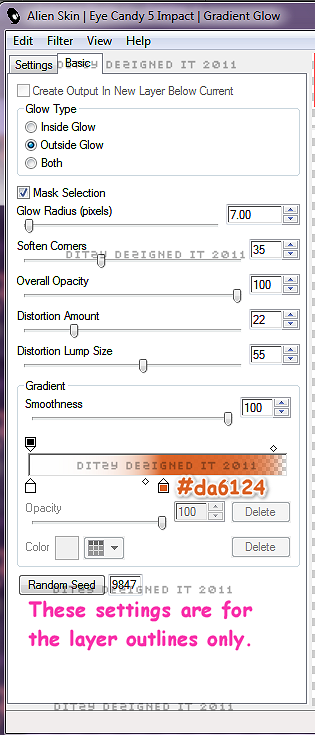
Go to Effects - click Plugins - then click Eye Candy 5 Impact - then click Gradient Glow :
*You are welcome to use my settings below or your own, its up to you*
Then click Ok.
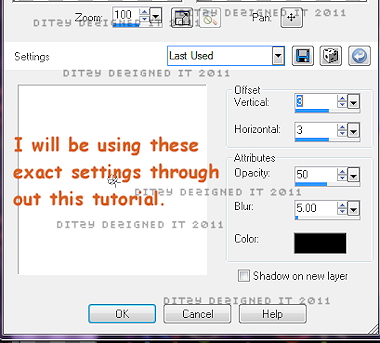
Now go to Effects - click 3D Effects - then click Drop Shadow :
*Again you can use my settings below or your own*
Then click Ok.
Now go back to your layers pallet & delete your original Raster 7 layer.
Now you will follow all of the same steps you followed for your Raster 7 layer for the following layers. I have added what paper I used for each layer.
Raster 10 - Use P10
Raster 8 - Use P8
Raster 4 - Use P9
Raster 5 - Use P11
Raster 6 - Use P2
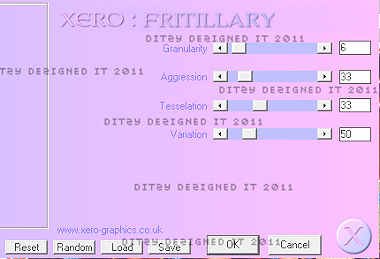
Now in your layers pallet - click on your Raster 2 layer - go to Effects - click Plugins - then click Xero - then click Fritillary -
Then click Ok.
Now keeping this Raster 2 layer selected, open your tube of choice - Copy & paste it as a new layer - then using your Move tool - position your tube within the marching ants to your liking.
Then go to Selections - click Invert - then on your keyboard press your Delete key 1 time. Then go back to Selections - click Select None.
Now go to your layers pallet - click on Raster 3 layer - follow the same steps that you did for your Raster 2 layer.
Then click on your Raster 14 layer - go to Effects - click Plugins - Xero - click Fritillary - apply the same settings as you did for the other layers. Then click Ok.
Now in your layers pallet - click on your Raster 12 layer - go to Adjust - click Add/Remove Noise - then click Add Noise. Set to Uniform, 50 & make sure your Monochrome box IS checked, then click Ok.
Then go to Effects - click 3D Effects - then click Drop Shadow.
*Use the same settings you have been using through out the tutorial*
Then click Ok.
Now follow the same steps you just did for your Raster 12 layer for the following layers :
Raster 13
Raster 15
Now Copy & paste your main tube of choice - as a new layer onto your canvas - then position it to the center of your template.
Go to your layers pallet - move your full tube layer down so that it is directly below your Raster 9 layer.
Then on your full tube layer - right click, click Duplicate. Then go to Adjust - click Blur - then click Gaussian Blur, set it to 5.00 & click Ok.
Then go back to your layers pallet, at the top and change your Blend Mode from Normal - to Overlay.
Now click on your original full tube layer (the one on the bottom) and go to Effects - 3D Effects - Drop Shadow. (Same settings as before & click Ok)
Now click on your Raster 9 layer - go to Effects - Plugins - Xero - Fritillary - use the same settings as before, so you should only have to click Ok to apply it.
Now go to Effects - click Plugins - then click Eye Candy 5 Impact - Gradient Glow - Again you will be using the same settings as before, (which should now be saved) so just click Ok.
Then go to Effects - click 3D Effects - Drop Shadow (same settings, click Ok)
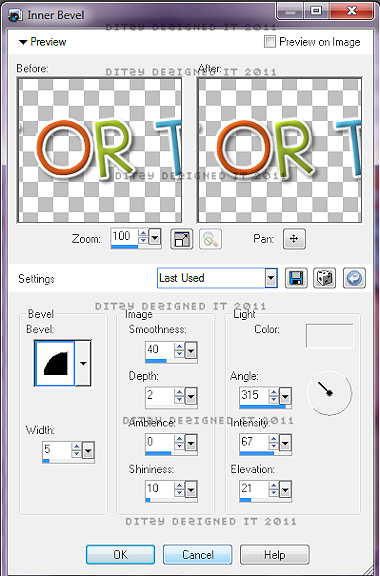
Now click on Raster 11 - go to Effects - 3D Effects - then click Inner Bevel -
Then click OK.
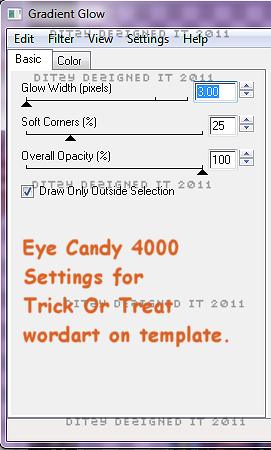
Now go to Effects - Plugins - Eye Candy 4000 - Gradient Glow -
***These settings are different than your Eye Candy 5 Gradient Glow settings, you are welcome to use mine, or play around with your settings to get the effect that you like.***
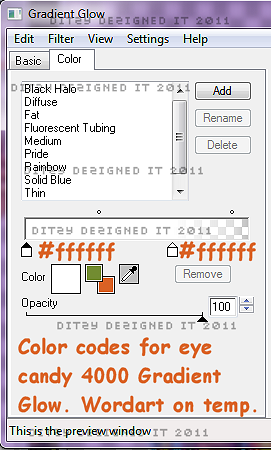
Before you click ok, make sure you click on the Color tab & set your colors as well.
Click Color Tab -
Now click Ok.
Then go to Effects - 3D Effects - Drop Shadow (Same settings, click Ok)
Now lets add some elements -
Open Text 2 element - Copy & paste it as a new layer onto your canvas - then using your Move Tool - position your Text 2 element to the center of your template.
Then go to Effects - Plugins - Eye Candy 4000 - Gradient Glow
(Use same settings as you just did above then click Ok.)
Now go to Effects - 3D Effects - Drop Shadow (same settings, click Ok)
Now in your layers pallet - Move your Text 2 layer down so it is directly under BOTH of your full tube layers. (The tube that is in the center of your canvas.)
Now open your Boo element - Copy & paste it as a new layer onto your canvas - then re-size it to 50%. Go to Image - click Free Rotate - set it to Left 30.00 & click Ok.
Now go to Effects - click Plugins - then click Eye Candy 4000 - Gradient Glow
*For this effect you will up the Glow Width (pixels) to 4.00.*Other than that everything is the same.
Now click Ok.
Using your Move tool position your Boo element to the top left corner of your template.
Go to Effects - click 3D Effects - Drop Shadow (same settings , click Ok)
Now open your Reaper element - Copy & Paste it as a new layer onto your canvas - then re-size it to 50%. Then re-size it again to 65%. Use your move tool to position it to your liking.
Go to Adjust - click Sharpness - then click Sharpen
Effects - 3D Effects - Drop Shadow (same settings, click Ok)
Open your Demon element - Copy & paste it as a new layer onto your canvas - then re-size it to 30%. Use your move tool & position your Demon element to your liking.
Adjust - Sharpness - Sharpen
Effects - 3D Effects - Drop Shadow (Same settings, click Ok)
Open your Ghost Dog element - Copy & paste it as a new layer onto your canvas - then re-size it to 30%. Use your Move tool & position your Ghost Dog element to your liking.
Adjust - Sharpness - Sharpen
Effects - 3D Effects - Drop Shadow (same settings, click Ok)
Open your Dangler element - Copy & paste it as a new layer onto your canvas - then re-size it to 35%. Using your move tool position your Dangler element to your liking.
Adjust - Sharpness - Sharpen
Effects - 3D Effects - Drop Shadow (same settings, click Ok
Open your Bug element - Copy & paste it as a new layer onto your canvas - then re-size it to 30%. Using your move tool, position your Bug element to your liking.
Adjust - Sharpness - Sharpen
Effects - 3D Effects - Drop Shadow (Same settings , click Ok )
Open your Bee element - Copy & paste it as a new layer onto your canvas - then re-size it to 30%. Using your move tool, position your Bee element to your liking.
Adjust - Sharpness - Sharpen
Effects - 3D Effects - Drop Shadow (same settings, click Ok)
Open your Ribbon element - Copy & paste it as a new layer onto your canvas, then using your Move Tool to position your Ribbon to your liking.
Adjust - Sharpness - Sharpen
Effects - 3D Effects - Drop Shadow (same settings, click Ok)
Open your Ribbon Bow element - Copy & paste it as a new layer onto your canvas - then re-size it to 75%. Now using your move tool, position your Ribbon Bow element to the left side of your template.
Adjust - Sharpness - Sharpen
Effects - 3D Effects - Drop Shadow (same settings, click Ok)
Now go your layers pallet - right click on your Ribbon Bow layer - then click Duplicate.
Now go to Image - click Mirror.
Now open your Ribbon Bow 2 element - Copy & paste it as a new layer onto your canvas - then re-size it to 75%. Now position it towards the center of your template.
Adjust - Sharpness - Sharpen
Effects - 3D Effects - Drop Shadow (same settings, click Ok)
In your layers pallet move your Ribbon Bow 2 layer down under both of your full tube layers.
Open your Ribbon 3 element - Copy & paste it as a new layer onto your canvas - then position it to your liking.
Adjust - Sharpness - Sharpen
Effects - 3D Effects - Drop Shadow (same settings, click Ok)
Open your Skull element - Copy & paste it as a new layer onto your canvas - then re-size it to 30%. Position it to your liking.
Adjust - Sharpness - Sharpen
Effects - 3D Effects - Drop Shadow (same settings, Click Ok)
Now go to your layers pallet - right click on your Skull layer - then click Duplicate. Now use your move tool to position your duplicated Skull element to your liking. Then go back to your layers pallet - & duplicate your Skull layer a couple more times, positioning each one around your tag to your liking.
Now open your Sparkles element - Copy & paste it as a new layer onto your canvas - then position it towards the bottom of your template.
Adjust - Sharpness - Sharpen
Do not apply a drop shadow to this element.
Go to your layers pallet - right click on your Sparkle layer - click Duplicate. Go to Image & click Flip. Use your Move Tool to adjust the position of your duplicated Sparkle element to the top of your template.
Now add your name & credit information.
For the name I used the following :
Font : KG Love You Through It
Size : 80 Pixels
Background Color : #8d3c82
Foreground Color : Set to nul
Now apply & position your name to your liking.
Go to your layers pallet - right click on your Name layer - then click Convert To Raster Layer.
Go to Effects - 3D Effects - Inner Bevel (Use the same settings as before )
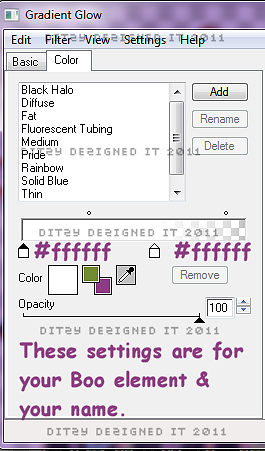
Now go to Effects - click Plugins - Eye Candy 4000 - Gradient Glow
Then click Color Tab :
Then click Ok
Go to Effects - 3D Effects - Drop Shadow (same settings, click Ok)
Now if your happy with the placement of your elements & name, go to your layers pallet - right click on any layer - click Merge - then click Merge Visible.
Now activate your Crop tool - crop off any access canvas that you did not use.
Now you may or may not need to re-size your tag, depending on where you will be using it.
If you re-size your tag be sure to apply one last Sharpen to it.
Now all that is left is to save your tag as a PNG file & you have completed this tutorial!! ♥
Subscribe to:
Post Comments (Atom)
About Me

- DitzyDezigns
- New York, United States
- Hiya Everyone! My name is Ronney, I have 3 wonderful teenagers, and have been married to my husband for 20 years. I LOVE to design signatures, tags & avatars, I design with PSP, and have been designing for over 2 1/2 years. I will be not only designing signatures, tags & avatars but will also be writing & posting tutorials as well. I will also be making some templates to share with you all as well. So I hope you enjoy and can use everything I have available on my blog :-) If you ever try any of my tutorials,please send me your completed designs and I would love to showcase it here on my blog!
Labels
- Addictive Pleasures Tuts (35)
- Angel's Designz Tuts (10)
- Animated (26)
- Announcements (2)
- Awards (2)
- Beginner (17)
- Butterfly Blush Tuts (8)
- Cool Scraps Digital (2)
- Creative Intentionz (2)
- Creative Scraps By Crys (19)
- Ditzys Scrapkits (1)
- Forum Sets (1)
- FTU (6)
- Intermediate Level Tuts (3)
- Peekaboo Land (1)
- Peekaboo Land PTU (4)
- Peekaboo Land Tuts (1)
- Pimp My Tags With Scraps Tuts (14)
- PTU (131)
- Scappin Dollars Tuts (1)
- Scrappin Dollars Tuts (7)
- Scraps From The Heart Tuts (3)
- Scraps With Attitude (27)
- Tammy's Scraps (8)
- Updates (1)
- Wickedly Ditzy Scraps (1)





0 comments:
Post a Comment