♥Ditzy's TOU♥
All of the tutorials written by me are of my own Ditzy imagination.
Do NOT copy or alter them in ANY way.
Do NOT copy & paste the tutorials to any website, forum or group.
Do NOT claim them as your own.
If you would like to show or share my tutorial do so by using a link to bring your members to my blog. However if you do please send me a courtesy email so that I know my tutorials are being used according to my TOU. Also if you would please send me a link to where you will be posting my link.
If you have done any of my tutorials I would LOVE to see the outcome of what you have made, so please email me OR you can leave me a link in my shout box so that I can see what you have made and display it on my blog for others to enjoy as well.
Other than that please have fun,and I hope that you enjoy all my tutorials!
Email me @ DitzyDezigns@hotmail.com
Email Me
I would love to see what you have made using any of my tutorials, so please feel free to email me at the address below.
DitzyDezigns@hotmail.com
Add Me On Facebook
Blog Archive
-
▼
2011
(152)
-
▼
October
(15)
- ♥Autumn Bouquet PTU♥
- ♥Trick Or Treat PTU♥
- ♥Autumn Colors PTU♥
- ♥Shades Of November PTU♥
- ♥Good Witch Or Bad Witch PTU♥
- ♥Happy Halloween PTU♥
- ♥Bubble Bubble PTU♥
- ♥Brewing Up Some Fun PTU♥
- ♥Spooky Sweet PTU♥
- ♥FYI♥
- ♥Emo Witch PTU♥
- ♥This Is Halloween♥ PTU
- ♥Let It Be Captured PTU♥
- ♥Finding Neverland PTU♥
- ♥Jaggedy Lantern FTU (Animated)♥
-
▼
October
(15)
Pages
Powered by Blogger.
Saturday, October 1, 2011
♥Jaggedy Lantern FTU (Animated)♥
**This tutorial was written & posted by DitzyDezigns on October 1st 2011**
***Any resemblance to any other tutorial is purely coincidental & completely unintentional!!***
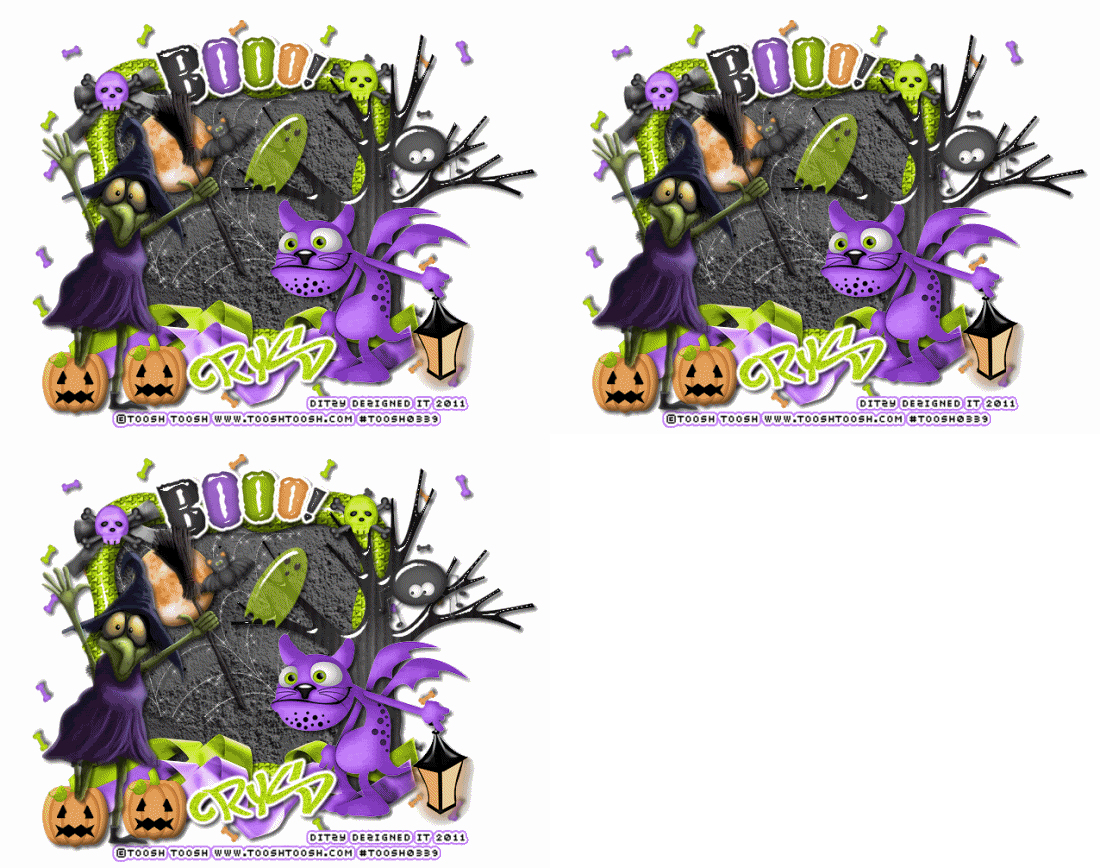
Here is what we will be making :
Supplies Needed :
Paint Shop Pro X2 (Any version should work)
Animation Shop
Tube Of Choice - I used the adorable work of Toosh Toosh (License Required)
Scrapkit - Jaggedy Lantern FTU By Creative Scraps By Crys
(Kit was FTU at the time this tutorial was written. I am not responsible if the kit maker expires the link at a later time.)
Plugins Used :
Eye Candy 4000 - Gradient Glow (Optional)
Eye Candy 5 Impact - Gradient Glow (Optional)
Eye Candy 5 Impact - Glass (Optional)
Alien Skin Xenofex 2 - Constellation (Optional for animation)
Font Used :
Most Wanted
Elements Used
Frame 5
Paper_8
Element_30
Element_28
Element_2
Element_5
Element_6
Element_10
Element_4
Element_27
Element_29
Element_31
Element_37
Element_39
Element_21
Element_20
Element_36
Lets Begin :
****Please note - I post screen shots with settings that I used for each tutorial, please feel free to use my settings if you would like, I have no problem at all with that. You may also play around with your own settings to get a look that you prefer. Nothing is set in stone. But I want you to feel comfortable and if you are just learning & would like to use my settings please feel free, that is what they are there for.****
Start with opening a new 800 X 600 white canvas. (Don't worry you will crop it later. This just gives you enough room to work.)
Now from your scrapkit - Open Frame_5 - Copy & paste it as a new layer onto your canvas - then position it in the center of your canvas.
Now activate your Magic Wand tool - then click inside your Frame_5
Then go to Selections - Modify - Expand - Set it to 8 then click ok.
Now from your scrapkit - open Paper_8 - Copy & paste it as a new layer onto your canvas - then go to Selections - click Invert. Then on your keyboard press your Delete key 1 time. Now go back to Selections & click Select None.
Go over to your Layers Pallet - move your Paper_8 layer down so that it is directly under your Frame_5 layer.
Now in your layers pallet - click on your Frame_5 layer - then go to Adjust - click Sharpness - then click Sharpen.
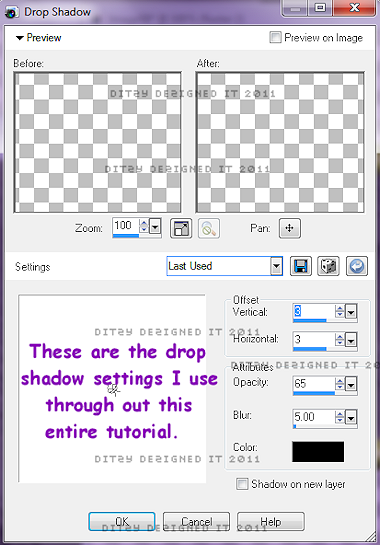
Now go to Effects - click on 3D Effects - then click Drop Shadow
(see added note on screen shot)
Click Ok.
Open Element_30 - Copy & paste it as a new layer onto your canvas - then re-size it to 65%. Using your move tool position your element_30 to the right side of your Frame_5.
Now go to Effects - click Plugins - then click Eye Candy 5 Impact - Glass
Click Ok.
Now go to Effects - 3D Effects - Drop Shadow (Use the same settings you used above)
Now open Element_28 - Copy & Paste it as a new layer onto your canvas - then re-size it to 25%. Using your move tool, position your element to the upper left corner of your Frame_5.
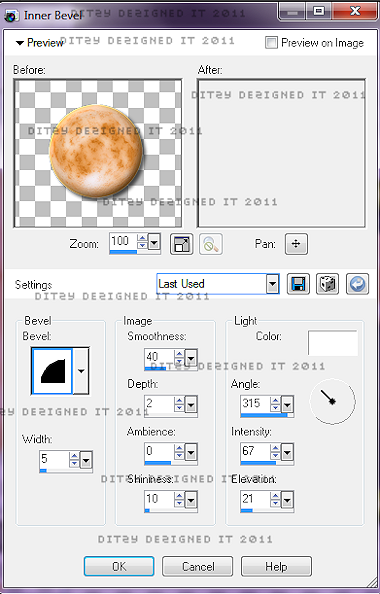
Now go to Effects - click 3D Effects - then click Inner Bevel
Click Ok
Now open Element _2 - Copy & paste it as a new layer onto your canvas - then re-size it to 45%. Position it to the right side of your frame. Make it so it is in front of your Tree element. (Element_30)
Go to Adjust - Sharpness - Sharpen
Then apply a drop shadow.
Open Element_5 - Copy & paste it as a new layer onto your canvas - then re-size it to 40%. Position it in the inside of your Frame_5.
Now go to Adjust - Sharpness - Sharpen
Then apply a drop shadow.
Then go to your layers pallet and right click on your Element_5 - then click Duplicate. Then right click on your Duplicated Element_5 layer & click Duplicate again.
Now if you are going to animate you will need to do these next steps, if you wish not to animate, then do not duplicate your Element_5 layer & move on to the step "Open Element_6")
Now in your layers pallet - you will want to rename the 3 Element_5 (Web) layers. Starting from the one on the bottom, rename it to Web 1, then the second one rename it Web 2, then the 3rd one rename it Web 3.
Now next to each layer you will see an eye icon. One your Web 2 & Web 3 layers , click the eye next to each of those two layers. Then click on the Web 1 layer its self. (not the eye)
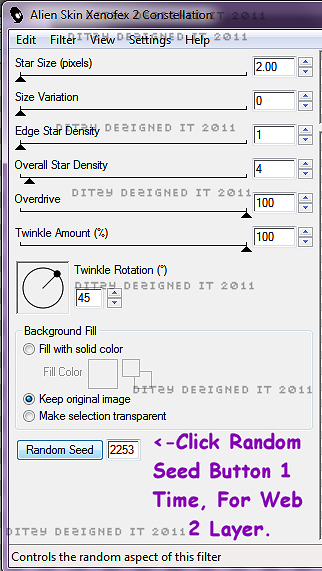
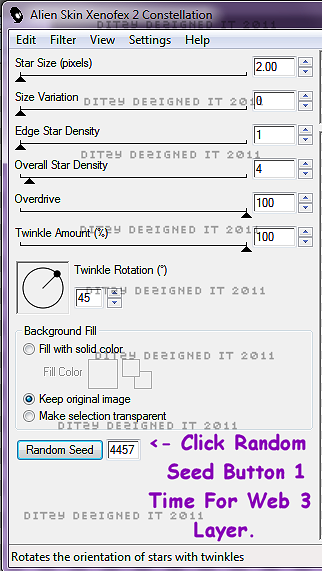
Go to Effects - click Plugins - Alien Skin Xenofex 2 - Constellation
Then click Ok.
Now in your layers pallet - click on the eye next to your Web 2 layer to open that layer. Then click the eye next to your Web 1 layer to close the layer. Then click on your Web 2 layer - go to Effects - Plugins - Alien Skin Xenofex 2 - Constellation - This time you will only click the Random Seed button 1 time , then click Ok.
Now in your layers pallet - click the eye next to your Web 3 layer to open it, then click the eye on your Web 2 layer to close it. Click on your Web 3 layer - Effects - Plugins - Alien Skin Xenofex 2 - Constellation .
Again this time you will only click your Random Seed button 1 time, then click Ok
Now in your layers pallet - click the eye next to your Web 1 layer to open it. Then click the eye next to your Web 3 layer to close it. (We will come back to these layers when it is time to animate)
Open Element_6 - Copy & paste it as a new layer onto your canvas - then re-size it to 25%. Position it to your liking.
Adjust - Sharpness - Sharpen
Effects - 3D Effects - Drop Shadow
Open Element_10 - Copy & Paste it as a new layer onto your canvas - then re-size it to 15%. Position it to your liking.
Then go to Effects - 3D Effects - Inner Bevel & apply the same settings you used before.
Now apply a drop shadow as well.
Open Element_4 - Copy & paste it as a new layer onto your canvas - then re-size it to 20%. Now go to Image- click Free Rotate, set it to Right 30.00 & click Ok.
Now using your move tool, position your Element_4 to the upper right corner inside your Frame_5 element.
Go to Effects - Plugins - Eye Candy 5 Impact - Glass (Use the same settings you used previously)
Now apply a drop shadow.
Open Element_27 - Copy & paste it as a new layer onto your canvas - then re-size it to 15%. Go to Image- click Free Rotate , set it to Left 30.00 & click Ok. Now go to Effect s- 3D Effects - Inner Bevel & apply the same settings as before. Also apply a drop shadow.
Now in your layers pallet - click on your White Background layer -
Open Element_29 - Copy & Paste it as a new layer onto your canvas - then re-size it to 80%. Position it to the top of your frame.
Sharpen & apply a drop shadow.
Then go back to your layers pallet - right click on your Element_29 layer - then click Duplicate. Now go to Image & click Flip.
Now in your layers pallet - click on the very top layer -
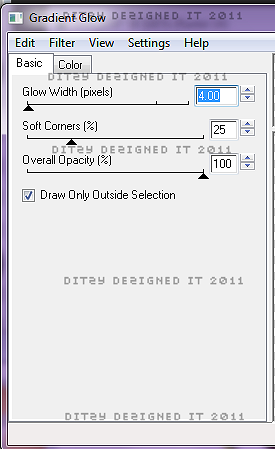
Open Element_31 - Copy & paste it as a new layer onto your canvas - then re-size it to 30%. Go to Effects- Plugins -Eye Candy 5 Impact - Glass (Same settings as before) then click Ok, then go back to Effects - Plugins - Eye Candy 4000 - Gradient Glow.
Click Ok
Sharpen & apply a drop shadow
Now position it to your liking.
Open Element_37 - Copy & paste it as a new layer onto your canvas - then re-size it to 65%. Position it to your liking.
Sharpen & apply a drop shadow
Open Element_39 - Copy & paste it as a new layer onto your canvas - then re-size it to 65%. Position it to your liking.
Sharpen & apply a drop shadow
Open Element_21 - Copy & paste it as a new layer onto your canvas - then re-size it to 30%. Now go to Image - Free Rotate , set it to Left 15.00 & click Ok.
Sharpen & apply a drop shadow.
Position your Element_21 to the upper left corner of your Frame_5 element.
Now add your name & copyright information.
For the name I used :
Font : Most Wanted
Size : 80 Pixels
Background Color : #b2d600
Foreground Color : Set to nul
One you are happy with your name - go to Adjust - click Add/Remove Noise - then click Add Noise
Set to Uniform, 35 & make sure your Monochrome box is checked. Then click Ok.
Now go to Effects - Plugins - Eye Candy 4000 - Gradient Glow. Use the same settings you used for your Element above. Then click Ok.
Then apply a drop shadow
Now activate your crop tool & crop off any access canvas you did not use.
Now open your Animation Shop
Go back to PSP -
In your layers pallet - click on your Web 1 layer (make sure your Web 2 & Web 3 layers are closed) then go to Edit - Copy Special - Copy Merged
Go to Animation Shop - Right click on your grey work area - click Paste As New Animation
Go back to PSP -
In your layers pallet - click on the eye next to your Web 2 layer to open it, then click the eye next to your Web 1 layer to close it. Click on your Web 2 layer - go to Edit - Copy Special - Copy Merged
Go to Animation Shop - Right click inside Frame 1 that you just put there, click Paste - After Current Frame
Go back to PSP -
Click on Web 3 layer - also click on the eye next to your Web 3 layer to open it, then click the eye next to your Web 2 layer to close it.
Then got o Edit - Copy Special - Copy Merged
Go to Animation Shop
Right click inside Frame 2 - click Paste - After Current Frame.
Now view your animation to make sure you like it.
Then all that is left is to re-size your tag & save it as a GIF file.
(To re-size in animation shop - use your Shift & S keys on your keyboard at the same time & that will open your re-sizing menu.)
Thank-You for trying my tutorial!♥
Subscribe to:
Post Comments (Atom)
About Me

- DitzyDezigns
- New York, United States
- Hiya Everyone! My name is Ronney, I have 3 wonderful teenagers, and have been married to my husband for 20 years. I LOVE to design signatures, tags & avatars, I design with PSP, and have been designing for over 2 1/2 years. I will be not only designing signatures, tags & avatars but will also be writing & posting tutorials as well. I will also be making some templates to share with you all as well. So I hope you enjoy and can use everything I have available on my blog :-) If you ever try any of my tutorials,please send me your completed designs and I would love to showcase it here on my blog!
Labels
- Addictive Pleasures Tuts (35)
- Angel's Designz Tuts (10)
- Animated (26)
- Announcements (2)
- Awards (2)
- Beginner (17)
- Butterfly Blush Tuts (8)
- Cool Scraps Digital (2)
- Creative Intentionz (2)
- Creative Scraps By Crys (19)
- Ditzys Scrapkits (1)
- Forum Sets (1)
- FTU (6)
- Intermediate Level Tuts (3)
- Peekaboo Land (1)
- Peekaboo Land PTU (4)
- Peekaboo Land Tuts (1)
- Pimp My Tags With Scraps Tuts (14)
- PTU (131)
- Scappin Dollars Tuts (1)
- Scrappin Dollars Tuts (7)
- Scraps From The Heart Tuts (3)
- Scraps With Attitude (27)
- Tammy's Scraps (8)
- Updates (1)
- Wickedly Ditzy Scraps (1)






0 comments:
Post a Comment