♥Ditzy's TOU♥
All of the tutorials written by me are of my own Ditzy imagination.
Do NOT copy or alter them in ANY way.
Do NOT copy & paste the tutorials to any website, forum or group.
Do NOT claim them as your own.
If you would like to show or share my tutorial do so by using a link to bring your members to my blog. However if you do please send me a courtesy email so that I know my tutorials are being used according to my TOU. Also if you would please send me a link to where you will be posting my link.
If you have done any of my tutorials I would LOVE to see the outcome of what you have made, so please email me OR you can leave me a link in my shout box so that I can see what you have made and display it on my blog for others to enjoy as well.
Other than that please have fun,and I hope that you enjoy all my tutorials!
Email me @ DitzyDezigns@hotmail.com
Email Me
I would love to see what you have made using any of my tutorials, so please feel free to email me at the address below.
DitzyDezigns@hotmail.com
Add Me On Facebook
Blog Archive
-
▼
2011
(152)
-
▼
October
(15)
- ♥Autumn Bouquet PTU♥
- ♥Trick Or Treat PTU♥
- ♥Autumn Colors PTU♥
- ♥Shades Of November PTU♥
- ♥Good Witch Or Bad Witch PTU♥
- ♥Happy Halloween PTU♥
- ♥Bubble Bubble PTU♥
- ♥Brewing Up Some Fun PTU♥
- ♥Spooky Sweet PTU♥
- ♥FYI♥
- ♥Emo Witch PTU♥
- ♥This Is Halloween♥ PTU
- ♥Let It Be Captured PTU♥
- ♥Finding Neverland PTU♥
- ♥Jaggedy Lantern FTU (Animated)♥
-
▼
October
(15)
Pages
Powered by Blogger.
Tuesday, October 25, 2011
♥Autumn Colors PTU♥
**This tutorial was written & posted by Ditzy Dezigns on October 25th 2011**
***Any resemblance to any other tutorial is purely coincidental & completely unintentional!!***
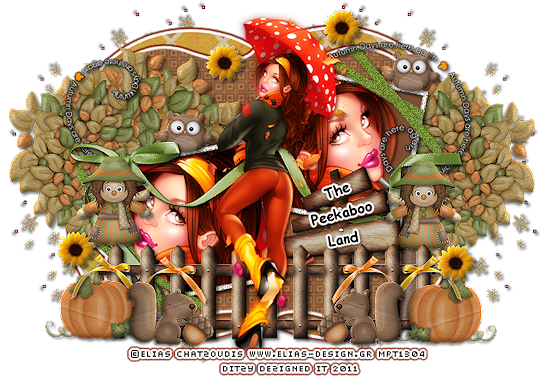
Here is what we will be making :
Supplies Needed :
Paint Shop Pro X2 (Any version should work)
Tube Of Choice - Elias Chatzoudis PTE
*The tube I used was a limited edition from Elias while he was at MPT*
Scrapkit - Autumn Days By The Peekaboo Land
Autumn Template 2 By Tracy @ Friends & Freebies Blog
**For the Autumn templates - scroll down to about half way, look to the right, click on the link "Tracy's Autumn Templates 1-7"**
Plugins Used :
Eye Candy 5 Impact - Gradient Glow (Optional)
Eye Candy 4000 - Gradient Glow (Optional)
Xero - Radiance (Optional)
Font Used :
Comic Scan
Elements Used :
Paper 2
Paper 5
Wordart 01
Wood Fence
Tree 01
Pumpkin 01
Bow 2
Bow 3
Owl 01
Wood Sign
Element 02
Chipmunk
Acorn
Flowers 2
Scarecrow 01
Lets Begin :
Start by opening your Autumn Template 2 -
Go to Image - click Canvas Size - set to 800 X 600 (Don't worry you will crop it at the end of the tutorial)
Now go to your layers pallet & delete the following layers :
Tracy F. Designz - (Credit layer) - **Please leave Tracy a thank-you when you download the templates :-)**
Stars 1
Stars 2
Rectangle 1
Rectangle 2
Leaves
Now in your layers pallet - click on your Shape layer - go to Selections - click Select All, go back to Selections & click Float - back to Selections - click Defloat -
Now open Paper 02 - Copy & Paste it as a new layer onto your canvas - then re-size it to 50%, 3 times.
Then use your move tool to adjust the position of your Paper 02 to your liking within the marching ants. Once happy with placement go to Selections & click Invert.
Now on your keyboard press your Delete key 1 time.
Now go back to Selections & click Select None.
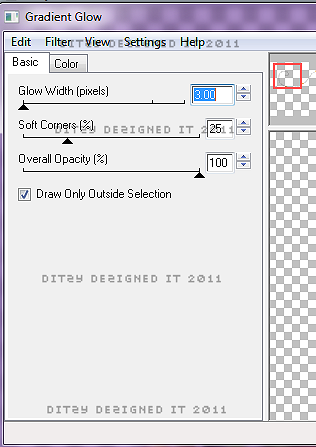
Then go to Effects - click Plugins - then click Eye Candy 5 Impact - then click Gradient Glow -
**You can use my settings below or your own, the choice is always yours**
Then click Ok.
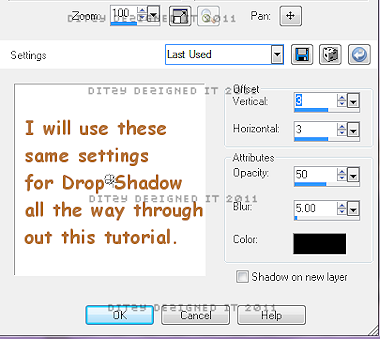
Now go to Effects - click 3D Effects - then click Drop Shadow -
**See note on screen shot**
Then click Ok.
Now go to your layers pallet - delete your original Shape layer.
Then still in your layers pallet - click on your Back Plate layer - then follow all of the steps above that you followed for your Shape layer. Only this time use a different paper. The paper I chose to use was Paper 05.
Now in your layers pallet - click on your Square 2 layer - go to Selections - click Select All - Float - Defloat -
Now make a new raster layer - set your background color to #7e4f35, then using your Flood Fill tool, click inside your Square 2 area.
Now keeping your Square 2 selected, open your tube of choice - Copy & paste it as a new layer onto your canvas - then re-size it if needed. I did not re-size my tube.
Now position it to your liking. Then go to Selections, click Invert - then on your keyboard press your Delete key 1 time. Then go to Selections - click Select None.
Now go to your layers pallet - right click on your tube layer - then click Duplicate. Then go to Adjust - click Blur - then click Gaussian Blur - set it to 5.00 & click Ok.
Now go back to your layers pallet - change your Blend Mode from Normal to Overlay.
Then click on your Original tube layer - now go to Effects - 3D Effects - Drop Shadow. (Use same settings as before, click OK.)
Now go to your layers pallet & delete your original Square 2 layer.
Now follow those same steps for your Square 1 layer.
Now click on your Frame 1 layer - go to Adjust - click Add/Remove Noise - set to Uniform, 100 & make sure your Monochrome box is checked, then click Ok.
Then go to Effects - click 3D Effects - Drop Shadow (Same settings, click Ok)
Now in your layers pallet - click on your Frame 2 layer - apply the same Noise setting & drop shadow to this layer as well.
In your layers pallet - click on your Ribbon layer - Use your move tool to position your Ribbon to the upper left corner of your Frame 2 . Go to Adjust - Sharpness - click Sharpen.
Effects - 3D Effects - Drop Shadow (same settings, click Ok.)
Now in your layers pallet - click on your Strap 2 layer - Selections - Select All - Float - Defloat -
Make a new raster layer - set your background color to #728c31 - then using your Flood Fill tool - click inside your marching ants. Selections - Select None.
Now go to Effects - 3D Effects - Drop Shadow (same settings, click Ok)
Now go to your layers pallet - and delete your original Strap 2 layer.
Now follow those same steps for the following layers :
Strap 1
Strap 3
Strap 4
Don't forget to delete each original layer once you have made the new colored layer.
Now click on your new Strap 1 layer - go to Adjust - Add/Remove Noise - set to Uniform , 35, make sure your Monochrome box is checked & click OK.
Now add that noise setting to the following layers :
Strap 2
Strap 3
Strap 4
Now open your full tube - Copy & paste it as a new layer onto your canvas - then re-size it to 90%. Then using your move tool position your tube to the center of your template.
Go to your layers pallet - right click on your full tube layer - click Duplicate. Now go to Adjust - click Blur - then click Gaussian Blur - set to 5.00 & click Ok.
Now change your Blend Mode from Normal - to Overlay.
Then click on your Original tube layer -
Effects - 3D Effects - Drop Shadow (Same settings, click Ok)
Now lets add some elements to our tag :
Open your Wordart 01 - Copy & Paste it as a new layer onto your canvas - then re-size it to 30%, then re-size it again to 70%, then again to 80%. Use your move tool to position your Wordart 01 to the center of your template.
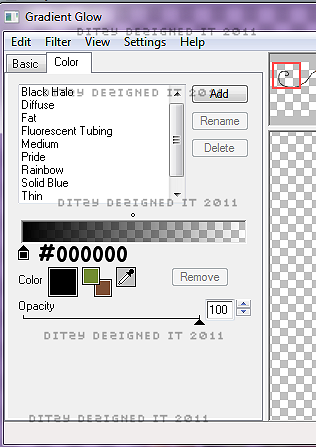
Go to Effects - click Plugins - Eye Candy 4000 - Gradient Glow :
Then click on your Color tab :
Set your color to black #000000
Then click OK.
Now go to Effects - 3D Effects - Drop Shadow (same settings, click Ok)
Now go to your layers pallet - move your Wordart 01 layer down so that it is below ALL of your tube layers.
Now click back on the very top layer in your layers pallet -
Open your Woodfence element - Copy & paste it as a new layer onto your canvas - then re-size it to 30%, then again to 50%. Position it using your Move Tool center on your template at the bottom. (See my tag if needed)
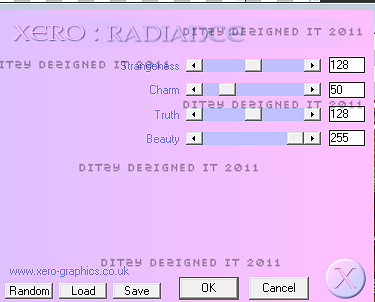
Now go to Effects - Plugins - click Xero - then click Radiance -
Then click Ok.
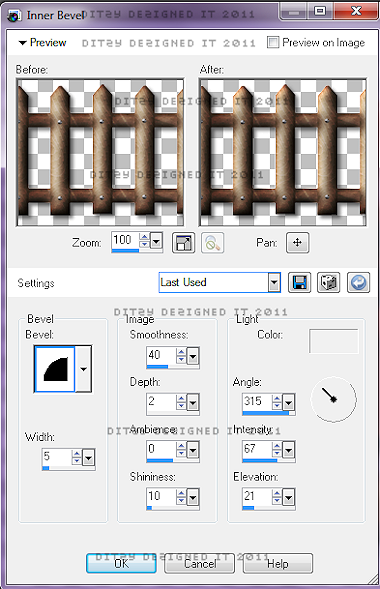
Now go to Effects - 3D Effects - then click Inner Bevel -
**I forgot to write this on this screen shot, but we will be using Inner Bevel through out this tutorial, once you set your settings here , they are the same settings you will use on the other elements, so you will only have to open the Inner Bevel menu, then just click Ok each time.**
Then click Ok
Then Effects - 3D Effects - Drop Shadow (same settings, click Ok)
In your layers pallet - move your Wood Fence layer down so that it is under BOTH of your full tube layers.
Now open your Tree 01 element - Copy & paste it as a new layer onto your canvas - then re-size it to 30%, then re-size it again to 75%, then one more time to 85%. Use your move tool & position your Tree element to the left end of your Wood Fence element.
Effects - 3D Effects - Inner Bevel (same settings as before, click Ok)
Effects - 3D Effects - Drop Shadow (same settings as before, click OK)
Adjust - Sharpness - Sharpen.
Now go to your layers pallet - move your Tree01 layer down below all of your tube & frame layers.
Now right click on your Tree 01 layer - then click Duplicate - then go to Image & click Mirror. Now use your Move tool to adjust the position of your duplicated Tree 01 element if needed.
Open your Pumpkin 01 element - Copy & paste it as a new layer onto your canvas - then re-size it to 20%. Then re-size it again to 50%. Now using your move tool, position your Pumpkin 01 element to the left end of your Wood Fence element.
Effects - 3D Effects - Inner Bevel (same settings as before, click Ok)
Effects - 3D Effects - Drop Shadow (same settings as before, click Ok)
Adjust - Sharpness - Sharpen.
Now go to your layers pallet - right click on your Pumpkin 01 layer - then click Duplicate. Go to Image - click Mirror. Now use your Move Tool to adjust the position of your duplicated Pumpkin 01 element to the right end of your Wood Fence element.
Open your Bow 2 element - Copy & paste it as a new layer onto your canvas - then re-size it to 10%, then again to 40%. Now use your move tool & position your Bow on your fence.
Adjust - Sharpness - Sharpen
Effects - 3D Effects - Drop Shadow (Same settings, click Ok)
Now go to your layers pallet - right click on your Bow2 layer - then click Duplicate. Now use your move tool to position your 2nd Bow 2 element to your liking.
Now open your Bow 1 element - Copy & paste it as a new layer onto your canvas - then re-size it to 10% then again to 40%. Now use your move tool to position to your liking.
Adjust - Sharpness - Sharpen
Effects - 3D Effects - Drop Shadow (same settings, click Ok)
Go to your layers pallet - right click on your Bow 1 layer - click Duplicate - now use your move tool to adjust the position of your duplicated Bow 1 element.
Open your Owl 01 element - Copy & paste it as a new layer onto your canvas - then re-size it to 10%, then again to 40%. Use your move tool & position your Owl 01 element to your liking.
Effects - 3D Effects - Inner Bevel (Same settings, click Ok)
Effects - 3D Effects - Drop Shadow (same settings , click Ok)
Adjust - Sharpness - Sharpen
Go to your layers pallet - right click on your Owl 01 layer - click Duplicate, now use your move tool to position your duplicated Owl 01 element to your liking.
Open your Wood Sign 01 - Copy & paste it as a new layer onto your canvas - then re-size it to 30%. Now position your Wood Sign 01 element to your liking.
Go to Effects - Plugins - Xero - Radiance (Use same settings as before & click Ok)
Now Effects - 3D Effects - Inner Bevel (same settings, click Ok)
Effects - 3D Effects - Drop Shadow (Same settings, click Ok)
Adjust - Sharpness - Sharpen.
Open Element 02 - Copy & paste it as a new layer onto your canvas - then re-size it to 30%, then again to 30%. Now use your move tool & position your Element 02 to the lower right corner of your template.
Adjust - Sharpness - Sharpen
Effects - 3D Effects - Drop Shadow (same settings , click Ok.)
Go to your layers pallet - right click on your Element 02 layer - click Arrange - then click Send To Bottom.
Now go to your Element 02 layer - right click, click Duplicate - now go to Image - click Mirror.
Use your move tool to adjust the position of your duplicated Element 02 to the lower left corner of your template.
Now go back to your layers pallet - right click on your Duplicated Element 02 layer - click Merge - then click Merge Down.
Now right click on your Merged Element 02 layer - click Duplicate. Now go to Image - click Flip.
Use your move tool to adjust the position of your duplicated merged Element 02 .
Open your Chipmunk element - Copy & paste it as a new layer onto your canvas - then re-size it to 10%, then again to 80%. Now position your Chipmunk element so it is in front of your Wood Fence element on the right side.
Effects - 3D Effects - Inner Bevel (same settings, click Ok)
Effects - 3D Effects - Drop Shadow (same settings , click Ok)
Adjust - Sharpness - Sharpen.
Go to your layers pallet - right click on your Chipmunk layer - click Duplicate. Now go to Image & click Mirror. Use your move tool to position your duplicated Chipmunk element to the left end of your Wood Fence element.
Now open your Acorn element - Copy & paste it as a new layer onto your canvas - then re-size it to 10%, then again to 80%. Now position your Acorn element so it is in front of your Wood Fence element on the right side in front of your Chipmunk element.
Effects - 3D Effects - Inner Bevel (same settings, click Ok)
Effects - 3D Effects - Drop Shadow (same settings , click Ok)
Adjust - Sharpness - Sharpen.
Go to your layers pallet - right click on your Acorn layer - click Duplicate. Now go to Image & click Mirror. Use your move tool to position your duplicated Acorn element to the left end of your Wood Fence element.
Open your Flower 02 element - Copy & paste it as a new layer onto your canvas - then re-size it to 10%, then again to 40%. Now use your move tool & position your Flower 2 element to your liking.
Effects - 3D Effects - Inner Bevel (Same settings, Click Ok)
Effects - 3D Effects - Drop Shadow (same settings, click Ok)
Adjust - Sharpness - Sharpen.
Then go to your layers pallet - right click on your Flower 02 layer - then click Duplicate, now use your move tool to adjust the position of your duplicated Flower 02 element to your liking.
Then go back to your layers pallet - right click on your Duplicated Flower 2 layer & click Duplicate again, position to your liking. Do this 1 more time, so that you have a total of 4 Flower 02 elements positioned around your template.
Open your Scare Crow element - Copy & Paste it as a new layer onto your canvas - then re-size it to 10% then again to 80%. Now position your Scare Crow element to the left end of your Wood Fence element.
Effects - 3D Effects - Inner Bevel (same settings, click Ok)
Effects - 3D Effects - Drop Shadow (same settings, click Ok)
Adjust - Sharpness - Sharpen.
Now go to your layers pallet - move your Scare Crow layer down so that it is directly under your Wood Fence layer.
Then right click on your Scare Crow layer - click Duplicate - now use your Move Tool & move your duplicated Scare Crow element to the right end of your Wood Fence element. (See my tag for example if needed)
Now you will want to add your name & copyright information.
For the name I used :
Font : Comic Scan
Size : 20 Pixels (Depends on where you place your name, and the length of your name)
Background Color : #000000
Foreground Color : Set to nul
Apply & position your name.
Now go to your layers pallet - right click on your Name layer - click Convert To Raster Layer.
Then go to Effects - Plugins - Eye Candy 4000 - Gradient Glow. You will basically use the exact same settings as you did for your Wordart 01. However you will want to change the color of the glow to WHITE (#ffffff).
So below on the screen shot, you see the little black square & the code next to it, you will want to click on the larger black box & change your color code to #ffffff.
Then click OK.
Now go to Effects - 3D Effects - Drop Shadow
This time on your drop shadow settings, if you place your name on the sign element like I did, you will want to lower your drop shadow a bit, so where you see the 3's. Change those to 1's. Then click Ok.
Now add your copyright & credit information. (IMPORTANT)
The font I use for my copyright/credit info is Pixelette
Now once happy with all elements & wording on your tag, go to your layers pallet - right click on any layer - then click Merge - then click Merge Visible.
Now activate your Crop tool & Crop off any access canvas that you did not use.
Then you may or may not need to re-size your tag. Depending on where you will be using it.
If you re-size your completed tag, make sure that you apply one more Sharpen.
Then all that is left is to save your tag as a PNG file & you have completed this tutorial!♥
Subscribe to:
Post Comments (Atom)
About Me

- DitzyDezigns
- New York, United States
- Hiya Everyone! My name is Ronney, I have 3 wonderful teenagers, and have been married to my husband for 20 years. I LOVE to design signatures, tags & avatars, I design with PSP, and have been designing for over 2 1/2 years. I will be not only designing signatures, tags & avatars but will also be writing & posting tutorials as well. I will also be making some templates to share with you all as well. So I hope you enjoy and can use everything I have available on my blog :-) If you ever try any of my tutorials,please send me your completed designs and I would love to showcase it here on my blog!
Labels
- Addictive Pleasures Tuts (35)
- Angel's Designz Tuts (10)
- Animated (26)
- Announcements (2)
- Awards (2)
- Beginner (17)
- Butterfly Blush Tuts (8)
- Cool Scraps Digital (2)
- Creative Intentionz (2)
- Creative Scraps By Crys (19)
- Ditzys Scrapkits (1)
- Forum Sets (1)
- FTU (6)
- Intermediate Level Tuts (3)
- Peekaboo Land (1)
- Peekaboo Land PTU (4)
- Peekaboo Land Tuts (1)
- Pimp My Tags With Scraps Tuts (14)
- PTU (131)
- Scappin Dollars Tuts (1)
- Scrappin Dollars Tuts (7)
- Scraps From The Heart Tuts (3)
- Scraps With Attitude (27)
- Tammy's Scraps (8)
- Updates (1)
- Wickedly Ditzy Scraps (1)





0 comments:
Post a Comment