♥Ditzy's TOU♥
All of the tutorials written by me are of my own Ditzy imagination.
Do NOT copy or alter them in ANY way.
Do NOT copy & paste the tutorials to any website, forum or group.
Do NOT claim them as your own.
If you would like to show or share my tutorial do so by using a link to bring your members to my blog. However if you do please send me a courtesy email so that I know my tutorials are being used according to my TOU. Also if you would please send me a link to where you will be posting my link.
If you have done any of my tutorials I would LOVE to see the outcome of what you have made, so please email me OR you can leave me a link in my shout box so that I can see what you have made and display it on my blog for others to enjoy as well.
Other than that please have fun,and I hope that you enjoy all my tutorials!
Email me @ DitzyDezigns@hotmail.com
Email Me
I would love to see what you have made using any of my tutorials, so please feel free to email me at the address below.
DitzyDezigns@hotmail.com
Add Me On Facebook
Blog Archive
-
▼
2011
(152)
-
▼
October
(15)
- ♥Autumn Bouquet PTU♥
- ♥Trick Or Treat PTU♥
- ♥Autumn Colors PTU♥
- ♥Shades Of November PTU♥
- ♥Good Witch Or Bad Witch PTU♥
- ♥Happy Halloween PTU♥
- ♥Bubble Bubble PTU♥
- ♥Brewing Up Some Fun PTU♥
- ♥Spooky Sweet PTU♥
- ♥FYI♥
- ♥Emo Witch PTU♥
- ♥This Is Halloween♥ PTU
- ♥Let It Be Captured PTU♥
- ♥Finding Neverland PTU♥
- ♥Jaggedy Lantern FTU (Animated)♥
-
▼
October
(15)
Pages
Powered by Blogger.
Monday, October 24, 2011
♥Shades Of November PTU♥
**This tutorial was written & posted by Ditzy Dezigns on October 24th 2011**
***Any resemblance to any other tutorial is purely coincidental & completely unintentional***
Supplies Needed :
Paint Shop Pro X2 (Any version should work)
Scrapkit - Shades Of November By Creative Scraps By Crys
Plugins Used :
Eye Candy 5 Impact - Gradient Glow (Optional)
Font Used :
Happy
Elements Used :
Fence
Lights
Tree
Flowers
Bush
Birdhouse
Vine
Owl
Fox
Butterfly
Bow2
Stardust
Lets Begin :
Start by opening a new 800 X 600 transparent canvas. (Don't worry you will crop your unused canvas off at the end of this tutorial)
Now open your Fence element - Copy & paste it as a new layer onto your canvas. Now re-size it to 75%. Use your move tool to position your Fence element to the center of your canvas.
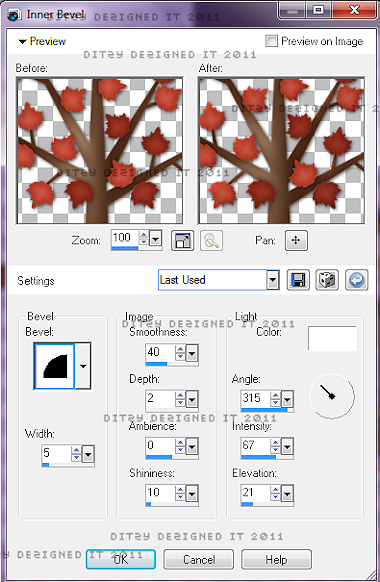
Go to Effects - 3D Effects - click Inner Bevel
**You are welcome to use my settings below or your own**
***You will use this effect through out this tutorial, so once you have your settings set, you should only have to click on Inner Bevel then click ok. (Yes I know I have the image of the tree element in this screen shot lol, I forgot to take the screen shot when I applied it to the Fence element lol)***
Now click Ok.
Now go to Adjust - click Sharpness - then click Sharpen
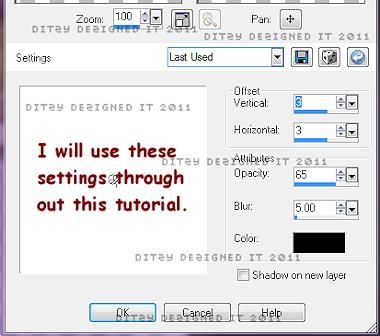
Go back to Effects - 3D Effects - this time click Drop Shadow
**Again, you may use my settings or your own**
***You will also use these same settings all the way through out this tutorial, so after you have your settings set you should only have to go to Drop Shadow, wait for menu to open then click ok.)
Click Ok
Now open your Lights element - Copy & paste it as a new layer onto your canvas - then re-size it to 40%. Use your move tool to position your Lights element to the left side of your Fence element.
Adjust - Sharpness - Sharpen
Effects - 3D Effects - Drop Shadow (wait for menu to open, then click Ok. Same settings as before)
Now go to your layers pallet - right click on your Lights layer - then click Duplicate. Then go to Image & click Mirror. Now use your Move tool to adjust the position of your duplicated Lights element if needed.
Open your Tree element - Copy & paste it as a new layer onto your canvas - then re-size it to 50%. Position it to the left end of your Fence element. Now in your layers pallet - move your Tree layer down so it is directly under your Fence element.
Go to Effects - 3D Effects - Inner Bevel (Same settings as before, click Ok.)
Adjust - Sharpness - Sharpen
Effects - 3D Effects - Drop Shadow (same settings as before, click Ok.)
Back in your layers pallet - right click on your Tree layer - then click Duplicate. Now go to Image & click Mirror. Use your move tool to adjust the position of your duplicated Tree element to the right end of your Fence element.
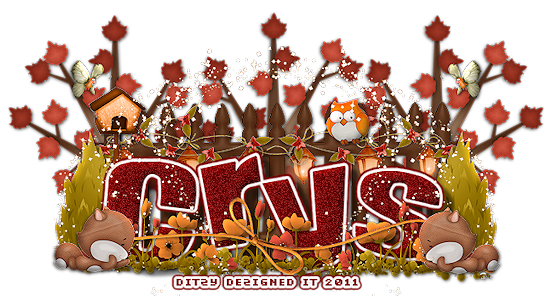
Back in your layers pallet - right click on your duplicated Tree layer - then click Duplicate. Now use your move tool to position your 3rd Tree element to the middle of your Fence element. (See my tag above if needed)
(No need to add inner bevel, sharpen or drop shadow to your duplicated elements because you already applied those to your main element.)
Open your Flowers element - Copy & paste as a new layer onto your canvas, then use your move tool to position your Flowers element along the bottom of your Fence element.
Effects - 3D Effects - Inner Bevel (same settings, click Ok)
Adjust - Sharpness - Sharpen
Effects - 3D Effects - Drop Shadow (same settings , click Ok)
Open your Bush element - Copy & paste it as a new layer onto your canvas - then re-size it to 35%. Using your move tool - position your Bush element to the left end of your Fence element.
Effects - 3D Effects - Inner Bevel (same settings, click Ok)
Adjust - Sharpness - Sharpen
Effects - 3D Effects - Drop Shadow (same settings, click Ok)
Now go to your layers pallet - first move your Bush layer down so it is directly under your Flowers layer, - then right click on your Bush layer - then click Duplicate. Now go to Image & click Mirror. Then use your move tool and adjust the position of your duplicated Bush element to the right end of your Fence element.
Now open your Birdhouse element - Copy & paste it as a new layer onto your canvas -then re-size it to 35%. Use your move tool & position your Birdhouse element to your liking.
Effects - 3D Effects - Inner Bevel (same settings, click Ok)
Adjust - Sharpness - Sharpen
Effects - 3D Effects - Drop Shadow (same settings, click Ok)
Open your Vine element - Copy & paste it as a new layer onto your canvas - then re-size it to 35%. Use your move tool & position your Vine element to the left side of your Fence element, and place it along your Lights element on the left.
Effects - 3D Effects - Inner Bevel (same settings, click Ok)
Adjust - Sharpness - Sharpen
Effects - 3D Effects- Drop Shadow (same settings, click Ok)
Go to your layers pallet - right click on your Vine layer - then click Duplicate. Now go to Image & click Mirror. Use your move tool to adjust the position of your duplicated Vine element to the right side of your Fence element if needed.
Open your Owl element - Copy & paste it as a new layer onto your canvas - then re-size it to 10%. Use your move tool & position your Owl element to your liking.
Effects - 3D Effects - Inner Bevel (same settings, click Ok)
Adjust - Sharpness - Sharpen
Effects - 3D Effects - Drop Shadow (same settings, click Ok)
Now open your Fox element - Copy & paste it as a new layer onto your canvas - then re-size it to 20%. Now position your fox element to the right lower side of your Fence element.
Effects - 3D Effects - Inner Bevel (same settings, click Ok)
Adjust - Sharpness - Sharpen
Effects - 3D Effects - Drop Shadow (same settings, click Ok)
Now go to your layers pallet - right click on your Fox layer - then click Duplicate. Now go to Image & click Mirror. Use your move tool to position your duplicated Fox element to the left lower end of your Fence. (See my tag for example)
Open your Butterfly element - Copy & paste it as a new layer onto your canvas - then re-size it to 10%. Use your move tool & position your Butterfly element to the upper right of your tree elements.
Adjust - Sharpness - Sharpen
Effects - 3D Effects - Drop Shadow (same settings, click Ok)
Now go to your layers pallet - right click on your Butterfly layer - then click Duplicate. Now go to Image & click Mirror. Now using your move tool, adjust the position of your duplicated Butterfly element to your liking.
Now you will want to add your name & and credit information.
The settings I used for the name are :
Font : Happy
Size : 150 Pixels (this will depend on the length of your name)
Background Color : #800000
Foreground Color : Set to nul
Now apply your name & position it within your 2 fox elements.
Go to your layers pallet - move your Name layer down so that it is directly under both your Fox layers.
Now on your Name layer -
Go to Effects - 3D Effects - Inner Bevel (same settings click Ok.)
Now go to Adjust - click Add/Remove Noise - then click Add Noise, set to Uniform, 35, and make sure your Monochrome box IS checked, then click Ok.
Now go to Effects - click Plugins - then click Eye Candy 5 Impact - Gradient Glow
**You can use my settings below or your own.**
***I have included the color codes for the 2 colors I used***
Now click OK.
Then go back to Effects - click 3D Effects - Drop Shadow (Same settings, click Ok)
Now open your Bow 2 element - Copy & paste it as a new layer onto your canvas - then re-size it to 80%. Use your move tool & position your Bow2 element across your name, see my tag for example.
Then go to your layers pallet - move your Bow 2 layer down so it is directly below both of your Fox layers, but keeping it above your Name layer.
Then go to Adjust - Sharpness - Sharpen
Effects - 3D Effects - Drop Shadow
Now open your Stardust element - Copy & paste it as a new layer onto your canvas - then re-size it to 80%. Use your move tool to position your Stardust element to the left side of your tag.
Adjust -Sharpness - Sharpen
*Do not add Inner Bevel or Drop Shadow to this element*
Now go to your layers pallet - right click on your Stardust layer - then click Duplicate. Now go to Image & click Mirror.
Use your move tool to adjust your duplicated Stardust element to the right side of your tag if needed.
Make sure you have added any credit that needs to be added.
If you are happy with the placement of your name & elements, go to your layers pallet - right click on any layer - then click Merge - then click Merge Visible.
Now activate your Crop tool & crop off any access canvas that you did not use.
Once you have cropped your tag, you may or may not need to re-size your completed tag. If you choose to re-size your tag you might want to apply one more Sharpen to your tag.
Now all that is left is to save your tag as a PNG file & you have completed this tutorial!!♥
Subscribe to:
Post Comments (Atom)
About Me

- DitzyDezigns
- New York, United States
- Hiya Everyone! My name is Ronney, I have 3 wonderful teenagers, and have been married to my husband for 20 years. I LOVE to design signatures, tags & avatars, I design with PSP, and have been designing for over 2 1/2 years. I will be not only designing signatures, tags & avatars but will also be writing & posting tutorials as well. I will also be making some templates to share with you all as well. So I hope you enjoy and can use everything I have available on my blog :-) If you ever try any of my tutorials,please send me your completed designs and I would love to showcase it here on my blog!
Labels
- Addictive Pleasures Tuts (35)
- Angel's Designz Tuts (10)
- Animated (26)
- Announcements (2)
- Awards (2)
- Beginner (17)
- Butterfly Blush Tuts (8)
- Cool Scraps Digital (2)
- Creative Intentionz (2)
- Creative Scraps By Crys (19)
- Ditzys Scrapkits (1)
- Forum Sets (1)
- FTU (6)
- Intermediate Level Tuts (3)
- Peekaboo Land (1)
- Peekaboo Land PTU (4)
- Peekaboo Land Tuts (1)
- Pimp My Tags With Scraps Tuts (14)
- PTU (131)
- Scappin Dollars Tuts (1)
- Scrappin Dollars Tuts (7)
- Scraps From The Heart Tuts (3)
- Scraps With Attitude (27)
- Tammy's Scraps (8)
- Updates (1)
- Wickedly Ditzy Scraps (1)


0 comments:
Post a Comment