Don't Be A Pirate

My Blinkies

Add Me On Facebook
Protected


Blogs I Stalk


Awards :-)


Find Me At

Favorite Stamps


Monday, August 22, 2011
Pirate Boy PTU
**This tutorials was written & posted by DitzyDezigns on August 22nd 2011**
***Any resemblance to any other tutorials is purely coincidental & completely unintentional!!***
Here is what we will be making :

Supplies Needed :
Paint Shop Pro X2 (Any version should work)
Animation Shop
Scrapkit - Pirate Boy By Peekaboo Land
Mask Of Choice
Plugins Used :
Eye Candy 4000 - Gradient Glow
Font Used :
Sloop
Elements Used :
Frame 1
Paper 6
Paper 12
Flag 2
Parakeet
Palm 1
LifeGuard 2
Waves 3
Boy 1
Boy 2
Glitter
Anchor
Leaves
Chest 1
Lets Begin :
Start by opening a new 800 X 650 white canvas. (Don't worry you can crop it later )
Open Frame 1 - Copy & paste it as a new layer onto your canvas - then re-size it to 50%. Then re-size it again to 65%.
(To re-size go to Image - click Re-size)
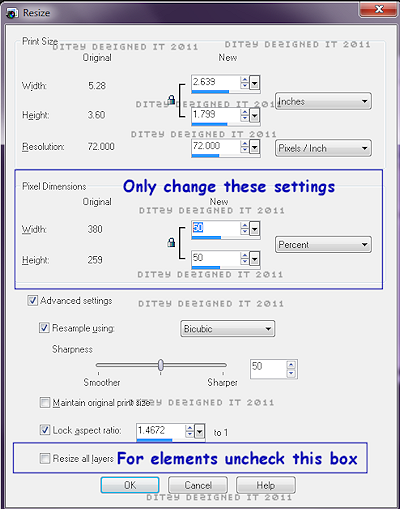
Click Ok
Now go to Image - click Free Rotate - set it to Right , 90 & click Ok.
Now use your Move Tool to position your Frame 1 element to the center of your canvas.
Activate your Magic Wand - now click inside each frame opening.
Go to Selections - click Modify - Expand
Set your number of pixels to 9 & click Ok.
Open Paper 6 - Copy & paste it as a new layer onto your canvas - then re-size it to 50% , do this size 3 times total.
Now go to Selections - click Invert -
Then on your keyboard press your delete key 1 time.
Go to Selections & click Select None.
In your Layers Pallet - move your Paper 6 layer down under your Frame 1 layer.
Go to Adjust - Sharpness - Sharpen
Then go to Effects - 3D Effects - Drop Shadow
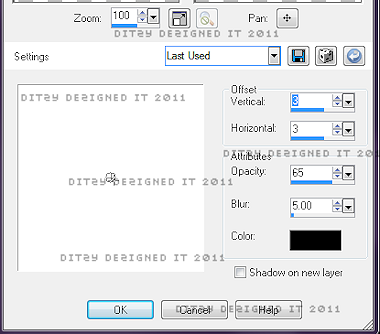
Click Ok
Now click on your background layer in your layers pallet -
Open Glitter - Copy & paste it as a new layer onto your canvas - then re-size it to 20%.
Use your move tool & position it to the left side of your frame.
Go back to your layers pallet - right click on your Glitter layer - click Duplicate - then go to Image & click Mirror. Use your move tool to adjust the position of your duplicated Glitter element if needed.
Back to your layers pallet - right click on your duplicated Glitter layer - click Merge - Merge Down
Now go to Adjust - Sharpness - Sharpen
Now open Paper 12 - Copy & paste it as a new layer onto your canvas - then re-size it to 50%, three times.
Go to Layers - Load/Save Mask - Load Mask From Disk
, choose your mask of choice & click load.
Go to your layers pallet - right click on your Mask layer - click Merge Group.
Now right click on your Mask layer again & click Duplicate.
Right click on your duplicated layer & click Duplicate again.
Now use your move tool & position it to the center of your frame.
Duplicate your duplicated Mask layer again & use your move tool & position it to the right end of your frame.
Go to your layers pallet - right click on your top mask layer - click Merge - Merge Down.
Then right click again on your newly merged mask layer - click Merge - Merge Down.
Now all 3 mask layers should be 1 complete layer.
Go to Adjust - click Add/Remove Noise - then click Add Noise
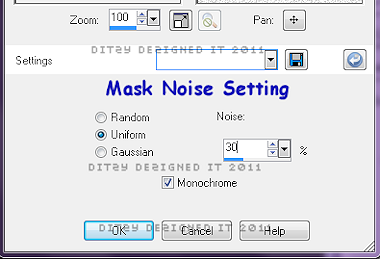
Click Ok.
Now in your layers pallet click on your Frame 1 layer -
Open your Flag 2 element - Copy & paste it as a new layer onto your canvas - then re-size it to 20%.
Position it to the upper left corner of your frame. (See my tag for example)
Then go to Adjust - Sharpness - Sharpen
Then Effects - 3D Effects - Drop Shadow
Click Ok
Click on your top layer in your Layers Pallet -
Open your Parakeet element - Copy & paste it as a new layer onto your canvas - then re-size it to 15%.
Use your move tool to position it to the top of your frame.
Adjust - Sharpness - Sharpen
Effects - 3D Effects - Drop Shadow (Same settings as before)
Open Palm 1 element - Copy & paste it as a new layer onto your canvas - then re-size it to 20%.
Use your move tool to position it to the right end of your frame.
Adjust - Sharpness - Sharpen
Effects - 3D Effects - Drop Shadow
Open LifeGuard 2 element - Copy & paste it as a new layer onto your canvas - then re-size it to 15%. Then re-size it again to 50%.
Use your move tool to position it center on your frame.
Adjust - Sharpness - Sharpen
Effects - 3D Effects - Drop Shadow
Click on Paper 11 layer in your layers pallet -
Open your Wave 3 element - Copy & paste it as a new layer onto your canvas - then re-size it to 20%, then re-size it again to 70%.
Use your move tool to position it in your frame.
Now use your Pick Tool to bring in each end of your Wave 3 element until the ends are hidden by the frame.
Go to Effects - 3D Effects - Drop Shadow (Same settings as before)
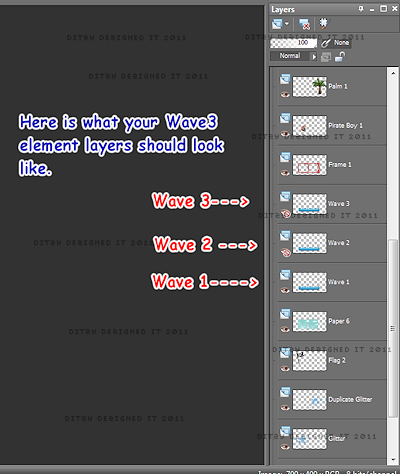
Now go to your layers pallet - right click on your Wave 3 layer - then click Duplicate. Now right click on your Duplicated layer & click Duplicate it again.
You should now have a total of 3 Wave layers. Now rename them, bottom to top - Wave 1 - Wave 2 - Wave 3
Close off the top two wave layers by clicking the eye next to each layer -
Click on Wave 1 layer - Go to Adjust - Add/Remove Noise - Add Noise
Click Ok -
Now open your Wave 2 layer -
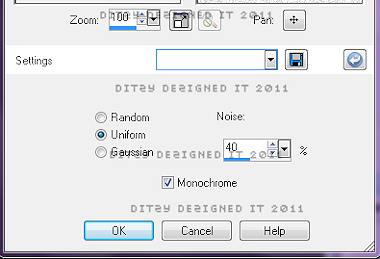
Adjust - Add/Remove Noise - Add Noise -
Click Ok.
Now open your Wave 3 layer -
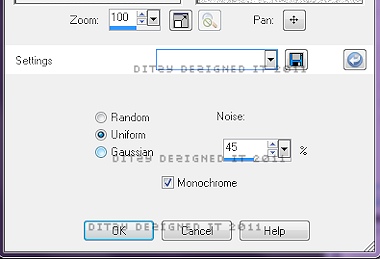
Adjust - Add/Remove Noise - Add Noise -
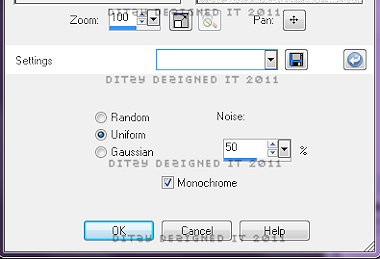
Click Ok.
Now back in your layers pallet - click the eye's (to close the layer) on your Wave 2 & Wave 3 layers. (This way when it comes time to animated your layers are ready.)
Click on your Paper 6 layer in your layers pallet -
Open your Boy 1 element - Copy & paste it as a new layer onto your canvas - then re-size it to 20%. Then re-size it again to 50%.
Go to Image - click Mirror.
Use your move tool to position it in the left frame.
Adjust - Sharpness - Sharpen
Effects - 3D Effects - Drop Shadow (Same settings as before)
Now click on your very top layer - in your layers pallet -
Open your Boy 2 element - Copy & paste it as a new layer onto your canvas - then re-size it to 20%. Position it using your move tool to the right end of your frame.
Adjust - Sharpness - Sharpen
Effects - 3D Effects - Drop Shadow (Same settings as previously used)
Open Anchor element - Copy & paste it as a new layer onto your canvas -then re-size it to 20%. Use your move tool to position it to the left end of your frame.
Adjust - Sharpness - Sharpen
Effects - 3D Effects - Drop Shadow (Same settings)
Open your Leaves 1 element - Copy & paste as a new layer onto your canvas - Re-size it to 20%. Use your move tool to position it beside your Anchor element.
Adjust - Sharpness - Sharpen
Effects - 3D Effects - Drop Shadow
Open your Chest 1 element - Copy & paste it as a new layer on your canvas - then re-size it to 20%. Then re-size it again to 50%. Use your move tool to position it on top of your Anchor & Leaves element .
Adjust - Sharpness - Sharpen
Effects - 3D Effects - Drop Shadow (same settings as before)
Open your Sun element - Copy & paste it as a new layer onto your canvas - then re-size it to 20%. Then re-size it again to 40%. Now use your move tool to position it in the right side of your frame.
Adjust -Sharpness - Sharpen
Effects - 3D Effects - Drop Shadow
Now add your credit information.
Now add your name -
I used :
Font : Sloop
Size : 100 Pixels (Depends on the length of your name)
Background Color : #1515b9
Foreground Color : set to nul
Position your name where you want it on your tag,
Then go to your layers pallet - right click on your name layer , then click Convert To Raster Layer
Then go to Effects - Plugins - Eye Candy 4000 - Gradient Glow
(You can use my settings or your own - make sure you click on your Color tab & change your color to white :-)
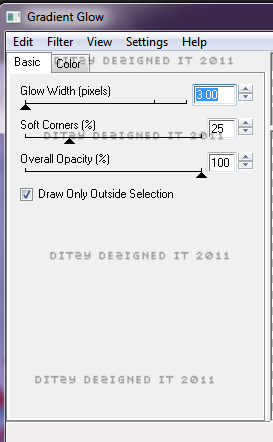
Click Ok.
Now go to Effects - 3D Effects - Drop Shadow
Activate your crop tool - crop off any access canvas that you did not use.
.
Then open your Animation Shop -
Go back to your psp -
Click on your Wave 1 layer - Copy Merged
Go to Animation Shop -
Right click on your grey work area - then click Paste As New Animation.
Go back to PSP -
Click on your Wave 2 layer & click the eye next to it to open the layer, then click the eye next to your Wave 1 layer to close it.
Copy Merged -
Animation Shop -
Right click in your 1st frame - then click Paste - After Current Frame
Go back to PSP -
Click on your Wave 3 layer & click the eye next to it to open the layer, then click the eye next to your Wave 2 layer to close it.
Go to Animation Shop -
Right click in your 2nd frame - click Paste - After Current Frame
Now view your animation to make sure it is how you want it.
Before you save it you might want to re-size it to fit where you will be using it. To re-size your tag in Animation Shop - on your keyboard - press your Shift & S key to open your re-size menu.
The size I used on my screen shot is the size I use for my personal blog - you may want yours bigger or smaller - so just adjust it accordingly.

Click Ok.
Now go to File - Save As - set it to GIF - name your tag & click Save to finish this tutorial!!♥
Subscribe to:
Post Comments (Atom)
About Me
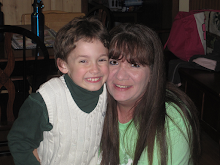
- DitzyDezigns
- New York, United States
- Hiya Everyone! My name is Ronney, I have 3 wonderful teenagers, and have been married to my husband for 20 years. I LOVE to design signatures, tags & avatars, I design with PSP, and have been designing for over 2 1/2 years. I will be not only designing signatures, tags & avatars but will also be writing & posting tutorials as well. I will also be making some templates to share with you all as well. So I hope you enjoy and can use everything I have available on my blog :-) If you ever try any of my tutorials,please send me your completed designs and I would love to showcase it here on my blog!
♥I CT For♥


Blog Hop

Today's Date

Favorite Stores

♥Forums♥


My Pixels


♥My Avatars♥


0 comments:
Post a Comment