Don't Be A Pirate

My Blinkies

Add Me On Facebook
Protected


Blogs I Stalk


Awards :-)


Find Me At

Favorite Stamps


Sunday, August 21, 2011
♥So Rock Pink (PTU)
**This tutorial was written & posted by DitzyDezigns on August 21st 2011**
***Any resemblance to any other tutorial is purely coincidental & completely unintentional!!!***
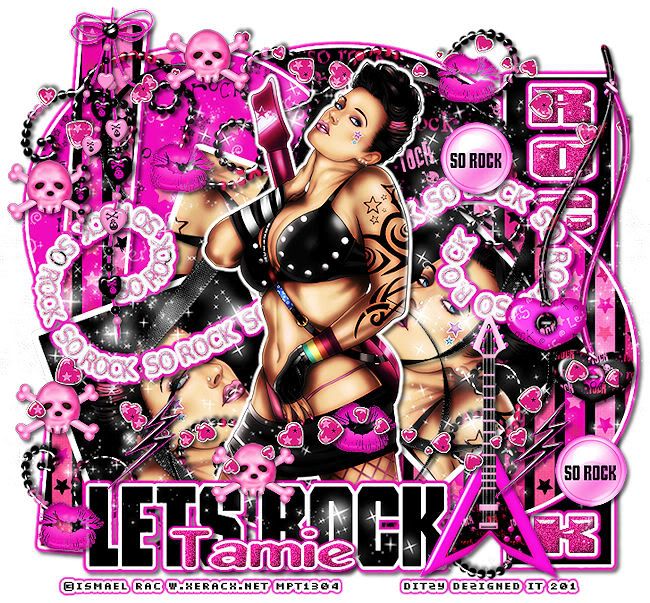
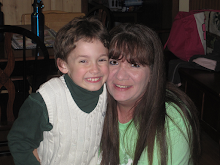
Here is what we will be making :
Supplies Needed :
Paint Shop Pro X2 (Any version should work)
Tube Of Choice - I used the awesome work of Ismael Rac . Which is available for purchase @ Ismael Rac
(My license # states MPT because that is where I purchased it from, but he has since moved to his own store :-)
Scrapkit - So Rock Pink By Tamie @ Addictive Pleasures
Template 104 also by Tamie @ Addictive Pleasures Template Blog
Plugins Used :
Eye Candy 5 Impact - Gradient Glow
Eye Candy 5 Impact - Glass
Eye Candy 4000 - Gradient Glow
Elements Used :
P9
P6
P3
Text
Beads3
Skull
Button2
Kiss
Beads2
Hearts2
Guitar2
SwirlRibbon
Scattered Hearts
Lightening
Sparkles
Lets Begin :
Open your Temp104 -
Go to Image - click Canvas Size - set your size to 800 X 700 (Don't worry you can crop it at the end of the tutorial - but this gives you more room to work with!)
Now go to your layers pallet - delete the credit & background layers.
Now in your layers pallet - click on Raster 9 layer - then go to Selections & click Select All - Float - Defloat -
Now open P3 - Copy & paste it as a new layer onto your canvas - then go to Selections - click Invert - then on your keyboard press your delete key 1 time.
Go back to Selections & click Select None.
Now go to Effects - click Plugins - Eye Candy 5 Impact - Gradient Glow -
You can either use my settings below or your own .
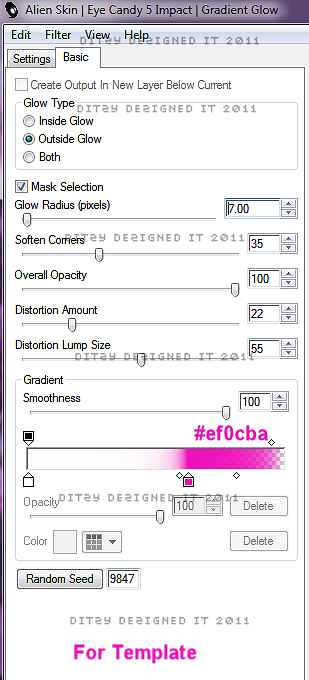
Click Ok.
Now go to Effects - click 3D Effects - then click Drop Shadow
Again you can use my settings below or your own -
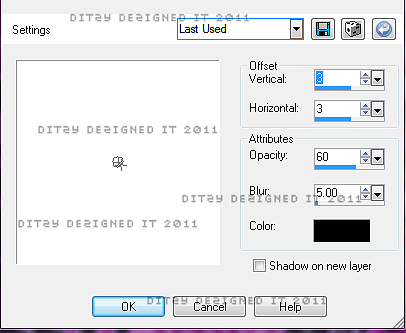
Click Ok.
Now go to your layers pallet & delete your original Raster 9 layer.
Now click on your Raster 4 layer - follow the exact same steps you followed above for this layer as well, only this time use P6 .
Also remember to apply your Gradient Glow & Drop Shadow.
Continue to follow those steps for the following layers :
Raster 5 (Use P9)
Raster 14 (Use P9)
Now in your layers pallet - click on your Raster 1 layer -
Go to Selections - click Select All - Float - Defloat
Now open your tube of choice - Copy & paste the close up tube as a new layer onto your canvas. Position it to your liking.
Then go to Selections & click Invert . Then on your keyboard press your delete key 1 time. Now go to Selections & click Select None.
Go to Effects - click Plugins - then click Xero - Radiance
You can use my settings below or your own
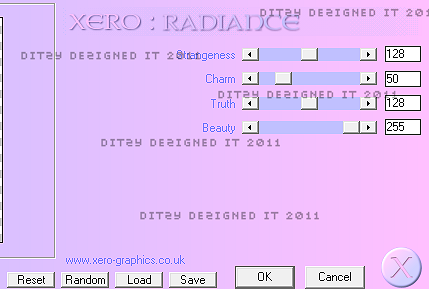
Click Ok.
Now click on Raster 2 layer - go to Selections - click Select All - Float - Defloat
Make a new raster layer -
Set your Foreground color to #000000 (Black)
Now using your flood fill tool - flood fill your area between your marching ants.
Keeping your raster selected - Copy & paste your close up tube again, this time position it so that a different area is visible.
Go to Selections - click Invert then on your keyboard press your delete key 1 time.
Now go to Selections & click Select None.
Go to Effects - click Plugins - Xero - Radiance
Same settings you used earlier
Click Ok.
Now follow the same steps for your Raster 3 layer.
Now copy & paste your full length tube onto your canvas - then position it center on your template.
Go to your layers pallet - move your full tube layer down so it is below your Raster 11 layer.
Go to Effects - Plugins - Xero - Radiance
Use the same settings you used earlier.
Then go to Effects - click Plugins - Eye Candy 4000 - Gradient Glow
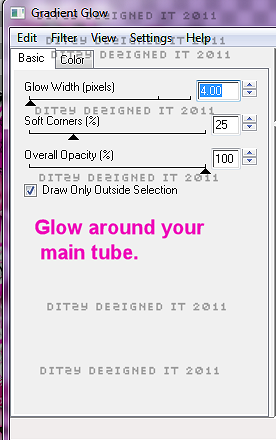
Click Ok & apply a drop shadow.
Now in your layers pallet - Delete your Raster 12 layer.
Then click on your Raster 11 layer - then go to Effects - click Plugins - Eye Candy 5 Impact - Gradient Glow
(Same settings you used earlier)
Now click on Raster 10 - Apply Eye Candy 5 Impact - Gradient Glow.
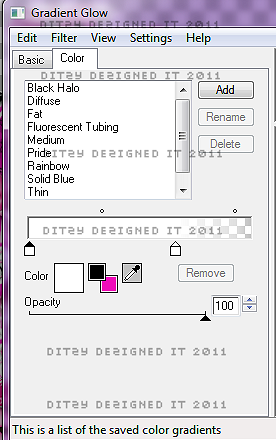
Now on Raster 13 - Activate your Magic Wand tool - click inside each visible letter R-O-C-K
Then once selected make a new raster layer -
Now flood fill your letters with #dd208b
Then go to Selections & click Select None.
Now go to Effects - click Plugins - Eye Candy 5 Impact - Gradient Glow
Use the same settings as before.
Then Effects - 3D Effects - Drop Shadow
Also same settings as before.
Now use your magic wand again & click inside each letter again - then go to Effects - Plugins - Eye Candy 5 Impact - Glass
You can use my settings below or your own -
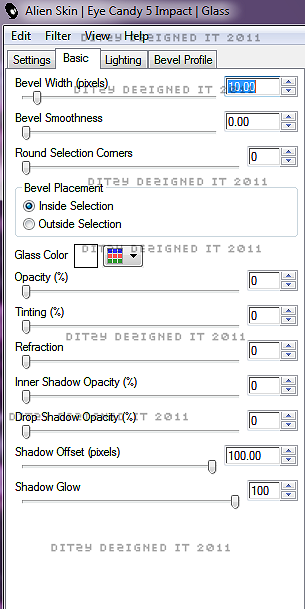
Click Ok.
Keeping your letters selected go to Adjust - click Add/Remove Noise - then click Add Noise
Set to Uniform 40 & make sure your Monochrome box IS checked, then click Ok.
Now go to Selections & click Select None.
Open your Text element - Copy & paste it as a new layer onto your canvas. Then re-size it to 80%. Now position it to your liking.
Go to Effects - Plugins - Eye Candy 5 Impact - Gradient Glow
Same settings as before.
Then apply a drop shadow.
In your layers pallet - move your Text element layer down below your full tube layer.
Open your Beads 3 element - Copy & paste them as a new layer onto your canvas . Then position them to your liking.
Go to your layers pallet & move your Beads3 layer down below your full tube & text layers.
Go to Adjust - click Sharpness - Sharpen
Apply a drop shadow.
Open your Skull element - Copy & paste it as a new layer onto your canvas - then re-size it to 40%. Now position it to your liking.
Go to Adjust - Sharpness - Sharpen
Then apply a drop shadow.
Go to your layers pallet - right click on your Skull layer - then click Duplicate. Position to your liking.
Open your Button2 element - Copy & paste it as a new layer onto your canvas - then re-size it to 30%. Position to your liking.
Adjust - Sharpness - Sharpen
Apply a drop shadow.
Go to your layers pallet & duplicate your Button 2 layer - use move tool to position to your liking.
Open your Kiss element - Copy & paste it as a new layer onto your canvas - then re-size it to 30%. Position it to your liking.
Sharpen & apply a drop shadow.
Go to your layers pallet - duplicate your Kiss layer a couple of times - position each one to your liking.
Open your Beads 2 element - Copy & paste it as a new layer onto your canvas - then re-size it to 65%. Position it on the upper left corner of your template.
Sharpen & apply a drop shadow.
Open your Hearts 2 element - Copy & paste it as a new layer onto your canvas - then re-size it to 65%. Position it to the upper right corner of your template.
Sharpen & apply a drop shadow.
Open your Guitar element - Copy & paste it as a new layer onto your canvas - then re-size it to 50%. Position it to the right of your full tube.
Sharpen & apply a drop shadow.
Open your Swirl Ribbon element - Copy & paste it as a new layer.
Go to your layers pallet - move your Swirl Ribbon layer down below your text layer.
Sharpen & apply a drop shadow.
Open your Scattered Hearts element - Copy & paste it as a new layer onto your canvas - then re-size it to 75%. Position it to the lower part of your template.
Sharpen & apply a drop shadow.
Go to your layers pallet - duplicate your Scattered hearts layer - go to Image & click Flip.
Now move your top ScatteredHearts layer down below your full tube layer.
Open your Lightening element - Copy & paste it as a new layer onto your canvas - Then re-size it to 30%. Position to your liking.
Sharpen & apply a drop shadow.
Open your Sparkles element - Copy & paste as a new layer onto your canvas - then move it to the left of your template.
Go to your layers pallet - duplicate your sparkles layer - then go to Image & click Mirror.
Then in your layers pallet - right click on your duplicated Sparkles layer - click Merge - Merge Down.
Now move your merged layer below your full tube layer.
Now copy & paste your Sparkles element again - use your move tool & position it down towards the bottom of your template.
In your layers pallet - move your new Sparkles layer above your Raster 11 layer.
Add your name & copyright information
I used the following for the name on my tag :
Font : Abbey Medium Extended
Size : 65 Pixels
Color : #dd208b
Once you have your name positioned - go to your layers pallet - right click on your name layer - click Convert to Raster Layer.
Go to Effects - Plugins - Eye Candy 5 Impact - Gradient Glow
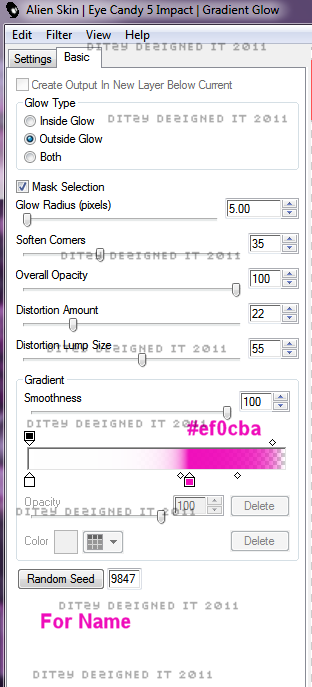
Click Ok.
Now apply a drop shadow.
Use your magic wand & click inside each letter of your name - then go to Effects - click 3D Effects - Inner Bevel

Click Ok
Now go to Adjust - click Add/Remove Noise - Add Noise - set to Uniform 40 & make sure your Monochrome box IS checked.
Click Ok.
Selections & click Select None.
Now go to your layers pallet - right click on any layer & click Merge - Merge Visible.
Then activate your crop tool - crop off any access canvas you did not use.
Re-size & sharpen
Save as PNG & you have compeleted this tutorial!♥
Subscribe to:
Post Comments (Atom)
About Me
- DitzyDezigns
- New York, United States
- Hiya Everyone! My name is Ronney, I have 3 wonderful teenagers, and have been married to my husband for 20 years. I LOVE to design signatures, tags & avatars, I design with PSP, and have been designing for over 2 1/2 years. I will be not only designing signatures, tags & avatars but will also be writing & posting tutorials as well. I will also be making some templates to share with you all as well. So I hope you enjoy and can use everything I have available on my blog :-) If you ever try any of my tutorials,please send me your completed designs and I would love to showcase it here on my blog!
♥I CT For♥


Blog Hop

Today's Date

Favorite Stores

♥Forums♥


My Pixels


♥My Avatars♥
0 comments:
Post a Comment