♥Ditzy's TOU♥
All of the tutorials written by me are of my own Ditzy imagination.
Do NOT copy or alter them in ANY way.
Do NOT copy & paste the tutorials to any website, forum or group.
Do NOT claim them as your own.
If you would like to show or share my tutorial do so by using a link to bring your members to my blog. However if you do please send me a courtesy email so that I know my tutorials are being used according to my TOU. Also if you would please send me a link to where you will be posting my link.
If you have done any of my tutorials I would LOVE to see the outcome of what you have made, so please email me OR you can leave me a link in my shout box so that I can see what you have made and display it on my blog for others to enjoy as well.
Other than that please have fun,and I hope that you enjoy all my tutorials!
Email me @ DitzyDezigns@hotmail.com
Email Me
I would love to see what you have made using any of my tutorials, so please feel free to email me at the address below.
DitzyDezigns@hotmail.com
Add Me On Facebook
Pages
Powered by Blogger.
Saturday, August 20, 2011
♥So Rock (Violet) PTU♥
**This tutorial was written & posted by DitzyDezigns on August 20th 2011**
***Any resemblance to any other tutorial is purely coincidental & completely unintentional!!!***
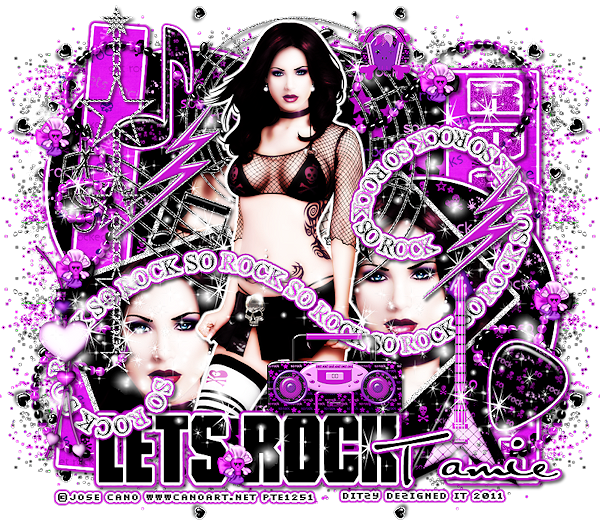
Here is what we will be making :
Supplies Needed :
Paint Shop Pro X2 (Any version should work)
Tube Of Choice - I used the amazing work of Jose Cano @ PTE
(Purchase & License Required To Use)
Scrapkit - So Rock Violet By Tamie @ Addictive Pleasures
Template 104 By Tamie @ Addictive Pleasures
Plugins Used :
Xero - Radiance (Optional)
Eye Candy 5 Impact - Glass
Eye Candy 5 Impact - Gradient Glow
Eye Candy 4000 - Gradient Glow
Fonts Used :
Al Sandra
Elements Used :
Papers 3,7 & 9
Text2
MusicNotes
Music Note
Guitar
Chain
Boombox
Beads
Bow2
Hearts
Glitter
Beads3
Guitar Pick
Lightening
SkullWithHeadPhones
Sparkles
Lets Begin :
Start by opening your template 104.
Once your template is open, go to Image - click Canvas Size
change your setting to 800 X 700 (Don't worry you can crop it later)
Now go to your layers pallet - delete the Credit & Background layers.
Still in your layers pallet -
Click on your Raster 9 layer - go to Selections - click Select All - Selections again & click Float - Selections again & click Defloat -
Now open Paper 3 from the kit - Copy & paste it as a new layer onto your canvas - then go to Selections & click Invert - now on your keyboard press your Delete key 1 time.
Go back to Selections & click Select None.
Go back to your layers pallet & delete your original Raster 9 layer.
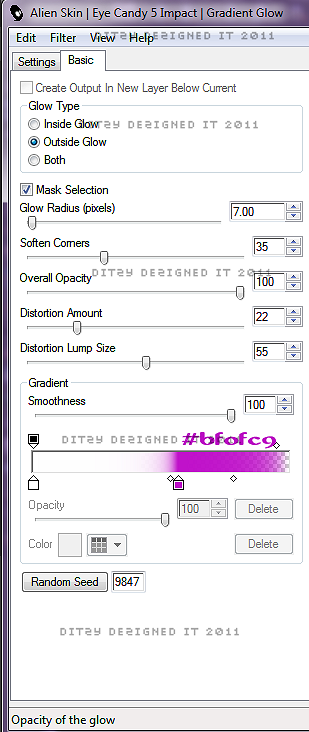
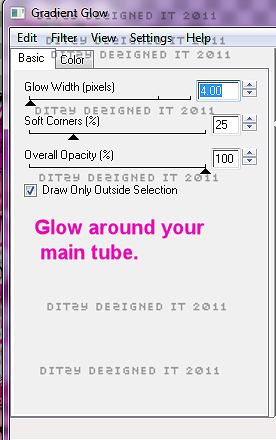
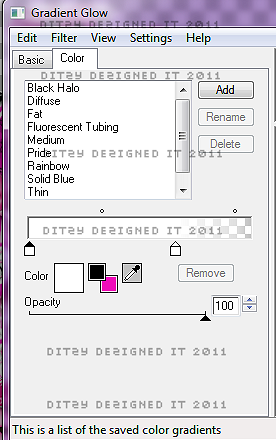
Now click on your new Raster 9 layer - go to Effects - click Plugins - then go to Eye Candy 5 Impact - Gradient Glow - You can use my settings below or your own -
Click Ok.
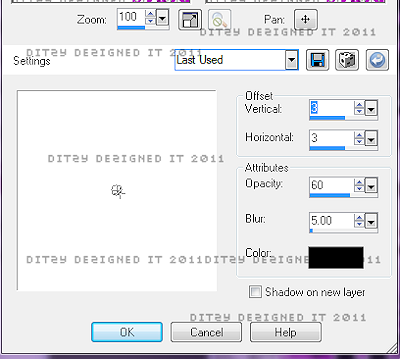
Now go to Effects - click 3D Effects - then click Drop Shadow.
Again you can use my settings below or your own -
Click Ok.
Now you will follow those exact same steps for the following layers, only thing you will change is the Paper you use :-) -
Raster 10 - Use paper 7
Raster 4 - Use paper 9
Raster 14 - Use paper 7
Raster 5 - Use Paper 9
Now click on Raster 1 - go to Selections - click Select All - Selections again click Float - Selections again & click Defloat -
Now open your tube of choice -
Copy & paste your close up as a new layer onto your template - then position to your liking, then go to Selections & click Invert - then on your keyboard press your Delete key 1 time.
Go back to Selections & click Select None.
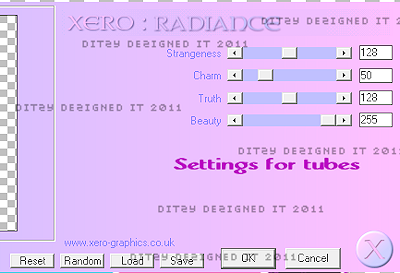
Now on your tube layer - go to Effects - click Plugins - then find your Xero plugin - then click Radiance -
Again you can use my settings or your own -
Then click Ok.
Now click on Raster 2 - Go to Selections - click Select All - Selections again then click Float - Selections again then click Defloat -
Now make a new Raster Layer - set your Foreground Color to black (#000000) then activate your Flood Fill Tool -
On your new raster layer flood fill your Raster 2 (Square) with your color.
Keeping your Raster 2 Selected, Copy & paste your close up tube again, now position it so that a different portion of the tube is showing, once happy with position go to Selections & click Invert . Then on your keyboard press your Delete key 1 time.
Go back to Selections & click Select None.
Now go to Effects - click Plugins - Xero - Radiance.
Use the exact same settings you used on your previous close up tube.
Click Ok.
Now you will want to repeat the steps above for the following layer -
Raster3
Now for Raster Layers 6,7,& 8 - Go to Adjust - click Add/Remove Noise - then click Add Noise - set to Uniform , 100 & make sure your Monochrome box IS checked , then click Ok.
Then go to Effects - click 3D Effects - then click Drop Shadow.
Apply your drop shadow to each frame that you added the noise too.
Click on Raster 13 - Activate your Magic Wand tool - click inside each letter that is showing - R-O-C-K.
Now make a new Raster Layer - activate your Flood Fill tool - set your Background Color to #ba0dc3
Now flood fill each letter .
Go to Selections - click Select None.
Now go to Effects - click Plugins - click Eye Candy 5 Impact - Gradient Glow - use the same settings you used previously.
Apply a drop shadow. (Using the exact same settings you have been using.)
Now activate your Magic Wand tool again - click inside each of the showing letters again R-O-C-K. Now go to Effects - click Plugins - then click Eye Candy 5 Impact - Glass -
You can use my settings or your own -
Click Ok.
Now keeping your letters selected go to Adjust - click Add/Remove Noise - set to , Uniform , 40 & make sure your Monochrome box is checked &click Ok.
Go to Selections & click Select None.
Back to your Layers Pallet - click on Raster 12 layer & delete it.
Now click on your Raster 11 layer & apply the Eye Candy 5 Gradient Glow , same settings as before.
Now apply a drop shadow.
Now copy & paste your full length tube - position it center on your template.
Then in your layers pallet - move your Tube layer down below your Raster 12 layer.
Now go to Effects - click Plugins - Xero - Radiance
Use same settings you used on your close up tubes.
Back to Effects - click Plugins - Eye Candy 4000 - Gradient Glow.
You can use my settings below or your own -
Click Ok.
Now apply a drop shadow to your main tube.
(Use the same settings you have been using)
Now lets add some elements to your template -
Open your Text2 element - Copy & paste it as a new layer onto your canvas - then use your move tool to position it to your liking.
Once happy with placement go to Effects - click Plugins - then click Eye Candy 5 Impact - Gradient Glow
(You can use my settings or your own)
Click Ok.
Apply a drop shadow.
Open your Music Notes element - Copy & paste it as a new layer - then re-size it to 70%. Now position it to your liking.
Go to your layers pallet - move your Music Notes layer down so it is directly under your Full Tube layer.
Go to Adjust - click Sharpness - then click Sharpen
Now apply a drop shadow to your element.
Open your Music Note Element - (This element is different from the last) - Copy & paste it as a new layer onto your canvas - then re-size it to 30%. Now position it to your liking.
Go to Adjust - Sharpness - Sharpen.
Apply a drop shadow.
Open your Guitar element - Copy & paste it as a new layer onto your canvas - then re-size it to 50%. Now position it to the right of your full tube.
Now go to Effects - click Plugins - Xero - Radiance.
Same settings as you used on your tubes.
Now apply a drop shadow to your Guitar element.
Open your Chain element - Copy & paste it as a new layer onto your canvas - then re-size it to 80%. Now position it to your liking.
Sharpen your element 2x's.
Apply a drop shadow.
Open your BoomBox element - Copy & paste it as a new layer onto your canvas - then re-size it to 40%. Position it to your liking.
Sharpen & apply a drop shadow.
Open your Beads element - Copy & paste it as a new layer onto your canvas - then re-size it to 70%. Position it to your liking.
Sharpen & apply a drop shadow.
Open your Bow2 element - Copy & paste it as a new layer onto your canvas - then re-size it to 25%. Now position it to your liking.
Sharpen & apply a drop shadow.
Go to your layers pallet - right click on your Bow2 layer - click Duplicate. Now use your move tool to position your duplicated element to your liking.
Open your Hearts element - Copy & paste it as a new layer onto your canvas - then re-size it to 65%. Position it to your liking.
Go to your layers pallet - move your Hearts layer down so that it is the last layer in the layers pallet.
Now right click on your Hearts layer - click Duplicate - go to Image & click Mirror.
Now right click on your duplicated Hearts layer , then click Duplicate - now go back to Image & click Flip.
Now duplicate again & go to Image & click Mirror.
Open your Beads3 element - Copy & paste it as a new layer onto you canvas - then position it to the left side of your template.
In your layers pallet - move your Beads3 layer down below your Full Tube layer.
Now right click on your Beads 3 layer & click Duplicate.
Then go to Image & click Mirror.
Use your move tool to adjust the position of your duplicated Beads3 layer if needed.
Open your Guitar Pick element - Copy & paste it as a new layer onto your canvas - then re-size it to 50%. Position it to the right of your Guitar element .
Go to Effects - click Pluguins - then click Eye Candy 5 Impact - Gradient Glow. Use the same settings as before.
Now apply a drop shadow.
Open your Lightening element - Copy & paste it as a new layer onto your canvas - then re-size it to 50%. Position it to the left of your Full Tube.
Sharpen & apply a drop shadow.
Go to your layers pallet - right click on your Lightening layer - click Duplicate. Now use your Move Tool to position it to the right side of your Full Tube.
Open your SkullWithHeadPhones element - Copy & paste it as a new layer onto your canvas - then re-size it to 30%. Now position it to your liking.
Sharpen & apply a drop shadow.
Now open your Sparkles element - Copy & paste it as a new layer onto your canvas - then position it towards the bottom of your template.
Go to your layers pallet - right click on your Sparkles layer & click Duplicate. Now go to Image & click Flip.
In your layers pallet - move your duplicated Sparkles layer down below your Full Tube layer.
Now duplicate your Sparkles layer again & use your move tool to position it in the middle of your template.
(If you wish to make this tag for several people you may want to save it now as a PSP File, that way you can re-open it at a later time & you will have all your layers & add your names. :-)
Now activate your Text Tool - Set your font, size & color.
I used :
Font : Al Sandra
Size : 70 Pixels
Background Color : #000000 (Black)
Foreground Color : Set to nul
Now click on your canvas to open your text box, type out the name you want on your tag. Then click Apply.
Now position your name where you would like it.
Go to your layers pallet - right click on your Name layer - click Convert To Raster Layer.
Now go to Effects - click Plugins - Eye Candy 5 Impact - Gradient Glow
Set your second color to #bf0fc9
Click Ok.
Now go to Effects click 3D Effects - Drop Shadow.
Use same settings you have used through out the tutorial.
Now add your copyright & credit information. (Do not skip this step! Very Important!!)
Now once you are happy with every thing on your tag - go to your layers pallet - right click on any layer - then click Merge - then click Merge Visible.
Now if needed activate your Crop Tool & crop off any access canvas that you did not use.
Once cropped you may want to re-size your tag depending on where you will be using it.
Once re-sized I like to Sharpen my tag one final time. You can do this as well or your own preference.
Now all that is left is to save your tag as a PNG file & you have completed this tutorial!!♥
Subscribe to:
Post Comments (Atom)
About Me

- DitzyDezigns
- New York, United States
- Hiya Everyone! My name is Ronney, I have 3 wonderful teenagers, and have been married to my husband for 20 years. I LOVE to design signatures, tags & avatars, I design with PSP, and have been designing for over 2 1/2 years. I will be not only designing signatures, tags & avatars but will also be writing & posting tutorials as well. I will also be making some templates to share with you all as well. So I hope you enjoy and can use everything I have available on my blog :-) If you ever try any of my tutorials,please send me your completed designs and I would love to showcase it here on my blog!
Labels
- Addictive Pleasures Tuts (35)
- Angel's Designz Tuts (10)
- Animated (26)
- Announcements (2)
- Awards (2)
- Beginner (17)
- Butterfly Blush Tuts (8)
- Cool Scraps Digital (2)
- Creative Intentionz (2)
- Creative Scraps By Crys (19)
- Ditzys Scrapkits (1)
- Forum Sets (1)
- FTU (6)
- Intermediate Level Tuts (3)
- Peekaboo Land (1)
- Peekaboo Land PTU (4)
- Peekaboo Land Tuts (1)
- Pimp My Tags With Scraps Tuts (14)
- PTU (131)
- Scappin Dollars Tuts (1)
- Scrappin Dollars Tuts (7)
- Scraps From The Heart Tuts (3)
- Scraps With Attitude (27)
- Tammy's Scraps (8)
- Updates (1)
- Wickedly Ditzy Scraps (1)





0 comments:
Post a Comment