♥Ditzy's TOU♥
All of the tutorials written by me are of my own Ditzy imagination.
Do NOT copy or alter them in ANY way.
Do NOT copy & paste the tutorials to any website, forum or group.
Do NOT claim them as your own.
If you would like to show or share my tutorial do so by using a link to bring your members to my blog. However if you do please send me a courtesy email so that I know my tutorials are being used according to my TOU. Also if you would please send me a link to where you will be posting my link.
If you have done any of my tutorials I would LOVE to see the outcome of what you have made, so please email me OR you can leave me a link in my shout box so that I can see what you have made and display it on my blog for others to enjoy as well.
Other than that please have fun,and I hope that you enjoy all my tutorials!
Email me @ DitzyDezigns@hotmail.com
Email Me
I would love to see what you have made using any of my tutorials, so please feel free to email me at the address below.
DitzyDezigns@hotmail.com
Add Me On Facebook
Blog Archive
-
▼
2011
(152)
-
▼
July
(13)
- ♥Beach Birds (Animated) PTU♥
- ♥Just An Update♥
- ♥Sunrise Summer (Animated) PTU
- ♥Cutie Patootie (Animated) PTU♥
- ♥Sleepy Time PTU♥
- ♦Beach Bum Girl (Animated) PTU♦
- ♥Special Day With Dad PTU♥
- ♥Sunny Dayz (Animated) PTU♥
- ♥Sea World PTU♥
- ♥Under The Sea PTU (Animated)♥
- ♥Groovy Chic PTU♥
- ♥Once I Had A Dream Forum Set PTU♥
- ♦Emolicious Forum Set PTU♦
-
▼
July
(13)
Pages
Powered by Blogger.
Wednesday, July 13, 2011
♥Under The Sea PTU (Animated)♥
**This tutorial was written & posted my DitzyDezigns on July 13th 2011**
***Any resemblance to any other tutorial is purely coincidental & completely unintentional!!***
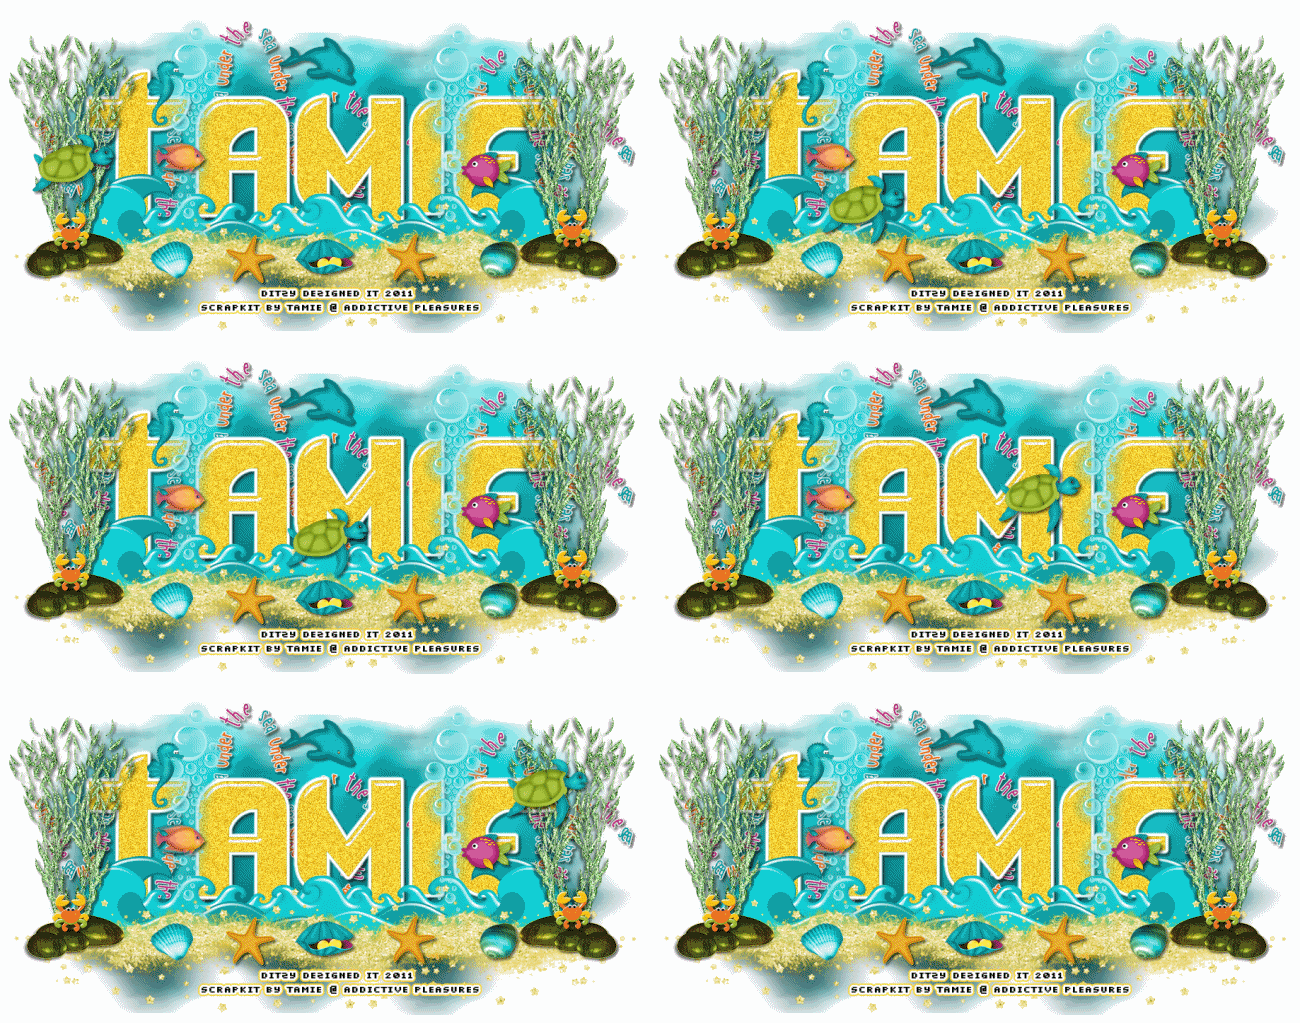
Here is what we will be making :
Supplies Needed :
Paint Shop Pro X2 (Any version should work)
Animation Shop
Scrapkit - Hermione By Tamie @ Addictive Pleasures
Mask Of Choice
Fonts Used :
DaFunk 2 (For name)
Pixelette (For credit info)
Plugins Used :
Eye Candy 4000 Gradient Glow
Eye Candy 5 Impact - Glass
Elements Used :
Turtle
Text
Shell & Shell2
Starfish2
Seahorse
Clam
Crab
Fish2
Dolphin
Fish
Rocks
Glitter
Bubbles2
Sea
Seaweed
P12
Lets Begin :
Start by making a new 1000 X 650 transparent canvas. (I know its a little big, but I like having enough room to work, you will crop it at the end.)
Now open your P12 - Copy & paste it as a new layer onto your canvas.
Go to Layers - click Load/Save Mask, then from the slide out menu click Load Mask From Disk.
Now choose a mask of your liking. Then click Load.
Now go to your layers pallet - right click on your Mask layer - then click Merge - then from the slide out menu click Merge Group.
Now re-size your mask if needed. I re-sized mine to 65%.
Now still in your layers pallet - right click on your mask layer again (the merged one) then click Duplicate.
Now right click on your Duplicated mask layer & click Merge - then from the slide out menu click Merge Down.
Now your two mask layers should become one layer.
Now using your move tool - move your Mask to the left side of your canvas.
Go back to your layers pallet - right click on your newly merged canvas layer - then click Duplicate .
Now using your move tool - move your Duplicated Mask element to the middle of your canvas. (Make sure the one end of your duplicated mask is still touching your first mask.)
Now go back to your layers pallet - right click on your Duplicated Mask layer - then click Duplicate .
Using your move tool, move your 3rd Mask element to the right side of your canvas. Again making sure that one end of the 3rd Mask is still touching the 2nd Mask.
Now activate your text tool - set your font, size & color
I used :
Font : Dafunk2
Size : 200 Pixels (You may have to adjust the size for your name, depending on the length of your name.)
Color : #ffd035
Now click on your canvas to open your text box.
Type out the name you wish to have on your tag.
Now click Apply.
Position your name so that it is center with your 3 Mask layers.
(Leave your name for now we will come back to it.)
Open your Sea element - Copy & paste it as a new layer onto your canvas - then re-size it to 80%.
Then re-size your Sea element again to 80%.
Now using your move tool , position your Sea element to the lower left side of your canvas. Trying to keep it even with the edge of your Mask that is on the left side.
Go to your layers pallet - Right click on your Sea layer - then click Duplicate -
Now go to Image & click Mirror.
Use your move tool to adjust the position of your duplicated Sea element if needed.
Open your Seaweed element - Copy & paste it as a new layer onto your canvas - then re-size it to 50%.
Now position your Seaweed element to the left end of your Sea element on the left side.
Go to your layers pallet - right click on your Seaweed layer & click Duplicate.
Go to Image & click Mirror.
Now using your move tool, move your duplicated Seaweed element back to the left side of your canvas & position it next to your original Seaweed element.
Go back to your layers pallet - right click on your Duplicated Seaweed layer - then click Merge - then from the slide out menu click Merge Down.
Now your 2 Seaweed layers are one.
Now go to Adjust - click Sharpness - then from the slide out menu click Sharpen.
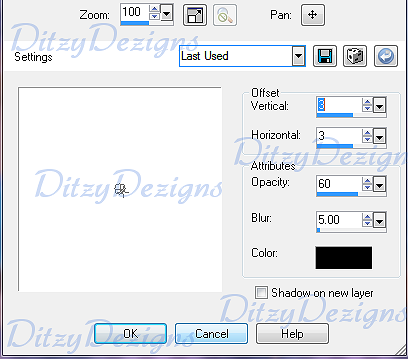
Then go to Effects - click 3D Effects - then from the slide out menu click Drop Shadow.
(You are more than welcome to use my settings below or your own, its totally up to you.)
Click Ok.
Now go back to your layers pallet - right click on your Merged Seaweed layer & click Duplicate - then go to Image - click Mirror. Use your move tool to adjust the position of your duplicated Seaweed if needed.
(There is no need to sharpen or add a drop shadow to this element because we already did it before we duplicated it.)
Open your Glitter element - Copy & paste it as a new layer onto your canvas then re-size it to 70%.
Using your move tool, position your Glitter element to the left side of your Sea element . (See my tag for reference if needed)
Now go to Adjust - click Sharpness - then click Sharpen.
Now apply a drop shadow. (Use the same settings as before)
Now go to your layers pallet - right click on your Glitter layer - then click Duplicate. Use your move tool to position your duplicated Glitter element to the middle of your canvas. Keeping one end of your duplicated Glitter element touching your first Glitter element.
Go back to your layers pallet - right click on your Duplicated Glitter layer - then click Duplicate. Now use your move tool & position your 3rd Glitter element to the right of your middle Glitter element. Again keeping the left end touching your middle Glitter element. (See my tag for reference)
Open your Bubbles 2 element - Copy & paste it as a new layer onto your canvas - then re-size it to 80%. Use your move tool & position your Bubbles2 element to your liking.
Go to Adjust - click Sharpness - then click Sharpen.
Now go to your layers pallet - right click on your Bubbles2 layer & click Duplicate.
Now use your move tool to position your duplicated Bubbles2 element to your liking.
Open your Rocks element - Copy & paste it as a new layer onto your canvas - then re-size it to 50%. Using your move tool position your Rocks element to the right side of your canvas. (See my tag for reference)
Now go to Adjust - click Sharpness - then click Sharpen.
Go to Effects - click 3D Effects - then click Drop Shadow. (Use the same settings as earlier)
Now go back to your layers pallet - right click on your Rocks layer - then click Duplicate.
Now go to Image & click Mirror. Use your move tool to adjust the position of your Duplicated Rocks element if needed.
Open your Fish element - Copy & paste it as a new layer onto your canvas - then re-size it to 20%. Now position your Fish element to your liking.
Adjust - Sharpness - Sharpen.
Apply a Drop Shadow.
Open your Dolphin element - Copy & paste it as a new layer onto your canvas - then re-size it to 20%. Position it to your liking.
Adjust - Sharpness - Sharpen
Apply a Drop Shadow
Open your Fish2 element - Copy & paste it as a new layer onto your canvas - then re-size it to 20%.
Now go to Image & click Mirror. Use your move tool to adjust the position if you would like.
Adjust - Sharpness - Sharpen
Apply a Drop Shadow.
Open your Crap element - Copy & paste it as a new layer onto your canvas - then re-size it to 20%. Position your Crap element to your liking.
Adjust - Sharpness - Sharpen
Apply a Drop Shadow.
Open your Clam element - Copy & paste it as a new layer onto your canvas - then re-size it to 25%.
Use your move tool to position your Clam element to your liking.
Adjust - Sharpness - Sharpen
Apply a Drop Shadow.
Open your Seahorse element - Copy & paste it as a new layer onto your canvas - then re-size it to 20%. Use your move tool & position your Seahorse element to your liking.
Adjust - Sharpness - Sharpen
Apply a Drop Shadow
Open your Starfish 2 element - Copy & paste it as a new layer onto your canvas - then re-size it to 20%. Use your move tool & position your Starfish2 element to your liking.
Adjust - Sharpness - Sharpen
Apply a Drop Shadow.
Open your Shell2 element - Copy & paste it as a new layer onto your canvas - then re-size it to 30%. Use your move tool & position your Shell2 element to your liking.
Adjust - Sharpness - Sharpen
Apply a Drop Shadow.
Open your Shell element - Copy & paste it as a new layer onto your canvas - then re-size it to 30%. Position it to your liking.
Adjust - Sharpness - Sharpen
Apply a Drop Shadow
Now go to your layers pallet - click on your TOP Mask layer -
Open your Text element - Copy & paste it as a new layer onto your canvas - then re-size it to 70%. Now go to Image - click Free Rotate , set to , Left , 45.00 & click Ok.
Now use your move tool to position your Text element to the left of your Mask element.
Adjust - Sharpness - Sharpen
Apply a Drop Shadow.
Go back to your layers pallet - right click on your Text layer - then click Duplicate.
Now use your move tool & move your duplicated Text element to the right.
Open your Turtle element - Copy & paste it as a new layer onto your canvas - then re-size it to 30%.
Use your move tool & position your Turtle element to the left & place it in the middle of your Seaweed element.
Adjust - Sharpness - Sharpen
Apply a Drop Shadow
(We will come back to the Turtle element when we begin our animation.)
Now activate your text tool, set your font, size & color for your copyright/credit information.
I used :
Font : Pixelette
Size : 13 Pixels
Background Color : #000000 (Black)
Foreground Color : set to nul
Click on your canvas to open your text box, type out all needed information, click Apply.
Now I applied a Gradient Glow to my credit information as it makes it easier to read because it is so small. You can do this as well, you certainly do not "have" to , just make sure your credit/copyright information is readable!
Now go back to your layers pallet - Right click on your Name layer -
Then click Convert To Raster Layer
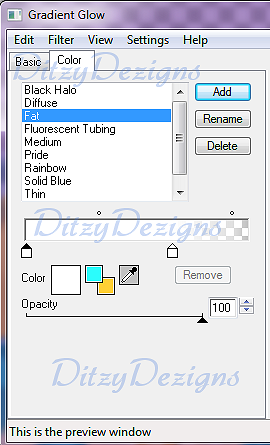
Now go to Effects - click Plugins - then click Eye Candy 4000 - then from the slide out menu click Gradient Glow.
(Again you can use my settings below or your own)
Click Ok.
Now apply a drop shadow. (Same settings as before)
Click Ok.
Now activate your Magic Wand tool - then click inside each letter in your name.
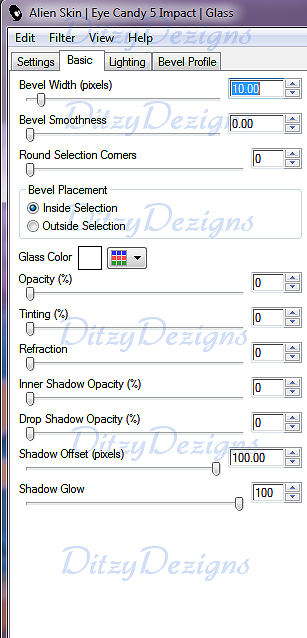
Once all letters are selected, go to Effects - click Plugins - then click Eye Candy 5 Impact - then from the slide out menu click Glass.
Click Ok.
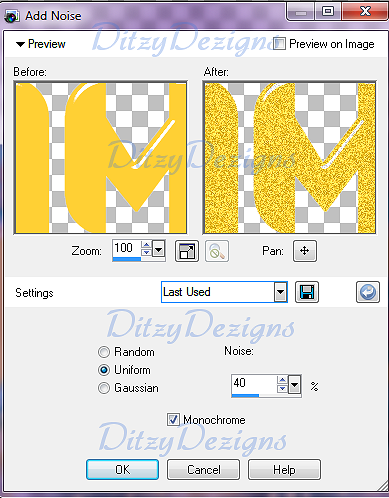
Now keeping your letters selected go to Adjust - click Add/Remove Noise - then from the slide out menu click Add Noise .
Click Ok.
Now go to Selections - click Select None.
If you wish not to animated your tag, you can stop here, merge your layers - re-size your tag then save it as a png file.
If you wish to animate your tag lets continue!
Open your Animation Shop -
Go back to your PSP
Activate your crop tool, now crop off any access canvas you did not use.
Once your tag is cropped, go to your layers pallet & click on your Turtle layer -
Go to Edit - click Copy Special - then click Copy Merged from the slide out menu.
Go to your Animation Shop - right click in your grey work area - then click "Paste As New Animation"
Go back to your PSP -
Use your move tool - now move your Turtle element to the right a little bit - (You can also move your Turtle element up or down a little each time as well)
Now go to Edit - Copy Special - Copy Merged
Go back to Animation Shop -
Right click inside the frame you just put there. Click Pate - then click After Current Animation.
Go back to PSP -
Using your move tool - move your Turtle a little more to the right (again you can move your turtle up or down each time you advance him a bit more)
Edit - Copy Special - Copy Merged
Go to Animation Shop -
Right click inside frame 2 that you just put there - click Paste - After Current Frame.
Go back to your PSP -
Using your move tool - move your Turtle element more to the right -
Edit - Copy Special - Copy Merged -
Go to Animation Shop -
Right click in frame 3 - click Paste - After Current Frame
Now go back to PSP -
Continue to follow the steps above until your turtle has made it across your tag .
Once your Turtle element reaches your Seaweed element on the right side of your tag - go to your layers pallet - & click on the eye next to your turtle layer - this will hide your turtle.
Then Edit - Copy Special - Copy Merged
Go to your Animation Shop -
Right click in your last frame - click Paste - After Current Frame.
Now when you have all of your frames - go back to your very first frame.
Click on it to select it.
Now on your keyboard - Press & hold your Ctrl key, then tap your A key - This will select ALL of your frames.
Now once all your frames are selected - on your keyboard again, press & hold your Alt key, then press your Enter key, this will open your Frame Properties window.
Now for your Display time, type in 50 & click Ok.
Now view your animation. (For those of you new to Animation Shop, to view your animation go to the top of your Animation Shop on the right side, you will see some icons, click the one that looks like a mini film strip.)
If you are happy with your animation , you will want to re-size your tag to the size you need it for where you are going to use it.
To re-size something in Animation Shop -
On your keyboard, press your Shift & S key, this will open your Re-size menu. Type in the size you need your tag & click Ok.
Now save your file as a GIF file & you have completed this tutorial!!♥
Subscribe to:
Post Comments (Atom)
About Me

- DitzyDezigns
- New York, United States
- Hiya Everyone! My name is Ronney, I have 3 wonderful teenagers, and have been married to my husband for 20 years. I LOVE to design signatures, tags & avatars, I design with PSP, and have been designing for over 2 1/2 years. I will be not only designing signatures, tags & avatars but will also be writing & posting tutorials as well. I will also be making some templates to share with you all as well. So I hope you enjoy and can use everything I have available on my blog :-) If you ever try any of my tutorials,please send me your completed designs and I would love to showcase it here on my blog!
Labels
- Addictive Pleasures Tuts (35)
- Angel's Designz Tuts (10)
- Animated (26)
- Announcements (2)
- Awards (2)
- Beginner (17)
- Butterfly Blush Tuts (8)
- Cool Scraps Digital (2)
- Creative Intentionz (2)
- Creative Scraps By Crys (19)
- Ditzys Scrapkits (1)
- Forum Sets (1)
- FTU (6)
- Intermediate Level Tuts (3)
- Peekaboo Land (1)
- Peekaboo Land PTU (4)
- Peekaboo Land Tuts (1)
- Pimp My Tags With Scraps Tuts (14)
- PTU (131)
- Scappin Dollars Tuts (1)
- Scrappin Dollars Tuts (7)
- Scraps From The Heart Tuts (3)
- Scraps With Attitude (27)
- Tammy's Scraps (8)
- Updates (1)
- Wickedly Ditzy Scraps (1)





0 comments:
Post a Comment