Don't Be A Pirate

My Blinkies

Add Me On Facebook
Protected


Blogs I Stalk


Awards :-)


Find Me At

Favorite Stamps


Monday, July 18, 2011
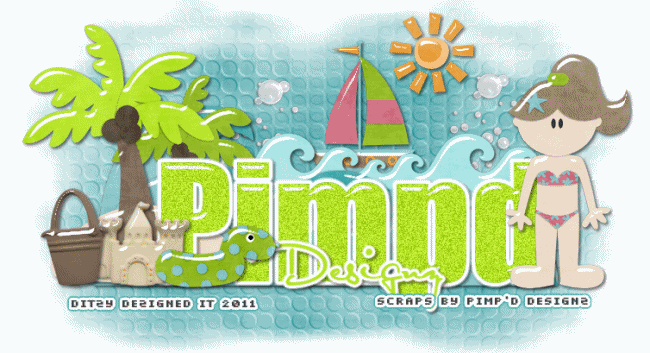
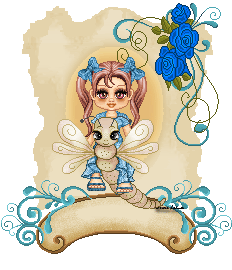
♦Beach Bum Girl (Animated) PTU♦
**This tutorial was written & posted by DitzyDezigns on July 18th 2011**
***Any resemblance to any other tutorial is purely coincidental & completely unintentional!**
Here is what we will be making :
Supplies Needed :
Paint Shop Pro X2 (Any version should work)
Animation Shop
Scrapkit - Beach Bum Girl By Pimp'd Designz @ PMTW/S
Mask Of Choice
Fonts Used :
Impact (For main name)
Al Sandra (For 2nd part of name)
Pixelette (For credit info)
Elements Used :
Waves
Sun
Sandcastle
Island
Floatie
Bucket
Bubbles
Boat
Beach Bum Girl
Lets Begin -
Start by opening a new 800 X 650 white canvas. (Don't worry you will crop it later.)
Open your Waves element - Copy & paste it as a new layer onto your canvas - then re-size it to 90%. Position it using your move tool so that it is center on your canvas.
Now go to Effects - click Plugins - then click Eye Candy 5 Impact - then from the slide out menu click Glass.
(You can use my settings below or your own.)
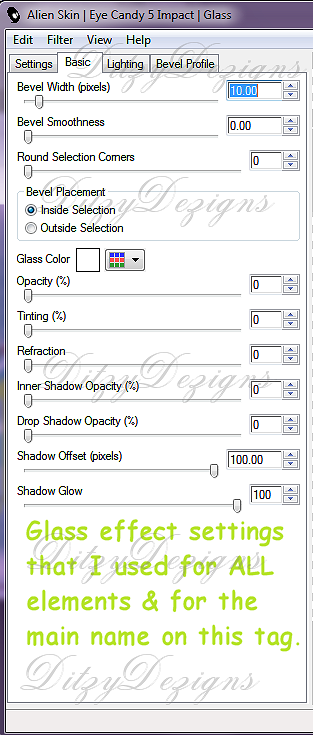
Click Ok.
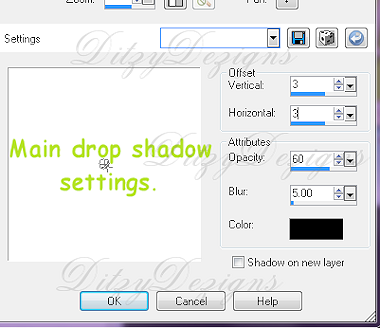
Now go to Effects - click 3D Effects - then click Drop Shadow.
(You can use my settings below or your own.)
Open your Island element - Copy & paste it as a new layer onto your canvas - then re-size it to 50%. Use your move tool to position it to the left side of your Waves element .
Now go to Effects - click Plugins - then click Eye Candy 5 Impact - then click Glass. Use the exact same settings you used on your Waves element.
Go to Effects - click 3D Effects - then click Drop Shadow.
Apply the exact same settings that you used on your Waves element.
Open your Sandcastle element - Copy & paste it as a new layer onto your canvas - then re-size it to 30%. Now position it to the left side of your Waves element.
Now apply your Glass effect & drop shadow.
Open your Bucket element - Copy & paste it as a new layer onto your canvas - then re-size it to 40%. Use your move tool to position it to the left side of your Sandcastle element -
Now apply your Glass effect & then your Drop Shadow.
Open your Bubbles element - Copy & paste it as a new layer onto your canvas - then re-size it to 50%. Position it using your move tool so it is on your Waves element towards the left side.
Now go to your Layers Pallet - move your Bubbles element below your Waves layer.
Now right click on your Bubbles layer - then click Duplicate. Now use your move tool & position your duplicated Bubbles element towards the right side.
Open your Boat element - Copy & paste it as a new layer onto your canvas - then re-size it to 30%. Now position it using your move tool so that it is sitting on top of your waves.
Go to your layers pallet - move your Boat layer down below your Waves layer. You want your boat element to still show above your waves on the top. (See my tag for reference.)
On your Boat layer - apply the Glass effect & a drop shadow.
Open your Beach Bum Girl - Copy & paste it as a new layer onto your canvas - then re-size it to 50%. Position it to the right end of your Waves element.
Apply your Glass effect & drop shadow.
Open your Sun element - Copy & paste it as a new layer onto your canvas - then re-size it to 25%. Position it above your Waves element to the right.
Apply the Glass effect & drop shadow.
Open your Floatie element - copy & paste it as a new layer onto your canvas - then re-size it to 50%. Go to Image - click Mirror. Now position it on the right side of your Sandcastle element.
Apply the Glass effect & drop shadow.
Go to your layers pallet & click on the very bottom layer -
Now open your PP-10 - Copy & paste it as a new layer onto your canvas - then go to Layers - click Load/Save Mask - then click Load Mask From Disk.
Now choose a mask of your choice & click Load.
Go to your layers pallet - right click on your Mask layer - then click Merge - then from the slide out menu click Merge Group.
Now re-size your Mask to 80%.
Use your move tool & position your Mask to the left side of your tag.
Go to your layers pallet - right click on your Mask layer - then click Duplicate . Now use your move tool to position it to the right side of your tag.
Now right click on your duplicated Mask layer & click Duplicate, then go to Image & click Flip. Now use your move tool to position your 3rd Mask element to the middle of your tag.
Now add the name you would like on your tag:
Activate your text tool - set your font, size & color.
I used :
Font : Impact
Size : 175 Pixels
Background Color : #b4e327
Foreground Color : Set to nul
Click on your canvas to open your Text box, type out the name you wish to have on your tag. Click Apply.
Then go to your layers pallet & move your name layer below all other layers except for your Waves layer.
Leave this name alone for a bit. We will come back to it.
Now if you have a second part to your name that you would like to add then follow this next step, if not, skip to the adding your credit.
Activate your text tool again - click on your canvas,
Set your font, size & color of choice for the second name.
I used :
Font : AL Sandra
Size : 50 Pixels
Background Color : #b4e327
Foreground Color : Set to nul
Now leave that for a moment.
Add any credit information you need to add.
Now if you are going to make this tag for multiple people you might want to save it here as a PSP file.
To complete the tag continue :
Activate your crop tool - crop off any access canvas that you did not use.
Now go to your layers pallet & right click on your Main (the bigger) name layer -
Then click Convert To Raster Layer.
Now go to Effects - click Plugins - then click Eye Candy 4000 - then from the slide out menu click Gradient Glow.
The settings below are what I prefer to use, you are welcome to use them, or your own.

Color Tab Settings
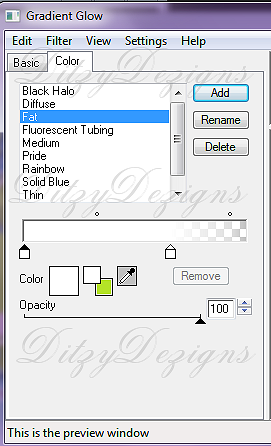
Click Ok.
Now apply a drop shadow.
Using the same settings you have been using.
Now follow the same steps for the second part of your name if you have one. Only this time use the following Basic tab setting for the Gradient Glow -
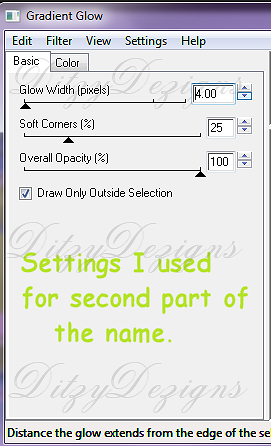
Click Ok & apply a drop shadow.
Now go back to your Main name layer -
Activate your Magic Wand tool & click inside each letter in the name on your tag. (If you have an "i" in your name remember to click inside the dot above your i.
Once all of your letters are selected - go to Effects - click Plugins - then click Eye Candy 5 Impact - then click Glass - use the same settings you used for all of your elements .
Click Ok.
Go to Adjust - click Add/Remove Noise - then from the slide out menu click Add Noise
Set to Uniform , 30 , then make sure your Monochrome box is checked & click Ok.
Now go to Selections & click Select None.
Go to Edit - click Copy Special - then click Copy Merged
Go to your Animation Shop -
Right click on the grey work area - then click Paste As New Animation.
Go back to your PSP -
Click your undo button 2 times -
Go to Adjust - click Add/Remove Noise - then Add Noise
This time change the noise setting to 35 & click Ok.
Selections - Select None.
Edit - Copy Special - then Copy Merged.
Go to Animation Shop -
Right click inside the frame you just put there, click Paste - then click After Current Frame.
Go back to your PSP -
Click your undo button 2 times
Go to Adjust - Add/Remove Noise - then click Add Noise
This time change your noise settings to 40 & click Ok.
Selections - Select None.
Edit - Copy Special - Copy Merged
Go to Animation Shop -
Right click in the 2nd frame you just put there, click Paste - then click After Current Frame.
Now view your animation.
If you are happy with it, re-size your tag.
(To re-size in animation shop, press your shift & s keys on your keyboard & that will open your re-size menu. Set your Pixel size to what you need for where you are using it & click Ok.
Now save your tag as a GIF file & you have completed this tutorial!!♥
Subscribe to:
Post Comments (Atom)
About Me
- DitzyDezigns
- New York, United States
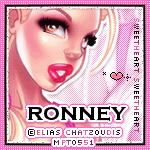
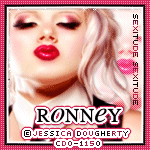
- Hiya Everyone! My name is Ronney, I have 3 wonderful teenagers, and have been married to my husband for 20 years. I LOVE to design signatures, tags & avatars, I design with PSP, and have been designing for over 2 1/2 years. I will be not only designing signatures, tags & avatars but will also be writing & posting tutorials as well. I will also be making some templates to share with you all as well. So I hope you enjoy and can use everything I have available on my blog :-) If you ever try any of my tutorials,please send me your completed designs and I would love to showcase it here on my blog!
♥I CT For♥


Blog Hop

Today's Date

Favorite Stores
♥Forums♥


My Pixels


♥My Avatars♥

0 comments:
Post a Comment