Don't Be A Pirate

My Blinkies

Add Me On Facebook
Protected


Blogs I Stalk


Awards :-)


Find Me At

Favorite Stamps


Sunday, March 20, 2011
♥Taste The Rainbow Tutorial PTU♥
Ok everyone, this is my very FIRST tutorial, so pleeease be nice lol, I have gone into GREAT detail so that anyone who is new to psp understands how to do each step , if you have any questions, please feel free to email me and I will help you the best that I can.
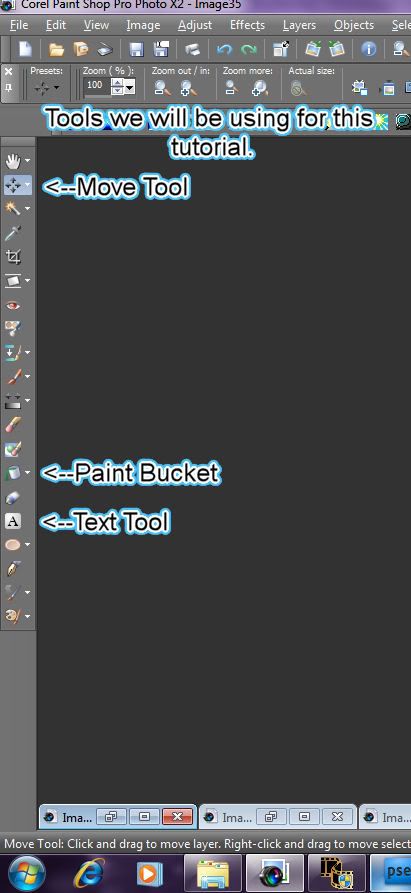
Here are the tools that we will be using during this tutorial :
This is what we will be making :

Supplies Needed :
Paintshop ProX2 (Any version should work)
Animation Shop
Scrapkit - Taste The Rainbow PTU By Kristin @ Toxic Desirez
(However you can use any kit that works for you, it does not have to be a PTU kit)
(However you can use any kit that works for you, it does not have to be a PTU kit)
Fonts : Impact (Or any thick bold font will work) & Mrs Von Eckley (Or any script font will work)
I start with a bigger work space than most, but remember we will crop it down.
Open a new 800x600 transparent canvas.

Now you will want to open the following elements :
(Hint--->To open more than one element at a time, click on the first element you need then hold down your Cntrl key and click on each element you need and they will open one after the other instead of you having to open each one at a time.<--)
Spice Drop 1,2 & 3
Ribbon 1
Lollipops 1,2,3,4 & 5
Frog 1 & Frog 2
Cupcake 1 & Cupcake 2
Now that we have all of our elements open and our transparent canvas ready we can begin putting our signature together.
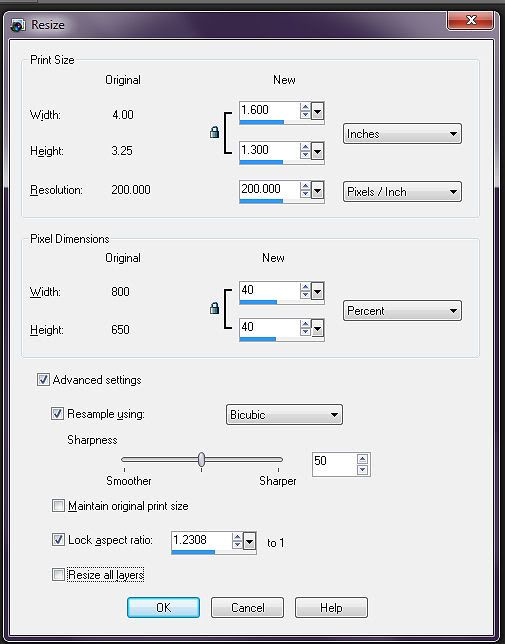
*Copy and paste element Cupcake 2 onto your canvas as a new layer. As you can see we need to re-size our Cupcake 2, to do this you hold down your shift key and press your s key and you will see the "re-size" menu pop open, change it to 40% (percent) See screen shot below :
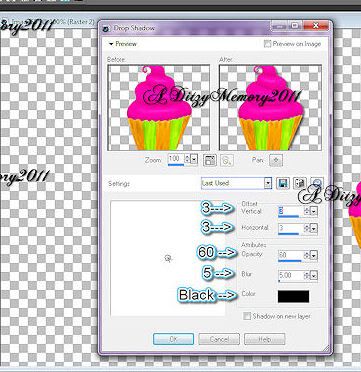
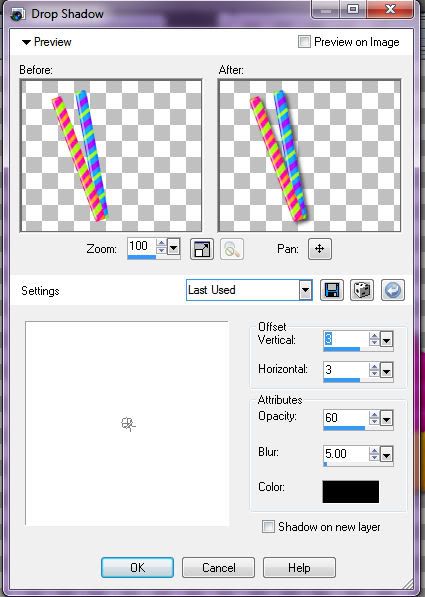
Now move your Cupcake 2 element over to the right side of your canvas, then go to effects, then click on 3D Effects, then slide over and click on Drop Shadow. (See my settings below)
Now we need Cupcake 1, Copy & paste it as a new layer onto your canvas, re-size it the exact same way we did for Cupcake 2, (40%). Move it over to the left hand side of your canvas, and give it the same drop shadow that we gave Cupcake 1 (follow same steps as we did for Cupcake 2).
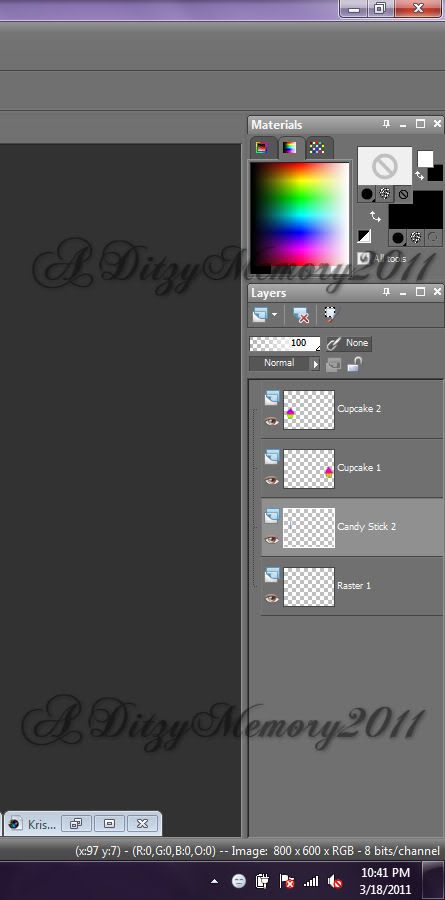
So thus far your canvas should look like mine below :
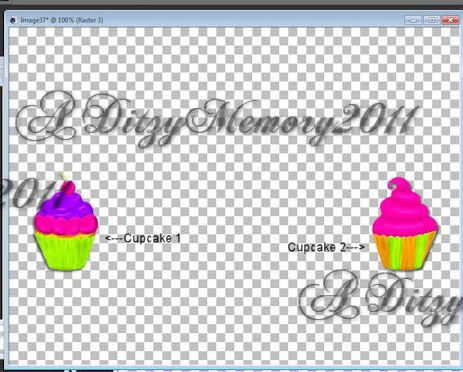
Now in your layers pallet to the right, you want to rename each of your cupcakes, so the cupcake on the left is Cupcake 1 and the one on the right is Cupcake 2. (To rename them just click on the layer until it opens the typing area for you, then just rename them.)
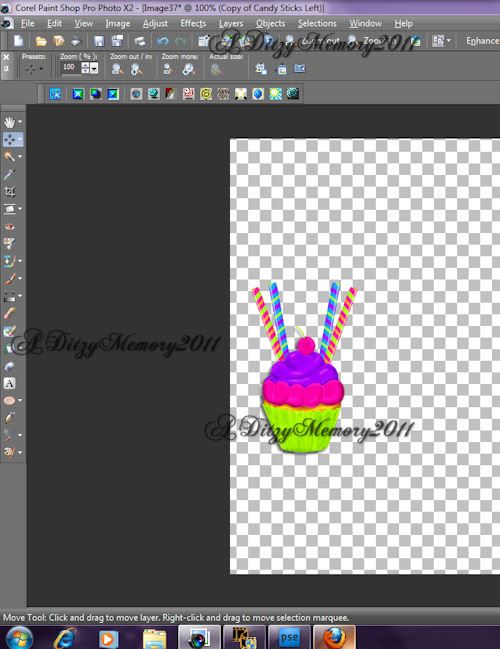
Now we are going to work on decorating Cupcake 1 (the one on the left). Find your element titled Candy Stick 2, we want to re-size it a bit prior to putting it on our canvas, so open your re-size menu (Shift & s) set it to 50% (percent) see below :
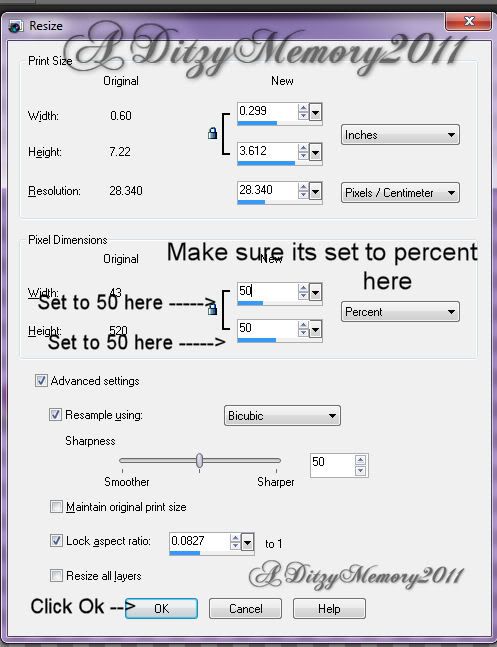
Then copy the element and paste it as a new image onto your canvas, now we need to re-size it again, so shift key & s key, re-size it to 50% (see shot above) then move it over so it looks like its on top of Cupcake 1.
Now move your mouse over onto your layers pallet, and click on your Candy Stick layer and rename it Candy Stick 2. Once the layer is renamed, move that layer below both cupcake layers.
(Your layers should look like mine below)
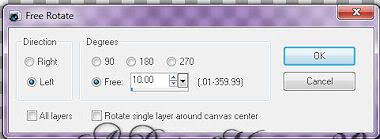
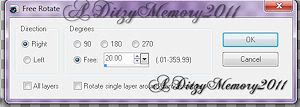
We need to rotate our CandyStick2 element, so to do that go up top and click on Image, then click on "free rotate", now you will get a pop up menu that looks like the one below, set your settings to match mine, and press"Ok".
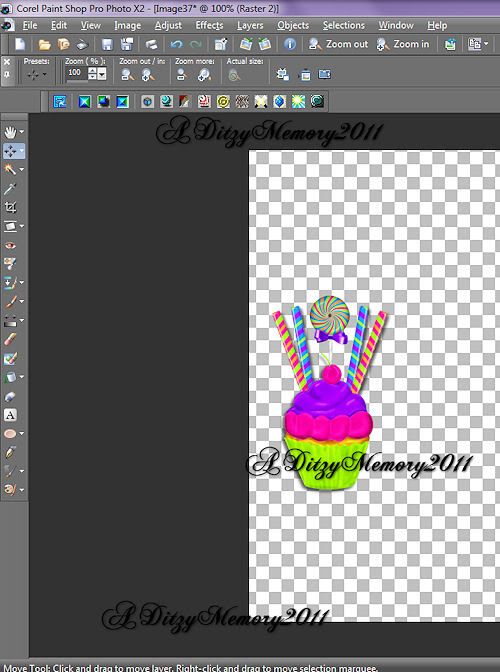
Move your Candy Stick 2 to the left of the pink cherry on top of your cupcake.
Now get element Candy Stick 1 active (to activate it just click on the element)
Again we need to re-size it to 50%, (use the screen shot above if you need to) then copy & paste it onto your canvas as a new layer, then re-size it again to 50%. Now move your Candy Stick 2 over to the left on the other side of Candy Stick 1, we will do this the same way we rotated Candy Stick 2, (See screen shot above if you need to) only this time we are going to change the setting to 20.00 .
In your layers pallet move the Candy Stick 1 so that it is above Candy Stick 2, but below both of your Cupcake layers.
(To move layers, left click on the layer you want to move, as you are holding down your left button drag your layer up or down to where you need it.)
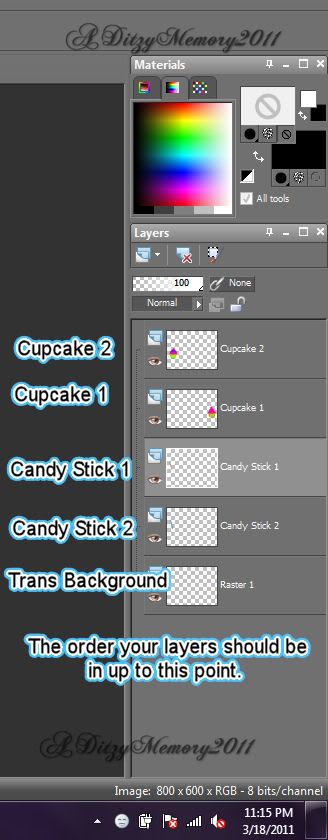
At this point your layer pallet should look like mine below :
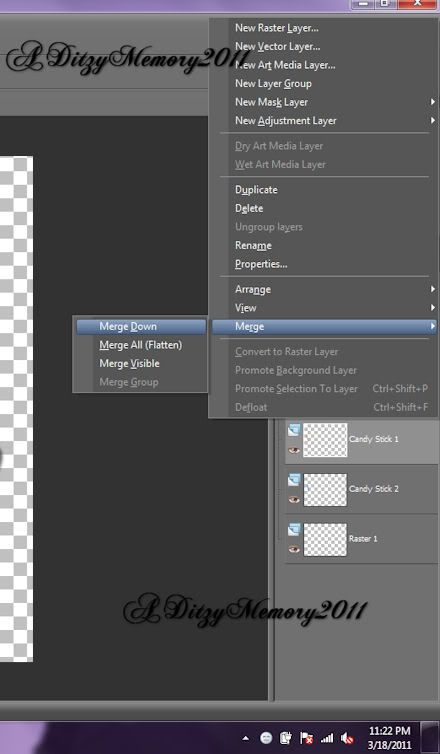
Now left click on your Candy Stick 1 layer, (in your layers pallet) now right click and click on merge, then on the slide out menu click on "merge down" (you want to merge Candy Stick 1 & 2 together) Rename it Candy Sticks Left.
Once they are merged together,click on your Candy Sticks Left layer, (in your layers pallet) then right click, the click duplicate. Now you will have 2 of the exact same layers. Now on the layer that says "Copy Candy Stick Left" go to Image, then click on mirror. Your second set of Candy Sticks is on the right side of your canvas,so use your move tool to drag them back over to your Cupcake 2 . (Position like mine below)
Now give both sets of Candy Sticks a drop shadow. (See my settings below)
Now we need to add our pink frog on the cupcake, So get your element "Frog 2" . Re-size it to 50% (see screen shot above if you need to reference back) then copy & paste it as a new layer onto your canvas, Once you have your frog 2 element on your canvas, resize it again to 50%.
Now over on your layers pallet move your "frog 2" element up above all the other layers, then position your "frog 2 " element so that it is to the right of but yet touching your Cupcake1. (See my tag above for reference in placing if you need to) give your "Frog 2" a drop shadow (same settings as above)
Now we are going to start adding the candy & spice drop elements.
First get your element Candy 3, (Now pay special attention from here on out as we are gonna try and cut down on some of the work)
K, again get your element Candy 3, re-size it to 50%, then copy & paste it as a new layer onto your canvas, Once you have it on your canvas, re-size it again to 50%. Move it so it is in front of your Cupcake 1, and position it like mine, then give it a drop shadow.
Now get your element Candy 4, Resize it to 50%, copy & paste it as a new layer onto your canvas, resize it again, only this time resize it to 60%. Now we need this candy to be behind your Candy 3 element. So go to your layers pallet and drag your Candy 4 layer BELOW your Candy 3 layer. Position it where you want it (use my tag for reference if you would like) add a drop shadow.
We are now ready for element Candy 2, resize it to 50%, copy & paste it as a new layer onto your canvas, then resize it again to 50%, position in front of your frog, (again use my tag as reference if you need to)
(Here is where it might get a little tricky, so be sure to follow along close)
Because we need that same candy element on the other Cupcake as well, we are going to fire name our layer Candy 2, then right click on that layer, then click duplicate.
Now make sure that you are on the "Copy Of Candy 2" layer, go to image, and then go down to and click mirror.Resize the buplicated Candy 2 layer to 80%. We will position it later. (So move it over to the right if you haven't already and leave it for now.)
Now we need Spice Drop 2, Resize it to 50%, Copy & paste it as a new layer on your canvas, resize it again, this time to 40%. Position on your tag (on the left cupcake) use mine as a reference if you would like, then add a drop shadow.
Again we need this element on the other side as well, so we are going to make sure we have renamed the layer as "Spice Drop 2" then right click on that layer, click duplicate, then make sure you are on the "Copy of Spice Drop 2" layer, and go to image, then click mirror. (Again we will position it later, so just move it over to the right side of your canvas.)
We now need Spice Drop 3, Resize it to 50%, then copy & paste it as a new layer onto your canvas, then resize it again to 40%.Position on your taglike I did and add a drop shadow.
We need Spice Drop 3 to be above Candy 3, so in your layers pallet, click on your Candy 3 layer and drag it down just below your Spice Drop 3 layer.
We need this element on the right side as well, so make sure you have named the layer "Spice Drop 3" then right click, then click on duplicate, then make sure you are on layer, "Copy Of Spice Drop 3", go to image, then click on mirror. We need 2 of the Spice Drop 3 elements on the right side, so click that layer again, then right click, click duplicate, then go to image click mirror, now it is going to put it back on the left side of your canvas, so use your move tool to drag it back over to the left side.
Now you can position all the other elements that you moved over to the right side and left, position them either where you want them, or you can use my tag as reference.
Also you may have to move your layers around in your layer pallet so that your elements are the way you need them to be, either in front of something, or behind something. (See above how to move your layers around.)
Ok, now we need our green frog, so get element Frog 1, Re-size him to 50%, then copy & paste him as a new layer onto your canvas, re-size him again to 50%, then position him where you want him. (Again you may have to adjust the layers to get him exactly the way you want him.)
**Make sure that you add a drop shadow to all of the elements on the right side that we just added**
You now want to add Spice Drop 1, So find that element, re-size it to 50%, then copy & paste it as a new layer onto your canvas, re-size it again, but this time re-size it to 60%. Move the layer BELOW all of the other elements EXCEPT for the cupcake layers.
Now we need element, Candy 1, Resize it to 50%, copy & paste as a new layer, then resize it again to 50% and position where you want it. Again, you may have to adjust the layers to get everything the way you want it.
WHEW! Get a fresh cup of coffee or beverage, and then we will finish up :-)
K, refreshed? Good! Lets finish it up!
We need to add the Lollipops to our Cupcake 2. Lets start with our center Lollipop which is Lollipop 1, which we already added on the left side, so in your layers pallet find your "Lollipop 1" layer, highlight the layer (to highlight or activate a layer just click on it) Once it is active/highlighted right click on that layer, then click duplicate, then go to and click on image, then click on mirror. It should now be right where you need it. (If it isnt use your move tool to adjust it to where you want it.) Now add a drop shadow.
Now get element Lollipop 5, Re-size it to 50%, copy & paste it as a new layer on your canvas, then resize it again to 50% and move it over to the right of your first lollipop. Now go to image, click on free rotate, click right, then enter 20.00. Click ok and add a drop shadow. (See shot below)
Now we need to add Lollipop 3 element, resize it to 50%, then copy & paste as a new layer on your canvas, resize it again to 50% position it and add your drop shadow.
Now we are going to add Lollipop 4, re-size it to 50%, copy & paste it as a new layer onto your canvas, re-size to 50% again, then go to image, free rotate, click RIGHT, and change the setting to 10.00 (See shot above)
Position it where you want it, you will have to adjust your layers to get it the way you want or need it. Add your drop shadow.
For our last Lollipop element, Lollipop 2, re-size it to 50%, then copy & paste it onto your canvas as a new layer, then re-size it again to 50%. Now go to image, click on free rotate, click LEFT, and change setting back to 20.00. Add your drop shadow.
Ok we are almost done,
Get your Ribbon 1 element, Re-size it to 50%, copy & paste it as a new layer onto your canvas, move it to the left of your canvas, in your layers pallet click on your Ribbon 1 layer and drag it all the way down so that it is the 2nd layer from the bottom. You want it behind everything. Then right click on that Ribbon 1 layer and duplicate it, then go to image, click on mirror, and it should put your Copy of Ribbon 1 evenly on the right side. If it isnt where you want it, then just use your move tool and adjust it to where you want it. Then add a drop shadow to both Ribbon 1 layers.
Now we will be adding our text, (name) so click on your text tool, and choose your font, for my name I used Impact size 150 pixels, and I used all capitals. You may have to adjust your font size according to the length of your name.
So type out your name in all capital letters, then to get the different colors per letter like I did, you need to have your text entry box open (see screen shot below) and highlight 1 letter at a time, go to your materials pallet, and choose a color from the elements you used from your kit.
(Follow the directions on the screen shot below)
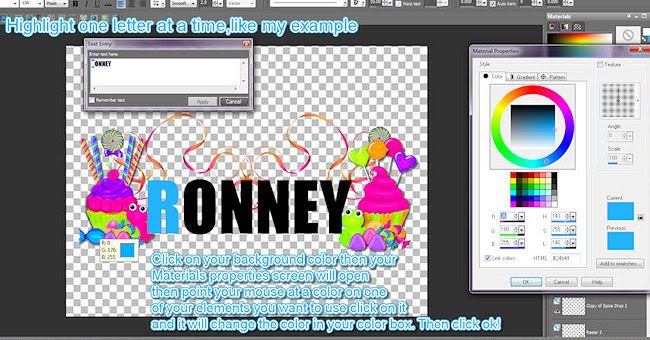
(Incase you can't read the directions on the above screen shot it says "Click on your background color,then your materials properties screen will open, then point your mouse at a color on one of your elements you want to use clicking on it will change the color of your color box. Then click ok :-)
Continue highlighting one letter at a time until you have different colors for each letter of your name.(You might have to use the same color twice)
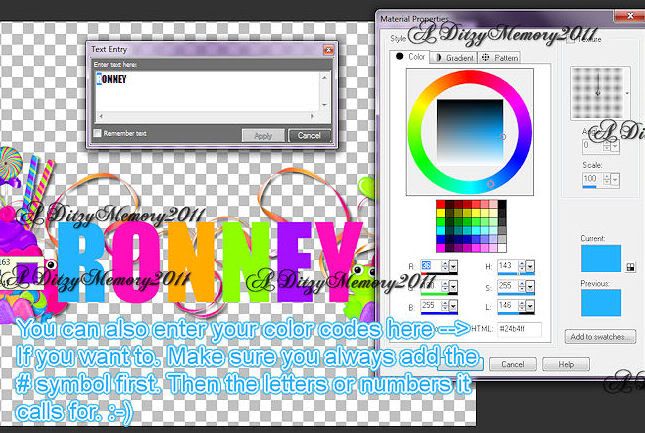
The colors I used are as follows :
R - #24b4ff
O - #ff10bb
N - #ffab00
N - #8ffd00
E - #a411ff
Y - #ff1obb
Ok, when you have your name the size & colors you want it, you need to move that layer down towards the bottom . You want your name layer to be the 4th from the bottom.. (It should be below all the layers EXCEPT for your 2 Ribbon layers. Leave your name layer as a "Vector" layer for now.
Now, click on your layer above your name layer, still using our text tool, click on a blank area on your canvas under your name area. (Do this if you want to add the second name like I did on mine)
Your text entry box will open again, this time we want the font Mrs Von Eckley size 70 color Black #000000
Now type out what you want it to say, click Apply on your text entry box.
Now you will want to add your name as the signature designer, so use any small font, I normally use Pixelette size anywhere between 10-14. You also want to give credit where credit is due, so always acknowledge the person who designed the scrapkit you used. See my tag for reference.
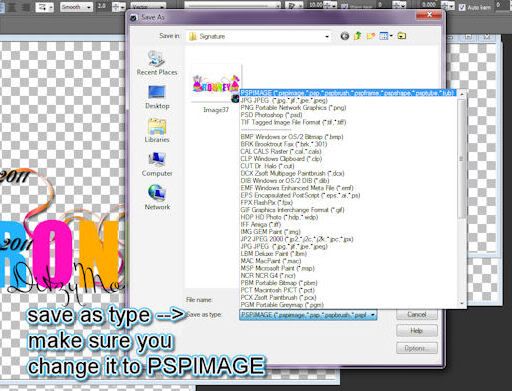
Now that you have added all the necessary information, you will want to save your tag as a PSP file. So that you can come back to it at any time, and make changes or make it for friends/family.
To save your tag, go to file, then save as, set your file type to PSPIMAGE (See screen shot below) once your window opens, go to a location you want to put your saved PSP file in, then change the file type, and click Save!
Now you will want to crop your image, so go to your crop tool, and adjust it to remove any excess area around your signature. Be sure not to crop it so close that you lose any part of your image or drop shadows.
Now select your name layer, the one we did in multi colors, right click on the layer, and click "Convert To Rater Layer". Go to selections, select all, selections again, click float, then selections again, scroll down and click on "Defloat", then go to selections again and click on "Modify" on the pop out menu click on "Expand" set the number of pixels to 4. Click Ok.
Go to layers, click on "New Raster Layer" and name it "Stroke". Then click on your paint bucket tool,then go to your materials pallet, click on your foreground color and make it white, (#ffffff) now click on each letter so that it turns white. go to selections click on select none.
Go to your layers pallet and rename this layer "Stroke", take your "Stroke" layer and move it directly below your multicolored name layer.
Now add a drop shadow to your "Stroke" layer, then click on your multicolored name layer and add a drop shadow to that as well.
Now if you don't want to animate your signature with glitter, you can now save your completed tag. Use the same directions as saving a pspimage, only change your "file type" to PNG. Click save!
If you choose to animate continue :
Open your Animation Shop. Then go back to your psp and
make sure you are on your multicolored name layer, go to adjust , click on add/remove noise then on the pop out menu click on "Add Noise". Set it to Uniform, and change the noise to 30.00 and make sure that Monochrome is checked and click ok..
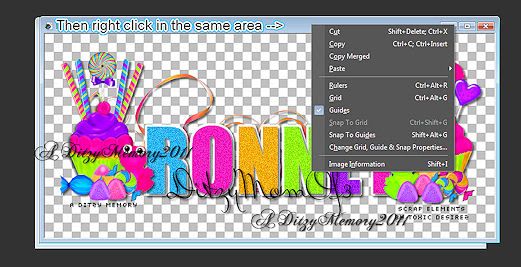
Now click on your tag at the area indicated on the screen shot below ,
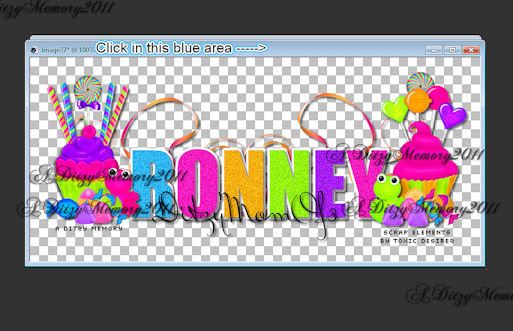
Then right click on the same area & then click "Copy Merged"
Go to your Animation Shop, and click in your workspace, then click "Paste As New Animation".
Now go back to your PSP, click "UNDO" one time, then go to adjust, down to "Add/Remove Noise" on the slide out menu click on "Add Noise", when the screen opens change your setting to "35", click ok, then go to your blue area again, right click, click "Copy Merged", then go to your animation shop, make sure your first frame you just put there is highlighted. (To highlight just click on that frame),
Then right click in your frame area, then click "Paste" then on the slide out menu click "After Current Frame". Then go back to your PSP one last time, click "Undo" one time, then go to adjust, down to "Add/Remove Noise" on the slide out menu click "Add Noise", change the setting to "40". Click ok. Right click in the blue area again, click "Copy Merged" then go to your Animation Shop, click on the SECOND frame to make sure it is highlighted (to know if it is highlighted it will have like a blue frame around it) then right click on the 2nd frame, go to "Paste" then on the slide out menu click "After Current Frame".
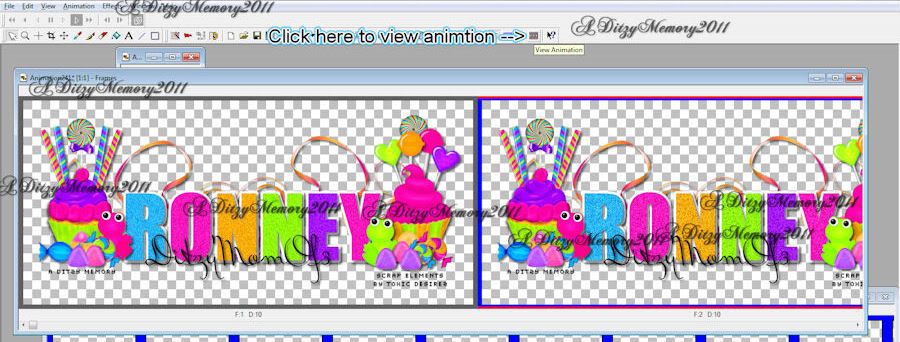
Now you want to view your animation, to do that you click the "View Animation" button at the top, (see location of that button in the screen shot below)
If you are happy with your animation, click your "View Animation" button again to close out the animated frame, then you need to re-size it according to where you are going to be using it. For this tutorial, the size of my tag is 500. So to re-size in Animation Shop, do the same thing I taught you to do in PSP, Hold down your "Shift Key" and then press your "s" key, that will bring up your re-size screen.
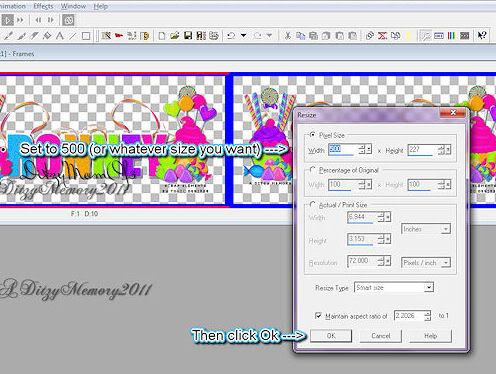
Set your width to whatever size you need it, I set mine to 500 , then your height setting will adjust its self. :-)
Now, you need to save your signature, so go to "File", click on "Save As" then find where you want to save your signature,set your file type to "Gif" if it isn't set there already and click "SAVE"
Thats it!! You have finally finished my FIRST tutorial, I hope that you enjoyed it, and that it was easy for you to follow.
I would love to see what you have made, so feel free to email me your completed signature.Click the email link below.
Thank you so much for trying my tutorial!
Email DitzyDezigns

Subscribe to:
Post Comments (Atom)
About Me
- DitzyDezigns
- New York, United States
- Hiya Everyone! My name is Ronney, I have 3 wonderful teenagers, and have been married to my husband for 20 years. I LOVE to design signatures, tags & avatars, I design with PSP, and have been designing for over 2 1/2 years. I will be not only designing signatures, tags & avatars but will also be writing & posting tutorials as well. I will also be making some templates to share with you all as well. So I hope you enjoy and can use everything I have available on my blog :-) If you ever try any of my tutorials,please send me your completed designs and I would love to showcase it here on my blog!
♥I CT For♥


Blog Hop

Today's Date

Favorite Stores

♥Forums♥


My Pixels


♥My Avatars♥


0 comments:
Post a Comment