Don't Be A Pirate

My Blinkies

Add Me On Facebook
Protected


Blogs I Stalk


Awards :-)


Find Me At

Favorite Stamps


Monday, March 28, 2011
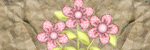
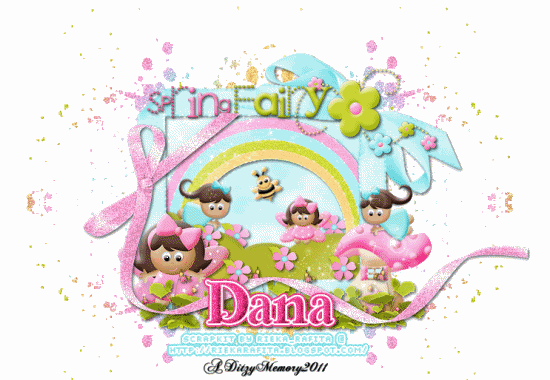
*Spring Fairy* PTU
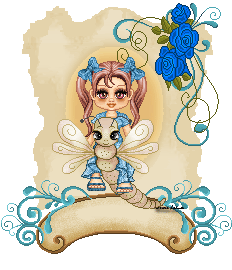
Here is what we are going to make :
***Please keep in mind that all of my tutorials are made using my own Ditzy noggin, any resemblance to any other tutorial is purely coincidental.***
Supplies Needed :
PaintShop Pro X2 (Any version will work)
Animation Shop
Eye Candy 5 Impact >Gradient Glow
Font Of Choice - I used 2 Moulin Rouge DNA
Size : 72
Color #ff3c8a
Scrapkit Called Spring Fairy By Rieka Rafita @ Scraps With Attitude
Elements Used :
Paper 10
Frame 2
Hill
Rainbow
Fairy 1 & 2
Mushroomhouse
Ribbon 1
Wordart 1
Flower 4
Bee
Sparkles 2
Leaves 1
Flower 1
Glitter Splash
Lets Begin :
Open a new image 800x650 (We will crop later)
Now open your Frame 2 element, copy & paste it as a new layer onto your canvas , re-size it to 75%.
Using your magic wand , click inside your frame, then go to Selections, then click Modify, then click Expand. Change the setting to 10.
Make a new raster layer.
Open Paper 10, Copy & paste it "INTO Selections". Now in your layers pallet move your paper layer below your frame layer.
Ctrl & d to deselect.
Then click on your frame layer & give it a drop shadow.
Open your Hill element, copy & paste it as a new layer, re-size it to 45%, and position it in your layers pallet so that the hill layer is below your frame layer but above your paper layer.
Now position it on your canvas so that it is where you want it.
Open your Rainbow element, copy & paste it as a new layer, re-size it to 50%. In your layers pallet move your rainbow layer so that it is below your frame & hill layer, but keep it above your paper layer.
On your Rainbow layer, go to Adjust, click Sharpness, then click Sharpen. Now add a drop shadow to your rainbow.
Open your Fairy 2 element, copy & paste it as a new layer, re-size it to 20%. Position it so it is on the right side of your hill, now go to Adjust, click Sharpness, then click Sharpen. Give your fairy 2 a drop shadow.
In your layers pallet make sure your fairy 2 layer is below your frame layer.
Now still in your layers pallet, click on your Fairy 2 layer, then right click, click duplicate, go to Image, then click Mirror, and either move it off to the side for now, or hide the layer by clicking the eye. We will be using this layer later in the tutorial.
Now open your Fairy 1 element, copy & paste it as a new layer, re-size it to 20%, then go to Image, click Mirror, then position it so that it is almost resting on the left side of your hill.
Go to Adjust, click Sharpness, then click Sharpen. Give your fairy 1 a drop shadow.
Now lets open our Mushroomhouse element, copy & paste it as a new layer onto your canvas, re-size it to 35% and position it in the lower right corner of your frame. Go to Adjust, click Sharpness, then click Sharpen, then add a drop shadow.
Open Ribbon 1 element, copy & paste as a new layer onto your canvas, position how you would like and then add a drop shadow.
Open your Wordart 1 element, Copy & paste it as a new layer onto your canvas, now re-size it to 50%, add a drop shadow and position it at the top of your frame.
Open your Flower 4 element, copy & paste it as a new layer onto your canvas, then re-size it to 50%, then resize it again to 80% 2 more times. Go to Adjust, click on Sharpness, then click Sharpen, then position it at the top right corner of your frame. Give your flower 4 and drop shadow.
Open your Bee element, copy & paste it as a new layer onto your canvas, re-size it to 10%, and position it on the inside of your frame. Go to Image, click on Free Rotate, then set it to Left 20.00. Now go to Adjust, click Sharpness, then click Sharpen, and give your Bee a small drop shadow.
Now lets open our Sparkle 2 element, copy & paste it as a new layer onto your canvas, then re-size it to 50%, Now in your layers pallet , right click on your Sparkle 2 layer and click Duplicate, then go to your duplicated layer and go to Image, then click Mirror then then Image again, then click Flip.
Open your Leaves 1 element, copy & paste as a new layer onto your canvas, re-size to 25%, position your leaves down by your mushroomhouse.
Right click on your Leaves layer (in your layer pallet) then click Duplicate, go to Image, click Mirror, then use your move tool to position your duplicated Leaves 2 layer . Now go to your layers pallet and make sure you are on your Leaves 2 duplicated layer, then right click, click Merge then click Merge Down. Now your Leaves layers are merged together go to Adjust, click Sharpness,then click Sharpen.
Give your merged leaves layer a small drop shadow.
Now unhide that duplicated Fairy 1 layer that we made earlier , and position it so that it appears to be ontop of the mushroomhouse.
Open your Fairy 2 layer again and copy & paste it as a new layer onto your canvas, re-size it to 25% and position it at the lower left of your frame. Now in your layers pallet move your second Fairy 2 layer so that it is behind both of your Leaves layers.
Open your Flower 1 element , copy & paste it as a new layer onto your canvas and re-size it to 15%, go to Adjust, click on Sharpness and then click Sharpen.
Add a drop shadow.
Now in your layers pallet, duplicate your Flower 1 layer a couple of times and place them all around your tag.
Now open your Glitter Splash element, copy & paste it as a new layer onto your canvas, now go to Image, click Flip. Now in your layers pallet, move this layer down in your layers pallet so that it is the second layer from the bottom.
Now still on your Glitter Splash layer, right click and click Duplicate, then go to Image, and click Mirror, then in your layers pallet make sure your duplicated Glitter Splash layer is active (click on it to activate it) then right click and click Merge, then click Merge Down..
Now right click on your merged Glitter Splash layer and duplicate it, then go to Image, then click Flip.
Now add your name & your copyright/credit information.
Crop your tag, if you wish not to animated your tag , then go to your layers pallet once your tag is cropped, click on any layer, then right click and then click Merge, on the slide out menu click Merge Visible.
Re-size your tag to your desired size.
Save as png!
If you wish to animate lets continue :
Once you have your name the way you want it, go to Effects > Plug-ins, Eye Candy 5 Impack, click on Gradient Glow and use the following settings ;

In your layers pallet click on your name layer, then get your magic wand , click inside each letter of your name. Once all letters are selected go to Effects > 3D >Inner Bevel and use these settings :
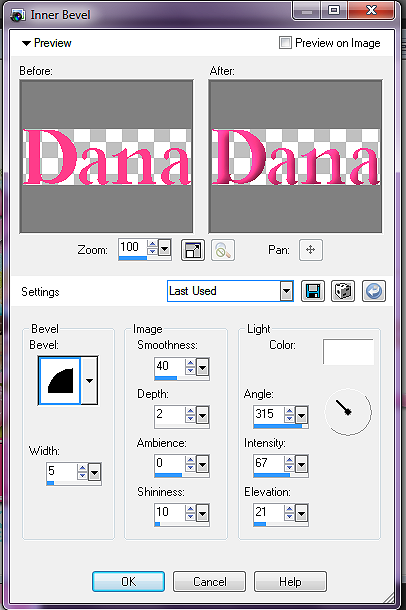
Click Ok.
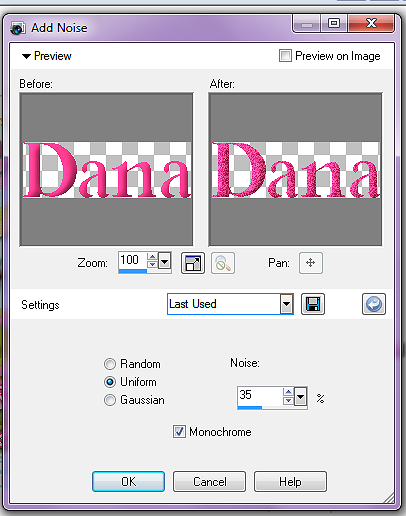
Now open your Animation Shop, then go back to your PSP, Now keeping your letters selected go to Adjust, click Add/Remove Noise, then on slide out menu click Add Noise. Change your settings to Uniform, 35 and make sure that your Monochrome IS checked. Then click Ok.
Now on your keyboard press your Ctrl & d to deselect,
In your layers pallet now click on your Ribbon 1 layer, then go to Adjust, click Add/Remove Noise, then click Add Noise from the slide out menu, using the exact same settings as we did for our name.
Click Ok.
Now go to Edit, Click "Copy Special" then on the slide out menu click "Copy Merged".
Now go to your Animation Shop, right click and click "Paste As New Animation".
Go back to your PSP, use your undo button OR hold your Ctrl key down while you press the letter Z 4 times. Stop where your letters are selected (with the marching ants)
Now that will undo the last steps we did but we want to stop where the letters are selected and our Inner Bevel is already in place, so once you are to that point, go to Adjust, click Add/Remove Noise, then on slide out menu click Add Noise, now this time only change your Noise setting to 40.

On your keyboard press your Ctrl & d keys to deslect.
Then in your layers pallet now click on your Ribbon 1 layer again, then go to Adjust, click Add/Remove Noise, then click Add Noise, from the slide out menu, use the exact same settings we just used, keep your noise setting at 40 and click Ok.
Go to Edit, click on "Copy Special" then on the slide out menu click "Copy Merged'
Now go to your Animation Shop, and right click inside the frame we just put there, click Paste, then click AFTER CURRENT FRAME.
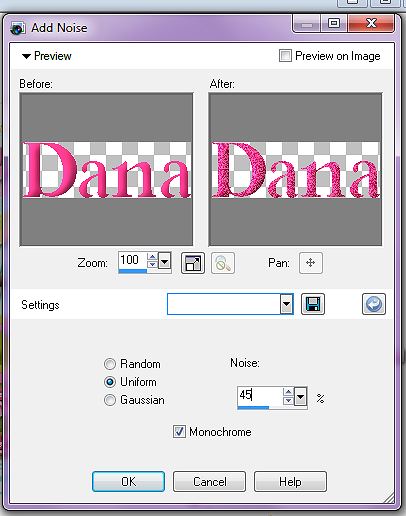
Now go back to your PSP, click your undo button 4 times, or use your Ctrl & tap the letter Z 4 times, remember to stop at the point where our letters are still selected and our Inner Bevel is still in place, now go to Adjust, click Add/Remove Noise, then click Add Noise. This time change your Noise setting to 45. click Ok.
On your keyboard press your Ctrl & d key to deselect your letters.
Then in your layers pallet now click on your Ribbon 1 layer again, then go to Adjust, click Add/Remove Noise, then click Add Noise, from the slide out menu, use the exact same settings to just used keeping your noise setting at 45. Click Ok.
Go to Edit, click "Copy Special" then on the slide out menu click "Copy Merged".
Go to your animation shop , and right click in the second frame and then click paste, then click AFTER CURRENT FRAME.
Now view your animation, if you are happy with it you will want to re-size your tag, to do that in Animation Shop press Shift & s on your keyboard, then your re-size screen will open up. Set to your liking.
Now save your tag as a gif file and your all set!!
Thank-You for trying my tutorial, and as always please email me anything you have made using my tutorials as I would love to showcase them on my blog!
♥Hugs♥
Ditzy
Subscribe to:
Post Comments (Atom)
About Me
- DitzyDezigns
- New York, United States
- Hiya Everyone! My name is Ronney, I have 3 wonderful teenagers, and have been married to my husband for 20 years. I LOVE to design signatures, tags & avatars, I design with PSP, and have been designing for over 2 1/2 years. I will be not only designing signatures, tags & avatars but will also be writing & posting tutorials as well. I will also be making some templates to share with you all as well. So I hope you enjoy and can use everything I have available on my blog :-) If you ever try any of my tutorials,please send me your completed designs and I would love to showcase it here on my blog!
♥I CT For♥


Blog Hop

Today's Date

Favorite Stores

♥Forums♥


My Pixels


♥My Avatars♥


0 comments:
Post a Comment