Don't Be A Pirate

My Blinkies

Add Me On Facebook
Protected


Blogs I Stalk


Awards :-)


Find Me At

Favorite Stamps


Monday, March 21, 2011
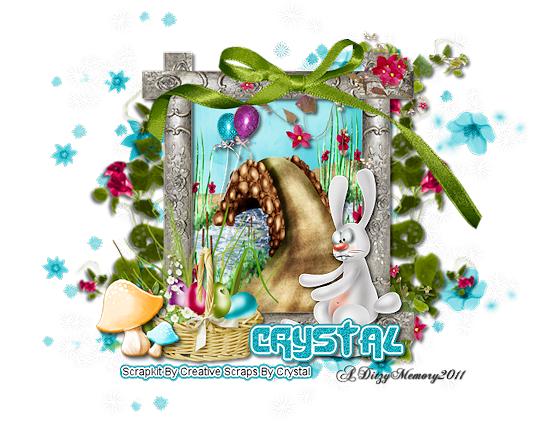
♥~Eggcellent Adventure PTU~♥
Here is what we are going to be making :
**This tutorial is made using my own Ditzy noggin, any resemblance to any other tutorial is purely coincidental**
Non-Animated
Scrapkit Used - Eggcellent Adventure @ Creative Scraps By Crystal
Eye Candy 5>Impact : Gradient Glow
Font Used - DaFunk2 Size 40 Color #13aaba
Elements Needed :
Flower Scatter 3
Bow 3
Bunny
Balloon 2 & 10
Colored Egg
Colored Egg 4,5 & 6
Basket
Mushroom
Grass
Leaves 2
Frame 4
Paper 23
(**HINT**To open all the elements at one time, click on the first element you need, then before you clickon the next hold down your CTRL key, while you click each element, then they will open one at a time in your PSP.**)
Start with a new image 800x600 Transparent Background (Not to worry we will crop later)
Copy & paste your "Frame 4" as a new layer on to your canvas, then re-size it to 80%.
Get your "Magic Wand" tool and click inside your frame making sure that you also click the canvas area in the top right where the flowers are on inside of your frame.
Go to selections, click Modify, then on the slide out menu click "Expand" set your number of pixels to 8. Click Ok.
Then go to layers, click "New Raster Layer", Go to your "Paper23", copy & paste INTO Selection.Now move your paper layer down below your frame layer in your layers pallet, select your frame layer, go to Layers, click on "New Raster Layer" go to your "bridge" element, copy & paste that "INTO Selections". Now move your "Bridge" layer BELOW your "Frame" layer, then go to Selections and click Select None.
Now with your "Bunny" element, copy & paste as a new layer on to your canvas, re-size it to 35%, then go to Adjust click on Sharpen, then Sharpen again on the slide out menu. Using your move tool, position your "Bunny" to the lower right corner of your frame. Give him a drop shadow.
Now with your "Bow 3" element, copy & paste it as a new layer onto your canvas, re-size it to 90%, then position it at the top of your frame & add a drop shadow.
Open "Balloon2" copy & paste as a new layer on to your canvas, re-size it to 20%, position it up on the left side on the inside of your frame. Go to Adjust, click on Sharpen, then on the slide out menu click Sharpen again. Now add a drop shadow.
Open "Balloon 10" copy & paste it as a new layer on to your canvas, re-size it to 20%, go to Image, then Free Rotate and set it to Right & 10.00, add drop shadow.
Open "Leaves 2" copy & paste as a new layer on to your canvas, re-size to 50%, go to Image, Free rotate, set it to Left , 40.00 . Position it on the right side of your frame.
Now in your layers pallet, move your "Leaves 2" layer down so that it is the second layer from the bottom, go to Adjust, Click Sharpen, then on the slide out menu click Sharpen again. Now add a drop shadow.Back in your layers pallet, make sure you are on your "Leaves 2" layer, right click , click duplicate, then on your duplicated layer go to image, and click Mirror. Now using your move tool, position your leaves so that they are showing from under both sides of your frame, (you can use my tag as reference if needed)
Open "Flower Scatter 3" , copy & paste it as a new layer on to your canvas, in your layers pallet move your "Flower Scatter 3" layer below both of your "Leaves" layers, Back on your canvas, using your move tool, move your "Flower Scatter 3" down towards the bottom of your frame, go back to your layers pallet and right click on your "Flower Scatter 3" layer, click Duplicate, then on your Duplicated layer, go to Image, then click "Flip". Then using your move tool again, adjust your "Flower Scatters" as you would like them.
Open your "Grass" element, copy & paste as a new layer on to your canvas, re-size to 50%, in your layer pallet, move this layer so that it is right above your frame layer, go to Adjust, Sharpen, then on the slide out menu click Sharpen again, now add a drop shadow to your grass.
Now open your "Mushroom" element, copy & paste it on to your canvas as a new layer, re-size it to 30%, move your "Mushroom" layer so that it is above your "Grass" layer in your layer pallet.
Now using your move tool, move your "Mushroom" to the left of your grass. Go to Adjust, Click Sharpen, on the slide out menu click Sharpen again. Then add a drop shadow to your grass.
Open your "Basket" element, copy & paste it as a new layer on to your canvas, resize it to 35%, move it down to the right side of your Mushrooms. In your layers pallet move your "Basket" layer below your "Mushroom" layer.
Now we are going to add our "Colored Egg & Colored Eggs 1,5,& 6" so follow these instructions for ALL 4 eggs! Except, on Eggs 1,5 & 6, after you re-size them to 10%, re-size them again to 80%.
Copy & paste your "Colored Egg" as a new layer on your canvas, re-size it to 10%, position your egg so that it looks like it is in the basket. (Now do that again for the rest of the eggs)
Now click on your "Basket" layer in your layer pallet and move it so that it is ABOVE all 4 egg layers. Click duplicate, then move your duplicated "Basket" layer BELOW all 4 egg layers. Now using your Eraser tool, set the size at 16, erase parts of your basket to make it look like your eggs are actually sitting in the basket. When you are done go back to your layer pallet and click on your BOTTOM "Basket" layer and give it a drop shadow.
Once you have your name set, right click on your name layer, click "Convert Layer To Raster". Then go to Effects, down to your plugins, go to Eye Candy 5 >Impact >Gradient Glow, set your settings, click Ok, and give your name a drop shadow.
Once you have your name set, right click on your name layer, click "Convert Layer To Raster". Then go to Effects, down to your plugins, go to Eye Candy 5 >Impact >Gradient Glow, set your settings, click Ok, and give your name a drop shadow.
You can crop your tag , merge your layers (make sure your layers are where I have explained and that your name & credit layers are on the top of your layer pallet).Then re-size your tag, then go to Adjust, click Sharpen, then Sharpen again. Then SAVE!!
Thank-You for trying my tutorial, again I would love to see anything you have made using my tutorial, so feel free to email it to me!
Thank-You for trying my tutorial, again I would love to see anything you have made using my tutorial, so feel free to email it to me!
Subscribe to:
Post Comments (Atom)
About Me
- DitzyDezigns
- New York, United States
- Hiya Everyone! My name is Ronney, I have 3 wonderful teenagers, and have been married to my husband for 20 years. I LOVE to design signatures, tags & avatars, I design with PSP, and have been designing for over 2 1/2 years. I will be not only designing signatures, tags & avatars but will also be writing & posting tutorials as well. I will also be making some templates to share with you all as well. So I hope you enjoy and can use everything I have available on my blog :-) If you ever try any of my tutorials,please send me your completed designs and I would love to showcase it here on my blog!
♥I CT For♥


Blog Hop

Today's Date

Favorite Stores

♥Forums♥


My Pixels


♥My Avatars♥


0 comments:
Post a Comment