♥Ditzy's TOU♥
All of the tutorials written by me are of my own Ditzy imagination.
Do NOT copy or alter them in ANY way.
Do NOT copy & paste the tutorials to any website, forum or group.
Do NOT claim them as your own.
If you would like to show or share my tutorial do so by using a link to bring your members to my blog. However if you do please send me a courtesy email so that I know my tutorials are being used according to my TOU. Also if you would please send me a link to where you will be posting my link.
If you have done any of my tutorials I would LOVE to see the outcome of what you have made, so please email me OR you can leave me a link in my shout box so that I can see what you have made and display it on my blog for others to enjoy as well.
Other than that please have fun,and I hope that you enjoy all my tutorials!
Email me @ DitzyDezigns@hotmail.com
Email Me
I would love to see what you have made using any of my tutorials, so please feel free to email me at the address below.
DitzyDezigns@hotmail.com
Add Me On Facebook
Blog Archive
-
▼
2011
(152)
-
▼
March
(14)
- ♥Pixie Dusk PTU♥
- ♥Lost In Space PTU♥
- ♥Whimsical Fairy PTU♥
- *Spring Fairy* PTU
- ♥Forever Loving My Boy♥
- ♥Emo Disco PTU♥
- ♥Emolicious PTU♥
- ♥~An Eggcellent Forum Set~♥PTU
- ♥Spring Day♥ PTU
- Pardon
- ♥~Eggcellent Adventure PTU~♥
- ♥~FTU Rockin It Girl Style~♥
- ♥Taste The Rainbow Tutorial PTU♥
- ♥Well,I'm Getting There....♥
-
▼
March
(14)
Pages
Powered by Blogger.
Sunday, March 27, 2011
♥Forever Loving My Boy♥
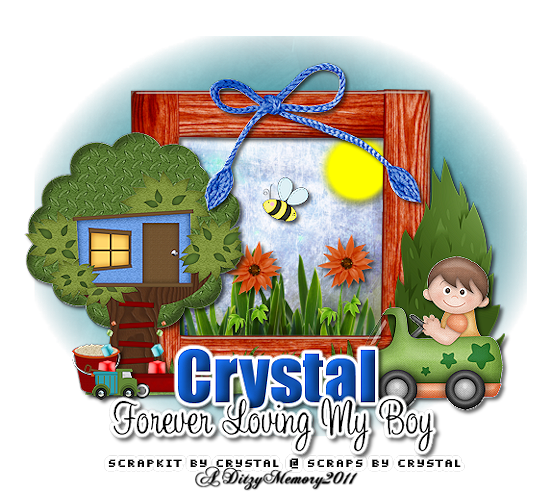
Here is what we are going to make :
***Please keep in mind that all of my tutorials are made using my own Ditzy noggin, any resemblance to any other tutorial is purely coincidental.***
Supplies Needed :
PaintShop Pro X2 (Any version will work)
Mask Of Choice
Eye Candy 4 > Gradient Glow
Scrapkit Used Is "All Boy" By Scraps By Crystal
Elements Used :
Paper 6
Paper 11
Frame 1
Little Boy
Bow 2
Bush
Grass 2
Bee
Flower
Treehouse
Pail
Dump Truck
Wagon
Blocks
Lets Begin :
Open a new image 800x650 (Don't worry we will crop it later)
Open your Frame 1 , copy & paste it as a new layer, re-size it to 50%.
Get your magic wand tool, and click the canvas inside your frame.
Go to Selections, click Modify, then click Expand, change your setting to 10.
Now make a new raster layer,
Open Paper 6, copy & paste it "INTO Selection".
In your layers pallet move your paper 6 layer below your frame layer.
On your keyboard press "Ctrl & d" to deselect.
Now open your Little Boy element, copy & paste it as a new layer, re-size it to 25%, and position it in the lower right side of your frame.
Go to Adjust, click Sharpness, then click Sharpen.
Add a drop shadow to your Little Boy & Frame.
Open your Bow 2, copy & paste it as a new layer, re-size it to 45%, position your bow 2 so that it is at the top of your frame. Now go to Adjust, click Sharpness, then click Sharpen. Also give it a drop shadow.
Make sure in your layers pallet that your Bow 2 layer is above your Frame 1 layer.
Now lets open our Bush element, copy & paste it as a new layer, re-size it to 40%, using your move tool, position your bush element so that it is behind your little boy element. Now go to Adjust, click Sharpness, then click Sharpen.
In your layers pallet make sure your Little Boy layer is above your Bush layer.
Open your Bee element, copy & paste it as a new layer, re-size it to 10%. Position it on the inside of your frame. Go to Adjust, click Sharpness, then click Sharpen. Add a drop shadow. (If your Bee element is not showing up, make sure your bee layer is above all the other layers)
Now open your Flower element, copy & paste it as a new layer, re-size it to 25%. In your layers pallet move your flower layer below your frame layer.
On your flower layer go to Adjust, click Sharpness, then click Sharpen. Now add a drop shadow.
Once you have sharpened your element & added a drop shadow, go to your layers pallet, make sure you are on your flower layer, and right click , then click duplicate, now using your move tool, position your second flower where every you would like it.
Adjust, click Sharpness, then click Sharpen.
Add a drop shadow.
Open your Pail element, copy & paste it as a new layer onto your canvas, re-size it to 10%.
Position your pail so that it is in front of your Treehouse.
Go to Adjust, click Sharpness, click Sharpen.
Give your pail element a drop shadow.
Now lets open our Drump Truck element, copy & paste it as a new layer onto your canvas, re-size it to 10%. Now position your dump truck so that it is just in front of your pail element.
Go to Adjust, click Sharpness, then click Sharpen.
Add a drop shadow.
Open your Wagon element, copy & paste it as a new layer onto your canvas, re-size it to 25%, and position it in front of your tree just a touch to the right.
Go to Adjust, click Sharpness, then click Sharpen.
Add a drop shadow.
Open your Blocks element, copy & paste it as a new layer onto your canvas, re-size it to 10%, now position it so it looks like they are in the dump truck, now copy & paste your Blocks element again, re-size it again to 10%, only this time position your blocks so they look like they are sitting in your wagon.
Go to Adjust, click Sharpness, then click Sharpen, and add a drop shadow. Do this for BOTH of your Block elements.
Now you need to click on the last layer in your layers pallet,
Open Paper 11, copy & paste it as a new layer onto your canvas, go to Layers, click Load Save Mask, then on the slide out menu click Load Mask From Disc.
Choose your desired Mask.
Once you have your mask chosen, click Load.
In your layers pallet, right click on your paper layer, click Merge, then click Merge Group. Now re-size to 80%. Back in your layers pallet right click on your mask layer, click Duplicate then right click on your duplicated layer and click Merge Down. Now re-size your merged layers to 80%.
Now open your Grass 2 element, copy & paste it as a new layer onto your canvas, re-size it to 65%, and position your grass 2 element at the bottom of your frame. (See my tag for reference if needed)
In your layers pallet move your Grass 2 layer below your other layers but keep it above your frame layer.
Now, click on your brush tool, set your foreground color to #ffff00, Set your brush to your +Round 50 brush (this should of came with your psp). Size 75, Hardness 75, Step 10, Density 100, Thickness 100, Rotation 0, Opacity 100, Blend Mode Normal, Continuous Checked, Wet Look Paint UNchecked.
Now using your brush tool, click inside your frame at the upper right corner.
If you need to in your layers pallet move your sun layer down so it is under your frame and any other elements that are either covering it or hidden by it.
Now is time to add your name: ,
Font I Used : Impact
Size : 70
Color : #1155b5
Type out your name, then go to Effects, down to your plug-ins, then click on Eye Candy 4 > Gradient Glow.
Now add drop shadow.
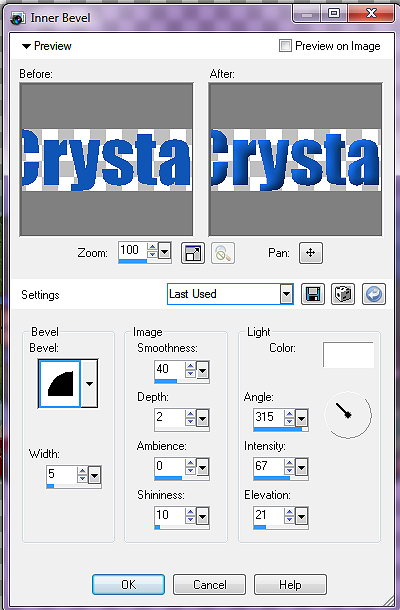
Get your magic wand tool, and click inside each letter, once every letter is selected use your inner bevel effect.
See my settings below :
Click Ok.
On your keyboard, push Ctrl & d to deselect.
Now is time to add any saying you would like to add, I used "Forever Loving My Boy"
Font Used Is :Sweetheart Script-Limited
Size 40
Color : Black (#000000)
Now add any copyright/credits that need to be added.
Once you have all of the above completed, crop your tag, be careful that you don't crop to close to your tag and crop off any of your mask or elements.
Once your tag is cropped ,go to your layers pallet, right click and click Merge, then click Merge Visible.
Now re-size your tag, the settings for this part is totally up to what size you need your tag to be where ever you are going to use it. For my tutorial sample I used 550.
Once your tag is cropped and layers are all merged, go to Adjust, click Sharpness, then click Sharpen.
Now all that is left is to save your tag as png & your done!!
Thank-You for taking the time to do my tutorial, As always I would LOVE to see what you have made using my tutorials, so please email them to me, I would love to showcase them here on my blog!
Subscribe to:
Post Comments (Atom)
About Me

- DitzyDezigns
- New York, United States
- Hiya Everyone! My name is Ronney, I have 3 wonderful teenagers, and have been married to my husband for 20 years. I LOVE to design signatures, tags & avatars, I design with PSP, and have been designing for over 2 1/2 years. I will be not only designing signatures, tags & avatars but will also be writing & posting tutorials as well. I will also be making some templates to share with you all as well. So I hope you enjoy and can use everything I have available on my blog :-) If you ever try any of my tutorials,please send me your completed designs and I would love to showcase it here on my blog!
Labels
- Addictive Pleasures Tuts (35)
- Angel's Designz Tuts (10)
- Animated (26)
- Announcements (2)
- Awards (2)
- Beginner (17)
- Butterfly Blush Tuts (8)
- Cool Scraps Digital (2)
- Creative Intentionz (2)
- Creative Scraps By Crys (19)
- Ditzys Scrapkits (1)
- Forum Sets (1)
- FTU (6)
- Intermediate Level Tuts (3)
- Peekaboo Land (1)
- Peekaboo Land PTU (4)
- Peekaboo Land Tuts (1)
- Pimp My Tags With Scraps Tuts (14)
- PTU (131)
- Scappin Dollars Tuts (1)
- Scrappin Dollars Tuts (7)
- Scraps From The Heart Tuts (3)
- Scraps With Attitude (27)
- Tammy's Scraps (8)
- Updates (1)
- Wickedly Ditzy Scraps (1)


0 comments:
Post a Comment