♥Ditzy's TOU♥
All of the tutorials written by me are of my own Ditzy imagination.
Do NOT copy or alter them in ANY way.
Do NOT copy & paste the tutorials to any website, forum or group.
Do NOT claim them as your own.
If you would like to show or share my tutorial do so by using a link to bring your members to my blog. However if you do please send me a courtesy email so that I know my tutorials are being used according to my TOU. Also if you would please send me a link to where you will be posting my link.
If you have done any of my tutorials I would LOVE to see the outcome of what you have made, so please email me OR you can leave me a link in my shout box so that I can see what you have made and display it on my blog for others to enjoy as well.
Other than that please have fun,and I hope that you enjoy all my tutorials!
Email me @ DitzyDezigns@hotmail.com
Email Me
I would love to see what you have made using any of my tutorials, so please feel free to email me at the address below.
DitzyDezigns@hotmail.com
Add Me On Facebook
Pages
Powered by Blogger.
Wednesday, September 28, 2011
♥Sweet Candi PTU♥
**This tutorial was written & posted by DitzyDezigns on September 28th 2011**
***Any resemblance to any other tutorial is purely coincidental & completely unintentional!!***
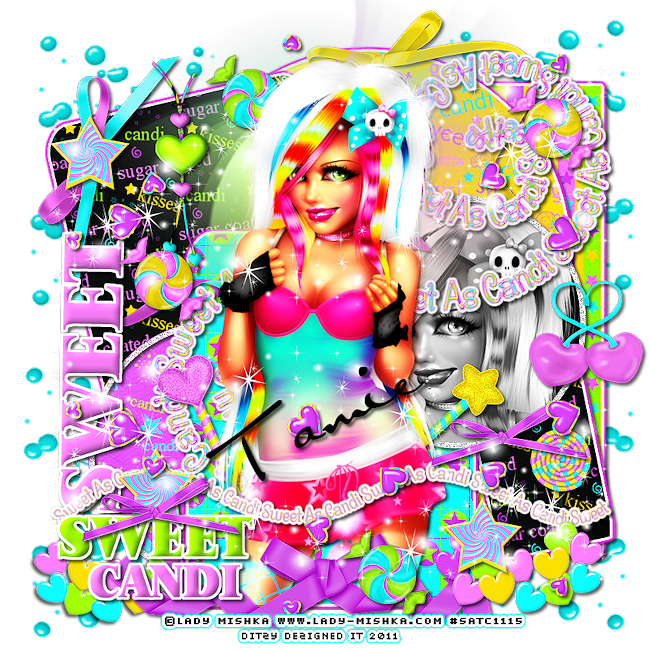
Here is what we will be making :
Supplies Needed :
Paint Shop Pro X2 (Any version should work)
Tube Of Choice - I used the amazing work of Lady Mishka, you can now purchase her work at PFD
Scrapkit - Sweet Candi By Tamie @ Addictive Pleasures
Template - Temp107 By Tamie @ Addictive Pleasures
Plugins Used :
Eye Candy 5 Impact - Gradient Glow (Optional)
Eye Candy 4000 - Gradient Glow (Optional)
Font Used :
AL Sandra
Elements Used :
P8
P5
P3
P11
P6
Text2
Text
Ribbon5
Ribbon3
RibbonBow
Star
Lolli2
Decor
Candi5
Candi4
Bow3
Beads
Hearts
Cherries
Hearts2
Candi2
Candi1
Splatters
Sparkles
Lets Begin :
Start by opening your Template 107-
Go to Image - click Canvas Size - set to 800 X 800 (Don't worry you will crop it later, this just gives you more room to work with)
Now go to your layers pallet - delete the credit & background layers.
In your layers pallet - click on your Raster 8 layer - Go to Selections - click Select All, go back to Selections & click Float , then go back to Selections & click Defloat -
Now open Paper6 - Copy & paste it as a new layer onto your canvas - then go to Selections - click Invert. Then on your keyboard press your delete key 1 time.
Go back to Selections & click Select None.
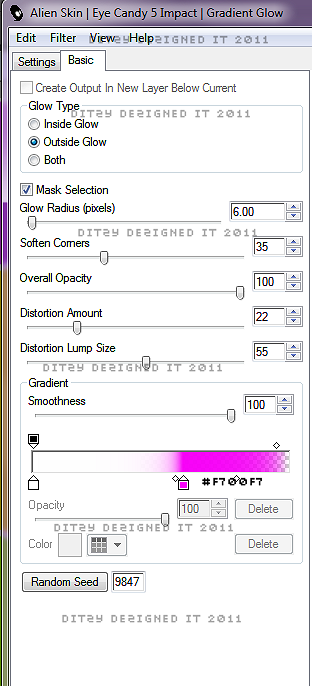
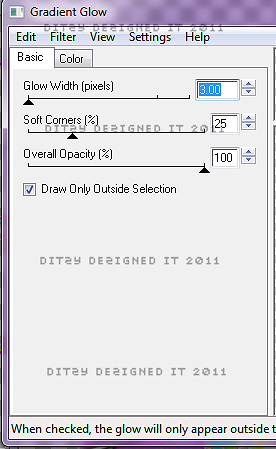
Now go to Effects - click Plugins - then click Eye Candy 5 Impact - Gradient Glow
(You are welcome to use my settings below or your own, the choice is always yours)
Then click Ok.
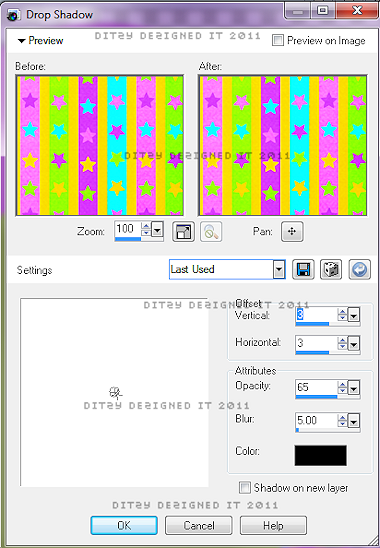
Now go to Effects - click 3D Effects - then click Drop Shadow.
Then click Ok.
Now go back to your layers pallet & delete your original Raster 8 layer.
In your layers pallet - click on your Raster 2 layer - go to Selections, Select All, Float - Defloat -
Open Paper 5 - Copy & paste it as a new layer onto your canvas - then go back to Selections & click Invert. Then on your keyboard press your delete key 1 time.
Go back to Selections & click Select None.
Now go to Effects - Plugins - Eye Candy 5 Impact - Gradient Glow
Use the same settings you used above.
Then go to Effects - 3D Effects - Drop Shadow - again using the same settings as before.
Now go to your layers pallet - delete your original Raster 2 layer.
Now follow those same steps for the layers I have listed below. Only on each layer you will use a different paper. I will list each paper that I used incase you would like to use the same. :-) Also make sure that you add your gradient glow & drop shadow to each layer, then go to your layers pallet & delete the original layer for each one.
Raster 7 - Paper5
Raster 4 - Paper 11
Raster 5 - Paper 3 (Do not add gradient glow or drop shadow to this layer)
Raster 3 - Paper 8
Now in your layers pallet - click on your Raster 6 layer - go to Selections, Select All, Float - Defloat -
Now make a new raster layer - activate your flood fill tool, set your background color to #000000 (black)
Then click inside your marching ants.
Now keeping this layer selected, open your tube of choice - Copy & paste it as a new layer onto your canvas. Then position it within your marching ants to your liking. Once happy with placement go to Selections - click Invert - then on your keyboard press your delete key 1 time.
Then go back to Selections & click Select None.
Now go to your layers pallet &on your tube layer, change your Blend Mode to Luminance (L)
Now in your layers pallet - click on your Raster 15 layer - go to Adjust - click Add/Remove Noise - Add Noise, set to Uniform , 100, and make sure your Monochrome box is checked, then click Ok.
Now apply a drop shadow to this layer.
Back in your layers pallet - click on your Raster 16 layer & apply the same Noise & drop shadow to this layer.
Now open your tube - Copy & paste it as a new layer onto your canvas - re-size it to 50%. Then re-size it again to 90%. (This size may vary depending on the tube you use, and your choice of placement)
Now place it to your liking. Then go to your layers pallet - right click on your tube layer - then click Duplicate - then go to Adjust - Blur - Gaussian Blur - set it to 5.00 & click Ok.
Go back to your layers pallet at the top & change the Blend Mode to Overlay.
Then in your layers pallet - click on your original tube layer & apply a drop shadow.
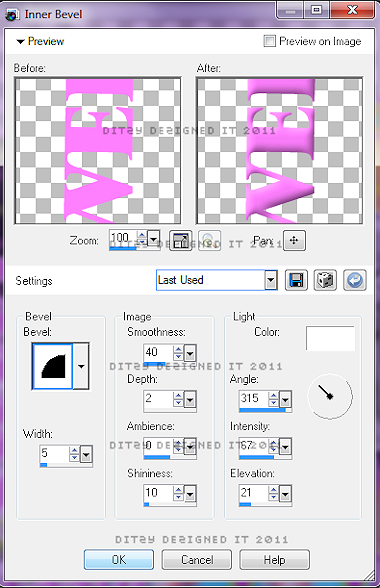
Now click on your Raster 9 layer - go to Effects - 3D Effects - Inner Bevel
(You can use my settings below or your own)
Click Ok.
Now go to Effects - 3D Effects - Drop Shadow. Use the same settings you have been using.
Also apply the same Inner Bevel settings to your Raster 11 layer.
Then on your Raster 12 layer apply a Drop Shadow.
Now lets add some elements :
Open your Text 2 element - Copy & paste it as a new layer onto your canvas - then position to your liking.
In your layers pallet - move your Text 2 layer down below both of your tube layers.
Go to Effects - Plugins - Eye Candy 4 - Gradient Glow
**Don't forget to click on the color tab as well & set your color to your liking)
Then click Ok.
Now go to Effects - 3D Effects - Drop Shadow . Use same settings as before.
Now open your Text element - Copy & paste it as a new layer onto your canvas - then re-size it to 80%. Position it to your liking.
Then apply Eye Candy 4000 - Gradient Glow & Drop Shadow.
Open Ribbon 5 element - Copy & paste it as a new layer, position it to your liking.
Adjust - Sharpness - Sharpen
Effects - 3D Effects - Drop Shadow (same settings)
Open Ribbon 3 element - Copy & paste it as a new layer onto your canvas - then re-size it to 70%. Now position it to your liking.
Sharpen & apply a drop shadow
Open your Ribbonbow element - Copy & paste it as a new layer onto your canvas - then re-size it to 70%. Position it to your liking then Sharpen & apply a drop shadow.
Open your Star element - Copy & paste it as a new layer onto your canvas - then re-size it to 30%. Position it to your liking.
Sharpen & apply a drop shadow.
Go to your layers pallet - right click on your Star layer - then click Duplicate. Then position your duplicated Star element to your liking. Then go back to your layers pallet - right click on your Duplicated Star layer & click Duplicate again. Now position this element to your liking as well.
Open your Lolli2 element - Copy & paste it as a new layer onto your canvas - then re-size it to 30%. Then position it to your liking.
Sharpen & apply a drop shadow.
Open your Decor element - Copy & paste it as a new layer onto your canvas - then position it to your liking.
Sharpen, but do not apply a drop shadow.
Open your Candi 5 element - Copy & paste it as a new layer onto your canvas - then re-size it to 50%. Now position it to your liking.
Sharpen & apply a drop shadow
Open your Candi 4 element - Copy & paste it as a new layer onto your canvas - then re-size it to 50%. Position to your liking.
Sharpen & apply a drop shadow
Open your Bow3 element - Copy & paste it as a new layer onto your canvas , then re-size it to 50%. Position to your liking.
Sharpen & apply a drop shadow.
Then go to your layers pallet - right click on your Bow3 layer - then click Duplicate. Now use your move tool to position your duplicated Bow3 element to your liking.
Open your Beads element - Copy & paste it as a new layer onto your canvas - then re-size it to 50%. Position to your liking.
Sharpen & apply a drop shadow.
Open your Hearts element - Copy & paste it as a new layer onto your canvas - then re-size it to 50%. Position to the lower right of your template.
Sharpen & apply a drop shadow.
Then go to your layers pallet - right click on your Hearts layer - then click Duplicate. Now go to Image & click Mirror. Use your move tool to adjust the position of these 2 elements if needed.
Open your Cherries element - Copy & paste it as a new layer onto your canvas - then re-size it to 60%. Position it to your liking.
Sharpen & apply a drop shadow
Open your Hearts2 element - Copy & paste it as a new layer onto your canvas - then re-size it to 80%. Position it to the bottom of your template.
Sharpen & apply a drop shadow.
Go to your layers pallet - right click on your Hearts2 layer - then click Duplicate. Now go to Image & click Flip. Then go back to your layers pallet & move your duplicated Hearts 2 layer down under both of your full tube layers.
Open your Candi 2 element - Copy & paste it as a new layer onto your canvas - then re-size it to 40%. Position it to your liking.
Sharpen & apply a drop shadow.
Go to your layers pallet - right click on your Candi 2 layer - then click Duplicate. Now position your duplicated Candi 2 element to your liking.
Open your Candi 1 element - Copy & paste it as a new layer onto your canvas - then re-size it to 40%. Position it to your liking.
Sharpen & apply a drop shadow.
Go to your layers pallet - right click on your Candi 1 layer - then click Duplicate. Now position your duplicated Candi 1 element to your liking.
Open your Splatter element - Copy & paste it as a new layer onto your canvas - then position it to the upper left corner of your template.
Then go to your layers pallet - move your Splatter layer down so it is the very last layer in your layers pallet.
Now right click on your Splatter layer - then click Duplicate. Go to Image & click Mirror.
Now right click on your duplicated Splatter layer ,click Duplicate, then go to Image & click Flip.
Then duplicate your duplicated layer again , then go to Image & click Mirror.
You should now have a copy of your Splatter element in all 4 corners of your template. Use your move tool to adjust the position of each one if needed.
Open your Sparkles element - Copy & paste it as a new layer onto your canvas - position your Sparkles element to the bottom of your template.
Now go to your layers pallet - right click on your Sparkles layer - then click Duplicate. Now go to Image & click Flip.
Use your move tool to adjust the position of either Sparkles element if needed.
Now activate your text tool - set your Font, Size & Color
I used :
Font : AL Sandra
Size : 80 Pixels (Will vary depending on length of your name, adjust accordingly)
Background Color : #000000
Foreground Color : Set to nul
Type out your name, then click Apply. Position your name where you would like it.
Once happy with placement go to Effects - click 3D Effects - Drop Shadow. Use the same settings as you have through this tutorial.
If you are happy with the placement of everything on your tag - then go to your layers pallet - right click on any layer - then click Merge - then click Merge Visible.
Now activate your Crop tool, & crop off any access canvas that you did not use.
Now re-size your tag depending on the size you will need it to be for where you will be using it.
Once I re-size my tag I like to Sharpen it one final time, so you may do that if you wish as well.
Now all that is left is to save your tag as a PNG file & you have completed this tutorial!! ♥
Subscribe to:
Post Comments (Atom)
About Me

- DitzyDezigns
- New York, United States
- Hiya Everyone! My name is Ronney, I have 3 wonderful teenagers, and have been married to my husband for 20 years. I LOVE to design signatures, tags & avatars, I design with PSP, and have been designing for over 2 1/2 years. I will be not only designing signatures, tags & avatars but will also be writing & posting tutorials as well. I will also be making some templates to share with you all as well. So I hope you enjoy and can use everything I have available on my blog :-) If you ever try any of my tutorials,please send me your completed designs and I would love to showcase it here on my blog!
Labels
- Addictive Pleasures Tuts (35)
- Angel's Designz Tuts (10)
- Animated (26)
- Announcements (2)
- Awards (2)
- Beginner (17)
- Butterfly Blush Tuts (8)
- Cool Scraps Digital (2)
- Creative Intentionz (2)
- Creative Scraps By Crys (19)
- Ditzys Scrapkits (1)
- Forum Sets (1)
- FTU (6)
- Intermediate Level Tuts (3)
- Peekaboo Land (1)
- Peekaboo Land PTU (4)
- Peekaboo Land Tuts (1)
- Pimp My Tags With Scraps Tuts (14)
- PTU (131)
- Scappin Dollars Tuts (1)
- Scrappin Dollars Tuts (7)
- Scraps From The Heart Tuts (3)
- Scraps With Attitude (27)
- Tammy's Scraps (8)
- Updates (1)
- Wickedly Ditzy Scraps (1)




0 comments:
Post a Comment