Don't Be A Pirate
My Blinkies

Add Me On Facebook

Protected


Blogs I Stalk















Awards :-)



Find Me At

Favorite Stamps








Wednesday, October 19, 2011
♥Happy Halloween PTU♥
 10:13 PM |
  Created By
DitzyDezigns |
Created By
DitzyDezigns |


**This tutorial was written & posted by DitzyDezigns on October 19th 2011**
***Any resemblance to any other tutorial is purely coincidental & completely unintentional!!***
Here is what we will be making :

Supplies Needed :
Paint Shop Pro X2 (Any version should work)
Tube Of Choice - I used the amazing work of Elias Chatzoudis & is available @ PTE
Scrapkit - Winifred by Tamie @ Addictive Pleasures
Halloween Template 2 By Tracy @ Freebies & Friends (Scroll about half way down the page & click on Tracy's Halloween Templates 1-10.)
Plugins Used :
Eye Candy 5 Impact - Gradient Glow (Optional)
Eye Candy 4000 - Gradient Glow (Optional)
Font Used :
Some Weatz Symbols
Elements Used :
Hearts
Grave
Frog
Cat3
Candle
Winged Pumpkin
Sparkles
Text 2
Stars
String
Skull
Ribbon 4
Ribbon
Latern
Bow 4
P2
P9
P5
P7
Lets Begin :
**Please note - I provide screen shots for all of my plugin settings, please feel free to use them if you wish. I wouldn't post them if I didn't want you to be able to use them :-) Or you can adjust the settings to acquire an effect of your liking. I don't feel the need to keep secret how I do something. I learned by someone sharing their knowledge with me, so I would like to repay that favor.**
Start by opening your Halloween Template 2 -
Go to Image - click Canvas Size - then set it to 800 X 600
Now go to your layers pallet & delete the following layer :
Tracy.F.Designz (Credit layer - plz leave Tracy some love when you download the templates)
Now in your layers pallet - click on your Circle layer - Go to Selections - click Select All, then back to Selections & click Float - then back to Selections & click Defloat -
Open P2 - Copy & paste it as a new layer onto your canvas - then go back to Selections & click Invert - now on your keyboard press your Delete key 1 time. Then go back to Selections & click Select None.
Now on your P2 layer go to Effects - then click Plugins - then click Eye Candy 5 Impact - then click Gradient Glow

Then click Ok.
Now go to Effects - then click 3D Effects - then click Drop Shadow

Click Ok.
Now go to your layers pallet & delete your original Circle layer.
Now follow those exact same steps for the following layers - **except use a different paper on each one, I will provide the paper # that I used on mine in case you would like to do the same.**
Rectangle 2 - P5
Shape - P9
Square - P7
Now in your layers pallet - click on Rectangle 1 layer - Selections - click Select All - Selections - click Float - Selections click Defloat -
Now go to Layers & click New Raster Layer
Now in your Materials Pallet - set your Background Color to #000000 (Black) or a color of your choosing.
Then activate your Flood Fill tool - then on your template use your mouse & click inside the marching ants around your Rectangle. This will fill it in with your color of choice.
Then go to Selections - click Select None.
Now go to Adjust - click Add/Remove Noise - then click Add Noise, set it Uniform, 65 & make sure your Monochrome box IS checked, then click Ok.
Now on your Flood Filled layer - go to Effects - click Plugins - Eye Candy 5 Impact - Gradient Glow
Use the exact same settings you used above. (You should not have to change anything, just click ok)
Now go to Effects - click 3D Effects - then click Drop Shadow (again using the same settings above, you shouldn't have to change anything, just click Ok.)
Now go to your layers pallet & delete your original Rectangle 1 layer.
Now click on your Text layer - go to Effects - click Plugins - then click Eye Candy 5 Impact - Gradient Glow. The settings for this layers are different than the settings you have been using for other layers. Pay special attention to the colors as well as I have switched them so that the #673937 color is first & the #ffffff color is 2nd.

Now click Ok.
Go to Effects - click 3D Effects - Drop Shadow (Same settings, click Ok)
Now in your layers pallet - click on your Ghost layer - then go to Effects - click 3D Effects - then click Inner Bevel -

Then click Ok.
Now go to Adjust - click Sharpness - then click Sharpen.
Then go to Effects - click 3D Effects - then click Drop Shadow. (Using the same settings as before, click Ok)
Now open your tube of choice - Copy & paste the full tube layer onto your canvas as a new layer. Then using your Move Tool - position your tube to your liking.
Once you have your tube placed where you would like it, go to your layers pallet - right click on your full tube layer - then click Duplicate.
Now go to Adjust - click Blur - then click Gaussian Blur, set your Radius to 5.00 & click Ok.
Now go back to your layers pallet at the top & change your Blend Mode from Normal to Overlay.
Then click on your original tube layer (the bottom tube layer) go to Effects - click 3D Effects - then click Drop Shadow. Use the same settings as before & click Ok.
Now , in your layers pallet - click on your Web layer - then go to Effects - click Plugins - then click Eye Candy 4000 - then click Gradient Glow -
This one is a little different than the Gradient Glow we used above.

Then click on the Color tab :

Then click Ok.
Now go to Effects - click 3D Effects - then click Drop Shadow (Use the same settings as before)
Now lets add some elements :
Open your Text 2 element - Copy & paste it as a new layer onto your canvas - then re-size it to 65%. Use your move tool & position your Text 2 element to the center of your template.
Go to your layers pallet - then move your Text 2 layer down so that it is directly below BOTH of your tube layers.
Now go to Adjust - click Sharpness - then click Sharpen
Then go to Effects - Plugins - Eye Candy 4000 - Gradient Glow (You will be using the exact same settings that you used on your Web layer, so you should just have to click Ok.)
Now go to Effects - 3D Effects - Drop Shadow (same settings, click Ok)
Now open your Stars element - Copy & paste it as a new layer onto your template - then re-size your element to 75%. Use your move tool & position your Stars element to the top of your template.
Go to your layers pallet - right click on your Stars layer - then click Arrange - then click Send To Bottom. (You want it under all your other layers)
Adjust - Sharpness - Sharpen
Effects - 3D Effects - Drop Shadow
Now go to your Stars layer - then right click on it, click Duplicate. Then go to Image & click Flip. This will put the duplicated element to the bottom on your template.
Then go to your layers pallet & right click on your duplicated Stars layer & click Duplicate . Then use your Move Tool to position the 3rd Stars element to the center of your canvas.
(You do not need to sharpen or add a drop shadow to duplicated elements because you already put those effects on the first element, so anything you duplicate will already have those effects in place.)
Now open your String element - Copy & paste it as a new layer onto your canvas - then re-size it to 80%. Position your String element to the upper right of your template.
Open your Skull element - Copy & paste it as a new layer onto your canvas - then re-size it to 35%. Use your move tool to position your Skull element to your liking.
Adjust - Sharpness - Sharpen
Effects - 3D Effects - Drop Shadow (same settings click Ok)
Now go to your layers pallet - right click on your Skulls layer - then click Duplicate. Now use your Move Tool to position your duplicated Star element to your liking.
Then go back to your layers pallet - right click on your Duplicated Star layer - then click Duplicate. (Now you should have 3 Star elements/layers)
Open your Ribbon 4 element - Copy & paste it as a new layer onto your canvas - then re-size it to 90%. Use your Move Tool & position your Ribbon 4 element to your liking.
Adjust - Sharpness - Sharpen
Effects - 3D Effects - Drop Shadow (Same settings, click Ok)
Open your Ribbon element - Copy & paste it as a new layer onto your canvas - then re-size it to 50%. Then use your move tool to position your Ribbon element to your liking.
Adjust - Sharpness - Sharpen
Effects - 3D Effects - Drop Shadow (Same settings click Ok.)
Now open your Lantern element - Copy & paste it as a new layer onto your canvas - then re-size it to 30%. Then use your Move Tool to position your Lantern to your liking.
Adjust - Sharpness - Sharpen
Effects - 3D Effects - Drop Shadow (Same settings, click Ok)
Open your Bow 4 element - Copy & paste it as a new layer onto your canvas - then re-size it to 30%. Use your move tool to position your Bow 4 element to your liking.
Adjust - Sharpness - Sharpen
Effects - 3D Effects - Drop Shadow (same settings click ok.)
Open your Hearts element - Copy & paste it as a new layer onto your canvas - then re-size it to 50%. Use your Move Tool to position your Hearts element to your liking.
Adjust - Sharpness - Sharpen
Effects - 3D Effects - Drop Shadow (Same settings , click Ok.)
Open your Grave element - Copy & paste it as a new layer onto your canvas - then re-size it to 50%. Use your move tool to position your Grave element to your liking.
Adjust - Sharpness - Sharpen
Effects - 3D Effects - Drop Shadow (Same settings click Ok.)
Open your Frog element - Copy & paste it as a new layer onto your canvas - then re-size it to 30%. Use your move tool to position your Frog element to your liking.
Adjust - Sharpness - Sharpen
Effects - 3D Effects - Drop Shadow (Same settings, click Ok)
Open your Candle element - Copy & Paste it as a new layer onto your canvas - then re-size it to 30%. Use your move tool to position it to your liking.
Adjust - Sharpness - Sharpen
Effects - 3D Effects - Drop Shadow (Same settings click Ok.)
Open your Winged Pumpkin element - Copy & paste it as a new layer onto your canvas - then re-size it to 30%.
Now go to Image - click Free Rotate - set it to Right 30.00 & make sure your "All Layers & Rotate Singly Layer boxes are UNchecked" then click Ok.
Use your Move Tool to position your Winged Pumpkin element to the upper right of your template.
Now Adjust - Sharpness - Sharpen
Effects - 3D Effects - Drop Shadow (Same settings , click Ok)
Now go to your layers pallet - right click on your Winged Pumpkin layer - then click Duplicate.
Go to Image - click Mirror. Now use your Move Tool to position your duplicated Winged Pumpkin element to the lower left side of your template.
Now in your layers pallet - right click on your Ghost layer - then click Duplicate.
Now re-size your Duplicated Ghost layer to 50%. Go to Image - click Free Rotate, set to Right 30.00 & make sure both boxes are UNchecked. Then click Ok.
Because we re-sized our duplicated Ghost you will want to sharpen it again to make it clearer.
Adjust - Sharpness - Sharpen.
Now use your Move tool to position your duplicated Ghost to the right side of your canvas.
Then in your layers pallet - move your duplicated Ghost layer down so it is below all layers except your 3 Stars layers.
Now right click your Duplicated Ghost layer - click Duplicate - then go to Image & click Mirror. Use your move tool to adjust the position of your Ghost element to your liking.
Go back to your layers pallet - right click on the Ghost layer you just duplicated, then click Duplicate again.
Use your Move Tool to position your 4th Ghost to your liking.
Now open your Sparkles element - Copy & paste it as a new layer onto your canvas - then re-size it to 50%. Use your move tool to position your Sparkles to the lower left corner of your template.
Adjust - Sharpness - Sharpen
**Do not add a drop shadow to your Sparkles**
Now go to your layers pallet - right click on your Sparkles layer - then click Duplicate. Then go to Image & click Mirror.
Back in your layers pallet - right click on your Duplicated Sparkle layer - then click Merge then click Merge Down. Now your 2 Sparkle layers should become one.
Now right click on your Merged Sparkle layer - then click Duplicate. Go to Image & click Flip.
This will put your duplicated Sparkles at the top of your template.
Now in your layers pallet you will want to move your duplicated Merged Sparkle layer down so that it is under both of your Full Tube layers.
Then right click on your Merged Sparkle layer - then click Duplicate, this time use your Move tool & position your 3rd Sparkles element to the center of your template.
Now you can add your name, copyright & any credit information required.
The settings I used for the name on my tag are :
Font : Some Weatz Symbols
Size : 80 Pixels
Background Color : #000000
Foreground Color : # Set to nul
Then once you apply & position your name - go to your layers pallet - right click on your Name layer - then click Convert To Raster Layer.
Now go to Effects - click Plugins - then click Eye Candy 5 - Impact - Gradient Glow

Then click Ok.
Now on your Name layer - go to Effects - 3D Effects - Drop Shadow (same settings , click Ok)
Now if you are happy with all of your elements & text, go to your layers pallet - right click on any layer - then click Merge Visible.
Now activate your crop tool & crop off any access canvas that you did not use.
Now you may or may not need to re-size your tag, depending on where you will be using it.
If you do re-size your tag as a whole be sure to Sharpen it one last time before saving it.
Now all that is left is to save your completed tag as a PNG file & you have completed this tutorial!!♥
 Labels:

Monday, October 17, 2011
♥Bubble Bubble PTU♥
**This tutorial was written & posted by Ditzy Dezigns on October 17th 2011**
***Any resemblance to any other tutorial is purely coincidental & completely unintentional!!***
Here is what we will be making :

Supplies Needed :
Paint Shop Pro X2 (Any version should work)
Scrapkit - Bubble Bubble By Creative Intentionz @ Twilight Scraps
White Frame By Weescotslass Creations
Mask Of Choice
Plugins Used :
Eye Candy 5 Impact - Gradient Glow (Optional)
Font Used :
Saginaw
Elements Used :
Paper 7
Paper 11
House
Moon
Mummy
Ghost
Lightray
Vine Flowers 1
Pumpkin
Legs
Witch
Vampbat
Bow 4
Lets Begin :
Start by opening a new 800 X 600 Transparent canvas. (Don't worry you will crop it at the end of the tutorial, this just gives you more space to work with.)
Now open your White Frame of choice - Copy & paste it as a new layer onto your canvas - I then re-sized mine to 65%. Then use your move tool to position your frame in the center of your canvas. (If you use a different frame than what I have you will need to adjust your size accordingly.)
Now activate your Magic Wand tool - then click inside your white frame - go to Selections - click Modify - then on the slide out menu click Expand. Set the Number Of Pixels to 10 & Click Ok.
Now make a new raster layer -
Now open Paper 1 - Copy & paste it INTO SELECTIONS.
Then go back to Selections - click Select None.
In your layers pallet - move your Paper 1 layer down so it is directly under your White Frame layer.
Now click on your White Frame layer - go to Adjust - click Sharpness - then click Sharpen.
Now go to Effects - click 3D Effects - then click Drop Shadow.
**You are welcome to use my settings below - or you can play around with the settings and get the effect that you like best.**

Now click Ok.
Now lets start adding some elements -
Open your House element - Copy & Paste it as a new layer onto your canvas - then re-size it to 50%. Position your house element using your move tool inside your White Frame.
Then go to your layers pallet - move your House layer down so it is directly below your White Frame layer. Be sure to keep it above your Paper 1 layer.
Now activate your Eraser Tool - then erase any part of the house that sticks out of the frame.
Then go to Adjust - click Sharpness - then click Sharpen
Effects - 3D Effects - Drop Shadow. (Use the same settings as you did above.)
Open your Moon element - Copy & paste it as a new layer onto your canvas - then re-size it to 20%. Now use your move tool & position your Moon element to the top left corner inside your White Frame.
Adjust - Sharpness - Sharpen
Effects - 3D Effects - Drop Shadow (same settings)
Open your Mummy element - Copy & paste it as a new layer onto your canvas - then re-size it to 45%. Now go to Image - click Mirror. Now use your move tool & position your Mummy element to the left side of your frame.
Then go to Adjust - Sharpness - Sharpen
Effects 3D Effects - Inner Bevel
**You can use my settings or your own**

Click Ok.
Now go back to Effects - click 3D Effects - Drop Shadow
Same settings as above.
Open your Ghost element - Copy & Paste it as a new layer onto your canvas - then re-size it to 30% then re-size it again to 70%. Use your move tool & position your Ghost element to the left side of your frame.
Adjust - Sharpness - Sharpen
Effects - 3D Effects - Inner Bevel (Same settings as before)
Effects - 3D Effects - Drop Shadow (same settings as before)
Open your Pumpkin element - Copy & paste it as a new layer onto your canvas - then re-size it to 25%. Use your move tool to position your Pumpkin to the right side of your House element in your White Frame.
Adjust - Sharpness - Sharpen
Effects - 3D Effects - Inner Bevel (Same settings)
Effects - 3D Effects - Drop Shadow (Same settings)
Open your Legs element - Copy & paste it as a new layer onto your canvas - then re-size it to 25%. Now use your move tool to position your Legs element to the inside of your White Frame, place them on top of your Pumpkin element.
Go to your layers pallet - move your Legs layer down so it is directly under your Pumpkin layer.
Adjust - Sharpness - Sharpen
Effects - 3D Effects - Inner Bevel (Same settings as before)
Effects - 3D Effects - Drop Shadow (Same settings as before)
Open your Witch element - Copy & paste it as a new layer onto your canvas - then re-size it to 35%. Use your move tool to position your Witch element to the right side of your White Frame.
Adjust - Sharpness - Sharpen
Effects - 3D Effects - Inner Bevel (same settings)
Effects - 3D Effects - Drop Shadow (same settings)
Open your Vampbat element - Copy & paste it as a new layer onto your canvas - then re-size it to 30%. Use your move tool to position your bat so it is above your upper left corner of your White Frame.
Adjust - Sharpness - Sharpen
Effects - 3D Effects - Inner Bevel
Effects - 3D Effects - Drop Shadow
Open your Lightray element - Copy & paste it as a new layer onto your canvas - then re-size it to 30%. Use your move tool to position your Lightray element to the upper left corner of the inside of your White Frame.
Go to your layers pallet - move your Lightray layer down so it is directly under your Moon layer.
Adjust - Sharpness - Sharpen
Open your Bow 4 element - Copy & paste it as a new layer onto your canvas - then re-size it to 20%. Use your move tool & position your Bow4 element to the upper right corner of your frame.
Adjust - Sharpness - Sharpen
Effects - 3D Effects - Inner Bevel (same settings)
Effects - 3D Effects - Drop Shadow (same settings)
Now go to your layers pallet - right click on your Bow 4 layer - then click Duplicate. Now go to Image & click Mirror. Use your Move tool to adjust the position of your duplicated Bow 4 element so that it is on the upper left corner of your white frame.
Open your Vine Flowers 1 element - Copy & paste as a new layer onto your canvas - then re-size it to 40%. Use your move tool & position your Vine Flowers 1 element to the upper left corner of your White Frame.
Go to your layers pallet - right click on your Vine Flowers 1 layer - then click Arrange - now click Send To Bottom.
Adjust - Sharpness - Sharpen
Effects - 3D Effects - Drop Shadow (same settings)
Do not apply inner bevel to this element.
Now back in your layers pallet - right click on your Vine Flowers 1 layer - then click Duplicate. Go to Image & click Mirror. Then use your move tool to position your duplicated Vine Flowers 1 element to the upper right corner of your White Frame.
Now open Paper 11 - Copy & paste it as a new layer onto your canvas - then re-size it to 70%. Now go to your layers pallet - right click on your Paper 11 layer - click Arrange - then click Send To Bottom.
Then go to Layers - click Load Save Mask - then click Load Mask From Disk.
Once your Mask menu opens, choose a Mask of your choice then click Load.
Now go to your layers pallet - right click on your Mask layer - then click Merge - then click Merge Group.
Now position your Mask so that it is on the left side of your tag. Then back to your layers pallet - right click on your Merged Mask layer - then click Duplicate. Now go to Image & click Mirror. Use your move tool to adjust the position of your duplicated Mask layer if needed.
Now add your name & any copyright/credit information needed.
The settings I used for the name are :
Font : Saginaw
Size : 40 Pixels (Depends on the length of your name)
Background Color : #000000
Foreground Color : Set to nul
(I used the exact same settings for my phrase "Happy Hallowen" except I changed the size from 40 pixels to 35 Pixels)
Now apply & position your name - (follow these same steps for your Happy Halloween phrase) Then go to your layers pallet - right click on your Name layer - then click Convert To Raster Layer.
Then go to Effects - Plugins - Eye Candy 5 Impact - Gradient Glow

Then click Ok.
Now go to Effects - 3D Effects - Drop Shadow (Use the same settings you have used through-out the tutorial)
Now if you are happy with all of your elements & your name - go to your layers pallet -right click on any layer then click Merge - then click Merge Visible.
Now activate your Crop tool & crop off any access canvas that you did not use.
Once you have your tag cropped you may or may not need to re-size your tag, depending on where you will be using it.
If you re-size your completed tag be sure to Sharpen it one final time.
Then all that is left is to save your tag as a PNG file & you have completed this tutorial!!♥
Sunday, October 16, 2011
♥Brewing Up Some Fun PTU♥
**This tutorial was written & posted by Ditzy Dezigns on October 16th 2011**
***Any resemblance to any other tutorial is purely coincidental & completely unintentional!!***
Here is what we will be making :

Supplies Needed :
Paint Shop Pro X2 (Any version should work)
Scrapkit - Brewing Up Some Fun @ Creative Scraps By Crys
Mask Of Choice
Plugins Used :
Eye Candy 4000 - Gradient Glow
Font Used :
Double Feature
Elements Used :
Paper 12
Element 32
Element 31
Element 2
Element 1
Element 3
Element 24
Element 25
Element 30
Element 21
Element 7
Element 15
Element 8
Element 20
Lets Begin -
Open a new 800 X 600 transparent canvas. (Don't worry you will crop it at the end of the tutorial, this just gives you extra space)
Open Element_32 - Copy & paste it as a new layer onto your canvas - then re-size it to 65%. Position this element to the center of your canvas.
Go to Adjust - click Sharpness - click Sharpen
Then go to Effects - click 3D Effects - then click Drop Shadow
(You can use my settings below or your own)
**See added note on screen shot**

Then click Ok.
Open your Element_31 - Copy & paste it as a new layer onto your canvas - then re-size it to 50%. Use your move tool & position this element to the center of your Element_32.
Adjust - Sharpness - Sharpen
Effects - 3D Effects - Drop Shadow (Same settings as above)
Open Element_2 - Copy & paste it as a new layer onto your canvas - then re-size it to 65%. Use your move tool to position this element to the left side of your Element_31.
Adjust - Sharpness - Sharpen
Effects - 3D Effects - Drop Shadow (Same settings as above)
Open Element_1 - Copy & paste it as a new layer onto your canvas -then re-size it to 55%. Use your move tool to position this element to the right side of your Element_31 as well.
Adjust - Sharpness - Sharpen
Effects - 3D Effects - Drop Shadow (same settings as above)
Open Element_3 - Copy & paste it as a new layer onto your canvas then re-size it to 65%. Use your move tool to position this element to the right side of Element_31.
Adjust - Sharpness - Sharpen
Effects - 3D Effects - Drop Shadow
Open Element_24 - Copy & paste it as a new layer onto your canvas - then re-size to 25%. Use your move tool to position this element to the left side of your Element_1.
Adjust - Sharpness - Sharpen
Effects - 3D Effects - Drop Shadow
Open Element_25 - Copy & Paste it as a new layer onto your canvas -then re-size it to 20%. Use your move tool to position this element to the top of Element_32.
Adjust - Sharpness - Sharpen
Effects - 3D Effects - Drop Shadow
Open Element_30 - Copy & paste it as a new layer onto your canvas - then re-size it to 20%. Position it to the right side of Element_1.
Adjust - Sharpness - Sharpen
Effects - 3D Effects - Drop Shadow
Open Element_21 - Copy & paste it as a new layer onto your canvas - then re-size it to 20%. Position it to your liking.
Adjust - Sharpness - Sharpen
Effects - 3D Effects - Drop Shadow
If you would like more than one of these elements - go to your layers pallet - right click on your Element_21 layer - then click Duplicate. Go to Image & click Mirror. Now position to your liking.
Open Element_7 - Copy & paste it as a new layer onto your canvas then re-size it to 70%. Then go to Effects - 3D Effects - Inner Bevel -

Then click Ok.
Now go to Effects - Plugins - Eye Candy 4000 - Gradient Glow

Then click on the Color tab - (Before clicking Ok)

Then click Ok.
Now go to Adjust - click Sharpness - then click Sharpen
Now Effects - 3D Effects - Drop Shadow (Use same settings you have been using)
Now using your move tool - position this element to the bottom of your canvas. (See my tag above)
Open Element_15 - Copy & paste as a new layer onto your canvas - then re-size it to 20%. Position to your liking.
Adjust - Sharpness - Sharpen
Effects - 3D Effects - Drop Shadow
Open Element_8 - Copy & paste it as a new layer onto your canvas - then re-size it to 20%. Then re-size it again to 40%. Position to your liking.
Adjust - Sharpness - Sharpen
Effects - 3D Effects - Drop Shadow (Same settings you have been using)
Open Element_20 - Copy & paste it as a new layer onto your canvas - then re-size it to 70%. Then re-size it again to 70%. Then go to Image - click Free Rotate - set it to Left 90.00 & click Ok.
Then go back to Image - click Free Rotate again this time set it to Right 30.00 & click Ok.
Now position it to the left side of your Element_7. (Halloween wordart)
Adjust - Sharpness - Sharpen
Effects - 3D Effects - Drop Shadow
Open Paper 12 - Copy & paste it as a new layer onto your canvas - then re-size it to 70%.
Go to your layers pallet - right click on your Paper 12 layer - click Arrange - Send To Bottom.
Now go to Layers - Load/Save Mask - click Load Mask From Disk.
Now choose a Mask of your choice.
Then click Load.
Now go to your layers pallet - right click on your Mask layer - click Merge then click Merge Group.
Now using your Move tool - position your Mask on your canvas to the left side. Go back to your layers pallet and right click on your Merged Mask layer - then click Duplicate. Go to Image & click Mirror.
Use your move tool to adjust the position of your duplicated Mask layer to your liking.
Now add your name & credit information -
The settings I used for the name are :
Font : Double Feature
Size : 55 Pixels (Depends on the length of your name)
Background Color : #55c4c3
Foreground Color : Set to nul
Now apply & position your name - once happy with placement go to your layers pallet - right click on your Name layer - then click Convert to Raster Layer.
Now go to Effects - 3D Effects - Inner Bevel

Then click Ok.
Now go to Adjust - click Add/Remove Noise - then click Add Noise

Then click Ok.
Now go to Effects - click Plugins - Eye Candy 4000 - Gradient Glow
Use the same settings you used for your Halloween wordart. (Element_7)
Now go to Effects - 3D Effects - Drop Shadow (Same settings as before)
Now if you are happy with the placement of your elements & name/credit information - go to your layers pallet & right click on any layer - then click Merge - then click Merge Visible.
Then activate your Crop tool - crop off any access canvas that you did not use.
Now you may or may not want to re-size your completed tag. If you choose to re-size make sure that you Sharpen your tag one last time.
Now all that is left is to save your tag as a PNG & you have completed this tutorial!!♥
♥Spooky Sweet PTU♥
**This tutorial was written & posted by Ditzy Dezigns on October 16th 2011**
***Any resemblance to any other tutorial is purely coincidental & completely unintentional!!**
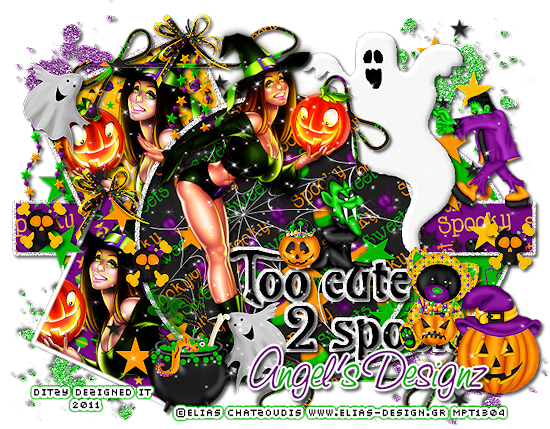
Here is what we will be making :
Supplies Needed :
Paint Shop Pro X2 (Any version should work)
Tube Of Choice - I used Elias Chatzoudis who is now available @ PTE (You will notice I have a MPT license # on my tag, that is because I purchased my tube when he was selling through MPT)
Scrapkit - Spooky Sweet by Angel's Designz
Template - Halloween Temp 1 -By Annu @ Creative Misfits Blog
Plugins Used :
Eye Candy 4000 - Gradient Glow
Xero - Radiance
Font Used :
Saginaw
Elements Used :
Paper 3
Paper 1
Paper 2
Paper 4
Web
Star String
Kitty
Frankenstein
Dracular
Bow 1
Candy Bucket
Pumpkin
Skull2
Star Trail
Ghost
String
Cauldron
Splat 1 & 2
Sparkles
Lets Begin :
Open your Halloween Template 1 -
Go to your layers palelt - Delete the following layers :
Credit (only after you have thanked the designer of the template)
Raster 7
Raster 1
Raster 13
Raster 4
Copy Of Raster 8
Now go to your layers pallet - Click on your Raster 9 layer - go to Selections - click Select All - go to Selections again & click Float - then go to Selections again & click Defloat -
Now open Paper 3 - Copy & paste it as a new layer onto your canvas - then go to Selections - click Invert - then on your keyboard press your Delete key 1 time. Then go back to Selections & click Select None.
Go back to your layers pallet - & delete your original Raster 9 layer.
Now click on your Raster 6 layer - go to Adjust - Add/Remove Noise -then click Add Noise - set it to Uniform 100 & make sure your Monochrome box is checked then click Ok.
Now go to Effects - click 3D Effects - then click Drop Shadow.
You can use my settings below or your own.
**See added note on the screen shot below**
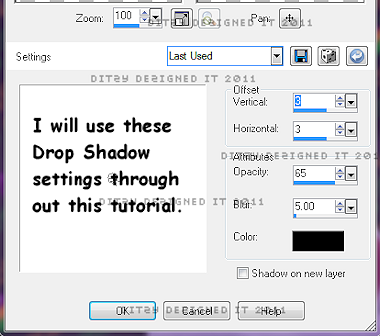
Now click Ok.
Now click on your Raster 2 layer - follow the same steps you did for your Raster 9 layer only use Paper 1 this time.
Now click on your Raster 3 layer - then add noise like you did on your Raster 6 layer. Then apply a drop shadow. (Same settings as above)
Click on your Raster 17 layer - go to Selections - Select All - Float - Defloat -
Open Paper 2 - Copy & paste it as a new layer onto your canvas - then go to Selections - click Invert - then on your keyboard press your Delete key 1 time.
Back to Selections & click Select None.
Then go to your layers pallet & delete your original Raster 17 layer.
Now in your layers pallet - click on your Raster 10 layer - Selections - Select All - Float - Defloat -
Open Paper 4 - Copy & paste it as a new layer onto your canvas - then go to Selections & click Invert - then on your keyboard press your Delete key 1 time.
Keeping this layer selected - open your Tube of choice - Copy & paste it as a new layer onto your canvas - re-size & position to your liking within the marching ants, once happy with placement - press your delete key 1 more time.
Go back to Selections & click Select None.
Now in your layers pallet - delete your original Raster 10 layer.
Still in your layers pallet - click on your Tube layer - then go to Effects - click Plugins - then click Xero - then click Radiance.
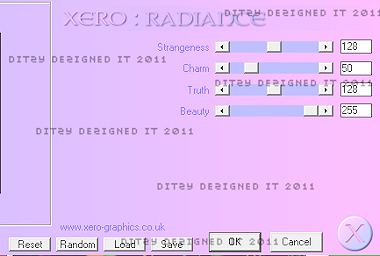
Then click Ok.
Now go to Effects - 3D Effects - Drop Shadow
Use the same settings as before.
Now in your layers pallet - click on your Frame 1 layer - go to Adjust - Add/Remove Noise - Add Noise - set to Uniform 100 & make sure your Monochrome box is checked then click Ok.
Now apply a drop shadow to your Frame 1 layer. (Same settings as before)
Now follow these same steps for your Raster 10 layer & your Frame 2 layer. Only this time on your Raster 10 layer - use Paper 7.
Now open your Full tube of choice - Copy & paste it as a new layer onto your canvas - then re-size it to 85% (if you are using the same tube. If you are using a different one adjust the size to your liking)
Now position your tube to your liking.
Go to your layers pallet - right click on your Tube layer - then click Duplicate - now go to Adjust - Blur - Gaussian Blur - set the Radius to 5.00 & click Ok.
Now go back to your layers pallet & change the Blend Mode from Normal to Overlay.
Then click on your Original full tube layer - and apply a drop shadow. (Same settings as before)
Now lets add some elements :
Open your Web element - Copy & paste it as a new layer onto your canvas - then re-size it to 70%. Position it to your liking.
Go to Adjust - Sharpness - Sharpen (You will do this for every element you re-size smaller)
Then apply a drop shadow (Same settings)
Open your Star String - Copy & paste it as a new layer onto your canvas - then re-size it to 30%. Position it to your liking.
Sharpen & apply a drop shadow.
Open your Kitty element - Copy & paste it as a new layer onto your canvas - then re-size it to 30%. Position to your liking. Sharpen & apply a drop shadow.
Open your Frankenstein element - Copy & paste it as a new layer onto your canvas - re-size it to 25%. Position it to your liking.
Sharpen & apply a drop shadow
Open your Dracula element - Copy & paste it as a new layer onto your canvas - then re-size it to 25%. Position to your liking. Sharpen & apply a drop shadow
Open your Bow 1 element - Copy & paste it as a new layer onto your canvas - then re-size it to 25%. Then position it to your liking. Sharpen & apply a drop shadow.
Open your Candy Bucket - Copy & Paste it as a new layer onto your canvas - then re-size it to 30%. Position it to your liking. Sharpen & apply a drop shadow.
Open your Pumpkin element - Copy & paste it as a new layer onto your canvas - then re-size it to 30%, then re-size it again to 50%. Position it to your liking. Sharpen & apply a drop shadow.
Open your Skull2 element - Copy & paste it as a new layer onto your canvas - then re-size it to 20%. Position to your liking.Sharpen & apply a drop shadow.
In your layers pallet - right click on your Skull 2 layer & click Duplicate. Position your duplicated Skull2 element to your liking.
Open your Star Trail - Copy & Paste it as a new layer onto your canvas - then position it to your liking.
Sharpen & apply a drop shadow.
Go to your layers pallet & duplicate this element 2 x's position each one to your liking.
In your Layers Pallet - click on your Raster 11 layer - go to Effects - 3D Effects - Inner Bevel
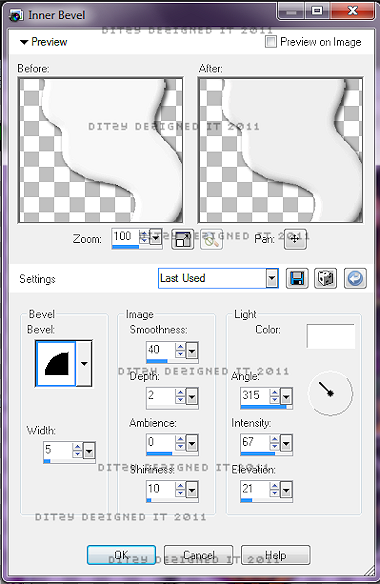
Then click Ok.
Now apply a drop shadow to this layer.
Open your Ghost element - Copy & paste it as a new layer onto your canvas - then re-size it to 25%. Position it to your liking. Sharpen & apply a drop shadow.
Open your String element - Copy & Paste it as a new layer onto your canvas - then re-size it to 70%. Position at the top of your template. Sharpen & apply a drop shadow
Go to your layers pallet - right click on your String layer - then click Duplicate. Now go to Image & click Flip then go back to Image & click Mirror.
Now position your duplicated String element to your liking.
Open your Cauldron element - Copy & paste it as a new layer onto your canvas - then re-size it to 30%. Position it to your liking. Then Sharpen & apply a drop shadow.
Open your Splat 2 element - Copy & paste it as a new layer onto your canvas - then re-size it to 50%. Position to the upper left of your template. Now sharpen & apply a drop shadow.
In your layers pallet - right click on your Splat 2 layer - then click Arrange - then Send To Bottom.
Open Splat 1 - Copy & paste it to your canvas as a new layer - then re-size it to 50%. position to your upper right corner on your template. Then Sharpen & apply a drop shadow.
Now right click on your Splat 1 layer - click Arrange - Send To Bottom. (if it isnt already there)
Now in your layers pallet - right click on your Splat 1 layer - then click Duplicate. Now go to Image & click Flip. Then back to Image & click Mirror. This element should now be in the lower left corner.
Now still in your layers pallet - right click on your Splat2 layer - click Duplicate - then go to Image - click Flip. Then Image again & click Mirror. This element should now be in the lower right corner.
Now open your Sparkles - Copy & paste as a new layer onto your canvas - then re-size it to 85%. Now position it to the bottom of your template. Then in your layers pallet - right click on your Sparkle layer - then click Duplicate. Go to Image & click Flip.
Add your name & copyright information.
The settings I used for the name are:
Font : Saginaw
Size : 50 Pixels (Depends on the length of your name)
Background Color : #000000 (Black)
Foreground Color : Set to nul
Apply & position your name - then go to your layers pallet - right click on your name layer - then click Convert To Raster Layer.
Then go to Effects - Plugins - Eye Candy 4000 - Gradient Glow
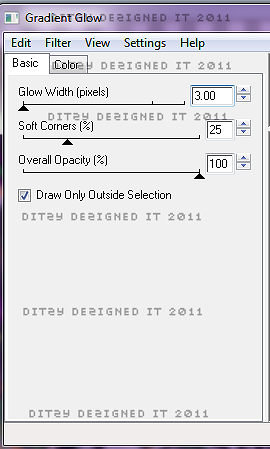
Click Ok.
Now apply a drop shadow to your name layer.
Once you are happy with all your elements & name - go to your layers pallet right click on any layer - click Merge - then click Merge Visible.
Then activate your Crop tool & crop off any access canvas that you did not use.
Then re-size your completed tag if you wish, this will depend on where you intend to use it and what their size limitations are.
Then once you re-size you will want to do one final sharpen.
Now all that is left is to save your tag as a PNG file & you have completed this tutorial!!♥
Saturday, October 15, 2011
♥FYI♥
I just wanted to let those that try my tutorials (the ladies I CT for) that I have been working on several this week, so I have about 5-7 tutorials that I need to post. So I will be trying to get those all posted for you tomorrow. Most are Halloween tuts, so be sure to check them out!!
Thanks for stopping by!!
((HUGS))
Ronney (a.k.a. DitzyDezigns)
Wednesday, October 12, 2011
♥Emo Witch PTU♥
**This tutorial was written by DitzyDezigns & posted on October 12th 2011**
***Any resemblance to any other tutorial is purely coincidental & completely unintentional!!**
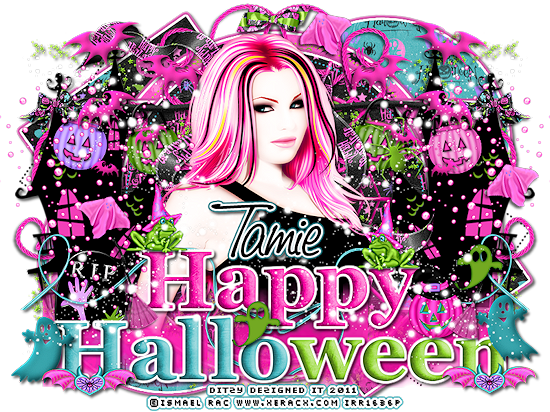
Here is what we will be making :
Supplies Needed :
Paint Shop Pro X2 (Any version should work)
Tube Of Choice - I used Ismael Racs awesome work, available for purchase @ Ismael Rac
Scrapkit - Emo Witch By Tamie @ Addictive Pleasures
Template - Halloween Template 7 By Kristen @ Toxic Desirez
Plugins Used :
Eye Candy 5 Impact - Gradient Glow (Optional)
Eye Candy 4000 - Gradient Glow (Optional)
Xero - Radiance (Optional)
Elements Used :
Paper 7
Paper 8
Paper 2
Paper 1
Paper 9
Text 2
Text
Web 2
Spider
Pumpkin
Lanterns
Bow2
House
Mist
Ghost2
Ghost
Headstone
Bats
Frog
Spider Heart
Sparkles
String 2
Bubbles
Ghost 3
Broom
Ribbon3
Bow3
Lets Begin :
Open Halloween Temp 7 -
Go to your layers pallet & delete the following layers :
Credit
Pixel Words
Background
Now go to Image & click Canvas Size , change it to 800 X 600
Now back in your layers pallet -click on your Circle Right layer - go to Selections - click Select All - Selections again & click Float - Selections again & click Defloat -
Now open Paper 7 - Copy & paste it as a new layer onto your canvas - then go to Selections & click Invert.
Then on your keyboard press your Delete key 1 time. Now go back to Selections & click Select None.
Then go to Effects - click Plugins - then click Eye Candy 5 Impact - Gradient Glow
(You are welcome to use my settings or set your to your liking)
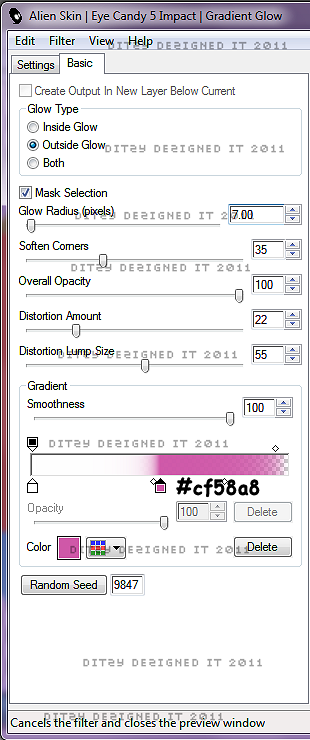
Click Ok.
Now go to Effects - click 3D Effects - then click Drop Shadow.
(Again you are welcome to use my settings or your own)
**See special note on screen shot below**

Click Ok.
Now go to your layers pallet - then delete your original Circle Right layer.
Now follow all of those same steps you followed for your Circle Right layer - for your Circle Left layer.
Then for the following layers as well :
Left Square - Use Paper 8 (or one of your choice)
Right Square - Use Paper 8 (or one of your choice)
Circle 1 - Use Paper 2 (or one of your choice)
Circle 2 - Use Paper 1 (or one of your choice)
Rectangle - Use Paper 9 (or one of your choice)
Now lets add some elements :
Open Text 2 - Copy & paste it as a new layer onto your canvas - then use your move tool to position it to the bottom of your template.
(See my tag for example if needed)
Now go to Effects - click Plugins - Eye Candy 4000 Gradient Glow -
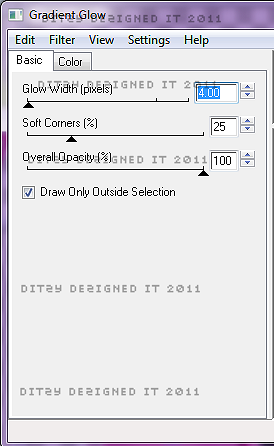
Click Ok.
Now go to Effects - 3D Effects - Drop Shadow - apply the same settings you used earlier.
Open Text element - Copy & paste it as a new layer onto your canvas - then position it under your Text 2 element.
Apply the same Eye Candy 4000 - Gradient Glow & then apply your Drop Shadow.
Open your Tube of choice - Copy & paste it as a new layer - then (if using the same tube) re-size it to 80%. (If you are not using the same tube, then re-size to your liking. Now position your tube center on your template.
Now in your layers pallet - move your tube layer down under BOTH of your Text element layers.
Now on your tube layer - go to Effects - Plugins - Xero - Radiance
(Apply the settings below or your own)
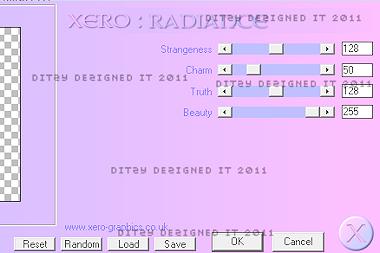
Click Ok.
Now apply a Drop Shadow. (Same settings you have been using will work just fine.)
Open Web 2 element - Copy & paste it as a new layer onto your canvas - then re-size it to 90%. Then position your Web 2 element within your Center Circle.
Then go to your layers pallet - & move your Web 2 layer down so it is under your tube layer.
Now go to Adjust - Sharpness - Sharpen
Then apply a drop shadow.
Open your Spider element - Copy & paste it as a new layer onto your canvas - then re-size it to 30%. Position it to your liking.
Go to Effects - 3D Effects - Inner Bevel
(You can use my settings below or your own)

Click Ok.
Now apply a drop shadow.
Open your Pumpkin element - Copy & paste it as a new layer onto your canvas - then re-size it to 30%. Now position it to your liking.
Sharpen & apply a drop shadow.
Open your Lanterns element - Copy & paste it as a new layer onto your canvas - then re-size it to 90%. Then position it across the top of your Paper9 layer.
Then Sharpen & apply a drop shadow.
Then go to your layers pallet & move your lantern layer down under your TUBE layer.
Now open your Bow 2 element - Copy & paste it as a new layer onto your canvas - then re-size it to 25%. Position it to the left end of your Lanterns elements.
Sharpen & apply a drop shadow.
Go to your layers pallet - right click on your Bow 2 layer - then click Duplicate. Now go to Image & click Mirror. Then use your move tool to position your duplicated Bow 2 element if needed.
Open your House element - Copy & paste it as a new layer onto your canvas - then re-size it to 70% - then re-size it again to 80%. Now use your move tool & position your House element to the left size of your template. Now go to Effects - 3D Effects - Inner Bevel. (Same settings as before.)
Now Sharpen & apply a drop shadow.
Then go to your layers pallet - right click on your House layer - then click Duplicate - then go to Image & click Mirror. Then use your move tool & adjust placement to your liking.
Open your Mist element - Copy & paste it as a new layer onto your canvas - then re-size it to 50%. Position it to your liking. Sharpen only.
Open your Ghost element - Copy & paste it as a new layer onto your canvas - then re-size it to 25%. Position it to your liking. Sharpen & apply a drop shadow.
Open your Head Stone element - Copy & paste it as a new layer onto your canvas - then re-size it to 30%. Position it to your liking. Sharpen & apply a drop shadow.
Open your Bats element - Copy & paste it as a new layer onto your canvas - then re-size it to 50%. Position it to your liking. Sharpen & apply a drop shadow.
Frog element - Copy & paste it as a new layer onto your canvas - then re-size it to 25%. Position to your liking. Sharpen & apply a drop shadow.
Spider heart element - Copy & paste it as a new layer onto your canvas - then re-size it to 30%. Position to your liking. Sharpen & apply a drop shadow.
Open your Sparkles 2 element - Copy & paste it as a new layer onto your canvas. Then position it to the left side of your template. Now go to your layers pallet - right click on your Sparkles 2 layer & click Duplicate. Now go to Image & click Mirror. Use your move tool to adjust the position if needed.
Open your String element - Copy & paste it as a new layer onto your canvas - then position it to the right side of your template. Sharpen & apply a drop shadow. Now move your string layer down so that it is below your house layer in your layers pallet. Now right click on your String layer & click Duplicate. Go to Image & click Mirror.
Open your Bubbles element - Copy & paste it as a new layer onto your canvas. Then position it to the left side of your template. Now go to your layers pallet - right click on your Bubbles layer then click Duplicate.
Now go to Image & click Mirror.
Open your Ghost 3 element - Copy & paste it as a new layer onto your canvas - then re-size it to 15%. Position it to your liking. Sharpen & apply drop shadow
Open your Broom element - Copy & paste it as a new layer onto your canvas - then re-size it to 25%. Position it to your liking. Sharpen & apply a drop shadow.
Open your Ribbon3 element - Copy & paste it as a new layer onto your canvas - then position it to the center of your template. Sharpen & apply a drop shadow.
In your layers pallet - move your Ribbon3 layer down below your tube layer.
Now open your Bow3 element - Copy & paste it as a new layer onto your canvas - then re-size it to 30%. Position to your liking . Sharpen & apply a drop shadow.
Open Sparkles - Copy & paste it as a new layer onto your canvas - then re-size to 50%. Position to your liking. Now sharpen only.
Then go to your layers pallet - right click on your Sparkles layer - then click Duplicate - then use your move tool to position your duplicate sparkles layer. Now right click on your duplicated Sparkle layer & click duplicate again. Now position this element to your liking.
Now add your name & copyright information.
For the name I used :
Font : Saginaw
Size : 80 Pixels
Background Color : #000000 (Black)
Foreground Color : Set to nul
Now apply your name - then go to your layers pallet - right click on your name layer then click Convert To Raster Layer.
Now go to Effects - click Plugins - Eye Candy 5 Impact - Gradient Glow
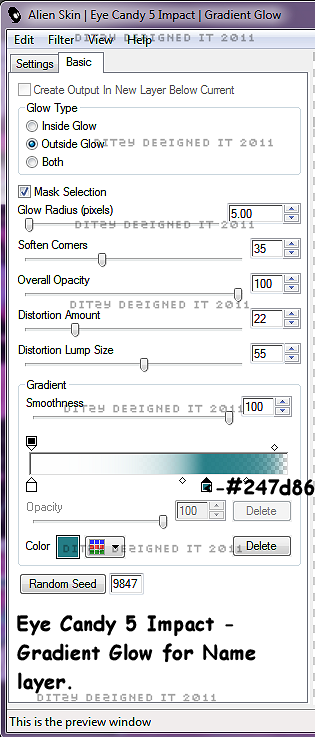
Click Ok.
Now apply a drop shadow to your name.
**Do not forget to add your copyright information**
Now once you are happy with all of your elements, name & copyright - go to your layers pallet - right click on any layer - then right click on any layer. Then click Merge - then click Merge Visible.
Now if needed crop off any access canvas that you did not use.
Now if needed re-size your completed tag . Then apply one more sharpen.
Now save your tag as a PNG file & you have completed this tutorial!!♥
Subscribe to:
Posts (Atom)
About Me
- DitzyDezigns
- New York, United States
- Hiya Everyone! My name is Ronney, I have 3 wonderful teenagers, and have been married to my husband for 20 years. I LOVE to design signatures, tags & avatars, I design with PSP, and have been designing for over 2 1/2 years. I will be not only designing signatures, tags & avatars but will also be writing & posting tutorials as well. I will also be making some templates to share with you all as well. So I hope you enjoy and can use everything I have available on my blog :-) If you ever try any of my tutorials,please send me your completed designs and I would love to showcase it here on my blog!
♥I CT For♥





Blog Hop

Today's Date

Favorite Stores

♥Forums♥


My Pixels




♥My Avatars♥