Don't Be A Pirate
My Blinkies

Add Me On Facebook

Protected


Blogs I Stalk










Awards :-)


Find Me At
Favorite Stamps







Tuesday, June 21, 2011
♥Beautiful Graduate PTU♥
 1:55 PM |
  Created By
DitzyDezigns |
Created By
DitzyDezigns |


**This tutorial was written & posted by DitzyDezigns on June 21st 2011**
***Any resemblance to any other tutorial is purely coincidental & completely unintentional!!***
Here is what we will be making :

Supplies Needed :
Paint Shop Pro X2 (Any version should work)
Animation Shop
Scrapkit - Kayla by Tamie @ Addictive Pleasures
Photo Of Choice. (The photo I used is my personal photo)
Plugins Used :
Xero - Radiance (Optional)
Eye Candy 4 Gradient Glow (Optional)
Elements Used :
Ribbon
Flower
Butterfly 3
Frame 3
Lets Begin :
Start by opening a 800 X 650 white canvas. I used a white canvas again because of my animation shop likes to put a ugly glow around my signature, so to avoid that I used white as my canvas.) Don't worry we will crop it later.
Now open your Frame 3 element - Copy & paste it as a new layer onto your canvas ,then re-size it to 45%. Use your move tool & position your frame to the left side of your canvas, leave enough room so that it is not touching the edge of your canvas, but you also want to leave enough room for the length of your name because you don't want it to touch the right end of your canvas.
Now activate your magic wand tool - click inside your frame 3 element - then go to Selections - click Modify then click Expand, set to 5 & click Ok.
Now make a new Raster Layer.
Open your picture of choice - Copy & paste it INTO SELECTION.
Now go to Selections & click Select None.
Go to Effects - Click Xero - Radiance -
Set your settings to your liking, the settings below are my own preference, you may use them if you would like:
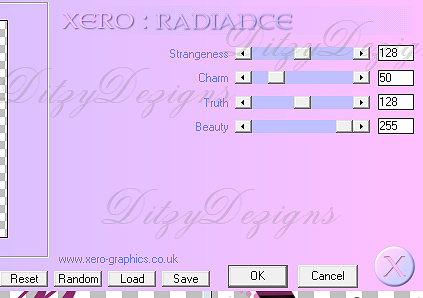
Click Ok.
Go to your layers pallet & click on your frame layer -
Go to Adjust, click Sharpness then click Sharpen.
Now go to Effects - Click 3D Effects - then click Drop Shadow. Again the settings below are my own personal preference, you are welcome to use them if you would like :
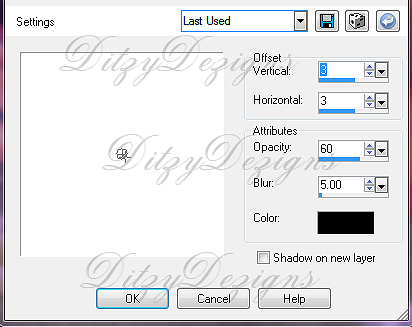
Click Ok.
Now activate your Text Tool, set your Font, Size & Color -
I used :
Font : Cynthia Script ES
Size : 200 Pixels
Background Color : #8f2b70
Foreground Color : Nil
Now click on your canvas to open your text box, then type out the name you would like on your signature.
Then click Apply.
Position your name to your liking on your canvas.
Go to your layers pallet, right click on your name layer, then click Convert To Raster Layer.
Then go to Effects - Plugins - Eye Candy 4 Gradient Glow (again you can use your own settings or mine below)
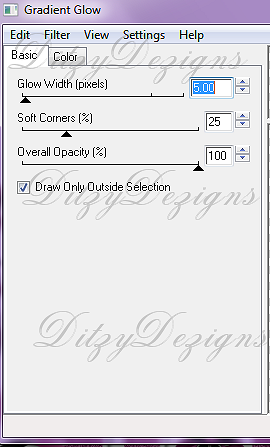

Click Ok.
Now go to Effects - click 3D Effects - Drop Shadow - use the same settings you used on your frame element.
(We will come back to our name later)
In your layers pallet, click on the white background layer -
Open your Floral element - Copy & paste it as a new layer onto your canvas, then re-size it to 85%.
Position it to the right end of your name.
Now sharpen & apply a drop shadow.
Go to your layers pallet - Right click on your Floral layer - then click Duplicate.
Now go to Image & click Mirror.
Use your move tool to adjust the position of your duplicated Floral element if needed.
Now in your layers pallet, click on your top layer -
Open your Butterfly 3 element - Copy & Paste it as a new layer onto your canvas ,then re-size it to 30%.
Position your Butterfly 3 element to your liking.
Sharpen & apply a drop shadow.
Go to your layers pallet & right click on your Butterfly 3 layer, then click Duplicate. Position your duplicated Butterfly 3 element to your liking.
Now duplicate this layer again until you have the desired amount of Butterflies you want on your Signature.
(I used a total of 5)
Open your Ribbon element - Copy & paste it as a new layer onto your canvas, then re-size it to 75%.
Position your Ribbon element so that the bow of your Ribbon is on the outside edge of your Frame.
Sharpen & apply a drop shadow.
Now in your layers pallet, move your Ribbon layer down so it is directly under your name layer.
Now activate your Text Tool - set your font, size & color you would like to use for the phrase, saying or quote you would like to add.
Now add your copyright & or credit information.
Open your Animation Shop -
Go back to your PSP -
In your layers pallet click on your name layer -
Activate your magic wand, then click inside each letter of the name on your canvas. (Depending on what font you use, you may only have to click the first & second letter , if you are using a script font & the letters are connected, it will automatically select all the letters that are connected to the one you click on.) You want all of the letters in your name to have the "marching ants" around them.
Now go to Adjust - click Add/Remove Noise - then click Add Noise -
Set your settings to :
Uniform
30
Monochrome box is checked.
Click Ok.
Then go to Selections, click Select None.
Go to Edit - click Copy Special - then click Copy Merged.
Go to your Animation Shop -
Right click on your grey work area, then click Paste As New Animation.
Go back to your PSP -
Click your undo button 2 times.
Now you should see your name surrounded in the marching ants again and the noise you previously added is gone.
Now go to Adjust, click Add/Remove Noise - then click Add Noise
this time change the setting to 35 & click Ok.
Go to Selections - click Select None.
Go to Edit - click Copy Special - then click Copy Merged.
Go to Animation Shop -
Right click on your first frame you just put there - then click Paste - then click After Current Frame.
Go back to your PSP -
Click your undo button 2 times -
Now you should see your letters selected again & the noise you added previously is gone.
Now go to Adjust, click Add/Remove Noise - then click Add Noise
This time change your setting to 40 & click Ok.
Go to Selections & click Select None.
Now go to Edit - click Copy Special - then click Copy Merged .
Go to your Animation Shop -
Right click in your 2nd frame you just put there, then click Paste - then click After Current Frame.
Now view your animation to see if you are happy with it. (To view your animation go to the top of your Animation Shop on the right end of your tool bar, click the icon that looks like a film strip. It is the 2nd icon in from the right end.)
Once you are happy with your animation, you may want to re-size your signature.
In Animation Shop to re-size a design, press your Shift & s key to open your re-size menu.
The settings below are my own preference that I use to post a signature on my blog for a tutorial, you can adjust the number to suit where you will be using your signature.
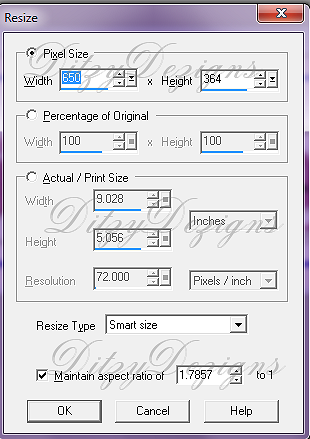
Then click Ok.
Now all that is left is to save your signature as a GIF file, (as it is now animated) & you have completed this tutorial!!♥
 Labels:

♥A Loving Mother PTU♥
**This tutorial was written & posted by DitzyDezigns on June 20th 2011**
***Any resemblance to any other tutorial is purely coincidental & completely unintentional!***

Supplies Needed :
Paint Shop Pro X2 (Any version should work)
Animation Shop
Animation Shop
Scrapkit - Kayla by Tamie @ Addictive Pleasures
Plugins Used :
Eye Candy 4 Gradient Glow
Eye Candy 5 Impact - Glass
Sparkle Tube (Optional)
Elements Used :
Flower
Flowers2
Sunflower
Ribbon
Lets Begin :
Start by opening a new 800 X 650 white canvas. I used a white canvas because sometimes my Animation Shop gives me problems and puts an ugly glow around my signature. So to avoid that I used a white canvas. (Don't worry we will crop it later.)
Activate your text tool, set your font, size & color.
I used :
Font : Cheri
Size : 200 Pixels (Adjust this size depending on the length of your name)
Background Color : #b45094
Set Stroke color to Nul.
Click on your canvas & your text box will open. Now type out your name & click Apply.
Now leave your name as it is and we will come back to it.
In your layers pallet, click on your last layer in your pallet,
Open your Flowers2 element - Copy & paste it as a new layer onto your canvas, then re-size it to 75%.
Go to Image & click Free Rotate, set to Left 30.00 & click Ok.
Using your move tool position your Flowers2 element to the left of your name.
Go to Adjust, click Sharpness then click Sharpen.
Apply a drop shadow. (Go to Effects, click 3D Effects, then click Drop Shadow.)
You can use my settings below or your own :

Click Ok.
Go to your layers pallet, right click on your Flowers 2 layer & click Duplicate. Now go to Image & click Mirror. Adjust the position of your duplicated Flowers 2 element if needed.
In your layers pallet, click on your name layer -
Open your Ribbon element - Copy & Paste it as a new layer onto your canvas, then re-size it to 75%.Position it to the left side of your name.
Position the end with the bow so that it is on the outside edge of your first letter.
Sharpen & apply a drop shadow.(Same settings as before)
Go to your layers pallet, right click on your Ribbon layer, then click Duplicate. Go to Image & click Mirror. Adjust if needed.
Go to your layers pallet & right click on your duplicated Ribbon layer. Then click Merge, then click Merge Down.
Now right click on your Merged Ribbon layer, & click duplicate.
Now right click on your duplicated merged ribbon layer & click Duplicate.
Now you will want to rename your ribbon layers, starting from the bottom merged ribbon layer. R1, R2 then R3.
Now in your layers pallet, click the eye next to layers R2 & R3, this will hide those layers until we need them.
Make sure you are on Merged Ribbon layer R1, go to Adjust, click Add/Remove Noise ,then click Add Noise.
Set to Uniform, 20 & make sure the Monochrome box is checked, then click Ok.
Now in your layers pallet, click on the eye next to your R2 layer to unhide it,& click on that layer as well.
Now go to Adjust, click Add/Remove Noise, then click Add Noise, this time only change your settings to 25 & click Ok.
Now click on your R3 layer & also click on the eye on your R3 layer to unhide it.
Go to Adjust, click Add/Remove Noise, then click Add Noise, set your setting to 30 & click ok.
Now in your layers pallet, click the eyes next to your R2 & R3 layer & make sure your eye next to your R1 layer is open.
Now in your layers pallet, click on your very top layer in your layers pallet -
Open your Sunflower element - Copy & paste it as a new layer onto your canvas, then re-size it to 40%. Position your Sunflower element to the left end of your name.
Sharpen & apply a drop shadow.
Go to your layers pallet, right click on your Sunflower layer & click Duplicate. Now go to Image & click Mirror. Use your move tool to adjust the position of your duplicated layer if needed.
Open your Flower element - Copy & paste it as a new layer onto your canvas, then re-size it to 40%. Position your flower element on your Ribbons where they come together.
Sharpen & apply a drop shadow.
(If you will be making this signature for others at a later time, you may want to save it now as a PSPIMAGE, that way it will be saved in the layers , and you will be able to change or retype anything.)
In your layers pallet, right click on your name layer & click Convert To Raster Layer.
Now go to Effects - Plugins - Eye Candy 4 Gradient Glow
You can use your own settings or mine below :
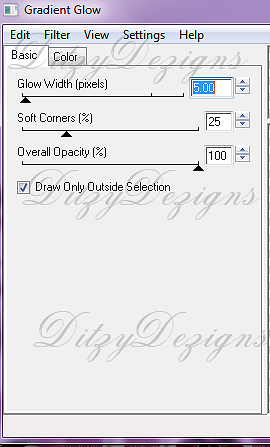
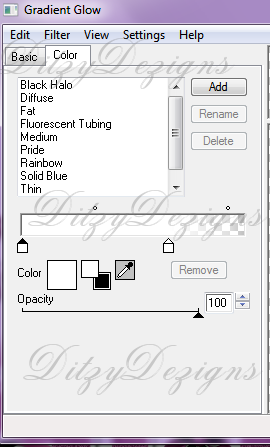
Click Ok.
Go to Effects - 3D Effects - Drop Shadow & apply the same settings you have been using.
Click Ok.
Now activate your Magic Wand tool - then click inside each letter in the name on your canvas.
Once all letters are selected, go to Effects - Plugins - Eye Candy 5 Impact - Glass.
You can use your own settings or mine below :
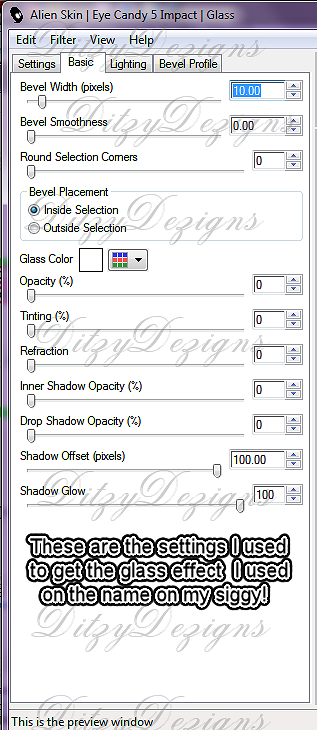
Click Ok.
Now go to Adjust, click Add/Remove Noise, then click Add Noise, set your Settings to Uniform, 30 & Monochrome box is checked.
Click Ok.
Now go to Selections & click Select None.
Make a new raster layer, & use a sparkle tube of your choice.
Now make a new raster layer -
Add any phrase or saying that you would like.
I used "Loving Mother"
Font : Carpenter Script ES
Size : 45 Pixels
Background Color : #000000 (Black)
Foreground Color : set to nil
Apply a drop shadow to your saying.
Add your copyright & credit information.
Activate your crop tool, then crop off the unused canvas around your signature.
Open your Animation Shop -
Go back to PSP -
In your layers pallet , click on your R1 layer (make sure that your R2 & R3 layers are both hidden)
Go to Edit, click Copy Special, then click Copy Merged.
Go to Animation Shop, right click in the grey area, then click Paste As New Animation.
Go back to your PSP -
Click the eye next to your R1 layer to hide it, then click on your R2 layer & click on the eye next to it to open it up.
Now go to Edit, click Copy Special, then click Copy Merged.
Go to Animation Shop, right click in the frame 1 you just put there, then click Paste, then click After Current Frame.
Go back to PSP, hide your R2 layer, then click on & unhide your R3 layer, go to Edit, click Copy Special, then click Copy Merged.
Go to your Animation Shop, right click in your Frame 2 you just put there, then click Paste, then click After Current Frame.
Now you will want to view your animation to make sure it is the way you want it. To do that click the film strip at the top right of your Animation Shop tool bar.
If you are happy with your animation, you may want to re-size your signature, to re-size in animation shop, on your keyboard press your Shift & s key to open your re-size menu.
Set your settings to your liking. (My screen shot below is just an example of what yours will look like, you can re-size it to whatever size you need for where you are going to use it)
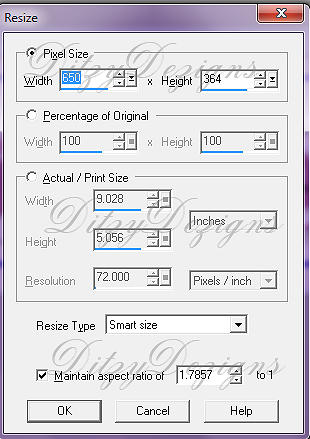
Click Ok.
Now all that is left is for you to save your signature as a GIF file & you have completed this tutorial!♥
Monday, June 20, 2011
♥Tequila PTU♥
**This tutorial was written & posted by DitzyDezigns on June 20th 2011**
***Any resemblance to any other tutorial is purely coincidental & completely unintentional!!***
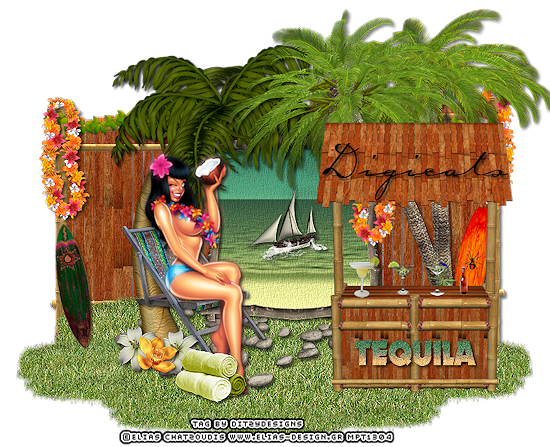
Supplies Needed :
Paint Shop Pro X2 (Any version should work)
Tube of choice - I used the amazing work of Elias Chatzoudis. I purchased my tube when he was at MPT, but you can now purchase his work at PTE.
Scrapkit - Tequila By Digicats @ Butterfly Blush Designs
Elements Used :
Lei
Cervesa
TikiBar
Tequila
Flowers 03 & 04
Pebbles
Sail Boat
Towels
Surf Boards
Palm Tree 01 & 02
Panel
Frame 03
Leaves
Deck Chair
Drink 01 & 02
Margarita
Paper 6
Lets Being :
Start by opening a new 800 X 650 transparent canvas. (Don't worry we will crop it later.)
Open your Panel element - Copy & paste it as a new layer onto your canvas ,then re-size it to 50%. Position in the center of your canvas.
Go to Adjust, click Sharpness then click Sharpen.
Go to Effects, click 3D Effects, then click Drop Shadow. Set your settings to your liking & click ok.
Open Frame 5 - Copy & paste it as a new layer onto your canvas ,then re-size it to 65%. Position your Frame center on your Panel element.
Activate your magic wand, then click inside your frame.
Go to Selections, click Modify, then click Expand, set the number of pixels to 6 & click Ok.
Open your Paper 06 - copy & paste it as a new layer onto your canvas ,then re-size it to 65%.
Now position your paper so that the sand, water & sky are where you like it within your frame.
Go back to Selections & click Invert, then on your keyboard press your delete key 1 time.
Go back to Selections & click Select None.
Now in your layers pallet, move your Paper 06 layer below your frame 5 layer.
Now click on your Frame 5 layer & Sharpen, then apply a drop shadow.
Open your Leaves element - Copy & paste it as a new layer onto your canvas ,then re-size it to 30%.
Position your leaves element along the top left of your Panel element . Go to your layers pallet & right click on your Leaves layer, then click Duplicate. Now use your move tool & position your duplicated Leaves element to the right side of your Panel.
Now sharpen & apply a drop shadow to both of your Leaves elements.
Go to your layers pallet & make a new Raster Layer.
Click on your tube tool, find your grass tube that should of came with your PSP. Now left click on your canvas & place your grass where you would like it. You can play around with the size & the location until you are happy with it.
Open your Palm Tree 02 element - Copy & paste it as a new layer onto your canvas ,then re-size it to 65%. Position it to the right end of your frame. Make sure that in your layers pallet that your Palm Tree 02 layer is below your frame & paper layer.
Now right click on your Palm Tree 02 layer & click Duplicate. Now in your layers pallet, move your duplicated Palm Tree 02 layer above your frame & paper layers.
On your duplicated Palm Tree layer, go to Adjust, click Sharpness then click Sharpen.
Then go to your bottom Palm Tree 02 layer & apply a drop shadow.
Open your Deck Chair element - Copy & paste it as a new layer onto your canvas ,then re-size it to 40%. Position it to the left side of your frame.
Sharpen & apply a drop shadow.
Open the tube of your choice, copy & paste it as a new layer. (I chose a tube that looked to be in the sitting pose, to make it easier to place in the chair.) If needed re-size your tube.
Now position your tube so that she appears to be sitting in the chair.
Go to your layers pallet, right click on your Tube layer & click Duplicate. On the duplicated tube layer go to Adjust, click Blur, then click Gaussian Blur, set it to 5.00 & click Ok.
Now click on your original tube layer & apply a drop shadow.
Open your Palm Tree 01 element - Copy & paste it as a new layer onto your canvas ,then re-size it to 70%. Position it to the right side of your frame.
Sharpen & apply a drop shadow.
Open your Surf Board element - before you copy & paste it, activate your crop tool & crop off all the boards except for the first one. Now copy & paste that one surfboard as a new layer onto your canvas ,then re-size to a size of your liking,position, then sharpen & apply a drop shadow.
Now go back to your Surfboard element canvas, and click your undo button 1 time. Now all 4 surfboards should be visible. Now crop off all the surfboards except for the 2nd board. (or one of your choosing).
Copy & paste it as a new layer onto your canvas, re-size to your liking, and position as desired.
Open your Towels element - Copy & paste it as a new layer onto your canvas, then re-size it to 30%. Position your Towels element to the side of your deck chair element.
Sharpen & apply a drop shadow.
Open your Sailboat element - Copy & paste it as a new layer onto your canvas, then re-size it to 20%. Now position your Sailboat inside your frame, so that it appears to be on the water.
Sharpen & apply a slight drop shadow.
Open your Pebbles element - Copy & paste it as a new layer onto your canvas ,then re-size it to 80%. Position the Pebble element to your liking.
Sharpen & apply a slight drop shadow.
Open your Flower 04 element - Copy & paste it as a new layer onto your canvas, then re-size it to 15%. Position it to your liking.
Sharpen & apply a drop shadow.
Go to your layers pallet, right click on your Flower 04 layer & click Duplicate. Position to your liking.
Open your Flower 03 element - Copy & paste it as a new layer onto your canvas, then re-size it to 15%. Now position it in the middle of your two Flower 04 elements.
Sharpen & apply a drop shadow.
Open your Tiki Bar element - Copy & paste it as a new layer onto your canvas, then re-size it to 50%. Position it to the right side of your frame.
Sharpen & apply a drop shadow.
Open your Tequila element - Copy & paste it as a new layer onto your canvas ,then re-size it to 30%. Position it where you would like it.
Sharpen & apply a drop shadow.
Open your Cervesa element - Copy & paste it as a new layer onto your canvas, then re-size it to 10%. Position it on your Tiki Bar element .
Sharpen & apply a slight drop shadow.
Open your Drink 01 element - Copy & paste it as a new layer onto your canvas, then re-size it to 10%. Position it on your Tiki bar.
Sharpen & apply a slight drop shadow.
Open your Drink 02 element - follow the same steps you did for your Drink 01 element.
Open your Margarita element - follow the same steps as you did for your Drink 01 & Drink 02 elements.
Open your Lei element - Copy & paste it as a new layer onto your canvas, then re-size it to 30%.
Go to Image, then click Free Rotate, set to Left 90.00 & click Ok.
Position to the left end of your Panel element.
Go to your layers pallet, right click on your Lei layer, click Duplicate.
Now in your layers pallet, move your Duplicated Lei layer below your Panel layer.
Activate your eraser tool, erase part of the Lei element so that it appears to be hanging on your Panels post.
Now add your name.
Font I used is called :
Carpenter Script ES
Size : 80 Pixels
Color : #000000 (Black)
Add your copyright & credit information.
Once you are happy with the placement of your elements & text, go to your layers pallet & right click on any layer, then click Merge ,then click Merge Visible.
Now crop your tag.
Once your tag is cropped you may want to re-size it. Once your tag is re-sized you can sharpen it one more time.
Now all that is left is to save your tag as PNG file & you have completed this tutorial!♥
♥Dark Secrets PTU♥
**This tutorial was written by DitzyDezigns & posted on June 20th 2011**
***Any resemblance to any other tutorial is purely coincidental & completely unintentional!!***

Supplies Needed :
Paint Shop Pro X2 (Any version should work)
Scrapkit - Dark Secrets by Missy (SWA) @ PMTWS
Plugins Used :
Eye Candy 5 Impact - Gradient Glow
Eye Candy 5 Impact - Glass
Font Used :
Cheri
Size : 200 Pixels
Color : #e70675 (or color of your choice)
Elements Used :
(These elements are not listed in any specific order)
Broken Heart
Fuzzy Heart2
Dangling Heart 1
Bead Stuff 1
Bottle 1
Bow 2
Barbed Wire
Word Tape 1
Word Tape 2
BF2
BF1
Curly Ribbon 1
CK5_4
Hearts 1
Lets Begin :
Start by opening a new 800 X 650 transparent canvas. (Don't worry we will crop it at the end)
Activate your text tool, set your font, size & color. Again the ones I used were
Cheri
Size : 200 Pixels
Color : #e70675
Now click on your canvas to open your text box, type out your name & click Apply.
Now in your layers pallet, right click on your name layer & then click Convert To Raster Layer.
Now go to Effects - click Plugins - then click Eye Candy 5 Impact - then Gradient Glow.
You can use your own settings, or mine, the choice is always yours, mine are just an example :
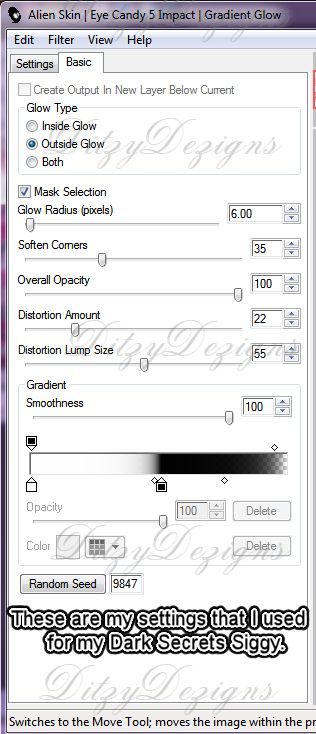
Then click Ok.
Now go to Effects, click 3D Effects, then click Drop Shadow.
These are the settings that I used : (remember these are just my personal preference, you can change anything you would like :
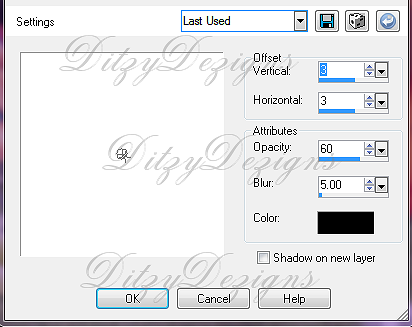
Click Ok.
Now activate your Magic Wand tool, then click inside each letter in your name.
(Depending on the font you use you may not have to click in each letter, if you use a script font, or one where the letters are connected together, you may only have to click the first letter, it depends on the font. But you want all the letters to have the little marching ants around them :-)
Once all your letters are selected, go to Effects, click Plugins, then click Eye Candy 5 Impact, then click Glass.
Again these are my personal settings, you can use them if you wish, or you can play around with the settings until you get the effect that you want :
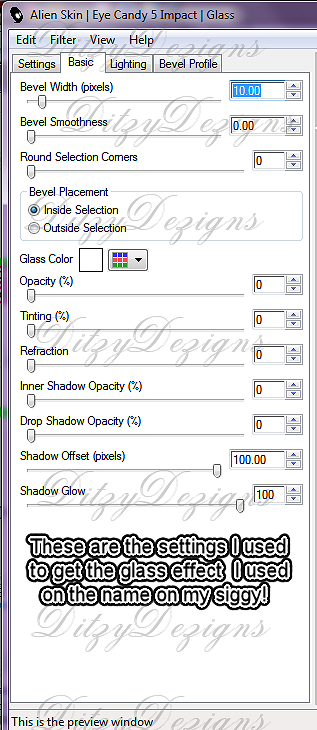
Click Ok.
Now keeping your letters selected, go to Adjust, click Add/Remove Noise, then click Add Noise. When that menu opens, set your settings to your liking.
I used the following :
Uniform
40
Monochrome checked.
Click Ok.
Now go to Selections & click Select None.
Then in your layers pallet, click on the very last bottom layer,
Now open your Hearts 1 element - Copy & paste it as a new layer onto your canvas ,then re-size it to 40%. (To re-size an element, go to Image, & click on Re-size. Then the following window will open)
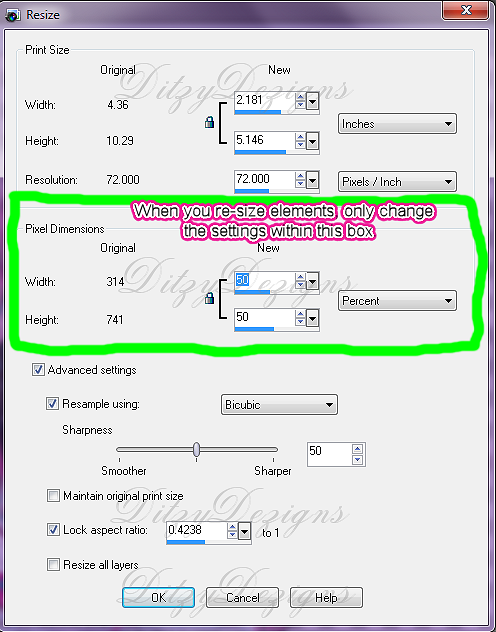
Then click Ok.
Now using your move tool, position your element to the left side of your canvas, go back to your layers pallet
& right click on your Hearts 1 layer, then click Duplicate. Position your duplicated element in the middle of your canvas.
Now go back to your layers pallet & right click on your duplicated Heart 1 element & click Duplicate , now position that element to the right on your canvas.
Now go back to your layers pallet & click on your Name layer.
Now open your CK5_4 element - Copy & paste it as a new layer, then re-size it to 40% (Remember the re-size directions above)
Then position your element to the left end of your name, you want it close to the beginning letter.
Go back to your layers pallet & right click on your CK5_4 layer, then click Duplicate.
Now go to Adjust, click Blur, then click Gaussian Blur, set to 5.00 & click Ok.
Now at the top of your layers pallet, change your Blend Mode to Overlay.
In your layers pallet, click on your original CK5_4 layer & apply a drop shadow. (Same as you used before.)
Now in your layers pallet, click on your top Hearts 1 layer-
Now open your Curly Ribbon 1 element - Copy & paste it as a new layer onto your canvas, then re-size it to 50%. Position it to the right of your name, then go to your layers pallet & right click on your Curly Ribbon 1 layer & click Duplicate. Then go to Image & click Mirror. Adjust the position of the duplicated Curly Ribbon if needed.
Apply a drop shadow to both Curly Ribbon elements.
Open your Bead Stuff 1 element - Copy & paste it as a new layer onto your canvas ,then re-size it to 50%. Position it to the left side of your canvas.
Go to Adjust, click Sharpness then click Sharpen.
Apply a drop shadow. (Same as you have used with your other elements.)
Go to your layers pallet, right click on your Bead Stuff 1 layer & click Duplicate, go to Image & click Mirror. Adjust the position of the duplicated Bead Stuff 1 element if needed.
Go to your layers pallet & click on your the top layer -
Open your BF1 element - Copy & paste it as a new layer onto your canvas ,then re-size it to 10%.
Now go to Image, click Free Rotate, set to Right 30.00 & click Ok.
Now position your BF1 to your liking.
Sharpen & apply a drop shadow.
Go to your layers pallet & duplicate your BF1 layer, then go to Image & click Mirror.
Position again to your liking.
You can duplicate your BF1 layer as many times as you would like to get the look that you want. :-)
Open your BF2 element, and follow the same steps as you did for the BF1 element, only when you rotate it set it to Left 30.00 & click Ok.
Open your Tape 2 element - Copy & paste it as a new layer onto your canvas, then re-size it to 20%. Position it at the bottom of your name to the left.
Sharpen & apply a drop shadow.
Go to your layers pallet, right click on your Tape 2 layer & click Duplicate, then use your move tool to position your duplicated element to the right end of your name.
Open your Tape 1 element - Copy & paste it as a new layer onto your canvas ,then re-size it to 20%. Position this element in the center of your two Tape 1 elements.
Sharpen & apply a drop shadow.
Open your Bow 2 element - Copy & paste it as a new layer onto your canvas, then re-size it to 10%. Position it to the left corner of your Tape 2 element.
Go to Image, click Free Rotate set to Left 30.00 & click Ok.
Go to your layers pallet & right click on your Bow 2 layer, then click Duplicate.
Go to Image & click Mirror. Adjust the position if needed.
Open your Bottle 1 element - Copy & paste it as a new layer onto your canvas, then re-size it to 15%. Position your bottle element to the right end of your name.
Sharpen & apply a drop shadow.
Open your Barbed Wire element - Copy & paste it as a new layer onto your canvas ,then re-size it to 50%.
Position your barbed wire element to the bottom left of your name.
Sharpen & apply a drop shadow.
Now go to your layers pallet & right click on your Barbed Wire layer, then click Duplicate.
Now use your move tool to position the duplicated barbed wire elements to the right side of your name.
Open your Dangling Heart 1 element - Copy & paste it as a new layer onto your canvas ,then re-size it to 20%. Now position it to the top right of your Beads Stuff 1 element.
Sharpen & apply a drop shadow.
Go to your layers pallet & right click on your Bow2 layer, then click Duplicate. Position your duplicated Bow2 element to the top of the ring on your Dangling Heart 1 element.
Open your Fuzzy Heart 2 element - Copy & paste it as a new layer onto your canvas ,then re-size it to 10%. Then re-size it again to 80%.
Position to your liking.
Sharpen & apply a drop shadow.
Now duplicate this element a few times & place around your siggy to your liking.
Open your Broken Heart 1 element - Copy & Paste it as a new layer onto your canvas ,then re-size it to 10%. Then re-size it again to 80%.
Go to Image, click Free Rotate, set to Left 20.00 & click Ok.
Position to your liking.
Sharpen & apply a drop shadow.
Duplicate this element a couple of times & position them to your liking.
Now if you have one, activate your Sparkle tube, make a new raster layer, then left click on your canvas where you would like to place your sparkles.
Now you will want to add any copyright & or credit information.
Then if you are happy with the placement of all your elements & text, go to your layers pallet, right click on any layer & click Merge, then from the slide out menu click Merge Visible.
Now activate your crop tool & crop off any access canvas that we did not use.
Then once you have cropped your canvas ,you may want to re-size your siggy. Remember that when re-sizing the completed merged siggy that you make sure you are set to Pixels, and that re-size all layers box is checked.
After you re-size , go to Adjust, click Sharpness, then click Sharpen, to give your siggy one last finishing touch. :-)
All that is left now is to save your siggy in PNG format & you have completed this tutorial !! ♥
Sunday, June 19, 2011
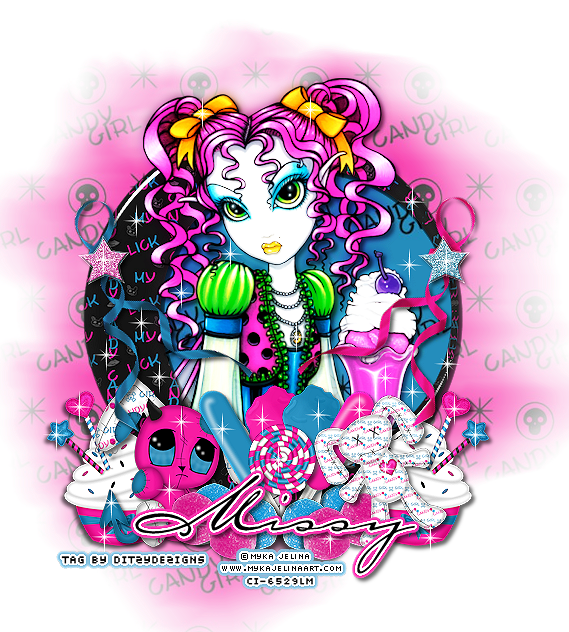
♥CandyGirl PTU♥
**This tutorial was written & posted on June 19th 2011**
***Any resemblance to any other tutorial is purely coincidental & completely unintentional!!***
Here is what we will be making :
Supplies Needed :
Paint Shop Pro X2 (Any version should work)
Tube of choice : I used the amazing work of Myka Jelina, I purchased her work when she was at CILM, she is now selling her work independently HERE
Scrapkit : CandyGirl By Missy @ PMTWS
Mask Of Choice
Plugins Used :
Eye Candy 5 Impact - Glass (Optional)
Eye Candy 4 Gradient Glow (Optional)
Elements Used :
59,58,60,57,24,10,11,8,3,32,7,36,35,4,21
Papers 4 & 5
Lets Begin :
Start by opening a new 800 X 650 transparent canvas.
Open Element 32 - Copy & paste it as a new layer onto your canvas ,re-size it to 50%. (To re-size your element, go to Image, click Re-size, then the screen below will open. Change your settings accordingly.)
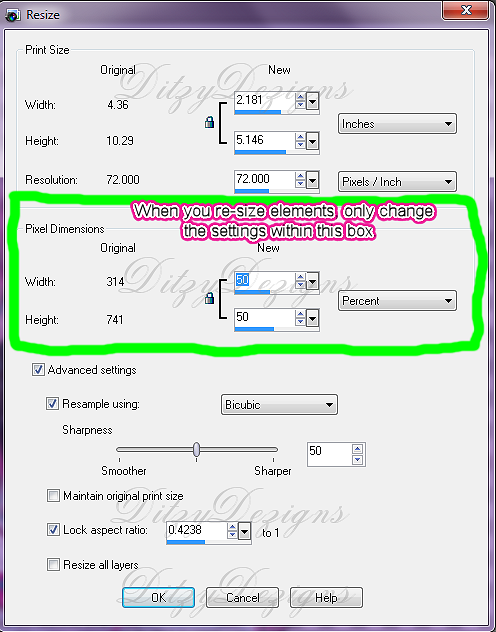
Click Ok
Now using your move tool, center your frame (element 32) on your canvas.
Now activate your magic wand tool - Click inside your frame. (element 32)
Go to Selections - Click Modify, then click Expand - Set to 12 & click Ok.
Open Paper_5 - Copy & paste it as a new layer onto your canvas, then re-size it to 80%. Now go to Selections & click Invert. Then on your keyboard press your delete key 1 time.
Go to Selections & click Select None.
In your layers pallet, move your Paper_5 layer below your Element 32 layer.
Now click on your Element 32 layer & go to Effects - Click Plugins - then click Eye Candy 5 Impact - Glass
You can use my settings below or your own :
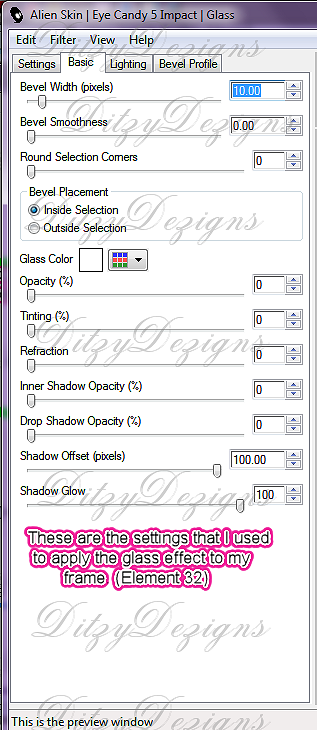
Click Ok.
Now go to Adjust, click Sharpness then click Sharpen.
Go to Effects - 3D Effects - Drop Shadow - (You can use your own settings or mine below)
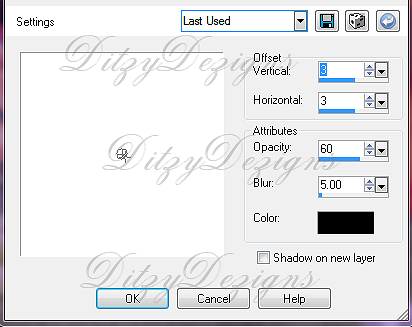
Click Ok.
Open your tube of choice - Copy & paste it as a new layer onto your canvas, then re-size if needed. (I did not need to re-size my tube)
Center your tube with your frame. You will have parts of your tube that overlap your frame as well. That is ok as we are going to fix it.
Now once your tube is centered with your frame, go to your layers pallet & right click on your tube layer, then move your duplicated tube layer below your frame layer but keeping it above the paper layer.
Now in your layers pallet, click on the top tube layer. (the original one)
Activate your Eraser Tool - begin erasing the parts of your tube that overlap your frame only at the bottom.
Once you have erased the parts from the top layer, you must click on the bottom tube layer (the one under your frame layer) & erase the same parts as you did for the top tube layer.
Once you are happy with your tube, go to your Original tube layer. (The one on the top of your layers pallet) right click, then click Duplicate. Now go to Adjust, click Blur, then Gaussian Blur, set to 5.00 & click Ok.
Now change your Blend Mode to Overlay.
Then on your 3rd tube layer down, apply the same drop shadow that you did for your frame.
Open Element 3 - Copy & paste it as a new layer, then re-size it to 20%. Now position your Element 3 to the left side of your frame.
Sharpen & apply a drop shadow.
Open Element 21 - Copy & Paste it as a new layer onto your canvas ,then re-size it to 25%. Position this element to the left of your Element 3 (cupcake)
Sharpen & apply a drop shadow.
Open Element 35 - Copy & paste it as a new layer onto your canvas ,then re-size it to 20% & position it to your liking.
Sharpen & apply a drop shadow.
Open Element 36 - Copy & paste it as a new layer onto your canvas ,then re-size it to 20%. Position it nexgt to Element 35.
Sharpen & apply a drop shadow.
In your layers pallet, right click on your Element 36 layer, then click Merge, then click Merge Down.
Now right click on your merged layer & click Duplicate. Go to Image & click Mirror.
Adjust the position if needed.
Open Element 40 - Copy & paste it as a new layer onto your canvas ,then re-size it to 20%.
Position as desired .
Sharpen & apply a drop shadow.
Open Element 11 - Copy & paste it as a new layer onto your canvas, Then re-size it to 20%.
Position to your liking.
Sharpen & apply a drop shadow.
Open Element 7 - Copy & paste it as a new layer onto your canvas, then re-size it to 20%. Go to Image, click Free Rotate set to Right 30.00 & click Ok.
Position to your liking.
Sharpen & apply a drop shadow.
Open Element 8 - Copy & paste it as a new layer onto your canvas, then re-size it to 20%. Go to Image, click Free Rotate set to Left 30.00 & click Ok.
Position to your liking.
Sharpen & apply a drop shadow.
In your layers pallet, right click on your duplicated merged layer (the gumdrops) & click Duplicate. Then duplicate it 2 more times, Position where they are needed to fill in gaps.
Open Element 24 - Copy & paste it as a new layer onto your canvas ,then re-size it to 15%. Position to your liking.
Sharpen & apply a drop shadow.
Open Element 57 - Copy & paste it as a new layer onto your canvas, then re-size it to 30%. Go to Image, click Free Rotate set to Left 30.00 & click Ok.
Position on the left side of your frame (element 32)
Sharpen & apply a drop shadow.
Open Element 58 - Copy & paste it as a new layer onto your canvas ,then re-size it to 30%.
Image - Free Rotate set to Right 30.00 & click Ok.
Position on the left side of your frame.
Sharpen & apply a drop shadow.
Open Element 59 - Copy & paste as a new layer onto your canvas ,then re-size to 10%. Position to the left side & place on Element 58.
Sharpen & apply a drop shadow.
Open Element 60 - Follow the same step only this time position it to the right on Element 57.
Now make a new raster layer.
Use your Sparkles brush & place Sparkles around on your tag.
In your layers pallet, click on the very last layer.
Open Paper 4 - Copy & paste it as a new layer onto your canvas ,then re-size it to 80%.
Go to Layers, click Load/Save Mask, then click Load Mask From Disk. Now select a mask of choice.
Click Load.
In your layers pallet, right click on your mask layer, then click Merge, then click Merge Group.
Now re-size your mask layer if needed.
Activate your text tool, set your font, size & color.
Font : Carpenter Script ES
Size : 80 Pixels
Color : #000000 (Black)
Type out your name & click Apply.
Position your name to your liking.
Go to your layers pallet, right click on your name layer & click Convert To Raster Layer.
Go to Effects, click Plugins, then click Eye Candy 5 Impact - Gradient Glow.
Again you can either use my settings below or your own :
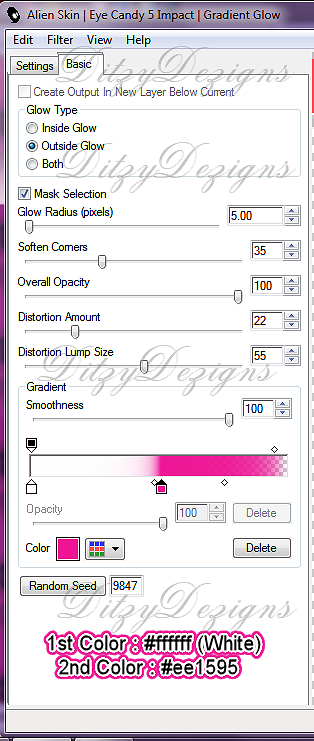
Click Ok.
Now apply a drop shadow to your name.
Add your copyright & credit information in a small pixel font.
I used Pixelette
Size : 12
Color : #000000 (Black)
Once you are happy with the placement of all your elements & texts, go to your layers pallet, right click on any layer & click Merge, then click Merge Visible .
Now activate your crop tool & crop off any access canvas that you did not use.
Now re-size your tag.
Then go to Adjust, click Sharpness, then click Sharpen.
Save your tag as a PNG file & you have completed this tutorial!!♥
Subscribe to:
Posts (Atom)
About Me
- DitzyDezigns
- New York, United States
- Hiya Everyone! My name is Ronney, I have 3 wonderful teenagers, and have been married to my husband for 20 years. I LOVE to design signatures, tags & avatars, I design with PSP, and have been designing for over 2 1/2 years. I will be not only designing signatures, tags & avatars but will also be writing & posting tutorials as well. I will also be making some templates to share with you all as well. So I hope you enjoy and can use everything I have available on my blog :-) If you ever try any of my tutorials,please send me your completed designs and I would love to showcase it here on my blog!
♥I CT For♥




Blog Hop
Today's Date

Favorite Stores
♥Forums♥


My Pixels



♥My Avatars♥