Don't Be A Pirate
My Blinkies

Add Me On Facebook

Protected


Blogs I Stalk














Awards :-)


Find Me At
Favorite Stamps








Friday, March 2, 2012
♥Irish Girl (PTU)♥
 9:15 PM |
  Created By
DitzyDezigns |
Created By
DitzyDezigns |


***This tutorial was written & posted by Ditzy Dezigns. Any resemblance to any other tutorial is purely coincidental & completely unintentional!!***
Here is what we will be making :

Supplies Needed
Paint Shop Pro X4 (Any version should work)
Tube Of Choice - I am using the amazing artwork of the very talented Keith Garvey. You can purchase his work at PTE
Scrapkit : Irish Girl By Tamie @ Addictive Pleasures
Temp 184 By Tamie @ Addictive Pleasure Templates (Please note that the template link is different than the scrapkit link)
Font Used :
Halo Handletters
Plugins Used :
Eye Candy 5 Impact - Gradient Glow (Optional)
Elements Used :
P7
P8
P6
P2
Flowers
Lucky
Heart2
Ribbon3
Tag2
4LeafClover
Bow2
Horseshoe
Beads
Button2
Hat
Sparkles
Sparkle
Lets Begin :
Open your Temp184 -
Now go to your layers pallet & delete the following layers :
Raster 1
Background
Now still in your layers pallet - click on your Copy Of Raster 9 layer -
Go to Selections - click Select All - Float - Defloat-
Now open P7 - Copy & paste as a new layer onto your template. Then position your paper so that the area within your marching ants is covered by your paper. Then got o Selections - click Invert - then on your keyboard press your Delete key 1 time.
Go to Selections & click Select None.
Now go back to your layers pallet & delete your original Copy Of Raster 9 layer.
Now in your layers pallet - click on your P7 layer - go to Effects - click Plugins - then click Eye Candy 5 Impact - then click Gradient Glow -
(You can use my settings below or your own, the choice is always yours)
I have also included the color codes for the colors I chose to use.
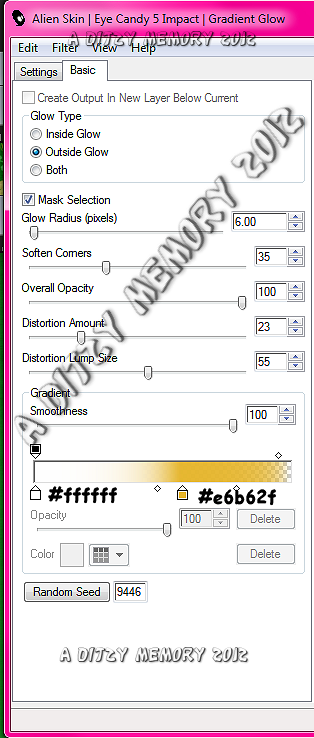
Now click Ok.
Now still on your P7 layer - go to Effects - click 3D Effects - then click Drop Shadow
(Again you are welcome to use my settings below or your own)
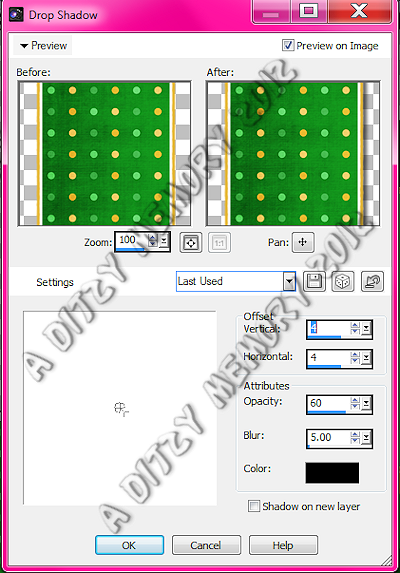
Now click Ok.
Back in your layers pallet - click on your Raster 9 layer - then follow the same steps that you followed for the Copy Of Raster 9 layer.
Use the same Eye Candy 5 Impact - Gradient Glow
&
Drop Shadow settings.
Back to your layers pallet - click on your Raster 4 layer -
Go to Selections - click Select All - Float - Defloat -
Open P8 - Copy & paste it as a new layer onto your template canvas.
Now reposition if needed.
Go to Selections - click Invert - then on your keyboard press your Delete key 1 time.
Go back to Selections & click Select None.
Go back to your layers pallet & delete your original Raster 4 layer.
Now on your P8 layer - go to Effects - click Plugins - then click Eye Candy 5 Impact - then click Gradient Glow
This time change your 2nd color to #075c0d (This is repeated for you again on the screen shot below)
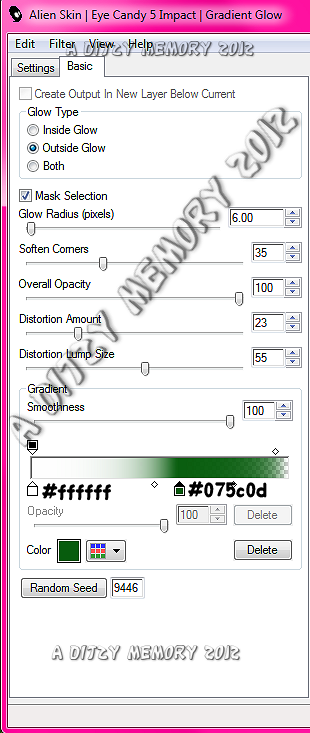
Then click Ok.
Now still on your P8 layer - go to Effects - click 3D Effects - Drop Shadow
*Use the same settings as before*
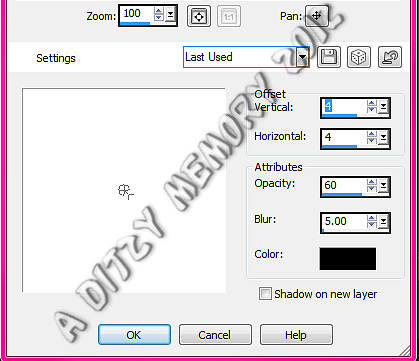
Then click Ok.
Now in your layers pallet - click on your Raster 5 layer - Go to Selections - Select All - Float - Defloat -
Open P6 - Copy & paste it as a new layer onto your canvas - then position if needed.
Then go to Selections - Invert - then on your keyboard - press your Delete key 1 time.
Go to Selections - click Select None.
Back to your layers pallet - delete your original Raster 5 layer.
Now back on your P6 layer - go to Effects - click Plugins - Eye Candy 5 Impact - Gradient Glow -
*Pay attention to the color change for your 2nd Color*
Then click Ok.
Then go to Effects - click 3D Effects - then click Drop Shadow
Apply the same settings that you use previously.
Then click Ok.
Now back to your layers pallet - click on your Raster 2 layer -
Go to Selections - Select All - Float - Defloat -
Open P2 - Copy & paste it as a new layer onto your template canvas.
Position if needed - now go to Selections - click Invert - then on your keyboard press your Delete key 1 time.
Go to Selections - click Select None.
Go to your layers pallet & delete your original Raster 5 layer.
Then on your P2 layer - go to Effects - Plugins - Eye Candy 5 Impact - Gradient Glow
*Note that the 2nd color code has changed again*
Then click Ok.
Now go to Effects - click 3D Effects - then click Drop Shadow
*Use the same settings as before*
Then click Ok.
Now in your layers pallet - click on your Raster 8 layer -
Go to Adjust - click Add/Remove Noise - then click Add Noise
*You can use my settings below or your own, its up to you*
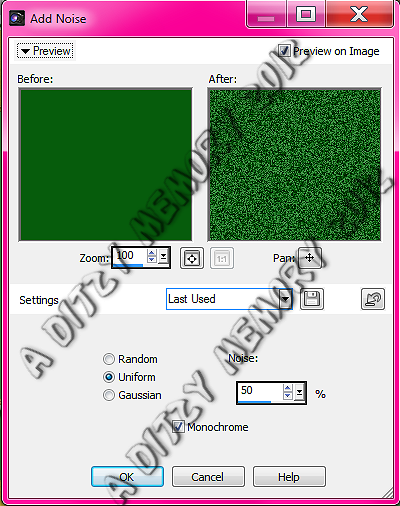
Then click Ok.
Go to Effects - Plugins - Eye Candy 5 Impact - Gradient Glow
Then click Ok.
Now go to Effects - click 3D Effects - Drop Shadow
*Use same settings as before*
Click Ok.
Now in your layers pallet - click on your Raster 6 layer -
Go to Selections - click Select All - Float - Defloat -
Now make a New Raster Layer
Go to your Materials Pallet -
Set your Foreground color & background color to your liking. (OR you are welcome to use the colors I used, which are included in the screen shot below)

Now still in your Materials Pallet - click on your Foreground Color box -
Once it opens, Click on Gradient Tab -
Now when that menu opens, click on the top color , find the Foreground/Background color box -
Then set the settings as they are below (or you can play around with it til you get something you like better)
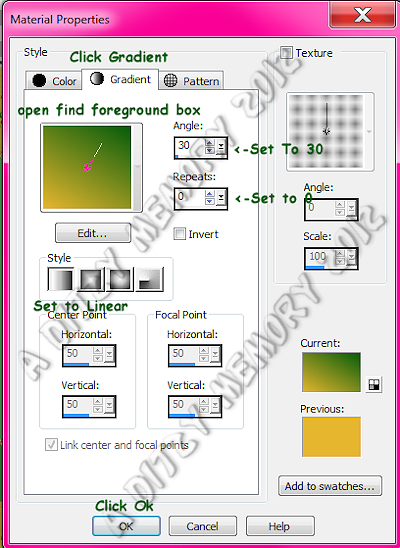
Then click Ok.
Now in your Tools Pallet - select your Flood Fill Tool
Now on your template - using your Flood Fill Tool - click within your "marching ants" area.
Now keep this Selected -
Open your mid size tube of choice -
Copy & paste it onto your template canvas - then using your Move Tool - position it within your "marching ants" area until you are happy with it.
Once happy go to Selections - click Invert - then on your keyboard press your Delete key 1 time.
Now go back to Selections & click Select None.
Now in your layers pallet -
Right click on your Tube layer - then click Duplicate.
Now on your duplicated tube layer - go to Adjust - click Blur - then click Gaussian Blur
Set to 3.00 & click Ok.
Now in your layers pallet - at the top - change your Blend Mode from Normal to Overlay.
Then in your layers pallet - click on your original tube layer (the bottom one) and now change the Blend Mode to Luminance (L).
Now still on your original tube layer - go to Effects - click 3D Effects - Drop Shadow.
Apply same settings that you have been using. So click Ok.
Now in your layers pallet - click on your Raster 7 layer - then go to Effects - 3D Effects - Drop Shadow
Apply the same settings you have been using. So click Ok.
Now back to your layers pallet -
Click on your Copy Of Raster 6 layer - follow the exact same steps that you followed for your original Raster 6 layer.
Including your Flood Fill, & tube steps.
Once you are done with your Copy Of Raster 6 layer - go back to your layers pallet - click on your Copy Of Raster 7 layer - apply a Drop Shadow to that just as you did to the original Raster 7 layer.
Now let's start adding our Elements -
Open your Flowers element - Copy & paste it as a new layer onto your template canvas.
Then re-size it to 80%.
Position it using your Move Tool to your liking.
Once you are happy with the placement, go to Adjust - click Sharpness - then click Sharpen
Now go to Effects - 3D Effects - then click Drop Shadow
*You will be using the same settings as you have been using through-out designing your template*
Then click Ok.
Now go to your layers pallet - right click on your Flowers layer - then click Duplicate - Now go to Image - click Flip Vertical- then click Image - then click Flip Horizontal, then position your duplicated Flower element to the top right corner of your template.
Now open your Lucky element - Copy & paste it as new layer onto your canvas - then re-size it to 40%. Using your Move Tool position it to your liking.
Then Adjust - Sharpness - Sharpen
Effects - 3D Effects - Drop Shadow (Same settings as before)
Open your Heart2 element - Copy & paste it as a new layer onto your template canvas - then re-size it to 40%. Using your Move Tool position your Heart2 element to your liking.
Adjust - Sharpness - Sharpen
Effects - 3D Effects - Drop Shadow
Now open your Ribbon3 element - Copy & paste it as a new layer onto your canvas - then using your Move Tool - position your Ribbon3 element to your liking.
Adjust - Sharpness - Sharpen
Effects - 3D Effects - Drop Shadow
Now go to your layers pallet - right click on your Ribbon3 layer - click Duplicate. Using your Move Tool position your duplicated Ribbon 3 element to your liking.
Now duplicate your Ribbon3 one more time & position that to your liking as well.
Now open your Tag 2 element - Copy & paste it as a new layer onto your template canvas - now re-size it to 40%. Use your Move Tool to position to your liking.
Adjust - Sharpness - Sharpen
Then go to Effects - 3D Effects - Drop Shadow (Same settings as before)
Now open your 4LeafClover element - Copy & paste it as a new layer onto your template canvas - then re-size it to 40%, then using your Move Tool position to your liking.
Adjust - Sharpness - Sharpen
Effects - 3D Effects - Drop Shadow (same settings as before)
Now go to your layers pallet - right click on your 4LeafClover layer - then click Duplicate. Then position your duplicated element to your liking as well.
Open your Bow2 element - Copy & paste it as a new layer onto your template canvas - then re-size it to 40% then re-size it again to 65%. Using your Move Tool again position to your liking.
Adjust - Sharpness - Sharpen
Effects - 3D Effects - Drop Shadow (same settings)
Open your Horseshoe element - Copy & paste it as a new layer onto your template canvas - then re-size it to 40%, then re-size it again to 50%. Using your Move Tool position it to your liking.
Adjust - Sharpness - Sharpen
Effects - 3D Effects - Drop Shadow
Now open your Beads element - Copy & paste it as a new layer onto your template canvas - then re-size it to 50%. Using your Move Tool position to your liking.
Adjust - Sharpness - Sharpen
Effects - 3D Effects - Drop Shadow
Now open your Button2 element - Copy & paste it as a new layer onto your template canvas - then re-size it to 50%. Using your Move Tool position it to your liking.
Adjust - Sharpness - Sharpen
Effects - 3D Effects - Drop Shadow
Open your Hat element - Copy & Paste it as a new layer onto your template canvas - then re-size it to 40%. Using your Move Tool position it to your liking.
Adjust - Sharpness - Sharpen
Effects - 3D Effects - Drop Shadow
Go to your layers pallet - right click on your Hat layer - then click Duplicate. Now use your Move Tool again & position your duplicated Hat element to your liking.
Open your Sparkles element - Copy & paste it as a new layer onto your template canvas - Using your Move Tool position to your liking.
Adjust - Sharpness - Sharpen
Do not apply drop shadow.
Lastly open your Sparkle element - Copy & paste it as a new layer onto your template canvas - then using your Move Tool position it where you would like it.
Adjust - Sharpness - Sharpen.
Now go to your layers pallet - right click on your Sparkle layer - then click Duplicate - use your Move Tool to position your duplicated Sparkle element to your liking.
Go back to your layers pallet - continue to duplicate your Sparkle layer & move each one to a different area on your tag.
Now add your name :
The settings I used are below :
Font : Halo Handletter
Size : 125 Pixels (You may want to adjust the size depending on the length of your name)
Background Color : #000000
Foreground Color - set to nul
If you would like you can add a gradient glow to your name - just use the same settings you used on your template layers - only change the top setting from 6.00 to 5.00
Now make sure that you add the copyright information & your license #.
Once you have everything the way you would like it on your new tag, go to your layers pallet - right click on any layer - then click Merge - then from the slide out menu click Merge Visible.
Now you may or may not need to re-size your tag - if you do re-size it, do one final Sharpen on it, just to keep it looking bright.
(Adjust - Sharpness - Sharpen)
Now all that is left is to save your tag & you have completed this tutorial!!♥
Thank-you for trying my tutorial, I would LOVE to see what your results are - if you could please send them to my email I would be honored to put it on my blog. :-)
You can email me @ ronneyprice@yahoo.com
 Labels:

Wednesday, February 22, 2012
♥DitzyDezigns Is Back!! 2/22/2012♥
Just wanted to let my followers know that I am BACK online! For good!!! So I will be redesigning my blog - then I will start posting some tutorials. I have also taken the time to read some of the comments in my chat box, and I will do my best to write some FTU tutorials as well as the PTU tutorials. :-) Hopefully this will be helpful to everyone!
I look forward to getting back into the swing of things! I have missed it greatly!
Tuesday, January 3, 2012
♥New Tag - Rac's Angel (PTU)♥
I know it has been a long time, and there have been no tutorials written for some time now, however I am trying to get back into the swing of things. Until then, I will be posting all tags made by me. If you are interested in seeing the tutorial for a specific tag, please leave a message in my chatter box with a way to contact you back.
Here is a preview of my most recent tag -
The kit I used is called Rac's Angel By Angel's Designz
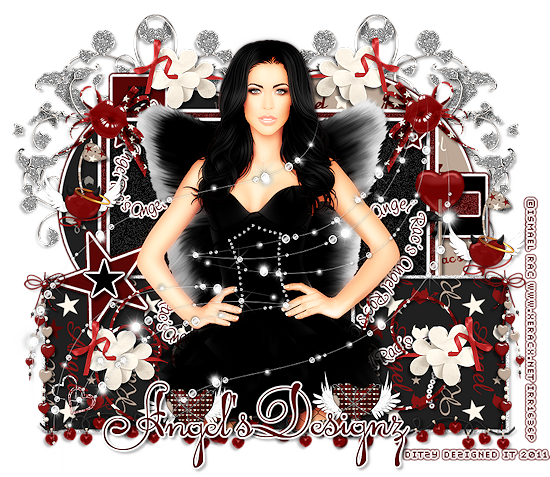
Thanks for looking!!♥
Wednesday, November 9, 2011
♥Oh Rudolf PTU♥
**This tutorial was written & posted by Ditzy Dezigns on November 9th 2011**
***Any resemblance to any other tutorial is purely coincidental & completely unintentional!!***
Here is what we will be making :
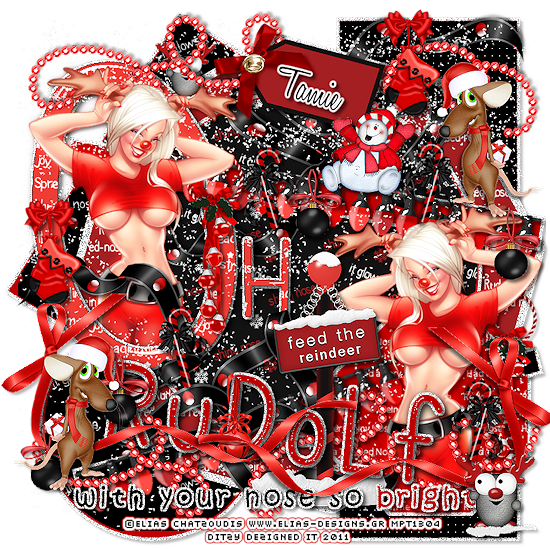
Supplies Needed :
Paint Shop Pro X4 (Any version should work)
Tube Of Choice - I used Elias Chatzoudis who is now available @ PTE
Scrapkit - Rudolfina By Tamie @ Addictive Pleasures OR Dreams N Digital
Template - Temp79 By Tamie @ Addictive Templates **Look on the right of the blog - under Temps - click on the link Temps 76-80**
Plugins Used :
Eye Candy 4000 - Gradient Glow (Optional)
Eye Candy 5 Impact - Glass (Optional)
Font Used :
Honey Script
Elements Used :
P5
P1
P2
P8
P4
Snowman
Stocking
Sign2
Bauble5
Bells
Bell
Tag
Mouse2
Reindeer
Ribbon 3
Beads
Candy Cane
Lights
Ribbon
Snow
Lets Begin :
Start by opening your Temp 79
Now go to your layers pallet & delete the following layers :
Credit Layer
Background Layer
Now in your layers pallet - click on your Raster 11 layer - now activate your Magic Wand tool - then click inside the red area on your canvas for Raster 11.
Then go to Selections - click Modify - then click Contract - now set it to 1 & click Ok.
Now open P5 - Copy & paste it as a new layer onto your canvas - then go to Selections - click Invert - then on your keyboard press your Delete key 1 time. Now go back to Selections & click Select None.
Now back in your Layers Pallet - then go to Effects - click 3D Effects - then click Drop Shadow
**Please note the settings I have set below are the exact settings that I will use through out this tutorial**You are welcome to use the same settings, or play around with your settings to get an effect that you like**
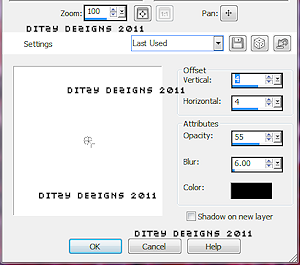
Now click Ok.
Now go back to your layers pallet - click on your Raster 5 layer - then go to Selections - click Select All - then click Selections again & click Float - then go to Selections again & click Defloat -
Now open P1 - Copy & paste it as a new layer onto your canvas - then go to Selections - click Invert - then on your keyboard press your Delete key 1 time.
Go back to Selections & click Select None.
Now go back to your layers pallet - click on your Raster 6 layer - then go to Effects - 3D Effects - then click Drop Shadow. (Remember , apply the exact same settings yo used above & click Ok)
Now in your layers pallet - click on Raster 12 - Effects - 3D Effects - Drop Shadow (same settings as before, click Ok)
Back in your layers pallet - click on Raster 13 - activate your Magic Wand tool - click inside the red area for Raster 13 - then go to Selections - click Modify - then click Contract - this time set to 2 & click Ok.
Now open P2 - Copy & paste it as a new layer onto your canvas - then go to Selections - click Invert - then on your keyboard press your Delete key 1 time. Now go back to Selections - click Select None.
Go to your layers pallet - click on your Original Raster 13 layer - then go to Effects - 3D Effects - Drop Shadow (same settings & click Ok)
Go back to your Layers Pallet - click on your Raster 7 layer - go to Selections - click Select All - then back to Selections - click Float - back to Selections - click Defloat -
Now open P8 - Copy & paste it as a new layer onto your canvas -then go back to Selections - click Invert - then on your keyboard press your Delete key 1 time. Then go back to Selections - click Select None.
Now back in your layers pallet - DELETE your ORIGINAL Raster 7 layer.
Now in your layers pallet - click on your Raster 8 layer - Effects - 3D Effects - Drop Shadow (same settings as before, click Ok)
Now in your layers pallet - click on Raster 16 layer - activate your Magic Wand tool - click inside the red area for your Raster 16, then go to Selections - click Modify - then click Contract - set to 2 & click Ok.
Now open P5 - Copy & paste it as a new layer onto your canvas - then go back to Selections - click Invert - then on your keyboard press your Delete key 1 time. Now go back to Selections & click Select None.
Now in your layers pallet - click on your original Raster 16 layer - go to Effects - 3D Effects - Drop Shadow (Use same settings as before, click Ok)
Now in your layers pallet - click on your Raster 1 layer - go to Selections - click Select All - then back to Selections - click Float - then back to Selections - click Defloat -
Now open P4 - Copy & paste it as a new layer onto your canvas - then go back to Selections - click Invert - then on your keyboard - press your Delete key 1 time. Now go back to Selections - click Select None.
Now in your layers pallet - click on your Raster 2 layer - Effects - 3D Effects - Drop Shadow (same settings as before, click Ok)
Now open your Tube of choice - Copy & paste it as a new layer onto your canvas. Then re-size it to about 85%. Using your Move Tool - position your tube so that it is over the big "O" on your template. Now go to your layers pallet - right click on your Tube layer - then click Duplicate. Now move your duplicated Tube layer down so that it is under your P4 & Raster 1 layers.
Now still in your layers pallet - click on your top (original) tube layer - then activate your Eraser Tool - now erase any part of your Tube that is over lapping the bottom of your "O".
You may also have to click on your duplicated (bottom) tube layer & erase the same parts that you erased on your top tube.
Now back in your layers pallet - make sure you are on your top (original) tube layer - now right click on that layer - then click Duplicate. Now go to Adjust - click Blur - then click Gaussian Blur - set to 5 & click Ok.
Now back in your layers pallet - at the top - change the Blend Mode from Normal to Overlay.
Now in your layers pallet - click on your duplicated (bottom) tube layer (the first one you duplicated & moved down in your layers pallet) Go to Effects - 3D Effects - Drop Shadow. (Use the same settings & click Ok)
Now in your layers pallet - click on your Raster 10 layer - Effects - 3D Effects - Drop Shadow (same settings, click Ok)
Now follow that same step (adding a drop shadow) to the following layers :
Raster 9
Raster 2
Raster 15
Now back in your layers pallet - click on your Raster 3 layer - go to Effects - click Plugins - then click Eye Candy 5 Impact -then click Glass.
**The settings below are my own preference, you may use them if you would like, or play around with the settings to get your own effect.**
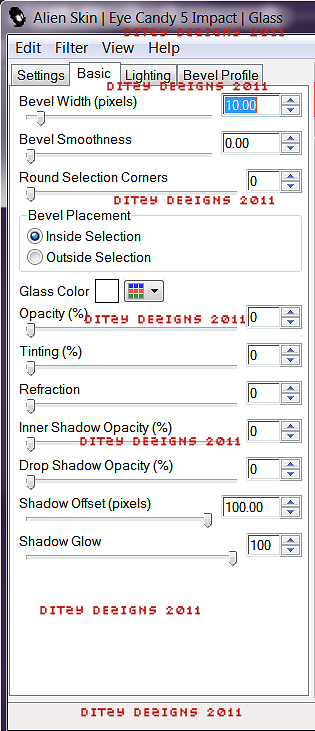
Then click Ok.
Now go to Effects - 3D Effects - Drop Shadow (use same settings, click Ok)
Now click on Raster 4 - Effects - 3D Effects - Drop Shadow (Same settings, click Ok)
Now open your tube of choice again - Copy & paste it as a new layer onto your canvas - then re-size it to 85%. Now go to Image - click Flip Horizontal (on other versions of psp you might have to click Mirror instead)
Now using your Move Tool - position your tube to the lower left (see my tag for reference if needed)
Be sure to line up the bottom of your tube with the glitter edge.
Now in your layers pallet - move your tube layer down so it is below your Raster layers 14, 15,3 & 4.
Now right click on your tube layer - click Duplicate - then go to Adjust - click Blur - then click Gaussian Blur - set to 5 & click Ok.
Now in your layers pallet - at the top - change your Blend Mode from Normal to Overlay.
Then in your layers pallet - click on your original tube layer - Go to Effects - 3D Effects - Drop Shadow (Same setttings, click Ok)
Now lets add some Elements :
Open your Snowman element - Copy & paste it as a new layer onto your canvas - then re-size it to 40%. Using your Move tool - position your Snowman element to your liking.
Now go to Adjust - click Sharpness - then click Sharpen
*You will want to sharpen each element that you re-size*
Now go to Effects - 3D Effects - Drop Shadow (same settings, click Ok)
Now open your Stocking element - Copy & paste it as a new layer onto your canvas - then re-size it to 40%. Using your Move Tool - position your Stocking element to your liking.
Adjust - Sharpness - Sharpen
Effects - 3D Effects - Drop Shadow
Then go to your layers pallet -right click on your Stocking layer - then click Duplicate. Now using your Move tool to position your duplicated Stocking element to your liking.
Now open your Sign2 element - Copy & paste it as a new layer onto your canvas - then re-size it to 65%. Using your Move Tool - position your Sign2 element to your liking.
Adjust - Sharpness - Sharpen
Effects - 3D Effects - Drop Shadow
Open your Bauble5 element - Copy & paste it as a new layer onto your canvas - then re-size it to 45%. Using your move tool - position your Bauble5 element to your liking.
Adjust - Sharpness - Sharpen
Effects - 3D Effects - Drop Shadow
Now go to your layers pallet - right click on your Bauble5 layer - then click Duplicate. Now use your Move Tool to position your Duplicated Bauble5 element. You might want to duplicate this element a few more times & position them around your tag. That is totally up to your preference.
**Please note - you do not need to Sharpen or apply a Drop Shadow to elements that you have duplicated, as long as you applied those effects prior to duplicating the element**
Now open your Bells element - Copy & Paste it as a new layer onto your canvas - then re-size it to 45%. Using your move tool - position your Bells element to your liking.
Adjust - Sharpness - Sharpen
Effects - 3D Effects - Drop Shadow
Now go to your layers pallet - right click on your Bells layer - then click Duplicate. Now use your Move Tool - position your duplicated Bells element to your liking as well.
Open your Bell element - Copy & Paste it as a new layer onto your canvas - then re-size it to 30%. Now using your Move Tool - position your Bell element to your liking.
Adjust - Sharpness - Sharpen
Effects - 3D Effects - Drop Shadow (same settings, click Ok)
Now go to your layers pallet - right click on your Bell layer - then click Duplicate. Now using your Move Tool position your duplicated Bell element to your liking.
Open your Tag element - Copy & Paste it as a new layer onto your canvas - then re-size it to 65%. Using your Move Tool - position your Tag element to your liking.
Adjust - Sharpness - Sharpen
Effects - 3D Effects - Drop Shadow (same settings, click Ok)
Open your Mouse2 element - Copy & Paste it as a new layer onto your canvas - then re-size it to 50%. Using your move tool position your Mouse2 element to your liking.
Adjust - Sharpness - Sharpen
Effects - 3D Effects - Drop Shadow (same settings, click Ok)
Now go to your layers pallet -right click on your Mouse2 layer - then click Duplicate. Now go to Image & click Flip Horizontal (or Mirror, depending on what your version has) then using your Move Tool - position your Duplicated Mouse 2 element to your liking.
Open your Reindeer element - Copy & paste it as a new layer onto your canvas - then re-size it to 50%. Now using your Move Tool - position your Reindeer element to your liking.
Adjust - Sharpness - Sharpen
Effects - 3D Effects - Drop Shadow
Now go to your layers pallet - right click on your Reindeer layer - then click Duplicate. Now using your Move Tool - position your duplicated Reindeer element to your liking.
Open your Ribbon 3 element - Copy & paste it as a new layer onto your canvas. Use your Move Tool to position to your liking.
Then I went to my layers pallet - I moved the Ribbon 3 layer down so that it was under a few of the other layers - but yet on top of others. Its your choice how you wish to position your Ribbon3.
Adjust -Sharpness - Sharpen
Effects - 3D Effects - Drop Shadow
Open your Beads element - Copy & Paste it as a new layer onto your canvas - then using your move tool - position your beads to the lower part of your template.
Adjust - Sharpness - Sharpen
Effects - 3D Effects - Drop Shadow (same settings, click Ok)
Now go to your layers pallet - right click on your Beads layer - then click Duplicate. Now go to Image - click Flip Vertical. This will now make it so you can use your Move Tool & position your duplicated Beads element to the top of your template.
Again you will want to go to your layers pallet - move both of your Beads layers down under some of your elements & tube layers.
Open your Candy Cane element - Copy & paste it as a new layer onto your canvas - now re-size it to 30%. Using your move tool - position your Candy Cane element to your liking.
Adjust - Sharpness - Sharpen
Effects - 3D Effects - Drop Shadow (Same settings ,click Ok)
Now go to your layers pallet - right click on your Candy Cane layer - then click Duplicate. Now using your Move Tool & position your duplicated Candy Cane element to your liking. Now duplicate this element a couple more times, and position each to your liking.
Now open your Lights element - Copy & Paste it as a new layer onto your canvas - then re-size it to 75%. Go to Image - click Free Rotate - set to Right 10.00 & click Ok
Now using your Move Tool - position your Lights element to the upper Red bar that is towards the top of your template. (See my tag for reference if needed)
Adjust - Sharpness - Sharpen
Effects - 3D Effects - Drop Shadow
Now copy & paste your Lights element onto your canvas again - then re-size it to 75%. Go to Image - click Free Rotate - this time set it to Left 10.00 & click Ok. Now using your move tool - position this Light element to the lower Black bar towards the bottom of your template.
Adjust - Sharpness - Sharpen
Effects - 3D Effects - Drop Shadow (same settings, click Ok)
Now open your Ribbon element - Copy & Paste it as a new layer onto your canvas - then using your Move Tool - position your Ribbon element to your liking.
Adjust - Sharpness - Sharpen
Effects - 3D Effects - Drop Shadow (Same settings as before, click Ok)
Now go to your layers pallet - right click on your Ribbon element - then click Duplicate. Now go to Image - click Flip Horizontal. Using your Move Tool - position your duplicated Ribbon to the opposite side of your original Ribbon element.
Now open your Snow element - Copy & paste it as a new layer onto your canvas - then position it to your liking.
Go to your layers pallet - move your Snow layer down so that it is below ALL of your TUBE layers.
Adjust - Sharpness - Sharpen
*Do not apply a drop shadow to this element*
Now add your name & copyright/credit information.
For my name I used the following settings :
Font : Honey Script
Size : 60 Pixels (This will depend on the length of your name)
Background Color : #000000 (Black)
Foreground Color : Set to nul
Once you apply & position your name - go to your layers pallet - right click on your Name layer - then click Convert To Raster Layer. Then go to Effects - click Plugins - then click Eye Candy 4000 - then click Gradient Glow.
**The settings below are my own personal preference, you are welcome to use the same settings, or your own**
(Before you click ok, be sure to click on the color tab & set your colors to your liking)
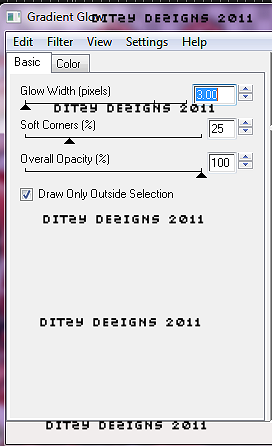
Then click on the Color Tab :
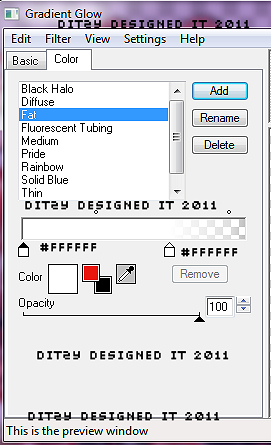
Then click Ok.
Now go to Effects - 3D Effects - Drop Shadow (Same settings as before, click Ok)
For my copyright/credit information I used the following :
Font : Pixelette
Size : 13 Pixels
Background Color : #000000
Foreground Color : Set to nul
Now once you are happy with the position of all of your papers - elements - name - copyright info, go to your layers pallet - right click on any layer - then click Merge - then click Merge Visible.
Now you may or may not need or want to re-size your Merged tag. If you re-size the size will depend on where you will be using your tag & that forums guidelines on what sizes are allowed.
Now once your layers are merged & your tag is re-sized, go to Adjust - Sharpness - Sharpen.
Now all that is left is to save it as a PNG file & you have completed this tutorial!! ♥
Monday, November 7, 2011
♥Revamping My Blog 11/8/11♥
♥~Hello Ladies ~♥
I just wanted to let you all know that I am going to be revamping my blog on 11/8/11 time to get it ready for the up coming holiday's!. So if you stop by & it looks a little "funky" you will know why.
Thanks for stopping by & I hope you will check back later when my blog is all revamped :-)
((HUGS))
Ronney (DitzyDezigns)
♥Rudolphina (Simple Siggy) PTU♥
**This tutorial was written & posted by Ditzy Dezigns on November 7th 2011**
***Any resemblance to any other tutorial is purely coincidental & completely unintentional!!***
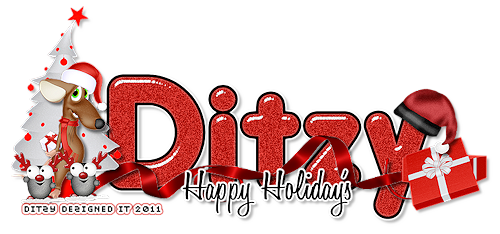
Here is what we will be making :
**I wanted to make a simple signature tutorial for those of you who are just starting out either making siggies, or using plugins. This is a very simple tutorial, using a few cute elements, that work for someone who is just learning. If you have any questions do not hesitate to email me @ aditzymemory@yahoo.com OR message me on facebook Ditzy Dezigns**
Supplies Needed :
Paint Shop Pro X4 (Any version should work)
Scrapkit - Rudolphina By Tamie @ Addictive Pleasures
Or it is available @ her store Dreams N Digital
Plugins Used :
Eye Candy 5 Impact - Glass (Optional)
Eye Candy 4000 - Gradient Glow (Optional)
Fonts Used :
Hiruko
Honey Script
Elements Used :
Reindeer 2
Reindeer
Tree
Ribbon2
Present
Hat
Lets Begin :
Start by opening a new 800 X 650 transparent canvas. (Don't worry you will crop it at the end of the tutorial, this just gives you room to work with)
Now open your Tree element - Copy & paste it as a new layer onto your canvas - then re-size it to 50%. Now using your Move tool position your Tree element to the left side of your canvas.
Now go to Adjust - click Sharpness - then click Sharpen
Now go to Effects - click 3D Effects - then click Drop Shadow
**You are welcome to use my settings below or your own**
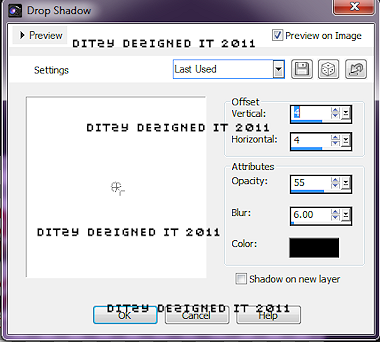
Then click Ok.
Now open your Mouse2 element - Copy & paste it as a new layer onto your canvas - then re-size it to 50%. Using your Move tool - position your Mouse 2 element on the left side of your canvas on place it on top of your Tree element.
Adjust - Sharpness - Sharpen
Effects - 3D Effects - Drop Shadow (Same settings, click Ok)
Now open your Reindeer element - Copy & paste it as a new layer onto your canvas - then re-size it to 35%. Using your Move tool - position your Reindeer element to the left side of your canvas & place it in front of your Mouse2 element.
Adjust - Sharpness - Sharpen
Effects - 3D Effects - Drop Shadow (Same settings as before, click Ok)
Now go to your layers pallet - right click on your Reindeer layer - then click Duplicate. Now using your Move tool, move your duplicated Reindeer element so that it is positioned right next to the original Reindeer element. (See my tag for reference if needed)
Now activate your Text tool - set your font, size & color settings.
For the name I used :
Font : Hiruko
Size : 225 Pixels (This will depend on the length of your name)
Background Color : #C5241C
Foreground Color : Set to nul
Type out your name. Then click Apply. Now position your name so that it is lined up next to your elements on the left.
Go to your layers pallet - move your Name layer down so that it is under all of your element layers. (It should be the 2nd layer from the bottom once you move it down)
Now right click on your Name layer - click Convert To Raster Layer.
Now go to Effects - click Plugins - then click Eye Candy 4000 - then click Gradient Glow -
**Again you are welcome to use my settings below or your own**
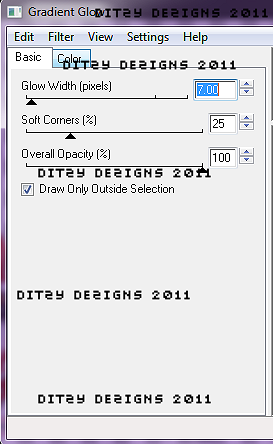
Then click Color Tab :

Now click Ok.
Now go to Effects - click 3D Effects - then click Drop Shadow. (Use the exact same settings you have used through out this tutorial)
Now activate your Magic Wand tool - click inside each letter in your name until all letters have the "Marching Ants" around them.
Now go to Effects - click Plugins - then click Eye Candy 5 Impact - then click Glass -
**Again you are welcome to use my settings below or your own**
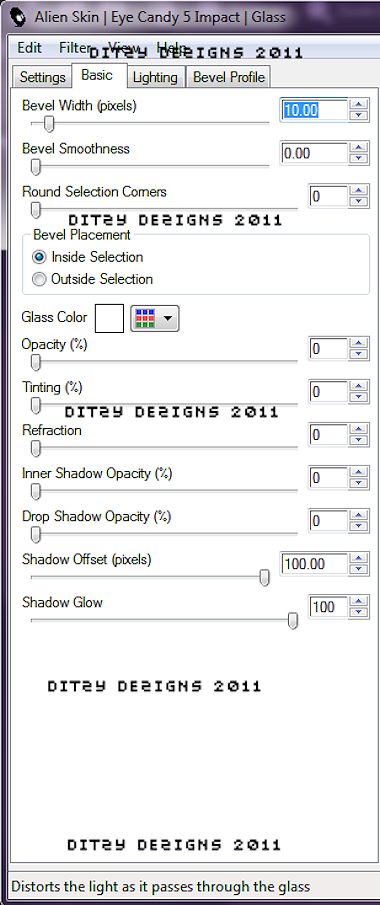
Then click Ok.
Now keeping your letters selected, go to Adjust - click Add/Remove Noise - then click Add Noise
**You can use the same settings as I did, or your own**
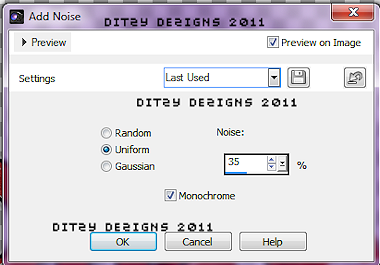
Then click Ok.
Now go to Selections & click Select None.
Now you will want to add any phrase you would like on your signature. I used the phrase "Happy Holiday's"
The settings I used are :
Font : Honey Script
Size : 72 Pixels
Background Color : #000000
Foreground Color : Set to nul
Once you have your phrase positioned to your liking, go to your layers pallet - right click on your Phrase layer - then click Convert To Raster Layer.
Then go to Effects - click Plugins - then click Eye Candy 4000 - then click Gradient Glow.
**These settings are different from the ones we used above so make sure you check them**
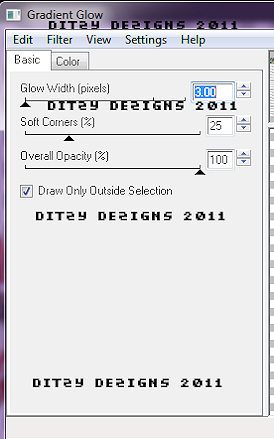
Now click your Color Tab -
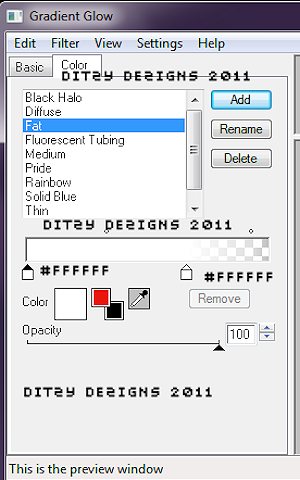
Then click Ok.
Now go to Effects - click 3D Effects - then click Drop Shadow (Same settings as before, click Ok)
Now open your Hat element - Copy & paste it as a new layer onto your canvas - then re-size it to 35%. Using your Move Tool position your Hat element to your liking on one of the letters in your name. I choose to use the last letter.
Adjust - Sharpness - Sharpen
Effects - 3D Effects - Drop Shadow (same settings as before)
Now open your Present element - Copy & paste it as a new layer onto your canvas - then re-size it to 45%. Using your Move tool position your Present element to the right end of your name.
Adjust - Sharpness - Sharpen
Effects - 3D Effects - Drop Shadow (Same settings as before)
Now open your Ribbon 2 element - Copy & paste it as a new layer onto your canvas - then re-size it to 80%. Then go to Image - click Free Rotate - set it to Left 90.00 & click Ok.
Now using your Move Tool - position your Ribbon 2 element so that it is center on your name. (See my tag for reference if needed)
Now go to Adjust - click Sharpness - then click Sharpen
Effects - click 3D Effects - then click Drop Shadow (Same settings as before, click Ok)
Now go to your layers pallet - then move your Ribbon2 layer down so that it is under the following layers :
Tree
Mouse2
Reindeer (both layers)
Present
Now once you have all of your elements, name & phrase where you like it, go to your layers pallet - right click on any layer - then click Merge - then click Merge Visible.
Now activate your Crop Tool - crop off any access canvas that you did not use.
Now you may or may not need or want to re-size your tag - this all depends on where you will be using it and what your signature sizes are allowed to be.
If you do re-size your tag, make sure that with your layers all merged that you apply one final Sharpen to your tag.
Now save your tag as a PNG file & you have completed this tutorial!!♥
Thursday, November 3, 2011
♥BEAUTI♥LICIOUS AWARD!♥
BEAUTI♥LICIOUS AWARD!
I got this award from the fabulous, Jenn @ JeremyJulieMom Designs. Check out her blog, she has some really fabulous tags & content that you will just LOVE!!!!! Thanks so much, Jenn!!! :)
This award is for the Beautiful Women (and Men) who grace us with their talents
in the Tagger Community. The intent of this award is to pass it on
to the Designer, Tagger, or Artist who has inspired you with their endless talent
and who has touched your heart.
I'd like to give this award to some wonderful blogs I visit!
They are amazing designers and Friends.
Thanks for all you do for me & others . :-)
in the Tagger Community. The intent of this award is to pass it on
to the Designer, Tagger, or Artist who has inspired you with their endless talent
and who has touched your heart.
I'd like to give this award to some wonderful blogs I visit!
They are amazing designers and Friends.
Thanks for all you do for me & others . :-)
Subscribe to:
Posts (Atom)
About Me
- DitzyDezigns
- New York, United States
- Hiya Everyone! My name is Ronney, I have 3 wonderful teenagers, and have been married to my husband for 20 years. I LOVE to design signatures, tags & avatars, I design with PSP, and have been designing for over 2 1/2 years. I will be not only designing signatures, tags & avatars but will also be writing & posting tutorials as well. I will also be making some templates to share with you all as well. So I hope you enjoy and can use everything I have available on my blog :-) If you ever try any of my tutorials,please send me your completed designs and I would love to showcase it here on my blog!
♥I CT For♥





Blog Hop

Today's Date

Favorite Stores

♥Forums♥


My Pixels



♥My Avatars♥