Don't Be A Pirate
My Blinkies

Add Me On Facebook

Protected


Blogs I Stalk












Awards :-)



Find Me At
Favorite Stamps









Tuesday, September 27, 2011
♥Happy Halloween PTU (Animated)♥
 8:36 PM |
  Created By
DitzyDezigns |
Created By
DitzyDezigns |


**This tutorial was written & posted by DitzyDezigns on September 27th 2011**
***Any resemblance to any other tutorial is purely coincidental & completely unintentional!!***
Here is what we will be making :

Supplies Needed :
Paint Shop Pro X2 (Any version should work)
Animation Shop
Tube Of Choice - I used the amazing work of Elias Chatzoudis, you can now purchase his work @ PTE
Scrapkit - Happy Halloween By Rebellious Scraps @ Scrappin Dollars
Template - Temp11 By Creative Chicks
Plugins Used :
Eye Candy 5 Impact - Gradient Glow
Eye Candy 4000 - Gradient Glow
Xero - Radiance
Alien Skin Xenofex 2 - Constellation
Font Used :
Gotica Bastard
Elements Used :
Paper1
Paper 3
Paper 6
SpiderWeb 1 & 2
Pumpkin
Jack
Frank
BlobMonster
Bat2
Bat
Cauldron
Spider 1 & 3
Charm2
Cat
Skeleton
Sparkles 2
Lets Begin :
(Please note - I post all of the settings I used for this tag threw out my tutorial, you are more than welcome to use my settings if you wish. Or you can also change them to your own personal preference. I have no issues with that what so ever. If I didn't want anyone to use them I wouldn't post them :-) If at any time you have any questions, please do not hesitate to shoot me an email & I will respond as quickly as I can.
Start by opening your Temp11, then go to your layers pallet & delete the credit layer.
Now in your layers pallet - click on the Raster 11 layer - go to Selections, click Select All, go to Selections again & click Float, then go to Selections again & click Defloat,
Now open Paper 12 - Copy & paste it as a new layer onto your canvas, then go to Selections & click Invert. Then on your keyboard press your delete key 1 time.
Now go back to Selections & click Select None.
Now go to Effects - click Plugins - Eye Candy 5 Impact - Gradient Glow.
(You can use my settings below or chose your own, the choice is always yours.)

Click Ok.
Now go to Effects - click 3D Effects - Drop Shadow
(Again you can use my settings below or your own)

Now go to your layers pallet & delete your original Raster 11 layer.
Now follow those exact steps for the "Copy Of Raster 11 layer"
Now in your layers pallet - click on the Raster 4 layer - Selections - Select All - Float - Defloat -
Open Paper 3 - Copy & paste it as a new layer onto your canvas, then go to Selections & click Invert, then on your keyboard press your delete key 1 time.
Go to Selections & click Select None.
Now go to Effects - click Plugins - Eye Candy 5 Impact - Gradient Glow. Use the same settings you used above.
Then go to Effects - 3D Effects - Drop Shadow. Use the same settings you used above.
Go back to your layers pallet & delete your original Raster 4 layer.
In your layers pallet - click on Raster 6 - Selections - Select All - Float - Defloat -
Open Paper 6 - Copy & paste it as a new layer onto your canvas - then go to Selections, click Invert. On your keyboard press your delete key 1 time.
Go back to Selections & click Select None.
Effects - Plugins - Eye Candy 5 Impact - Gradient Glow
Same settings as above.
Effects - 3D Effects - Drop Shadow . Same settings you used above.
Go to your layers pallet & delete your original Raster 6 layer.
Now in your layers pallet, delete the following layers :
Raster 10
Raster 12
Copy Of Raster 12
Now in your layers pallet - click on Raster 3 layer - Activate your Magic Wand tool - click inside your black frame area.
Now open your tube of choice - Copy & paste it as a new layer onto your canvas - re-size it if needed, then position it to your liking. Once happy with the position go to Selections & click Invert - then on your keyboard press your delete key 1 time.
Then go to Selections & click Select None.
Now go to your layers pallet - right click on your tube layer - then click Duplicate.
On your duplicated tube layer go to Adjust - click Blur - Gaussian Blur , set it to 5.00 & click Ok.
Now at the top of your layers pallet - change your Blend Mode to Overlay.
Now follow those same steps for your Copy Of Raster 2 layer.
Now in your layers pallet - click on Raster 7 layer - Selections - Select All - Float - Defloat -
Open Paper 1 - Copy & paste it as a new layer onto your canvas - then go to Selections - click Invert - then on your keyboard press your delete key 1 time. Now go back to Selections & click Select None.
Effects - Plugins - Eye Candy 5 Impact - Gradient Glow . Same settings as before.
Effects - 3D Effects - Drop Shadow. Same settings as before.
Now open your SpiderWeb 1 from your kit - Copy & paste it as a new layer onto your canvas - then re-size it to 40%. Position your SpiderWeb 1 element within your Copy Of Raster 5 circle on your template.
Once happy with the position, go to your layers pallet - right click on your SpiderWeb1 layer - then click Duplicate. Then on your duplicated SpiderWeb1 layer - right click again & click Duplicate.
Now you should have a total of 3 SpiderWeb 1 layers.
Now you will want to rename these three layers - starting from the bottom SpiderWeb 1 layer - rename it Purple Spider Web 1, then on the second one, Purple Spider Web 2, then the 3rd one Purple Spider Web 3.
Now in your layers pallet - close of the top 2 SpiderWeb layers.
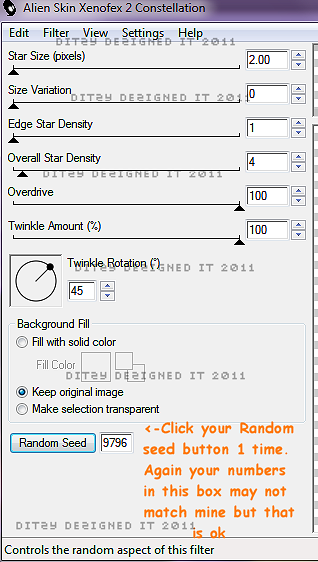
Click on SpiderWeb1 layer - go to Effects - click Plugins - Alien Skin Xenofex 2 - Constellation
(You can use my settings below or play around with them to get the effect you would like.)
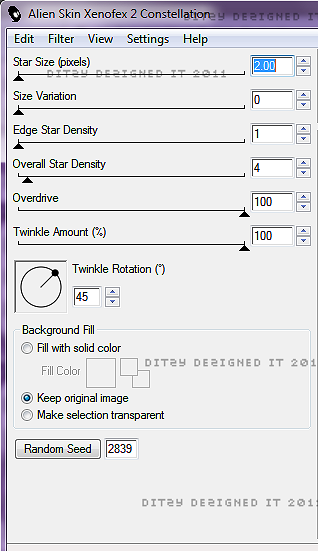
Click Ok
Now unhide your SpiderWeb 2 layer & close off your Spider Web 1 layer.
Go to Effects - Plugins - Alien Skin Xenofex2 - Constellation
This time click your Random Set button 1 time, then click Ok.
(The numbers in that box may not match mine, but that is ok)
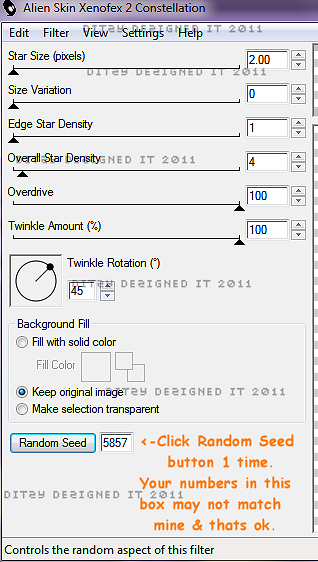
Now unhide your SpiderWeb 3 layer & close of your Spider Web 2 layer, Effects - Plugins - Alien Skin Xenofex2 - Constellation.
Click your Random Seed button & click Ok.
(Again your numbers in that box may not match mine, but that is ok)
Now unhide your Purple Spider Web 1 layer - then close off your Purple Spider Web 2 & 3 layers.
Now open your Spider Web 2 element - Copy & paste it as a new layer onto your canvas - then re-size it to 40%.
Now position it within your Raster 5 circle area on your template. When you rename these layers use - Orange Spider Web 1, Orange Spider Web 2, Orange Spider Web 3.
Then follow the same steps you did above for your 1st Spider Web 1 element. Duplicate the layer 2 times, then add the constellation, using the same settings you used on the purple spider web element.
Now open your Pumpkin element - Copy & paste it as a new layer onto your canvas - then re-size it to 30%. Position it to your liking.
Go to Adjust - Sharpness - Sharpen
Effects - 3D Effects - Drop Shadow
I used the same settings for my elements that I used for my layers, but you can use which ever you prefer .
Open your Jack element - Copy & paste it as a new layer onto your canvas - then re-size it to 70%, then position to your liking.
Adjust - Sharpness - Sharpen
Effects - 3D Effects - Drop Shadow
Open your Frank element - Copy & paste it as a new layer onto your canvas - then re-size it to 25%. Now position to your liking.
Adjust - Sharpness - Sharpen
Effects - 3D Effects - Drop Shadow
Open your Blob Monster element - Copy & paste it as a new layer onto your canvas - then re-size it to 20%. Position it to your liking.
Adjust - Sharpness - Sharpen
Effects - 3D Effects - Drop Shadow
Now open your Bat 2 element - Copy & paste it as a new layer onto your canvas - then re-size it to 20%. Position it to your liking.
Adjust - Sharpness - Sharpen
Effects - 3D Effects - Drop Shadow
Now go to your layers pallet - right click on your Bat2 layer - then click Duplicate. Then duplicate your Bat2 layer again for a total of 3. Now position each element to your liking.
Now open your Spider 1 element - Copy & paste it as a new layer onto your canvas. Then re-size it to 15%. Then position to your liking.
Adjust - Sharpness - Sharpen
Effects - 3D Effects - Drop Shadow
Now go to your layers pallet - right click on your Spider 1 element - then click duplicate, then duplicate that layer so that you have a total of 3 Spider 1 elements. Now position each element to your liking.
Now open your Spider 3 element - Copy & paste it as a new layer onto your canvas - then re-size it to 15%. Position it to your liking.
Adjust - Sharpness - Sharpen
Effects - 3D Effects - Drop Shadow
Go to your layers pallet - right click on your Spider 3 layer & click Duplicate. Then duplicate it again & position all 3 of your Spider elements to your liking.
Open your Spider Charm 1 element - Copy & paste it as a new layer onto your canvas - then re-size it to 20%. Position it to your liking.
Adjust - Sharpness - Sharpen
Effects - 3D Effects - Drop Shadow
Open your Spider Charm 3 element - Copy & paste it as a new layer onto your canvas - then re-size it to 20%. Position it to your liking.
Adjust - Sharpness - Sharpen
Effects - 3D Effects - Drop Shadow
Open your Cat element - Copy & paste it as a new layer onto your canvas - then re-size it to 30%. Position it to your liking.
Adjust - Sharpness - Sharpen
Effects - 3D Effects - Drop Shadow
Open your Skeleton element - Copy & paste it as a new layer onto your canvas - then position it to your liking.
Adjust - Sharpness - Sharpen
Effects - 3D Effects - Drop Shadow
Now go to your layers pallet - right click on your Skeleton layer - then click Duplicate.
Now position your duplicated Skeleton to your liking as well.
Open your Sparkles 2 element - Copy & paste it as a new layer onto your canvas - go to Adjust - Sharpness - Sharpen
Do not apply a drop shadow to this element.
Now go to your layers pallet - right click on your Sparkles 2 layer - then click Duplicate. Now go to Image - click Flip. Position to your liking.
In your layers pallet - click on your Raster 15 layer - then go to Effects - 3D Effects - Drop Shadow, set your settings click ok.
Then activate your Magic Wand tool - click inside your green bat - then go to Effects - 3D Effects - Inner Bevel
(You can use my settings below or your own)
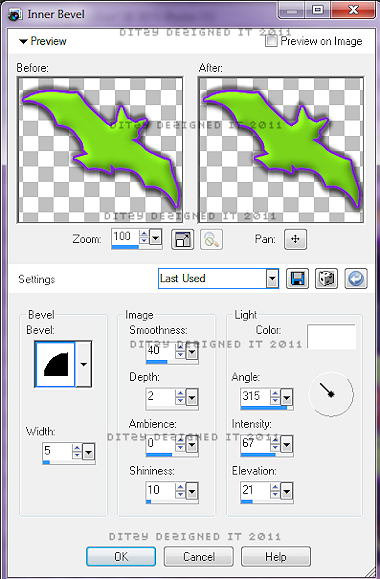
Click Ok
Now go to Selections & click Select None.
Now activate your text tool - set your font, size & color
I used :
Font : Gotica Bastard
Size : 80 Pixels (This size will depend on the length of your name)
Background Color : (I used a variety of colors, you are welcome to do so as well, or make them all one color. I will post the 3 different color codes I used incase you would like to do the same.)
Color #1 - #ec4d00
Color #2 - #330d4d
Color #3 - #7fdb1d
Foreground Color - set to nul
In order to change the color of your letters easier, type out the name you wish to use, then highlight each letter & change the color accordingly. Atleast that is the easiest way I have figured out to do lol
Once you have your colors the way you want it , click apply , then position your name to your liking. Once happy with placement go to your layers pallet - right click on your name layer then click Convert To Raster Layer.
Then go to Effects - click Plugins - Eye Candy 4000 - Gradient Glow
(You are welcome to use my settings or your own)
**See added note on screen shot below**
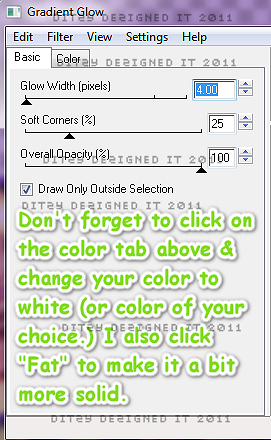
Once you have your Gradient Glow done, then go to Effects - click 3D Effects - Drop Shadow. Set to your liking & click Ok.
Now you will need to add any copyright/credit information & license #. (Very important not to miss this step.)
Once you have everything added that you would like, activate your crop tool -
Crop off any canvas that you did not use. Be careful not to crop to closely as you don't want to crop off any elements or parts of their drop shadow.
Open your Animation Shop
Go back to PSP -
Go to your layers pallet - on your Purple Spider Web 1 layers, make sure that your Purple Spider Web 1 layer is open & that Spider Web 2 & 3 layers are closed.
Then go to your Orange Spider Web 1 layers, make sure that your Orange Spider Web 1 layer is open & that your Orange Spider Web 2 & 3 layers are closed.
Now click on your Purple Spider Web 1 layer - go to Edit - Copy Special - Copy Merged
Go to your Animation Shop - right click in the grey work area, then click Paste As New Animation.
Go back to your PSP -
Unhide your Purple Spider Web 2 layer & close off your Purple Spider Web 1 layer.
Go to your Orange Spider Web 1 layer - Open your Orange Spider Web 2 layer & close off your Orange Spider Web 1 layer.
Make sure you are on your Orange Spider Web 2 layer - go to Edit - Copy Special - Copy Merged -
Go to Animation Shop -
Right click on your first frame you just put there, then click Paste - then Paste After Current Frame.
Go back to your PSP -
Now in your layers pallet - go to your Purple Spider Web layers - Open your Purple Spider Web 3 layer & close off your Purple Spider Web 2 layer.
Now go to your Orange Spider Web layers - Open your Orange Spider Web 3 layer & close off your Orange Spider Web 2 layer.
Edit - Copy Special - Copy Merged
Go to your Animation Shop -
Right click in your 2nd frame that you just put there, then click Paste - After Current Frame.
Now view your animation.
If happy with it, you will wanna re-size it to the size you will need for where you will be using it.
(To re-size in animation shop - use your Shift & S key at the same time & your re-size menu will open, set your desired size & click Ok.)
Now save your animated tag as a GIF file & you have completed this tutorial!♥
 Labels:

Monday, September 5, 2011
♥Best Friends Forever♥ PTU
**This tutorial was written & posted by DitzyDezigns on September 5th 2011**
***Any resemblance to any other tutorial is purely coincidental & completely unintentional!!***
Here is what we will be making :
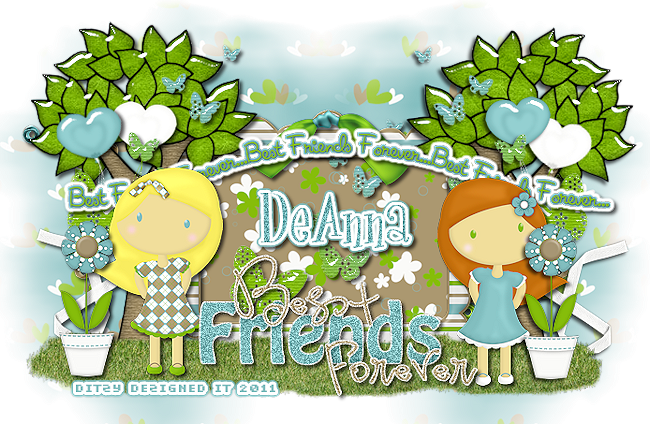
Supplies Needed :
Paint Shop ProX2 (Any version should work)
Scrapkit - Best Friends Forever By Butterfly Kisses @ Scrappin Dollars
Mask Of Choice
Plugins Used :
Eye Candy 5 Impact - Glass
Eye Candy 4000 - Gradient Glow
Font Used :
Girls are Weird
Elements Used :
Ribbon02
Wordart02
FlowerPot02
Paper 05 & 11
Tree02
Wordart01
Bow02
Butterflies
Balloon01 & 02
BFF01 & BFF02
Frame02
Lets Begin :
Open a new 800 X 650 transparent canvas. (Don't worry you will crop it at the end of the tutorial.)
Open Frame02 - Copy & paste it as a new layer onto your canvas - then re-size it to 50%. Now use your move tool & position your Frame02 element center on your canvas.
Now activate your Magic Wand tool - click inside your Frame02 element. Go to Selections - click Modify - then click Expand from the slide out menu. Then set your number of pixels to 10 & click Ok.
Now open Paper 11 - Copy & paste it as a new layer onto your canvas - then re-size it to 50%.
Go to Selections - click Invert - then on your keyboard press your delete key 1 time.
Go back to Selections & click Select None.
In your layers pallet - move your Paper 11 layer down so that it is directly below your Frame02 layer.
Then click on your Frame02 layer (in your layers pallet ) Then go to Effects - 3D Effects - Drop Shadow
*You can use my settings below or your own)
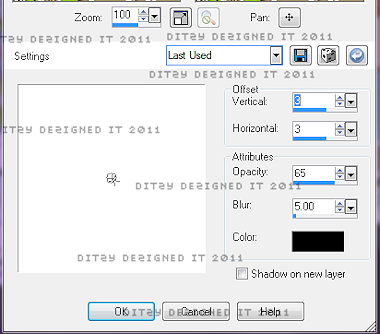
Click Ok.
Now open your BFF01 element - Copy & paste it as a new layer onto your canvas - then re-size it to 40%. Use your move tool & position your BFF01 element to the left side of your Frame02 element.
Go to Adjust - Sharpness - Sharpen
Then go to Effects - 3D Effects - Drop Shadow
Use the same settings as you used above.
Open your BFF02 element - Copy & paste it as a new layer onto your canvas. Then re-size it to 40%. Now position it to the right side of your Frame02 element.
Adjust - Sharpness - Sharpen
Effects - 3D Effects - Drop Shadow
Now open your Balloons01 element - Copy & paste it as a new layer onto your canvas - then re-size it to 30%. Position it to the left side of your frame towards the top.
Go to Effects - Plugins - Eye Candy 5 Impact - Glass
*You can use your own settings or mine below*
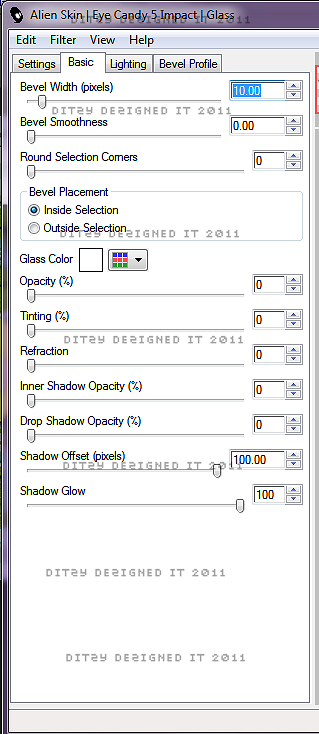
Click Ok.
Now go to Effects - 3D Effects - Drop Shadow. (Use the same settings you have been using)
Open your Balloon02 element & follow the same steps you did for your Balloon01.
Now in your layers pallet - move both of your Balloon layers down so they are under your BFF layers.
Now right click on your Balloon01 layer - click Duplicate. Go to Image & click Mirror.
Then go back to your layers pallet - right click on your Balloon02 layer - click Duplicate - Go to Image & click Mirror.
Use your move tool to adjust the position of both of your Balloon elements on the right side.
Open your Butterflies element - Copy & paste it as a new layer onto your canvas - then re-size it to 30%. Use your move tool & position it to the center of your frame element.
Go to Effects - Plugins - Eye Candy 5 Impact - Glass
(Use the same settings you used above)
Now go to Effects - 3D Effects - Drop Shadow. (Again use the same settings)
Now go to your layers pallet - right click on your Butterflies layer - then click Duplicate. Use your move tool to position this element to the upper left corner of your frame.
Back to your layers pallet - right click on your duplicated Butterflies layer - then click Duplicate - now go to Image & click Mirror. Then use your move tool to adjust the position of this element to your liking.
Open Bow02 element - Copy & paste it as a new layer onto your canvas - then re-size it to 25%. Position it to the top center of your Frame02 element.
Adjust - Sharpness - Sharpen
Effects - 3D Effects - Drop Shadow
Open Wordart01 element - Copy & paste it as a new layer onto your canvas - then re-size it to 65%. Position your Wordart01 element to the bottom of your frame. (See my tag for example if needed)
Now go to Adjust - click Add/Remove Noise - then click Add Noise.
Set to Uniform , 40 & make sure your Monochrome box IS checked, then click Ok.
Then go to Effects - 3D Effects - Drop Shadow (Apply the same settings you have been using)
Now open your Tree02 element - Copy & paste it as a new layer onto your canvas - then re-size it to 70%. Position your Tree02 to the left side of your Frame02 element.
Go to Effects - Plugins - Eye Candy 5 Impact - Glass
*Use the same settings as before & click Ok*
Now apply a drop shadow.
Go to your layers pallet - move your Tree02 layer down & put it right above your Frame02 layer.
Then right click on your Tree02 layer - click Duplicate. Now go to Image & click Mirror. Use your move tool to adjust the position of your duplicated Tree02 element if needed.
Now click on the last layer in your layers pallet -
Open Paper 05 - Copy & paste it as a new layer onto your canvas - then re-size it to 80%. Then go to Layers, click Load/Save Mask then click Load Mask From Disk.
Once your Mask menu opens choose a Mask of your choice then click Load.
Now go to your layers pallet - right click on your Mask layer - then click Merge - then Merge Group.
Now re-size your Mask to about 80%. Then use your move tool & position your Mask to the left side of your tag.
Now go back to your layers pallet - right click on your Mask layer then click Duplicate. Go to Image & click Mirror.
Use your move tool to adjust the position of either Mask layer if needed.
In your layers pallet - click on the very top layer in your layers pallet -
Open your FlowerPot02 element - Copy & paste it as a new layer onto your canvas - then re-size it to 30%. Use your move tool to position it to your liking. I positioned mine the left side.
Adjust - Sharpness - Sharpen
Effects - 3D Effects - Drop Shadow
Go to your layers pallet - right click on your FlowerPot02 layer - click Duplicate.
Now use your move tool & move your duplicated FlowerPot02 element to the right side of your tag.
Now make a new raster layer - then click on your Tube tool - then locate your Grass tube. Then click on your tag where you would like the grass to be. I clicked on time, positioned my grass, then go to your layers pallet - duplicate your grass 2 times - then position each one next to the other to cover the front of your frame.
Then merge those 3 grass layers together so they become one.
Position to your liking. Then you might have to move your Grass layer down in your layers pallet so it is under the elements so it isn't covering them.
Now open Wordart02 - Copy & paste it as a new layer onto your canvas - then re-size it to 70%. Position it to your liking.
Then go to Effects - click Plugins - Eye Candy 4000 - Gradient Glow
*You can use your own settings or mine below*

Click Ok.
Now activate your Text tool - set your Font ,Size & Color
I used :
Font : Girls are Weird
Size : 70 Pixels
Background Color : #70b1b4
Foreground Color : Set to nul
Then click on your tag to open your text box, then type out the name you would like on your tag. Click Apply.
Now position your name to your liking.
Go to your layers pallet - right click on your Name layer - then click Convert To Raster Layer.
Then go Adjust - Add/Remove Noise - Add Noise
Set it to Uniform , 40, make sure your Monochrome box IS checked then click Ok.
Now go to Effects - click Plugins - Eye Candy 5 Impact - Gradient Glow
*My settings below or your own*
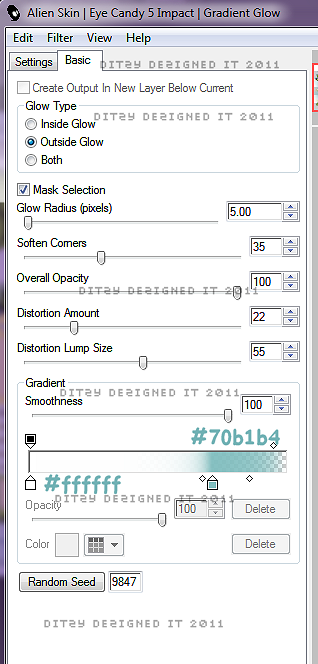
Click Ok.
Now go to Effects - 3D Effects - Drop Shadow - apply the same settings you have been using.
Now add your credit & or copyright information.
Now activate your Crop tool - crop off any access canvas that you did not use.
Then go to your layers pallet - right click on any layer - click Merge - Merge Visible
Now re-size your tag to the size you will need it for where you are going to use it.
Then go to Adjust - Sharpness - Sharpen (just to give your tag one last sharpen)
Now all that is left is to save your tag as a PNG file & you have completed this tutorial!!♥
Sunday, September 4, 2011
♥100% Addicted (Animated) PTU♥
**This tutorial was written & posted by DitzyDezigns on September 4th 2011**
***Any resemblance to any other tutorial is purely coincidental & completely unintentional!!***
Here is what we will be making :
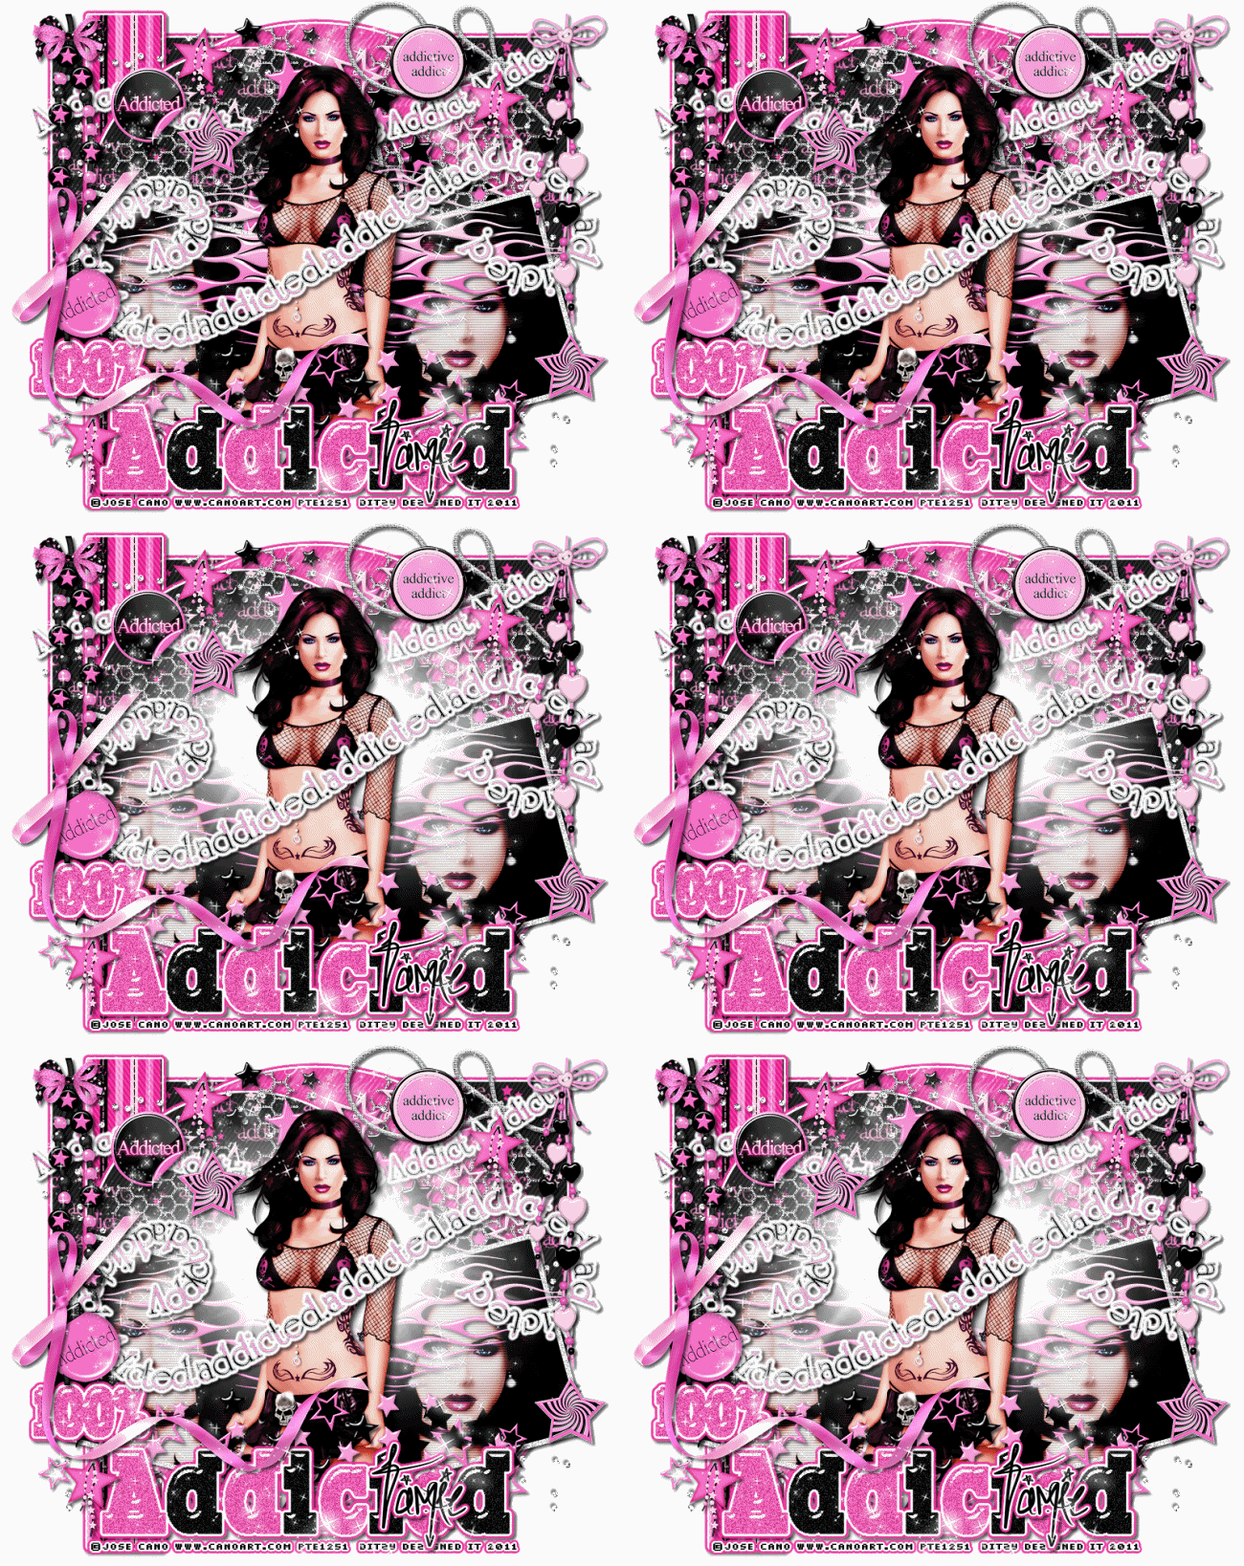
Supplies Needed :
Paint Shop ProX2 (Any version should work)
Animation Shop
Tube Of Choice - I used the amazing work of Jose Cano . You can purchase his work @ PTE
Scrapkit - Addicted By Tamie @ Addictive Pleasures
Template 3 By Addictive Pleasures Only Available @ Addictive Pleasures Forum
Animation Of Choice - I used one of Missy's from Divine Intentionz (Look to the right side & click on Animations. There is a ton there to choose from :-)
Plugins Used :
Eye Candy 4000 - Gradient Glow (Optional)
Eye Candy 5 Impact - Gradient Glow (Optional)
Eye Candy 5 Impact - Glass (Optional)
Elements Used :
Text
Text2
P10
P5
P9
P4
Sticker
Stars2
Stars
String2
Ribbonbow
Star2
Starbeads
Flames
Button2
Diamonds
Bomb
Bow5
Beads2
Beads
Wire
Sparkle
Font Used :
Sick Capital Vice
Lets Begin :
Open your Template 3 - go to Image - click Canvas Size - set it to 800 X 700
Now go to your layers pallet - delete the Credit & Background Layer.
In your layers pallet - click on your Raster 1 - go to Selections - click Select All - go back to Selections - click Float - then Selections again & click Defloat - (These steps will be used on most of the layers in the template.)
Now open P4 from your kit - Copy & paste it as a new layer onto your canvas - go to Selections - click Invert - then press your Delete key (on your keyboard) 1 time.
Go back to Selections & click Select None.
Now go to Effects - click Plugins - Eye Candy 5 Impact - Gradient Glow
**You are welcome to use my settings below or your own - the choice is always yours!**
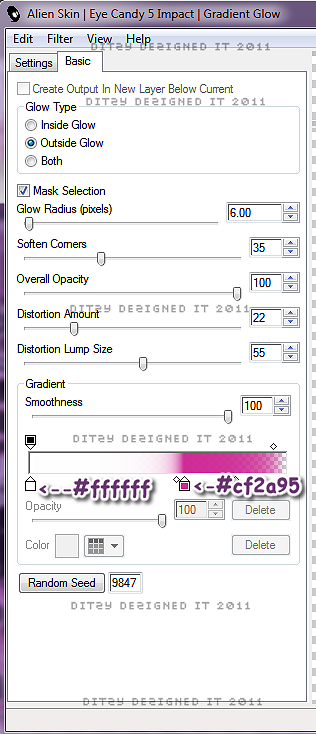
Click Ok.
Now go to Effects - 3D Effects - Drop Shadow
**Again you are welcome to use my settings - or your own**
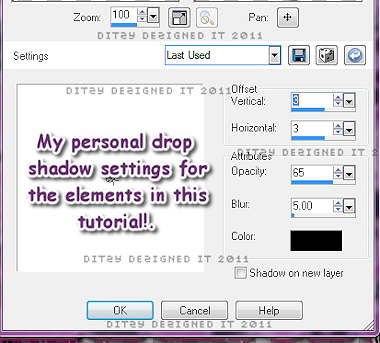
Click Ok.
Now go to your layers pallet - delete your original Raster 1 layer.
Now follow all of those same steps for the following layers - the only thing that will change each layer is what paper you use for each layer.
I will list the paper I used for each layer -
Raster 11 Layer - Paper 10
Raster 4 Layer - Paper 5
Raster 9 Layer - Paper 9
Raster 2 Layer - Paper 4
Now click on Raster 5 layer - then activate your Magic Wand tool - then click inside to select that layer on your canvas.
Make a new raster layer -
Activate your Flood Fill tool - set your Foreground Color to #000000 (Black) now flood fill your Raster 5 layer.
Keeping this layer selected - open your tube of choice - Copy & paste your close up tube. Use your move tool to position your close up tube to your liking. Once you are happy with it go to Selections - click Invert - then on your keyboard press your delete key 1 time.
Go to Selections & click Select None.
Now on your close up tube layer - go to Effects - click Plugins - Vanderlee - Unplugged
Now when your menu opens at the top right of it, scroll down the list til you see "Interlace" click on it to activate it.
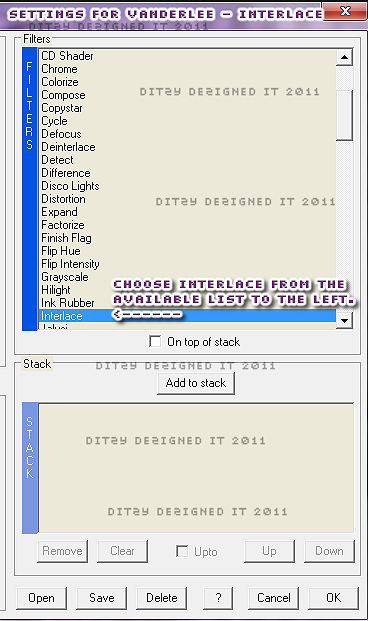
Then set your settings like mine below :
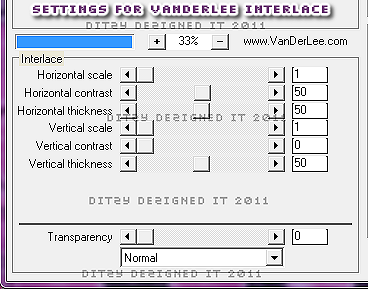
Then click Ok.
Go to your layers pallet - delete your original Raster 5 layer.
Now follow those exact same steps for your Copy Of Raster 5 layer.
Now click on Raster 6 layer & apply a drop shadow
Then click on your Copy Of Raster 6 layer & apply a drop shadow.
Now open your tube of choice again - Copy & paste your Full tube and position it using your move tool to the center of your template.
In your layers pallet - move your full tube layer down below your Raster 10 layer.
Now right click on your Full Tube layer - click Duplicate.
On your duplicated tube layer change your Blend Mode to Soft Light
Then on your original full tube layer (the bottom one) apply a drop shadow.
Click Ok.
Now in your layers pallet - delete your Raster 7 & Raster 9 layers.
Now click on your Raster 10 layer - activate your Magic Wand tool again -
Now click inside each number/symbol -
Make a new raster layer - set your Foreground Color to #f05fb0
Now flood fill your selected area's.
Now go to Effects - Plugins - Eye Candy 5 Impact - Glass
**My settings are below but you are welcome to use your own, its up to you**
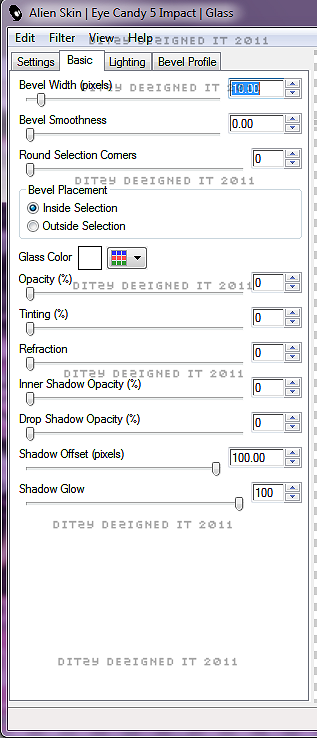
Click Ok.
Now go to Adjust - click Add/Remove Noise - Add Noise
Set to Uniform , 40 & monochrome box is checked , then click Ok.
Now go to Selections & click Select None.
Now go to Effects - click Plugins - Eye Candy 5 Impact - Gradient Glow (same settings as before)
Click Ok.
Now apply a drop shadow. (Same settings as before)
Go to your layers pallet - delete your original Raster 10 layer.
Now follow these exact same steps for your Raster 8 layer.
This time alternate colors , when you flood filling.
The colors I alternated with are :
#f05fb0
#000000 (Black)
Then once all of your template layers are the way I want them - start adding some elements from the kit.
Open your Text element - Copy & paste it as a new layer onto your canvas - then re-size it to 80%. Use your move tool & position your Text element to the center of your template.
Go to Effects - click Plugins - Eye Candy 4000 - Gradient Glow
**You are welcome to use my settings below or your own**
*Please note - when you click on the color tag in your Eye Candy 4000 - Gradient Glow menu - you can set it to Fat - then the color #ffffff (white) or any setting of your choice.*
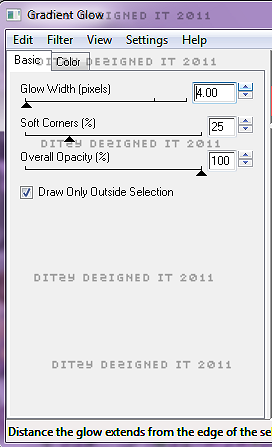
Click Ok.
Apply a drop shadow (same settings as above)
Now open your Text 2 element - Copy & paste it as a new layer onto your template - then re-size it to 80%. Now position your Text2 element towards the top of your template.
Apply the same Eye Candy 4000 - Gradient Glow effect that you used on your first Text element.
Then apply a drop shadow.
Open your Wire element - Copy & paste it as a new layer onto your canvas - then position it center on your template.
Go to Adjust - Sharpness - Sharpen
Effects - 3D Effects - Drop Shadow (same settings as before)
Now go to your layers pallet & move your Wire layer down under your 2 small frame layers.
Open your Beads element - Copy & paste it as a new layer onto your canvas - then re-size it to 70%. Position it to the upper left corner of your template.
Adjust - Sharpness - Sharpen
Effects - 3D Effects - Drop Shadow
Open Beads 2 element - Copy & paste it as a new layer onto your template - re-size it to 70%. Now use your move tool to position your element to the upper right corner of your template.
Adjust - Sharpness - Sharpen
Apply a drop shadow (same settings)
Open Bow 5 element - Copy & paste it as a new layer onto your template - then re-size it to 40%. Now position it to the top of your Beads element on the left.
Adjust - Sharpness - Sharpen
Apply a drop shadow
Open your Bomb element - Copy & paste it as a new layer onto your template - then re-size it to 40%.
Position it to your liking.
Adjust - Sharpness - Sharpen
Apply a drop shadow
Open your Diamonds element - Copy & paste it as a new layer onto your template - use your move tool to position them to the upper left of your template.
Go to your layers pallet - right click on your Diamonds layer - click Duplicate - then go to Image & click Mirror. (Use your move tool to adjust the position if needed)
Now go back to your layers pallet - right click on your duplicated Diamond layer again & click Duplicate. This time go to Image & click Flip.
Go back to your layers pallet - right click on your 2nd duplicated layer - then click Duplicate again, now go to Image & click Mirror.
(Adjust any of those elements using your move tool if needed)
Open your Button2 element - Copy & paste it as a new layer onto your canvas - then re-size it to 30%. Position it using your move tool to your liking.
Adjust - Sharpness - Sharpen
Effects - 3D Effects - Drop Shadow (same settings you have been using)
Open your Flames element - Copy & paste it as a new layer onto your template - then re-size it to 65%. Position your flames element to the right side of your full tube.
Adjust - Sharpness - Sharpen
Apply a drop shadow
Go to your layers pallet - move your Flames layer down so it is below both of your full tube layers.
Then right click on your Flame layer - click Duplicate. Now go to Image & click Mirror.
Adjust your position if needed.
Open your Starbeads - Copy & paste it as a new layer onto your template - then re-size it to 30%. Now position it to your liking.
Sharpen & apply a drop shadow
Go to your layers pallet - right click on your Starbeads - then click Duplicate -position your duplicated Starbead element to your liking. Now duplicate this layer again & position it to your liking.
Open your Star2 element - Copy & paste it as a new layer onto your canvas - then re-size it to 30%. Position it to your liking.
Sharpen & apply a drop shadow.
Then go to your layers pallet - right click on your Star2 layer - then click Duplicate.
Now use your move tool to position to your liking.
Open your Ribbonbow - Copy & paste it as a new layer onto your template. Now re-size it to 80%. Position it using your move tool to your liking.
Sharpen & apply a drop shadow.
Open your String2 element - Copy & paste it as a new layer onto your template - now re-size it to 80%. Position it using your move tool to your liking.
Sharpen & apply a drop shadow.
Open your Stars element - Copy & paste it as a new layer onto your template - use your move toolt o position your Stars element to your liking.
Sharpen & apply a drop shadow.
Open your Sticker element - Copy & paste it as a new layer onto your template - then re-size it to 30%. Position it to your liking.
Sharpen & apply a drop shadow.
Open your Sparkles element - Copy & paste it as a new layer onto your template - position them to the top of your template.
Then go to your layers pallet - right click on your Sparkles layer & click Duplicate.
Go to Image - click Flip.
Adjust the position if needed.
Now add your name . Set your Font, Size & Color.
I used :
Font : Sick Capital Vice
Size : 80 Pixels
Background Color : #000000 (Black)
Foreground Color : Set to nul
Apply your name. Then go to your layers pallet - right click on your name layer - then click Convert To Raster Layer.
Now go to Effects - click Plugins - Eye Candy 5 Impact - Gradient Glow
Click Ok.
Now apply a drop shadow to your name.
Now add your copyright & credit information. (Don't forget to add your license #)
Now activate your crop tool & crop off any access canvas you did not use.
Now open your Animation Shop -
Now open your animation of choice. Then click on the first frame in your animation - then on your keyboard use your Ctrl & A key to select ALL of the frames in your animation. (Take notice how many frames your animation has. You can do this quickly by looking at the lower right corner of your Animation Shop screen as it will tell you how many frames it has.)
Then go back to your PSP -
In your layers pallet - close off all of the layers from your bottom FULL TUBE layer up.
Then click on a layer that is below your closed off layers -
Edit - Copy Special - Copy Merged
Now go to your Animation Shop -
Right click - click Paste As New Animation
Now while in animation shop, you will need to duplicate your tag frame to as many frames as your animation of choice has.
For my animation it has 12 frames - so I need to make my tag into 12 frames.
To do that, on your keyboard, press your Ctrl & L key until you have exactly 12 frames.
Now click on the first frame in your tag frames. Then use your Ctrl & A keys again to select ALL of your tag frames. (ALL frames of your tags & ALL frames of your animation MUST be selected in order for your animation to work correctly.
Now go to your animation frames - right click in the first frame - then click Copy
Now go to your tag frames - right click in the first frame - then click Paste - Into Selected Frame
Now move your mouse around on your tag WITHOUT clicking until you see a part of your animation visible on the end of your mouse arrow. Once you see that portion of your animation - move your mouse around until you have your animation where you want it to begin. Once you are happy with placement - then left click to place your animation.
I used the exact same animation twice on my tag. So if you wish to do the same - then right click again on your 1st tag frame - then click Paste - Into Selected Frame - now move your mouse around until you see your animation again - once you see it - move your mouse so that your animation is in a different location than your first one. I positioned mine across from my 1st animation.
Now view your animation to make sure it is the way you want it.
If your not happy with it, click your undo button and do it again.
If you are happy with it, go back to your PSP -
Now in your layers pallet - open all of the layers you recently closed off. Then close off ALL of the layers that are below your bottom tube layer.
Now click on one of those active layers -
Go to Edit - Copy Special - Copy Merged
Go to Animation Shop -
Right click in your grey work area - then click Paste as New Animation -
Now you will need to make the same amount of frames that the bottom part of your tag & animation have -
mine has 12 frames.
So use your Ctrl & L keys until your top tag frame has 12 frames.
Once you have 12 frames for your top part of your tag. You will need to select ALL 12 of those frames. Do this the same way you did it for your other frames. Ctrl & A keys.
Now back to your top tag frames - right click in the first frame - then click Copy
Now go to the frames that have the back half of your tag & animation already on them.
Right click in the 1st frame - then click Paste - Into Selected Frame.
Now once the top of your tag appears - make sure you line it up so that it is the same as it was in your PSP.
Once happy with placement - left click to place your tag .
Now view your animation again to make sure you have it the way you want it.
If you are unhappy with the placement of the top part of your tag - click your undo button in your animation shop & try it again.
If you are happy with your tag then all that is left is to re-size it & save it as a GIF file!!♥
♥Lily InThe Night PTU♥
**This tutorial was written & posted by DitzyDezigns September 4th 2011**
***Any resemblance to any other tutorials is purely coincidental & completely unintentional!!***
Here is what we will be making :
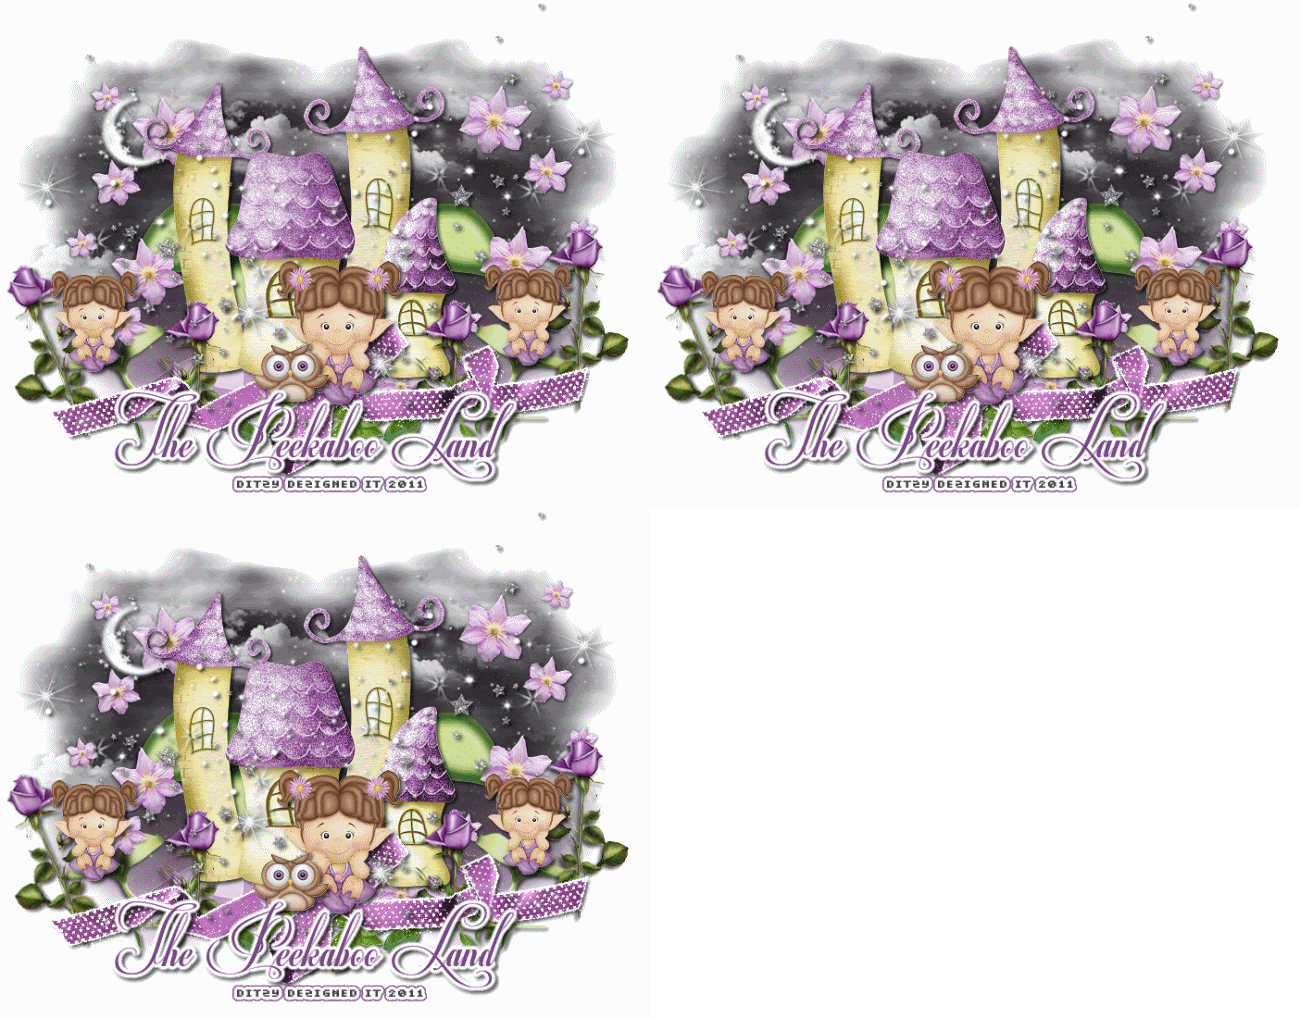
Supplies Needed :
Paint Shop Pro X2 (Any version should work)
Animation Shop
Scrapkit - Lily In The Night By The Peekaboo Land
Mask Of Choice
Plugins Used :
Eye Candy 4000 Gradient Glow (Optional)
Xero - Radiance (Optional)
Alien Skin - Constellation (Optional)
Elements Used :
House_03
Lily_01
Owl_01
Globe_01
Flower_07
Paper10
Leaf_03
Moon_01
Lily_02
Ribbon_01
Stars_01
Rose_01
Font Used :
Respective
Lets Begin :
Start by opening a new 800 X 650 white canvas. (Don't worry you can crop it later)
Then open your House_03 element - Copy & paste it as a new layer onto your canvas - then re-size it to 20%. Then re-size it again to 50%. Now use your move tool & position your house element to the center of your canvas.
Go to Adjust - Sharpness - Sharpen
Then - Effects - 3D Effects - Drop Shadow
*You can use my settings below or your own, the choice is always yours)
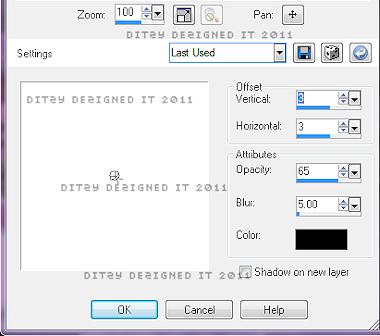
Click Ok.
Open your Lily_01 element - Copy & paste it as a new layer onto your canvas - then re-size it to 20%. Then re-size it again to 50%. Use your move tool & position your Lily element to the front of your House element.
Adjust - Sharpness - Sharpen
Effects - 3D Effects - Drop Shadow (Use same settings as you used above)
Open your Owl_01 element - Copy & paste it as a new layer onto your canvas - then re-size it to 20%. Then re-size it again to 50%. Now re-size it one more time to 65%.
Use your move tool to position your Owl element to the left side of your Lily element -
Adjust - Sharpness - Sharpen
Effects - 3D Effects - Drop Shadow (Same settings as above)
Open Globe_01 - Copy & paste it as a new layer onto your canvas - then re-size it to 20%, then re-size it again to 50%. Use your move tool & position your Globe element in front of your house slightly towards the left.
Go to your layers pallet - right click on your Globe layer - then click Duplicate.
Now use your move tool to position your duplicated Globe element slightly to the right.
Go back to your layers pallet - right click on your duplicated Globe layer - then click Merge - then click Merge Down.
Go to Adjust - Click Sharpness - then click Sharpen
Effects - 3D Effects - Drop Shadow (same settings as before)
Open your Flower_07 element - Copy & paste it as a new layer onto your canvas - then re-size it to 20%. Then re-size it again to 65%. Now use your move tool to position your flower in front of your house slightly to the left.
Go to your layers pallet - move your Flower layer down so it is directly below your House layer.
Adjust - Sharpness - Sharpen
Effects - 3D Effects - Drop Shadow
This time you want to apply a slight drop shadow, so I have changed my settings to those below :
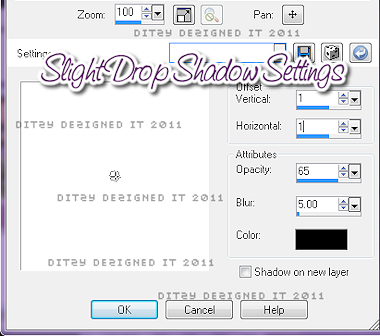
Click Ok.
Open Paper 10 - Copy & paste it as a new layer onto your canvas - then re-size it to 50% 3x's.
In your layers pallet - move your paper 10 layer down so that it is the 2nd layer from the bottom of your layers pallet.
Now go to Layers - click Load/Save Mask - then click Load Mask From Disk.
Now once your Mask menu opens, choose a Mask of your choice & click Load.
Now in your layers pallet - right click on your Mask layer - then click Merge - Merge Group
Now right click on your Merged Mask layer - click Duplicate.
Now right click on your Duplicated Mask layer - then click Merge - Merge Down
Now use your move tool to position your Mask slightly to the left on your canvas.
Then go back to your layers pallet - right click on your Mask layer & click Duplicate.
Go to Image - click Mirror. Use your move tool to adjust the position of your duplicated Mask layer if needed.
Now open your Leaf_03 element - Copy & Paste it as a new layer onto your canvas - then re-size it to 20%, then re-size it again to 40%. Use your move tool to position it to the right side of your house.
Go to your layers pallet - move your Leaf_03 layer so that it is under your Flower layers.
Now go to Effects - Plugins - Xero - Radiance
*My settings are below, if you would like to use them*
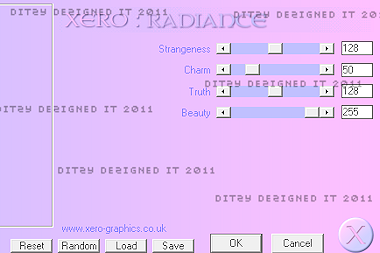
Click Ok.
Effects - 3D Effects - Drop Shadow
Click Ok.
Now go to your layers pallet - right click on your Leaf_03 layer - click Duplicate. Now go to Image & click Mirror. Use your move tool to adjust the position of your duplicated Leaf_03 element if needed.
Now open your Lily_02 element - Copy & paste it as a new layer onto your canvas - then re-size it to 20%. Then re-size it again to 35%. Use your move tool & position your Lily_02 to the left side of your house & place it on your leaf element so it appears to be sitting on the leaf.
Adjust - Sharpness - Sharpen
Effects - 3D Effects - Drop Shadow (same settings as above)
Now go to your layers pallet - right click on your Lily_02 layer & click Duplicate. Now use your move tool to move your duplicated Lily_02 element to the right side & place that one on the leaf so it appears to be sitting on it as well.
Open your Moon element - Copy & paste it as a new layer onto your canvas - then re-size it to 20%. Then re-size it again to 30%. Now use your move tool to position it to the upper left of your tag.
Adjust - Sharpness - Sharpen
Open your Leaf_02 - Copy & paste it as a new layer onto your canvas - then re-size it to 20%, then re-size it again to 50%. Now go to Image - click Free Rotate - set it to Right 90.00 & click Ok.
Now use your move tool to position it to the bottom left end of your Globe element.
Adjust - Sharpness - Sharpen
Effects - 3D Effects - Drop Shadow
Go to your layers pallet - right click on your Leaf_02 layer - click Duplicate. Now go to Image - click Mirror.
Open your Ribbon_01 element - Copy & paste it as a new layer onto your canvas - then re-size it to 20%. Then re-size it to 50%. Position it to the bottom of your tag.
Go to your layers pallet - move your Ribbon_01 layer below all 3 of your Lily elements.
Adjust - Sharpness - Sharpen
Effects - 3D Effects - Drop Shadow
Open your Stars_01 element - Copy & paste it as a new layer onto your canvas - then re-size it to 20% then re-size it again to 50%. Now position your Stars element to the left side of your tag.
Go to your layers pallet - move your Stars layer down so it is below all 3 of your Lily layers.
Now right click on your Stars layer - click Duplicate - now go to Image & click Mirror.
Now on your duplicated Stars layer - right click on it - then click Duplicate.
Now go to Image & click Mirror.
Go back to your layers pallet - right click on your duplicated Stars layer - then click Merge Down.
Now go to Adjust - Sharpness - Sharpen
Open your Rose_01 element - Copy & paste it as a new layer onto your canvas - then re-size it to 20%. Then re-size it again to 50%. Now use your move tool to position it to your liking.
Adjust - Sharpness - Sharpen
Effects - 3D Effects - Drop Shadow
Go to your layers pallet - right click on your Rose layer - then click Duplicate. Use your move tool to adjust the position to your liking.
Now duplicate your Rose layer a couple more times & place them to your liking.
In your layers pallet - click on your House layer -
Now activate your Selections Tool - then trace out the parts of your house that you want to animate with glitter.
Once you have everything selected go to your layers pallet - right click on your House layer - then click Promote Selections To Layer.
Now go to Selections - click Select None.
Go back to your layers pallet - right click on your Promoted Selections layer - then click Duplicate. Now right click on your duplicated layer & click Duplicate again.
Now you should have 3 layers of your area you are going to apply glitter to.
In your layers pallet - rename the 3 layers you just made. I used Glitter 1, Glitter 2, Glitter 3
Start from the bottom glitter layer & work your way up. When all of them have the Add Noise added, close off Glitter 2 & 3 layers.
Now in your layers pallet - click on your Glitter 1 layer - got o Adjust - click Add/Remove Nosie - then click Add Noise - set to Uniform , 30 & make sure your Monochrome is checked, then click Ok.
Click on your Glitter 2 layer - close off your Glitter 1 layer
Add Noise - this time change to 35 & click Ok.
Click on your Glitter 3 layer - close off your Glitter 2 layer -
Add Noise - this time change it to 40 & click Ok.
Now -
Add your Name & credit information .
Font I used for the name :
Font : Respective
Size : 65 Pixels (Depends on the length of the name)
Background Color : #764689
Foreground Color : Set to nul
Once happy with placement of name - go to Layers Pallet - right click - then click Convert To Raster Layer
Then go to Effects - click Plugins - Eye Candy 4000 - Gradient Glow with the following settings :
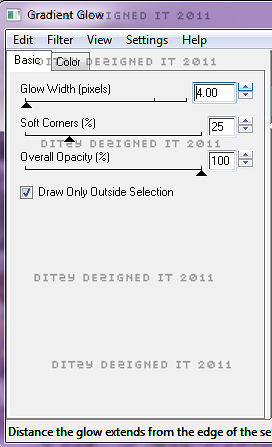
Click Ok.
Apply a drop shadow
Now click on your Glitter 1 layer -
Edit - Copy Special - Copy Merged
Right click on your grey work space - click Paste As new Animation
Go back to PSP -
Click on Glitter 2 layer & close of Glitter 1 layer
Edit - Copy Special - Copy Merged
Go to Animation Shop -
Right click in frame 1 & click Paste - After Current Frame
Go back to PSP
Click on Glitter 3 layer & close off Glitter 2 layer -
Edit - Copy Special - Copy Merged -
Right click on the 2nd frame - click Paste - click After Current Frame
Now you should have all 3 frames in your Animation Shop -
So now you will want to view your animation.
Then activate your crop tool in your Animation Shop & crop off any access canvas that you did not use.
Then re-size your tag & save it as a GIF file!!♥
Subscribe to:
Posts (Atom)
About Me
- DitzyDezigns
- New York, United States
- Hiya Everyone! My name is Ronney, I have 3 wonderful teenagers, and have been married to my husband for 20 years. I LOVE to design signatures, tags & avatars, I design with PSP, and have been designing for over 2 1/2 years. I will be not only designing signatures, tags & avatars but will also be writing & posting tutorials as well. I will also be making some templates to share with you all as well. So I hope you enjoy and can use everything I have available on my blog :-) If you ever try any of my tutorials,please send me your completed designs and I would love to showcase it here on my blog!
♥I CT For♥





Blog Hop

Today's Date

Favorite Stores
♥Forums♥


My Pixels



♥My Avatars♥