Don't Be A Pirate

My Blinkies

Add Me On Facebook

Protected


Blogs I Stalk


Awards :-)


Find Me At

Favorite Stamps


Showing posts with label Scraps With Attitude. Show all posts
Showing posts with label Scraps With Attitude. Show all posts
Saturday, July 30, 2011
♥Beach Birds (Animated) PTU♥
 7:05 PM |
  Created By
DitzyDezigns |
Created By
DitzyDezigns |


**This tutorial was written & posted by DitzyDezigns on July 30th 2011**
***Any resemblance to any other tutorial is purely coincidental & completely unintentional!!!***
Here is what we will be making - It is animated -

Supplies Needed :
Paint Shop Pro X2 (Any version should work)
Animation Shop
Scrapkit - Beach Birds By Candylicious Designz @ Scraps With Attitude
Plugins Used :
Eye Candy 5 Impact - Gradient Glow (Optional, Screen Shots Provided)
Eye Candy 5 Impact - Glass (Optional , Screen shot provided)
Fonts Used :
AntsyPants
Elements Used :
Sand
Lei
Waves
BeachBall
Pail
Sun
Surfboard
SandCastle
PalmTree
Penquin1 & 2
Lets Begin :
Start by opening a new 800 X 650 white canvas. (Don't worry you will crop it later.)
Open your Water element - Copy & paste it as a new layer onto your canvas. Then re-size it to 30%. Now re-size it again to 50%. Using your move tool, position your Water element to the center of your canvas.
Go to Adjust - Sharpness - Sharpen
Then go to Effects - 3D Effects - Drop Shadow.
(The settings below are my own personal preferences, you are welcome to use them if you wish, or you can set the settings to your own liking.)
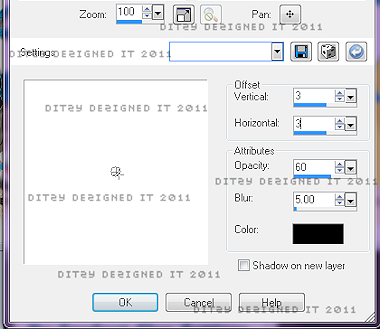
Click Ok.
Open your Penguin2 element - Copy & paste it as a new layer onto your canvas - then re-size it to 20% , then re-size it again to 50%. Using your move tool position your Penguin2 element to the left side of your Water element.
Adjust - Sharpness - Sharpen
Effects - 3D Effects - Drop Shadow
(Use the same drop shadow settings that you used on your Water element.)
Open your Penguin1 element - Copy & paste it as a new layer onto your canvas - then re-size it to 20%, then re-size it again to 50%.
This time position your Penguin 2 element to the right side of your Water element.
Adjust - Sharpness - Sharpen
Effects - 3D Effects - Drop Shadow (Same settings as before)
Open your PalmTree element - Copy & paste it as a new layer onto your canvas - then re-size it to 20%. Position your Palm Tree to the right side of your Water element.
Go to Effects - Plugins - Eye Candy 5 Impact - Glass
(You can use my settings or your own)
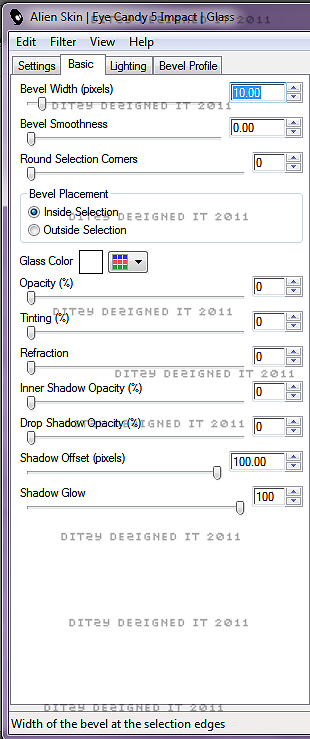
Click Ok.
Effects - 3D Effects - Drop Shadow. (Same settings as before)
Now go to your layers pallet - move your Palm Tree layer down so that it is below both of your Penguin layers.
Now right click on your Palm Tree layer - then click Duplicate.
Now go to Image & click Mirror.
Use your move tool to adjust the position of your duplicated Palm Tree element if needed.
Open your Sand Castle element - Copy & paste it as a new layer onto your canvas - then re-size it to 20%. Use your move tool & position it to the left side of your water element. (See my tag for reference if needed)
Adjust - Sharpness - Sharpen
Apply a drop shadow.
Open your Sun element - Copy & paste it as a new layer onto your canvas - then re-size it to 20%. Then re-size it again to 30%. Position it above your Water element to your liking.
Adjust - Sharpness - Sharpen
Apply a drop shadow.
Open your Surfboard element - Copy & paste it as a new layer onto your canvas - then re-size it to 20%. Then re-size it again to 50%. Position it to the right side. Then in your layers pallet - move your Surfboard layer below your Penquin layers.
Adjust - Sharpness - Sharpen
Apply a drops shadow.
Open your Pail element - Copy & paste as a new layer onto your canvas - then re-size it to 20%. Then again to 40%.
Now position to the left side & place it in front of your Sand Castle element .
Adjust - Sharpness - Sharpen
Apply a drop shadow.
Open your Beach ball element - Copy & paste it as a new layer onto your canvas - then re-size it to 20%. Then re-size it again to 20%. Position it to your liking.
Adjust - Sharpness - Sharpen
Apply a drop shadow.
Open your Lei element - Copy & paste it as a new layer, then re-size it to 20%. Then re-size it again to 40%. Position to your liking.
Adjust - Sharpness - Sharpen
Apply a drop shadow.
Open your Sand element - Copy & paste it as a new layer onto your canvas. Then re-size it to 50%. Position it to your liking. Go to your layers pallet - Move your Sand down so that it is just above your Water layer. Duplicate this layer 2 times. Position so that one goes to the left & one goes to the right, covering the width of your water element.
Activate your Text tool - set your Font , Size & Color
I used :
Font : AntsyPants
Size : Depends on the length of your name.
Background Color : #f9e613
Type out your name click apply.
Position your name so that it is center with your Water element.
Go to your layers pallet - right click on your Name layer - click Convert To Raster Layer.
Go to Effects - Plugins - Eye Candy 5 Impact - Gradient Glow
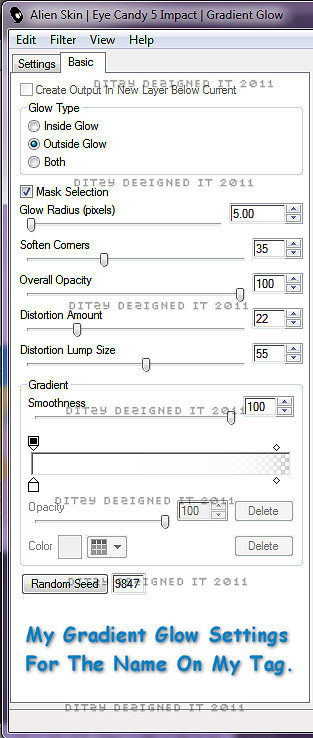
Click Ok.
Now apply a drop shadow.
Activate your Magic Wand tool - then click inside each letter in your name.
Go to Effects - 3D Effects - Inner Bevel
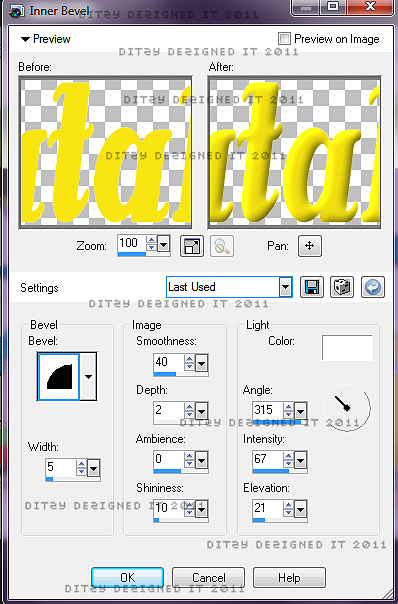
Click Ok.
Now go to Selections & click Select None
Apply your copyright/credit information
Click on your Water layer , now duplicate this layer 2 times.
For a total of 3 Water layers.
Close of your top 2 Water layers.
Click on your Water 1 layer. Go to Adjust - click Add/Remove Noise - Add Noise

Now open Wave 2 layer - Add Noise
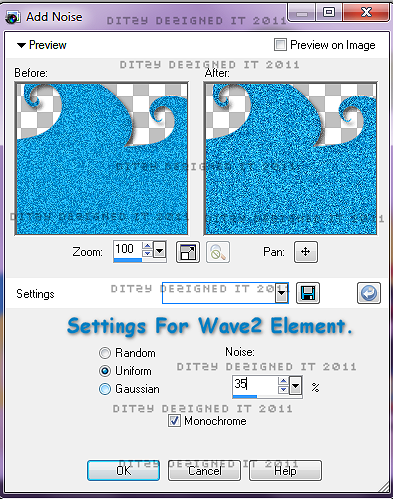
Now open Wave 3 layer - Add Noise
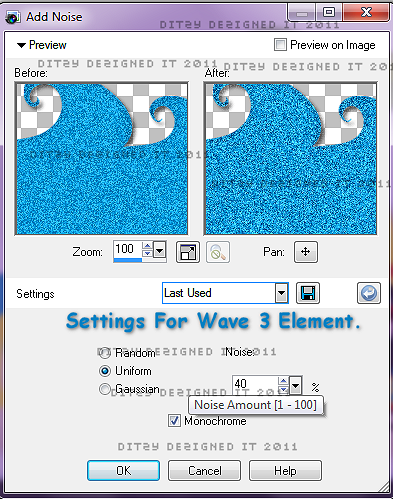
Now close of your Wave 2 & Wave 3 layers again. Click on your Wave 1 layer.
Open your Animation Shop -
Go back to your PSP-
Go to Edit - Copy Special - Copy Merged
Go to your Animation Shop - Right click in your grey work area - then click Paste As New Animation.
Go back to PSP -
Open & click on your Wave 2 layer & close your Wave 1 layer
Go to Edit - Copy Special - Copy Merged -
Go to your Animation Shop -
Right click in your first frame you just put there - click Paste - After Current Frame.
Go back to your PSP -
Open & click on your Wave 3 layer & close your Wave 2 layer -
Go to Edit - Copy Special - Copy Merged -
Go back to your Animation Shop -
Right click in your 2nd frame you just put there - click Paste - After Current Frame.
Now view your animation.
Once you are happy with your tag - activate your crop tool in your animation shop - then crop off any canvas that you did not use.
Now re-size your tag to your desired size & save as a GIF file.
 Labels:

Sunday, July 17, 2011
♥Sunny Dayz (Animated) PTU♥
**This tutorial was written & posted by DitzyDezigns on July 17th 2011**
***Any resemblance to any other tutorial is purely coincidental & completely unintentional!!***
Here is what we will be making :
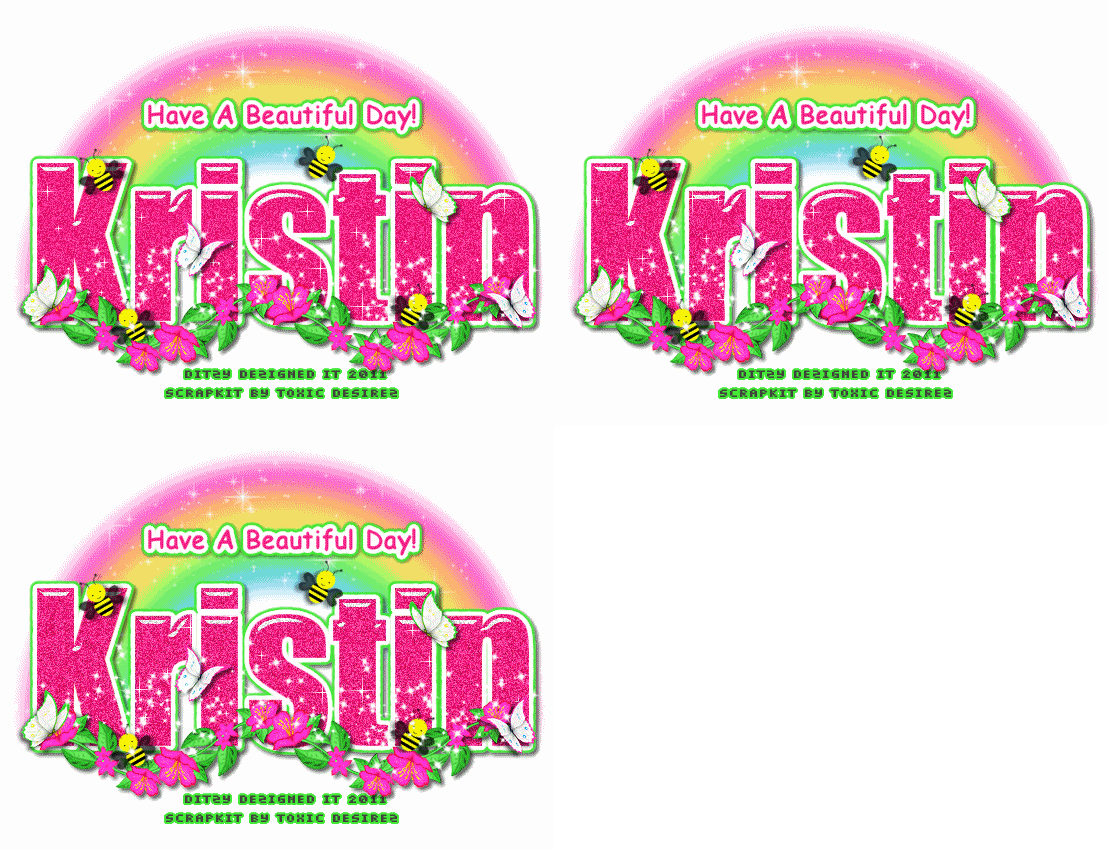
Supplies Needed :
Paint Shop Pro X2 (Any version should work)
Animation Shop
Scrapkit - Sunny Dayz By Toxic Desirez @ Scraps With Attitude
Plugins Used :
Eye Candy 5 Impact - Gradient Glow
Eye Candy 5 Impact - Glass
VM Natural - Sparkles
Fonts Used :
Impact (For main name)
Comic Scan (For phrase)
Pixelette (For credit info)
Elements Used :
Rainbow
Butterfly 1 & 4
Sparkles
FlowerRibbon1
Bee2
Lets Begin :
Start with opening a new 800 X 650 white canvas.
Open your Rainbow element - Copy & paste it as a new layer onto your canvas - then re-size it to 80%. Position it so that it is centered on your canvas.
Now activate your text tool, Set your font, size & color.
I used :
Font : Impact
Size : 225 Pixels
Background Color : #ff1e81
Foreground Color : Set to nul
Now click any where on your canvas - this will open your text box, then type out the name you would like on your tag. Then click Apply. Now position your name so that it is center with your Rainbow element.
(Now leave the name layer alone, as we will come back to it later)
Open your FlowerRibbon1 element - Copy & paste it as a new layer onto your canvas - then go to Image - click Free Rotate, set it to Left, 90.00 & click Ok.
Now position your FlowerRibbon1 element to the bottom of your name (See my tag for reference if needed)
Now go to Adjust - click Sharpness then click Sharpen.
Then go to Effects - click 3D Effects - then from the slide out menu click Drop Shadow.
(You can use my settings below or your own)
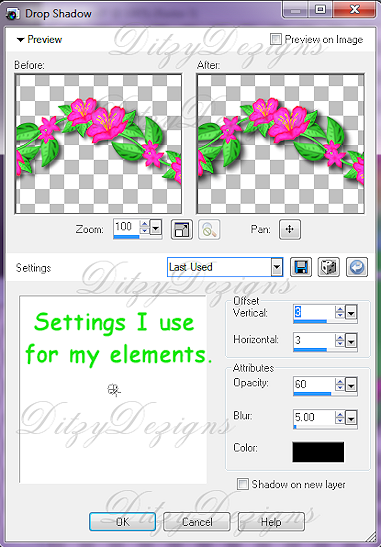
Click Ok.
Now open your Bee2 element - Copy & paste it as a new layer onto your canvas - then re-size it to 20%. Use your move tool & position your Bee2 element to your liking.
Go to Adjust - click Sharpness - then click Sharpen.
Now apply a drop shadow. (Use the same settings as above)
Now go to your layers pallet - right click on your Bee2 layer - then click Duplicate. Then go to Image & click Mirror. Now use your move tool to adjust the position of your duplicated Bee2 element to your liking.
Go back to your layers pallet - right click on your duplicated Bee2 layer - then click Duplicate.
Now use your move tool to position your 3rd Bee2 element to your liking.
Then duplicate your 3rd Bee2 layer again, then go to Image & click Mirror. Adjust the position of your 4th Bee2 element to your liking.
Open your Butterfly1 element - Copy & paste it as a new layer onto your canvas - then re-size it to 20%. Use your move tool to position your Butterfly1 element to your liking.
Adjust - Sharpness - Sharpen
Apply a drop shadow.
Go to your layers pallet - Right click on your Butterfly1 layer -then click Duplicate. Now go Image & click Mirror. Adjust the position of your duplicated Butterly1 element to your liking.
Open your Butterfly4 element - Copy & paste it as a new layer onto your canvas , then re-size it to 20%.
Position it to your liking.
Sharpen & apply a drop shadow.
Then duplicate your Butterfly4 layer, then go to Image & click Mirror. Now position your duplicated Butterfly4 element to your liking.
Open your Sparkles element - Copy & paste it as a new layer onto your canvas - then re-size it to 50%. Position your Sparkles element to the lower left side of your name. Now go to your layers pallet - right click on your Sparkles layer - then click Duplicate.
Now use your move tool & move your Duplicated Sparkles element to the lower right side of your name.
Now activate your text tool - set your font, size & color you would like to use for your phrase.
I used :
Font : Comic Scan
Size : 25 Pixels
Background Color : #ff1e81
Foreground Color : Set to nul
Now click on your canvas to open your text box, then type in what you would like your phrase to be. I used "Have A Beautiful Day"
Then click Apply.
Now go to your layers pallet & right click on your phrase layer - then click Convert To Raster Layer -
Then go to Effects - Plugins - Eye Candy 5 Impact - Gradient Glow.
Click Ok.
Now apply a drop shadow to your phrase. I used the same settings I used for my elements. But you can change it or keep it the same, its totally up to you.
Now add any copyright/credit information that is needed for your tag.
Once you have your credit info typed out & applied, then convert that layer to a raster layer - then apply a gradient glow to that as well. This helps it be easier to read.
Now before you convert your main name to a raster layer - you may want to save your tag as a PSP file. Incase you might want to make more of this specific tag. This way if you save it as a PSP file, you can reopen it at a later time & alter the main name to whatever you want it to be.
Now once you have done the steps above go to your layers pallet & right click on your Name layer.
Then from the menu click Convert To Raster Layer.
Now go to Effects - click Plugins - then click Eye Candy 5 Impact - then click Gradient Glow from the slide out menu - , again you can use my settings below, or your own.
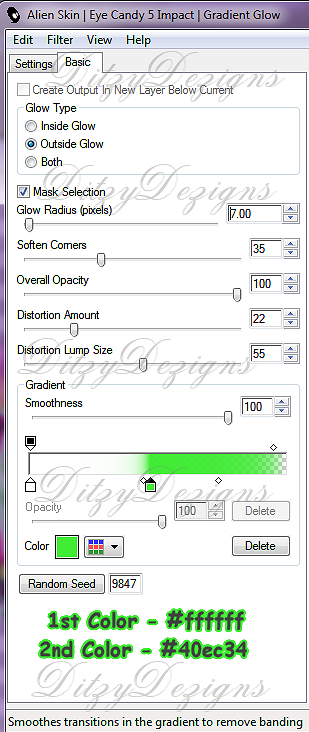
Click Ok.
Now apply a drop shadow to your name. (Same settings you have been using)
Now activate your Magic Wand Tool -then click inside EACH letter in your name - then go to Effects - Plugins - then click Eye Candy 5 Impact - then click Glass.
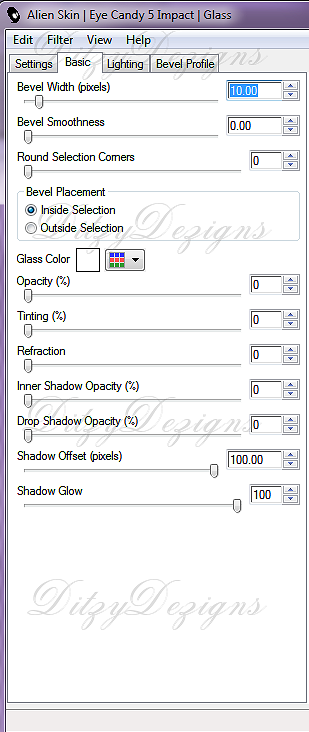
Click Ok.
Now keeping your letters selected -
Go to Adjust - click Add/Remove Noise - then click Add Noise -
Set it to Uniform - 40 & make sure your Monochrome box is checked, then click Ok.
Still keeping your letters selected -
Go to Effects - click Plugins - then click VM Natural - then click Sparkles
Settings below :

Then click Ok.
Now go to Selections & click Select None.
Now Open your Animation Shop -
Go back to your PSP -
Go to Edit - click Copy Special - then click Copy Merged from the slide out menu -
Now go to your Animation Shop -
Right click on your grey work area - then click Paste As New Animation
Now go back to your PSP -
Click your undo button 3 times - now you are back to where you added the glass effect.
Now go to Adjust - click Add/Remove Noise - then click Add Noise
This time only change the noise setting to 45 then click Ok.
Then go to Effects - click Plugins - then click VM Natural - Sparkles
This time only change the Random Seed by increasing it 5 points.
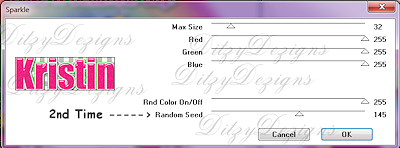
Click Ok.
Go to Selections & click Select None.
Now go to Edit - click Copy Special - then click Copy Merged
Go to your Animation Shop -
Right click in your first frame you just put there - then click Paste -then from the slide out menu click After Current Frame.
Now go back to your PSP -
Click your undo button 3 times -
Go to Adjust - Add/Remove Noise - then click Add Noise
This time only change your Noise setting to 50 & click Ok.
Now go to Effects - Plugins - VM Natural - and again increase the Random Seed by 5.
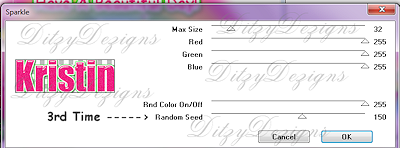
Click Ok.
Selections - Select None.
Go to your Animation Shop -
Right click in your 2nd frame that you just put there - then click Paste - then from the slide out menu click After Current Frame.
Now view your animation, if you are happy with the animation, you may want to re-size your completed tag .
To re-size in Animation Shop, press your Shift & S keys on your keyboard & this will open your re-size menu. Set the pixels to your liking & click Ok.
Now save your completed tag as a GIF file & you have completed this tutorial!!♥
Tuesday, June 14, 2011
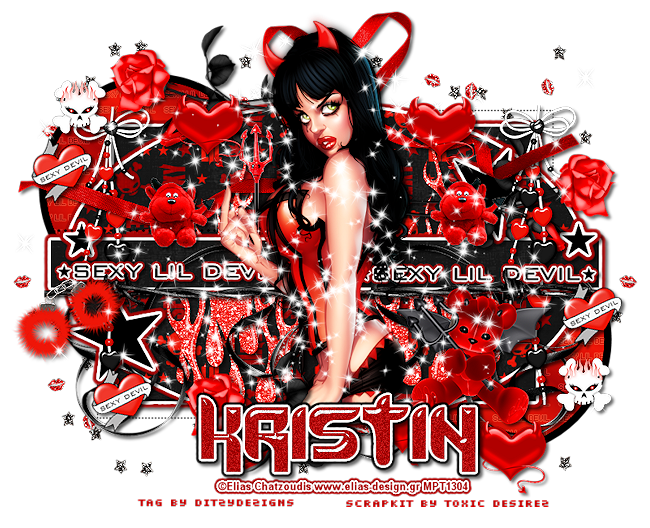
♥Sexy Lil Devil PTU♥
**This tutorial was written & posted on June 14th 2011**
***ANY resemblance to any other tutorial/tag is PURELY coincidental & COMPLETELY unintentional!!***
Here is what we will be making -
Supplies Needed :
Paint Shop Pro X2 (Any version should work)
Tube Of Choice - I used the amazing work of Elias Chatzoudis. I purchased mine at MPT but you can now purchase his work @ PTE (Do not use without the proper license!!)
Scrapkit - Sexy Lil Devil By Toxic Desirez @ Scraps With Attitude
Template_151 By Toxic Desirez (Scroll down a bit & on the left hand size you will see a label "Templates" with their download links, click the last link Templates 150-159)
Plugins Used -
Eye Candy 5 Impact - Glass & Gradient Glow
Elements Used :
Devil Bear
Lips & Star Scatter
Sparkles
Trident
Skull
Rose
Fuzzy Handcuffs
Ribbon 1 & 2
Heart & Banner
Sexy Lil Devil
Devil Heart
Flames
Beaded String
Barbwire
Papers 1 & 4
Lets Begin :
Start by opening your Template_151 -
Go to your layers pallet & delete the credit & background layers.
Go to Image & click Canvas Size - set to 800 X 650 (Don't worry you will crop off any unused canvas when you are finished.)
Now in your layers pallet, click on your Lrg Rectangle layer, go to Selections - Click Select All - then Selections again & click Float - Selections again & click Defloat -
(From here down when the above steps will be used I will only put the following -"Selections - Select All -Float - Defloat" then you will know that you will have to go to Selections each time.)
Open Paper 1 - Copy & paste it as a new layer onto your canvas ,then go to Selections & click Invert, then on your keyboard press your delete key 1 time.
Now go to Selections again & click Select None.
Go to your layers pallet & delete your original Lrg Rectangle layer.
Now go to Effects - click Plugins - Eye Candy 5 Impact - Gradient Glow & apply settings of your chosing.
Go to Effects - click 3D Effects - then click Drop Shadow. Set your settings to your liking & click Ok.
Now follow the same steps for your Oval layer. Except this time use Paper 4.
Remember to apply the same Gradient Glow & drop shadow that you did for your Lrg Rectangle layer.
Again follow the same steps from above for your Thin Rectangle layer, this time use Paper 1.
Apply your Gradient Glow & Drop shadow. (Same settings as the other 2)
Now in your layers pallet, click your Sm Stars layer - Apply the same Gradient Glow & drop shadow that you have applied to your other layers above.
Follow this same step for your Lrg Star layer as well.
Now in your layers pallet, click on your Wordart layer -
For this layer you will want to apply the same Gradient Glow & Drop Shadow as you did for the layers above.
Now position your wordart on your Thin Rectangle , go to your layers pallet, right click on your wordart layer, then click Duplicate, now use your move tool to move your duplicated wordart to the right side of your Thin Rectangle. (See my tag for reference if needed)
Open your tube of choice - Copy & paste it as a new layer onto your canvas, then re-size your tube if needed. (I did not need to re-size mine). Now use your move tool & move your tube to the center of your template.
Go to your layers pallet, right click on your tube layer & click Duplicate. Now in your layers pallet, move your duplicated tube layer below your Thin Rectangle layer.
Now activate your eraser tool, go back to your layers pallet, & click on your top tube layer.
Now on your canvas, erase the bottom part of your tube that goes lower than your Oval layers Gradient Glow.
Now click on your bottom tube layer, & erase the exact same part of your tube that you did on the top tube layer.
Now back up on your top tube layer, right click & click Duplicate. Now go to Adjust, click Blur, then click Gaussian Blur, set to 5.00 & click Ok.
Now go to the top of your layers pallet & change your Blend Mode to Overlay.
Then in your layers pallet, go to your 3rd tube layer down & apply a drop shadow.
Now in your layers pallet, click on the last layer in your layers pallet -
Open your Lips & Star Scatter element - Copy & paste it as a new layer onto your canvas ,then position to the left. Now go to your layers pallet & if needed move your Lips & Star Scatter layer down so that it is the very last layer in your pallet.
Now right click on your Lips & Star Scatter element - click Duplicate. Now go to Image & click Flip. Now right click on your Duplicated Lips & Star Scatter layer & duplicate it again.
Now this time use your move tool to position it to the middle of your canvas. (Still keeping it behind your layers but so it is visible on the top, bottom & sides of your template.)
Back in your layers pallet, click on your top layer in your layers pallet -
Open your Devil Bear - Copy & paste it as a new layer onto your canvas, then re-size it to 50%. Now position it to the right side of your tube & place where desired.
Go to Adjust, click Sharpness then click Sharpen.
Go to Effects - Click 3D Effects - then click Drop Shadow. Set your settings to your liking & click Ok.
Open your Barbwire element - Copy & paste it as a new layer onto your canvas ,then re-size it to 85%. Now use your move tool & position your element to the bottom of your thin rectangle. In your layers pallet, move your barbwire element below both of your top 2 tube layers.
Sharpen & apply a drop shadow.
Open your Beaded String element - Copy & paste it as a new layer onto your canvas, then re-size it to 65%.Now position it to the top left corner of your template.
Sharpen & apply a drop shadow.
In your layers pallet move your Beaded String layer below your wordart & barbwire layers.
Still in your layers pallet, right click on your Beaded String element & click duplicate. Now use your move tool to position your duplicated element to the top right corner of your template.
Open your Ribbon 2 element - Copy & paste it as a new layer onto your canvas ,then go to Image, click Free Rotate, set it to Right 90.00 & click Ok.
Then re-size your Ribbon 2 element to 65%.
Now position it to the left side of your template.
Go to your layers pallet & move your Ribbon2 layer down below your Lrg Star layer.
Sharpen & apply a drop shadow.
Now in your layers pallet, right click on your Ribbon2 layer & click Duplicate.
Go to Image & click Mirror.
Open your Flames element - Copy & paste it as a new layer onto your canvas, then re-size it to 65%. Now position your Flame element to the right side of your tube.
In your layers pallet, move your Flames layer below your Thin Rectangle layer.
Sharpen & apply a drop shadow to your Flame element.
Go back to your layers pallet, right click on your Flame layer & click Duplicate.Now go to Image & click Mirror.
Adjust the position of your duplicated Flame element if needed.
Open your Devil Heart element - Copy & paste it as a new layer onto your canvas, then re-size it to 30%. Position where you desire.
Sharpen & apply a drop shadow.
Go to your layers pallet & on your Devil Heart layer duplicate it a couple of times, each time using your move tool to position each element.
Open your Plush Devil - Copy & paste it as a new layer onto your canvas, then re-size it to 30%. Position to the left of your tube.
Sharpen & apply a drop shadow.
Go to your layers pallet, right click on your Plush Devil layer & click Duplicate.
Now use your move tool to position to the right side of your tube to your liking.
Open your Heart & Banner element - Copy & paste it as a new layer onto your canvas ,then re-size it to 30%. Go to Image & click Free Rotate set to Left 20.00 & click Ok.
Position to your liking. Sharpen & apply a drop shadow.
I also duplicated this element a couple of times & placed them around my tag.
Open your Ribbon 1 element - Copy & paste it as a new layer onto your canvas ,then position it at the top of your template.
In your layers pallet, move your Ribbon 1 layer down below both of your top tube layers.
Sharpen & apply a drop shadow.
Open your Fuzzy Handcuffs element - Copy & paste as a new layer onto your canvas ,then re-size it to 30%. Position to your liking.
Sharpen & apply a drop shadow.
Open your Rose element - Copy & paste it as a new layer onto your canvas ,then go to Image & click Free Rotate to 90.00 & click Ok. Now position to your liking.
Sharpen & apply a drop shadow.
Duplicate your Rose element & place as desired.
Open your Skull element - Copy & paste it as a new layer onto your canvas, then re-size it to 30%. Position to your liking.
Sharpen & apply a drop shadow.
Go to your layers pallet, right click on your Skull layer & click Duplicate. Position to your liking.
Open your Trident element - Copy & paste it as a new layer onto your canvas , then re-size it to 30%. Now position it to your liking.
Sharpen & apply a drop shadow.
Open your Sparkles element - Copy & paste it as a new layer onto your canvas ,then position to your liking.
If you would like you can duplicate your sparkles so that you can cover more of your tag.
Now apply the name you would like on your tag.
If you want to use the same font that I did , I used :
DaFunk2
Size : 80 Pixels
Color : #b10000
Once I applied my name I applied a drop shadow.
Then I used my magic wand tool & clicked inside each letter in the name. Then I applied my Eye Candy 5 Impact - Glass effect , then before deselecting my letters I went to Adjust, Add/Remove Noise, then Add Noise, set to Uniform, 30 & Monochrome box is checked. Click Ok.
Now Selections, click Select None.
Now add your copyright & credit information.
Once you have everything on your tag that you want to add, go to your layers pallet, right click on any layer & click Merge, then Merge Visible.
Use your crop tool & crop off any access canvas that you did not use.
Now if you need to re-size your tag as a whole.
After I re-size my tag I always like to apply one more sharpen to it.
(Adjust - Sharpness - Sharpen)
Now save as PNG & you have completed this tutorial!! :-)
Wednesday, June 8, 2011
♥Summers Breeze PTU♥
**This tutorial was written & posted on June 8th 2011**
***ANY resemblance to any other tag/tutorial is PURELY coincidental & COMPLETELY unintentional!!!***
Here is what we will be making :

Supplies Needed :
Paint Shop Pro X2 (Any version should work)
Animation Shop
Scrapkit - Summer Breeze By Rieka_Rafita @ Scraps With Attitude
Plugins Used :
Eye Candy 4000 - Gradient Glow (Optional)
Eye Candy 5 Impact - Glass (Optional)
Font Used :
Happy
Size : 125 Pixels
Color : #f54b00
Elements Used :
(These elements are not listed in any specific order, if you would like to open all of your elements at once instead of one at a time, open your elements folder, click on the first element you would like to use, then before you click open, press & hold your Ctrl key & then click another element you are going to use, continue to hold your Ctrl key until you have selected all of the elements you wish to open. Then click Open! Hope this helps!)
Ribbon1
Butterfly
Cocktail2
FlipFlops
Starfishs
BeachBall
Wordart 2
Towel
Cloud
Bee
Waves
Palm Tree
Sand
Flower 1 & 3
Sun
Lets Begin :
Start by opening a new 800 X 650 White canvas (I chose white for this tag because we are going to animated & sometimes animation shop does not like when you apply a drop shadow & it gives it an additional glow. So if you use a white background it fixes that issue.) . (Don't worry we will crop it later)
Now open your Wave element - Copy & paste it as a new layer onto your canvas ,then re-size it to 85%.
To open your re-size menu quickly press your Shift & S key & your re-size menu will open :-)
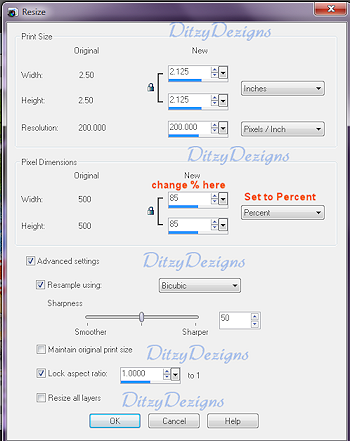
Using your move tool position your wave element to the center of your canvas.
Now go to Adjust, click Sharpness then click Sharpen.
Go to Effects, click 3D Effects, then click Drop Shadow from the slide out menu.
Set your settings : (You can use mine below or your own, the choice is always yours)
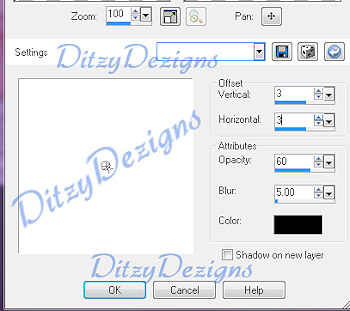
Click Ok.
Now go to your layers pallet, right click on your Wave layer. Then click Duplicate, then right click on your duplicated wave layer & click Duplicate again.
Now you should have 3 wave layers. Please label them starting from the bottom one Wave 1, Wave 2 & Wave 3. You will want them labeled for when we get to the animation part.
Once you have your wave layers numbered , close off your Wave 2 & Wave 3 layers. (Click the eye on the left next to each layer)
Now click on your Wave 1 layer, go to Adjust, click Add/Remove Noise then click Add Noise, set to Uniform, 30 & make sure your Monochrome box IS checked. Then click Ok.
Now back to your layers pallet,click on your Wave 2 layer then unhide your Wave 2 layer & hide your Wave 1 layer, now still on your Wave 2 layer go to Adjust, click Add/Remove Noise, then click Add Noise, set to Uniform, 35 & make sure your Monochrome box IS checked, then click ok.
Now back to your layers pallet, click on your Wave 3 layer & unhide it, then hide your Wave 2 layer. (Remember to hide & unhide you just click the eye next to each layer) Now go to Adjust, Add/Remove Noise - Add Noise, set to Uniform 40 & make sure your Monochrome box IS checked. Then click Ok.
Now that all 3 of our wave layers are now glittered, hide your wave 3 layer & then unhide your wave 1 layer. That way when it comes time to animated you are all set to go :-)
Now click on the top layer in your layers pallet.
Open your Sand element - Copy & paste it as a new layer onto your canvas ,then re-size it to 65%.
Use your move tool & position your sand element to the right side of your waves element.
Go to your layers pallet, right click on your Sand layer then click Duplicate. Go to Image & click Mirror.
Now use your move tool to adjust the position of your duplicated Sand element if needed.
Back to your layers pallet, right click on your duplicated sand layer, then click Merge, then from the slide out menu click Merge Down.
Now activate your text tool - Set your Font, Size & Color.
(My settings are at the beginning of this tutorial)
Once you have everything set, click on your canvas & that will open your text box, now type out the name you want to put on your tag & click Apply.
Now position your name so that it is center with your waves & sand elements.
Once your happy with placement go to your layers pallet, right click on your name layer & click Convert To Raster Layer.
Then go to Effects, click Eye Candy 4000, then click Gradient Glow.
Again you can use my settings or your own :
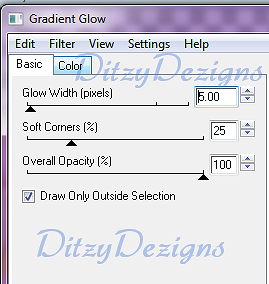
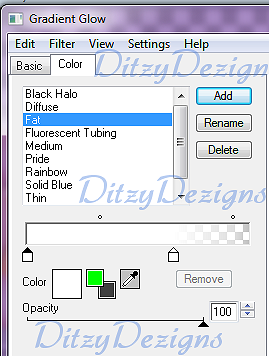
Click Ok.
Now apply a drop shadow using the same settings you used earlier.
Now activate your magic wand tool, click inside each letter of the name on your tag.
Once all letters are selected , go to Effects, click Plugins , then click Eye Candy 5 Impact - Glass.
You can use my settings or your own :

Click Ok.
Now with your letters still selected go to Adjust, click Add/Remove Noise, Then click Add Noise, set to Uniform , 20 & make sure your Monochrome box IS checked, then click Ok.
Now go to Selections & click Select None. (OR you can press your Ctrl & D key to deselect something :-)
Now making sure your name is still positioned the way that you want it.
Go to your layers pallet & right click on your merged Sand layer, then click Duplicate.
Now move your duplicated merged Sand layer above your name layer only.
Go back to your canvas & use your move tool to adjust the position of your duplicated sand layer. You want it to appear as if the letters in your name are resting in the sand.
Open your Palm Tree element - Copy & paste it as a new layer onto your canvas, then re-size it to 75%. Using your move tool position your Palm Tree to the left side of your Waves & Sand elements.
Sharpen & apply a drop shadow.
Go to your layers pallet, right click on your Palm Tree layer & click Duplicate. Now go to Image & click Mirror.
Position your duplicated Palm Tree if needed to the right end of your Waves & Sand elements.
Open your Beach Ball element - Copy & paste it as a new layer onto your canvas , then re-size it to 30%. Position your Beach Ball element to the left side in front of your Palm Tree.
Sharpen & apply a drop shadow.
Go to your layers pallet & right click on your Beach Ball & click Duplicate. Go to Image & click Mirror.
Position your duplicated Beach Ball if needed to place it in front of your Palm Tree on the right side.
Open your Wordart2 element - Copy & paste it as a new layer onto your canvas ,then re-size it to 85%. Position your Wordart2 element to the bottom of your sand element.
Place it in between your Beach Ball elements.
Sharpen & apply a drop shadow.
Go to your layers pallet & move your Wordart 2 layer down below both of your Beach Ball layers.
Open your Towel element - Copy & paste it as a new layer onto your canvas ,then re-size it to 30%. Position your towel element to the left side in front of your beach ball element.
Sharpen & apply a drop shadow.
Open your Cloud element - Copy & paste it as a new layer onto your canvas, now move your Cloud element so that it is above your waves element & center it between the 2 Palm Tree elements.
In your layers pallet move your Cloud layer down below all 3 of your wave layers.
Now click on the top layer of your layers pallet,
Open your Bee element - Copy & paste it as a new layer onto your canvas ,then re-size it to 30%. Position your Bee element to the left side & place it so the bee's hand is touching the Palm Tree.
Sharpen & apply a drop shadow.
Go to your layers pallet, right click on your Bee layer & click Duplicate. Go to Image & click Mirror.
Adjust the position of your duplicated Bee element if needed.
Open your Sun element - Copy & paste it as a new layer onto your canvas ,then re-size it to 20%. Position your Sun element to the top of your canvas above your waves element.
Sharpen & apply a drop shadow.
Open your Flower 1 element - Copy & paste it as a new layer onto your canvas, then re-size it to 30%. Position it to the right in front of your Beach Ball element.
Sharpen & apply a drop shadow.
Open your Flower 3 element - copy & paste it as a new layer onto your canvas ,then re-size it to 20%. Position your Flower 3 element to the right of your Flower 1 element.
Sharpen & apply a drop shadow.
Open your Cocktail 2 element - Copy & paste it as a new layer onto your canvas ,then re-size it to 25%. Position it to the right & place it in front of your flower elements.
Sharpen & apply a drop shadow.
Open your FlipFlop element - Copy & paste it as a new layer onto your canvas ,then re-size it to 20%, Position your flip flop element to the right side & place it in front of your Cocktail 2 element slightly to the left.
Sharpen & apply a drop shadow.
Open your Butterfly element - Copy & paste it as a new layer onto your canvas ,then re-size it to 15%. Go to Image & click Free Rotate, set it to Left 30.00 & click Ok.
Now position your butterfly element to the top above your waves to your liking.
Sharpen & apply a drop shadow.
Go to your layers pallet & right click on your Butterfly layer then click Duplicate. Now go to Image & click Mirror. Position your duplicated butterfly element to your liking.
Open your Starfishs element - Copy & paste it as a new layer onto your canvas ,then re-size it to 15% , position to your liking.
Sharpen & apply a drop shadow.
Go to your layers pallet, right click on your starfish layer & click Duplicate. Now use your move tool & position your duplicated starfish element to your liking.
Open your Ribbon 1 element - Copy & paste it as a new layer onto your canvas ,then re-size it to 85%. Position your Ribbon 1 element down on top of your wordart 2 element.
Go to your layers pallet & move your Ribbon 1 layer down so that it is directly under your Wordart 2 layer.
Sharpen & apply a drop shadow.
Now you will want to add any copyright or credit information.
You can also crop your tag as this point to get rid of any access canvas that you did not use.
To Animate :
(Open your Animation Shop)
(Go back to psp)
In your layers pallet, click on your Wave 1 layer, (Your wave 2 & 3 layers should already be hidden)
Go to Edit, click Copy Special then click Copy Merged from slide out menu.
Go to Animation Shop - Right click on the grey canvas area & click Paste As New Animation.
Go back to your PSP, hide your Waves 1 layer & click on & unhide your waves 2 layer, go to Edit, click Copy Special then click Copy Merged.
Go to Animation Shop - Right click in the first frame you just put there & click Paste, then from the slide out menu click After Current Frame.
Go back to PSP,
Hide wave layer 2, & unhide & click on your Wave 3 layer. Go to Edit, click Copy Special then click Copy Merged.
Go to Animation Shop - Right click in your 2nd frame then click Paste - Then click After Current Frame.
Now you should have 3 frames in your animation shop.
Now you will want to view your animation to make sure it is how you like it :
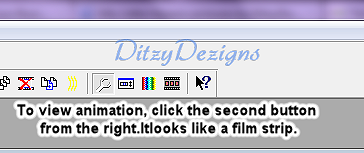
If you are happy you will click that same button again to hide your animation window.
Then you will only see your 3 frames of your original tag.
Now you might want to re-size your tag depending on where you will be using it.
Again to open your Re-size menu just press your Shift & S key and your re-size menu will open.
Set your size to your liking , mine is just an example of the re-size window in animation shop as it is a tad different than psp. I set my size to 650 pixels as I am using mine on my blog.
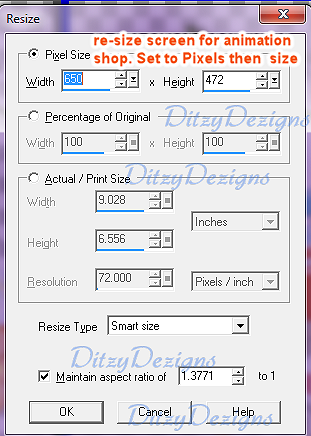
Now all that is left is for you to save your animated tag.
Go to File, click Save As, then find where you would like to save your tag & click Save. :-)
You have completed this tutorial!!
Monday, June 6, 2011
♥Toxic Candy PTU♥
**This tutorial was written & posted on June 6th 2011**
***Any resemblance to any other tutorial/tag is purely coincidental & completely unintentional!***

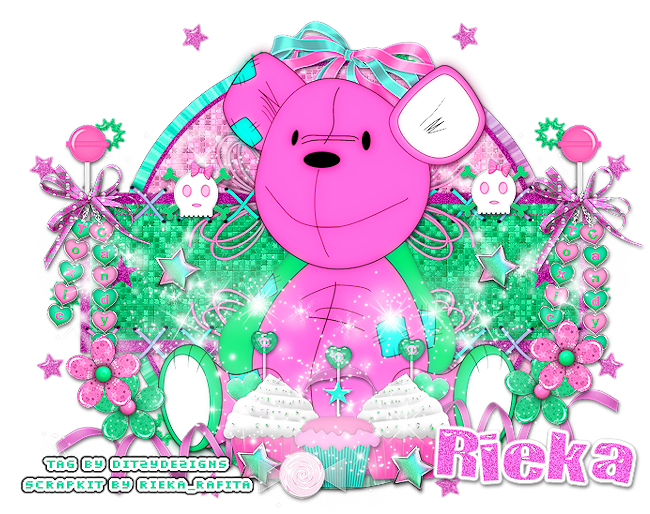
Supplies Needed :
Paint Shop Pro X2 (Any version should work)
Scrapkit - Toxic Candy By Rieka_Rafita @ Scraps With Attitude
Template 264 By Divine Intentionz
(Scroll about half way down, & too the left you will see Templates label, then click on the link Templates 261-280)
Plugins Used :
Eye Candy 4 Gradient Glow (Optional)
Eye Candy 5 Impact - Glass (Optional)
Xero - Fritillary (Optional)
Fonts Used :
Happy (for name) & Pixelette (for credit information)
Elements Used :
(These elements are not listed in any specific order. If you would like to open all of your needed elements at one time, just open your folder that your scrapkit is in, click on the first element you want to open, then before clicking open, press & hold your Ctrl key and begin clicking the rest of the elements that you want to open, once your elements are selected, click Open. Now each element will open one right after the other & you will not have to keep going and opening your folder & getting 1 element at a time.)
Candy
Lollipop 1 & 2
Bow 3
Star
Sparkles 1&2
Cupcake 1&2
Bow 2 & 3
StarScatters
Bear
Flower 1 & 2
Ribbon 3
Alpha-Heart
Skull1
Ribboneyelet
Lets Begin :
Start by opening your Template 264.
Go to your layers pallet & delete the credit & background layers.
Now in your layers pallet, click on your Circle 1 layer, go to Selections, Select All, Selections again & click Float, then Selections again & click Defloat...
Open Paper 15, copy & paste it as a new layer onto your template canvas ,then go to Selections & click Invert. Then on your keyboard press your delete key 1 time.
Go back to Selections & click Select None.
Now in your layers pallet, delete your original Circle 1 layer.
Apply a drop shadow to your Paper 15 layer.
In your layers pallet, click on your Circle 2 layer, got o Selections - Select All - Float - Defloat.
Open Paper 5, copy & paste it as a new layer onto your template canvas ,then go to Selections & click Invert.
Now on your keyboard press your delete key 1 time.
Go back to Selections & click Select None.
In your layers pallet, delete your original Circle 2 layer.
Now click on your Paper 5 layer if you arent already there, go to Effects, click Plugins, then click Xero - then click Fritillary from the slide out menu. You can either use my settings below or your own, the choice is always yours.

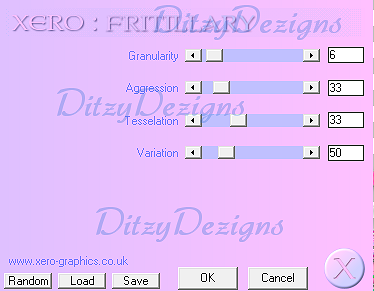
Click Ok.
Apply a drop shadow to your Paper 5 layer.
In your layers pallet, click on your Rectangle layer, go to Selections, click Select All, Selections again & click Float, Selections again & click Defloat....
Open Paper 6 - Copy & paste it as a new layer onto your canvas, then go to Selections & click Invert, then on your keyboard press your delete key 1 time.
Go back to Selections & click Select None.
In your layers pallet, delete your original Rectangle layer.
Now click on your Paper 6 layer if you arent already there, go to Effects, click Plugins, then click Xero - then click Fritillary from the slide out menu.You can use the same settings as before or play around with them and set them to your liking. I choose to use the same settings I used on my Circle 2 layer.
Click Ok.
In your layers pallet, click on your Glitter Rectangle layer & apply a drop shadow.
Now click on your Glitter Circle Layer & apply a drop shadow.
In your layers pallet, click on the very bottom layer in your pallet,
Open your StarScatters element - Copy & paste it as a new layer onto your canvas, then use your move tool & position your element to the left side of your template.
Go to your layers pallet, & right click on your StarScatters layer & click Duplicate.
Go to Image & click Mirror.
If needed use your move tool to adjust the position of your duplicated element to your liking.
(If needed, in your layers pallet, move both of your StarScatters layers down so they are the 1st & 2nd layers from the bottom of your layers pallet.)
Now in your layers pallet click on your very top layer,
Open your Skull1 element - Copy & paste it as a new layer onto your template canvas , then re-size it to 20%. Now using your move tool position your Skull2 element to your liking.
Go to Adjust, click Sharpness then click Sharpen.
Apply a drop shadow.
Now go to your layers pallet, right click on your Skull2 layer & click Duplicate. Use your move tool to adjust the position of your duplicated Skull2 element.
Open your Bear element - Copy & paste it as a new layer onto your template canvas, then using your move tool position your Bear element so that it is center on your template.
Go to your layers pallet, right click on your Bear layer & click Duplicate.
Go to Adjust, click Blur , then click Gaussian Blur from the slide out menu.
Set to 5.00 & click Ok.
Go back to your layers pallet & at the top of your layers pallet change your Blend Mode to Overlay.
Then click on your original Bear layer (the bottom one) & apply a drop shadow.
Open your Ribbon Eyelet element - Copy & paste it as a new layer onto your Template canvas ,then re-size it to 70%. Now go to Image & click Free Rotate, set it to Right 90.00 & click Ok.
Now use your move tool & position to the right .
Now in your layers pallet, move your Ribbon Eyelet layer below both of your Bear layers.
Sharpen & apply a drop shadow.
Now in your layers pallet, right click on your Ribbon Eyelet layer & click Duplicate.
Then go to Image & click Mirror.
Position your duplicated Ribbon Eyelet element to the left side of your template.
(You want the actual bow part of your eyelet to be behind your Bear element.)
Now in your layers pallet, right click on your Duplicated Ribbon Eyelet layer & click Merge, then click Merge Down from the slide out menu.
Now right click on your Merged Ribbon Eyelet layer & click Duplicate.
Go to Image & click Flip.
Now use your move tool to adjust the position of your duplicated element if needed.
Open your Alpha-Heart element - Copy & paste it as a new layer onto your template canvas, then re-size it to 30%.
Use your move tool to position your element to the top left corner of your rectangle.
Sharpen & apply a drop shadow.
Go to your layers pallet, right click on your Alpha-Heart layer & click Duplicate.
Now use your move tool to position your duplicated Alpha-Heart layer to the top right corner of your rectangle.
Open your Star element - Copy & paste it as a new layer onto your template canvas, then re-size it to 15%.
Now use your move tool & position it to the left of your Bear element.
Sharpen & apply a drop shadow.
Go to your layers pallet & right click on your Star layer & click Duplicate.
Now go to Image & click Mirror.
Adjust the position of your duplicated star element with your move tool if needed.
Go back to your layers pallet & duplicate your Star layer a couple more times, each time using your move tool to position each Star element to your liking.
Open your Cupcake2 element - Copy & paste it as a new layer onto your template canvas ,then re-size it to 50%. Use your move tool & position your Cupcake2 element to the inside of your Bear elements left leg.
Sharpen & apply a drop shadow.
Now go to your layers pallet, right click on your Cupcake2 layer & click Duplicate. Go to Image & click Mirror.
Adjust the position of your duplicated Cupcake2 element if needed.
Open your Cupcake1 element - Copy & paste it as a new layer onto your template canvas ,then re-size it to 40%.
Using your move tool position your Cupcake1 element between your 2 Cupcake2 elements.
Sharpen & apply a drop shadow.
Open your Bow2 element - Copy & paste it as a new layer onto your canvas, then re-size it to 50%.
Using your move tool position your Bow2 element to the top of your circle on your template.
Now in your layers pallet, move your Bow2 layer down below both of your Bear layers.
Sharpen & apply a drop shadow.
Open your Flower 1 element, copy & paste it as a new layer onto your template canvas ,then re-size it to 20%. Use your move tool & position your flower 1 element to your lower right corner of your rectangle.
Sharpen & apply a drop shadow.
Open your Flower 2 element - Copy & paste it as a new layer onto your template canvas, then re-size it to 20%. Now move your Flower 2 element to the lower right corner of your rectangle & position it next to your Flower 1 element.
Sharpen & apply a drop shadow.
In your layers pallet, right click on your Flower 2 layer, then click Merge, then from the slide out menu click Merge Down.
Now on your Merged Flower layers, right click & click Duplicate.
Go to Image & click Mirror.
Position using your move tool if needed.
Open your Ribbon 3 element - Copy & paste it as a new layer onto your template canvas, Go to Image & click Free Rotate - Set to Left 90.00 & click Ok, Now using your move tool position your Ribbon3 element down in front of your Cupcake elements.
Go to your layers pallet & move your Ribbon 3 layer below all 3 of your Cupcake layers.
Sharpen & apply a drop shadow.
Now click back up on your top layer in your layers pallet,
Open your Candy element - Copy & paste it as a new layer onto your template canvas ,then re-size it to 30%.
Position your Candy element to the bottom of your template & place it on the bottom of your Cupcake that is on the left.
Sharpen & apply a drop shadow.
Open your Lollipop2 element - Copy & paste it as a new layer onto your template canvas, then re-size it to 30%. Position your Lollipop2 element to the bottom & place it so that it appears to be sticking out of the Cupcake element on the left.
Go to your layers pallet & move your Lollipop2 layer below all 3 of your Cupcake layers. Make sure that your Lollipop2 element is still visible above your Cupcake elements, you just want the whole stick to be seen. Just a portion of the stick should stick out above the cupcake :-)
Sharpen & apply a drop shadow.
Now in your layers pallet , right click on your Lollipop2 layer,& click Duplicate. Use your move tool & position your duplicated Lollipop2 element over to the next Cupcake element. Now back to your layers pallet & duplicate your Lollipop2 layer again, and use your move tool to move it over to the 3rd cupcake element.
Open your Lollipop1 element - Copy & paste it as a new layer onto your template canvas ,then re-size it to 30%. Now position it to the top left corner of your rectangle.
Sharpen & apply a drop shadow.
Go to your layers pallet and move your Lollipop 1 layer down so that it is below your rectangle layer. You want some of the stick & the actually lollipop to stick out above the rectangle.
Now in your layers pallet, right click on your Lollipop1 layer & click Duplicate.
Now use your move tool & position your duplicated Lollipop 1 element to the top right corner of your rectangle.
Open your Sparkle1 element - Copy & paste it as a new layer onto your template canvas ,now using your move tool position your Sparkle1 element to the left corner of your rectangle.
Go to your layers pallet & move your Sparkle1 layer below both of your Bear layers.
Right click on your Sparkle 1 layer & click Duplicate.
Now go to Image & click Mirror.
Then go back to your layers pallet & right click on your Duplicated Sparkle1 layer, then click Merge, then click Merge Down from the slide out menu.
Now right click on your Merged Sparkle layer, & click Duplicate.
Go to Image & click Flip.
Adjust the position of your duplicated Sparkle element if needed.
Now click on your top layer in your layers pallet -
Open your Sparkle2 element - Copy & paste it as a new layer onto your template canvas, using your move tool position your Sparkle2 element to the right side of your template.
Go to your layers pallet & right click on your Sparkle 2 layer, then click Duplicate.
Go to Image & click Mirror.
Now we will add the name you want on your tag :
Activate your text tool, set your font, size & color,
The font I used is :
Happy
Size : 62 Pixels
Color : # ff6ee3
click on your canvas to open your text box, then type out the name you want on your tag.
Then click Apply.
Now position your name where you want it on your tag.
Then go to your layers pallet & right click on your name layer & click Convert To Raster Layer.
Now go to Effects - Click Plugins - Then click Eye Candy 5 Impact & click Glass from the slide out menu.
Now apply your settings to your likings & click ok.
Now go to Adjust, click Add/Remove Noise, then click Add Noise from your slide out menu.
Set to Uniform 30.00 & make sure your Monochrome box IS checked & click Ok.
Now go back to Effects - Click Plugins - Then click Eye Candy 4000 & click Gradient Glow from the slide out menu. Set your settings to your liking & click Ok.
Apply a drop shadow to your name.
Now add your credit and or copyright information to your tag. If you used an artists tube please make sure you also include your license #.
Once you have everything placed where you want it, go to your layers pallet & right click on any layer , then click Merge,then from the slide out menu click Merge Visible.
Now activate your Crop tool, crop off any access canvas that you did not use.
Once your tag is cropped you may want to re-size it.
After your tag is re-sized go to Adjust, click Sharpness then click Sharpen
Now all that is left is to save your tag as a PNG file & you have completed this tutorial!!
Subscribe to:
Posts (Atom)
About Me
- DitzyDezigns
- New York, United States
- Hiya Everyone! My name is Ronney, I have 3 wonderful teenagers, and have been married to my husband for 20 years. I LOVE to design signatures, tags & avatars, I design with PSP, and have been designing for over 2 1/2 years. I will be not only designing signatures, tags & avatars but will also be writing & posting tutorials as well. I will also be making some templates to share with you all as well. So I hope you enjoy and can use everything I have available on my blog :-) If you ever try any of my tutorials,please send me your completed designs and I would love to showcase it here on my blog!
♥I CT For♥


Blog Hop

Today's Date

Favorite Stores

♥Forums♥


My Pixels


♥My Avatars♥


