Don't Be A Pirate

My Blinkies

Add Me On Facebook

Protected


Blogs I Stalk


Awards :-)


Find Me At

Favorite Stamps


Showing posts with label Creative Scraps By Crys. Show all posts
Showing posts with label Creative Scraps By Crys. Show all posts
Thursday, March 8, 2012
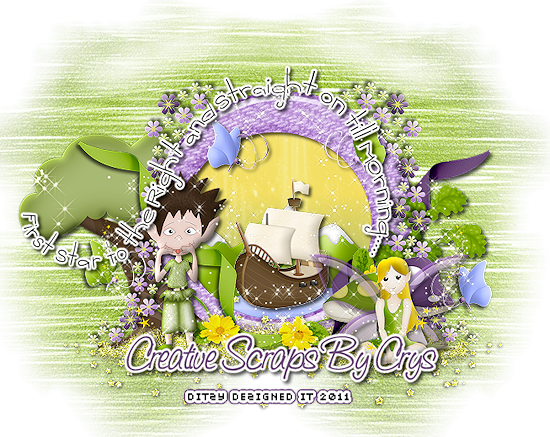
♥Irish Luck (FTU)♥
**This tutorial was written & posted by DitzyDezigns**
***Any resemblance to any other tutorial is purely coincidental & completely unintentional!!!***
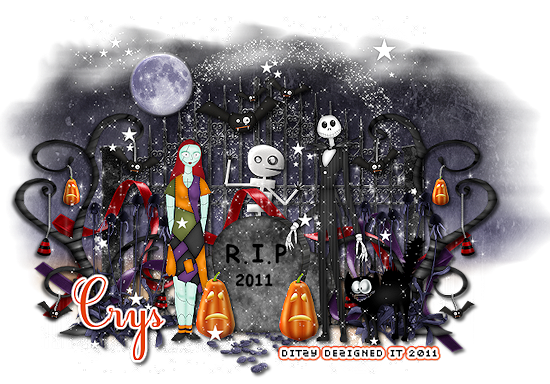
Here is what we will be making :
**You can click on the image to see it in its original size**
**You can click on the image to see it in its original size**

Supplies Needed :
Paint Shop Pro X4 (Any version should work)
Scrapkit : FTU Irish Luck @ Scraps By Crys
Plugins Used :
Eye Candy 4 Gradient Glow (Optional)
Font Used :
BorisBlack Bloxx (You can use any fat font you like)
Elements Used From Kit :
Element 1
Element27
Element 13
Element 24
Element 8
Element 11
Element 17
**Please note - I have included screen shots with all of my settings , you are welcome to use the same settings if you would like, or you can play around with them and get a better effect that you like more. The choice is always yours. If you are just beginning learning how to design signatures, and need more help, please do not hesitate to email me & I will answer any questions you may have.**
Lets Begin :
Start by going to File - then click New
I used a 800 x 650 transparent canvas. (Don't worry you will crop off any access canvas that you did not use, but this gives you plenty of room to work with.)
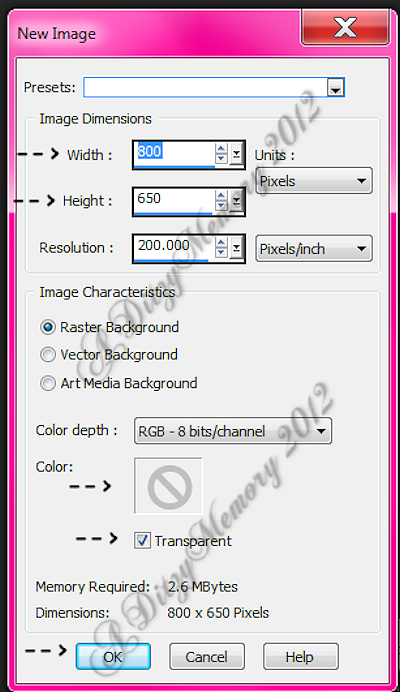
Once you click ok your new transparent canvas will open.
Now go to File & click Open -
Then go to where you have your scrapkit saved.
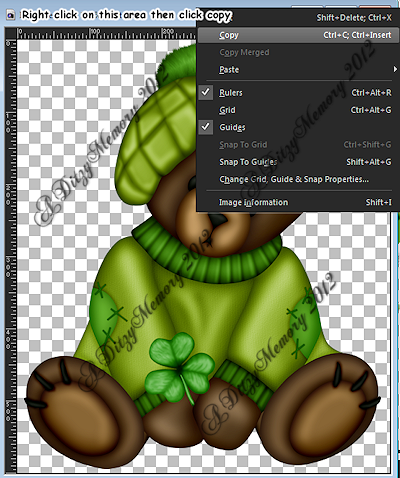
Find your Element 1 - then click on it - then click Open.
Once it opens - right click on the top bar of that canvas - then click Copy. (See screen shot below for location)
OR
You can just got to Image & click Copy -
Now go to your new transparent canvas - right click in the same area on that canvas - then click PASTE As New Layer.
OR
(You can go back to Image & click Paste As New Layer)
Which ever is easiest for you.:-)
Now your Element 1 (Bear) should be on your new transparent canvas.
Now go to Image - click Resize , when that menu opens it should look like mine below.
Set your Width to 50% then make sure that your set to "Percent" & that the "Resize all layers" is UNchecked.
*Take note of the comments on my screen shot - they should help you*
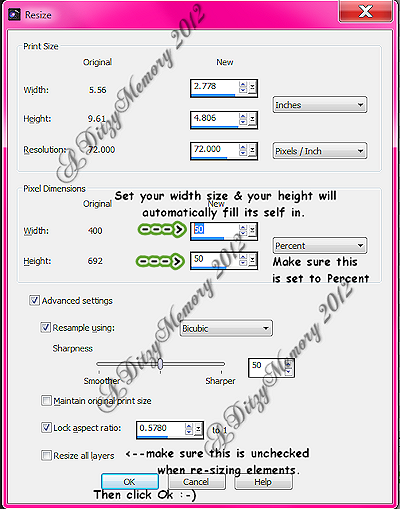
Then click Ok.
Then go to Image again - click Resize - this time change your Width & Height to 70% & click Ok.
Now your Element 1 should appear smaller to you. :-)
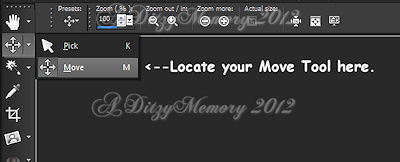
Now click on your Move Tool (See screen shot below for location of your Move Tool)
Now using your Move Tool - move your Element 1 (Bear) to the left side of your canvas.
Then go to Adjust - click Sharpness - then click Sharpen.
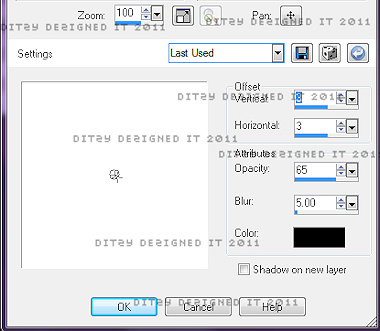
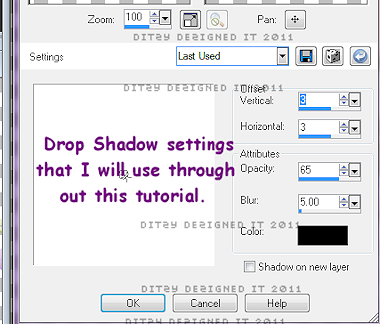
Now go to Effects - click 3D Effects - then click Drop Shadow
When that screen opens set your settings :
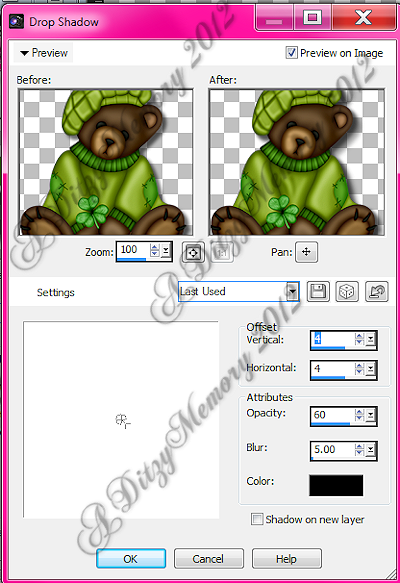
Then click Ok.
Now open your next element - which would be Element27 - Copy & paste it as a new layer onto your transparent canvas. (Use the screen shots above if needed.)
Now go to Image - click Resize - then re-size your Element 27 to 50%.
Now click on your Move Tool again & position your Element 27 to the left side of your transparent canvas.
Now go to your layers pallet (all the way over to the right of your psp.
Left click & HOLD on your Element 27 layer - then while still holding your left button down drag this layer down and place it below your Element 1 layer.
Now go to Adjust - click Sharpness - then click Sharpen.
Now go to Effects - click 3D Effects - then click Drop Shadow.
You are going to apply the exact same settings as you did for your Element 1 so all you have to do is click Ok.
Now open your Element 13 from your kit -
Copy & paste it as a new layer onto your transparent canvas - (revisit the screen shots above if you need to refresh your memory)
Now using your Move Tool again - position your Element 13 so that the left side of your Rainbow is covering your Element 1 (Bear) just a bit.
Go to your layers pallet - left click & HOLD on your Element 13 layer - now drag your Element 13 layer down so that it is under your Element 1 & Element 27 layers.
Now go to Adjust - click Add/Remove Noise - then click Add Noise from the slide out menu.
Set your settings - (You may use mine below if you would like)
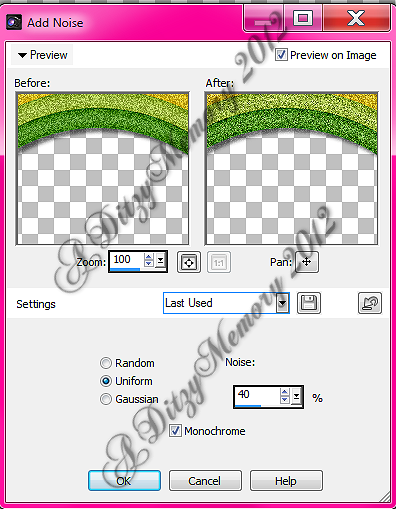
Then click Ok
Now go to Adjust - click Sharpness - then click Sharpen.
Now go to Effects - click 3D Effects - then click Drop Shadow. (You will use the same settings as you have been using so just click Ok)
Go to File - click Open - then Open your Element 24 -
Copy & paste it as a new layer onto your transparent canvas -
Then go to Image - click Resize - then change your Width to 50%. (Your height will change automatically)
Now go to Image - click Flip Horizontal
Now click on your Move Tool (If you don't still have it selected.
Then move your Element 24 to the right side of your Element 13.
Go to Adjust - click Sharpness - then click Sharpen.
Now go to Effects - click 3D Effects - then click Drop Shadow.
You again will use the exact same settings you have been using to all you have to do now is click OK.
Now go to File - click Open - then open your Element 8
Copy & paste it as a new layer onto your transparent canvas -
Go to Image - click Resize - then set your Width to 40%. (Remember the Height setting will adjust its self.)
Now using your Move Tool position your Element 8 to the right end of Element 13 (Rainbow)
Adjust - click Sharpness - then click Sharpen
Effects - 3D Effects - Drop Shadow (Exact same settings, so just click Ok)
Now go to your layers pallet -
Click on the very bottom layer in your layers pallet .
Now go to File - click Open, then open your Element 11.
Copy & paste it as a new layer onto your transparent canvas.
Now go to Image - click Resize - set your Width to 60%.
Now using your Move Tool position your Element 11 to the left side of your Rainbow element.
Go to Adjust - click Add/Remove Noise - then click Add Noise
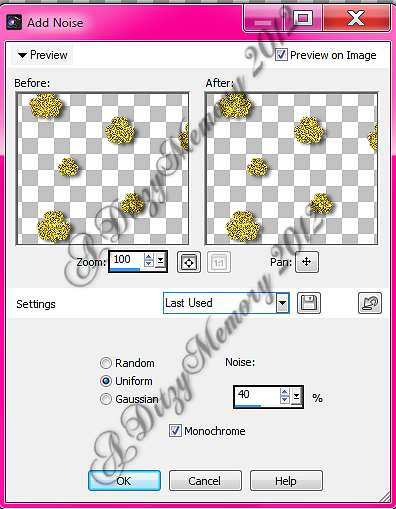
Then click Ok.
Now go to Adjust - click Sharpness - then click Sharpen
Effects - 3D Effects - Drop Shadow
Again you will be using the exact same settings, so all you have to do is click Ok.
Now go to your layers pallet - right click on your Element 11 layer - then click Duplicate.
Then go to Image - click Flip Horizontal.
Now use your Move Tool to position your Duplicated Element 11 to the right side of your transparent canvas.
Go to File - click Open - now open your Element 17.
Copy & Paste it as a new layer onto your transparent canvas.
Using your Move Tool position your Element 17 to the right side of your transparent canvas.
Go to Adjust - click Sharpness - then click Sharpen
Effects - 3D Effects - then click Drop Shadow. (Use the same settings, so just click Ok.)
Go to your layers pallet - Left click & HOLD on your Element 17 layer.
Then drag that layer down so it is below your Element 11 layers. (Both of them)
Now still in your layers pallet - right click on your Element 17 layer - then click Duplicate.
Go to Image & click Flip Horizontal.
Now use your Move Tool to position your Duplicate Element 17 to the left side of your transparent canvas.
Now it is time to add your name.
Now click on your Text Tool - (Screen shot below shows you where to locate that tool.)
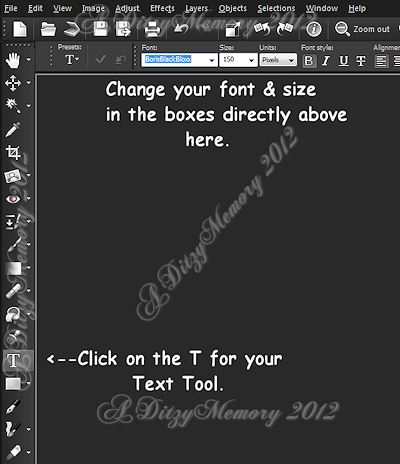
Once you click on your text tool - set your font - & size.
Then go to your Materials Pallet -(Screen shot below shows you what that looks like)
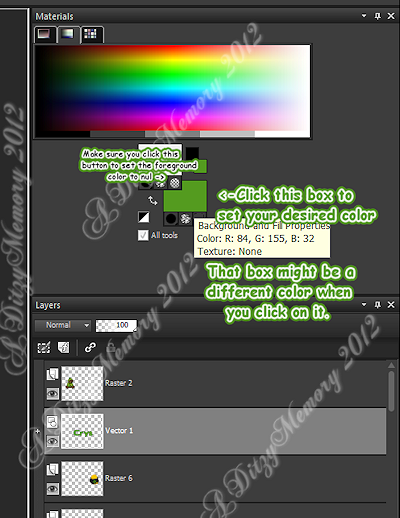
Once you click on your Background Color box (the bottom one as shown above)
The following window will then open :
This is where you either click on the color you would like, or if you know your color code you type that in the box that I highlighted in blue.
The color code for the color I used in my sample above is..... #549b20
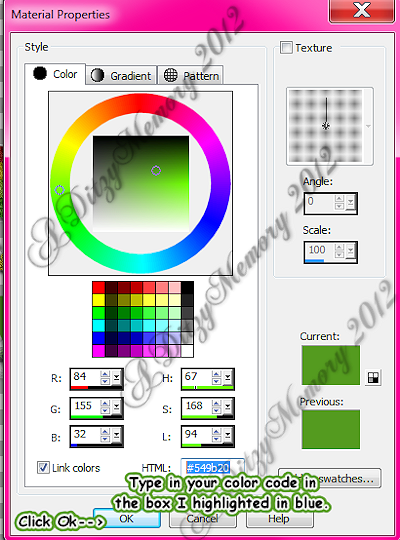
Then click Ok.
Now once you have all of your font settings & colors the way you want them -
Click any where on your canvas.
Then type out the name you would like.
When happy with it, click the accept check mark. (See screenshot below to see location of check mark.)

Now using your Move Tool position your Name so that it is between your Bear & Pot Of Gold element.
Then go to your layers pallet - right click on your Name layer - then click Convert To Raster Layer.
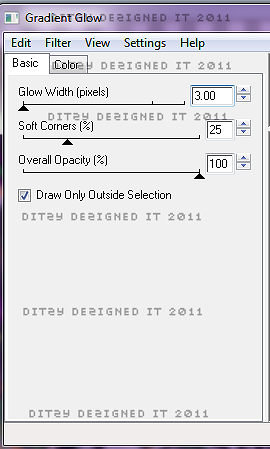
Then go to Effects - click Plugins - then from the slide out menu click Eye Candy 4 - then from the next slide out menu click Gradient Glow.
The screen shots below show you the settings that I used. Again you are welcome to use the same if you would like. Also be sure to see both screen shots so that you set the settings on your Basic tab & your Color tab.
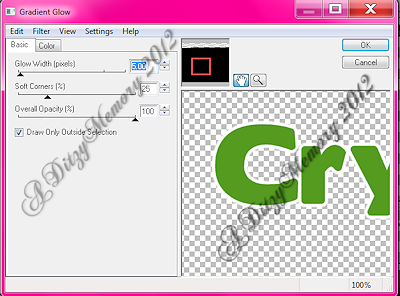
Before click Ok - click on your Color Tab
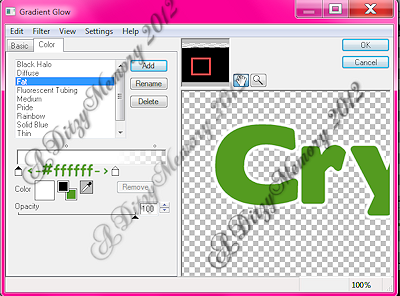
Now click OK.
Then in your Tools - click on your Magic Wand Tool - The screen shot below shows you the location of your Magic Wand Tool....
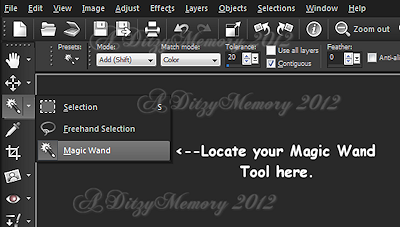
If you click the arrow you will then see the little menu that is on my screen shot.
Select (click on) your Magic Wand.
Now go to your canvas - click inside EACH letter in your name. Remember if you have any i's that you also click in the dot .
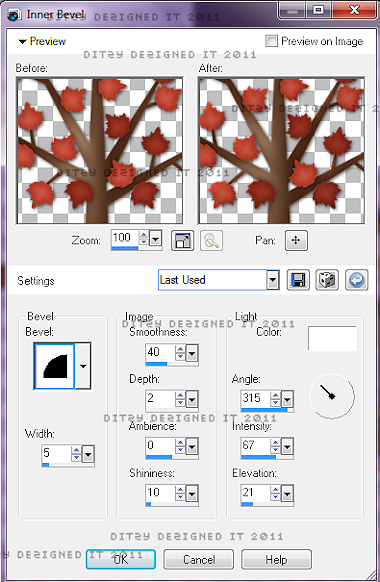
Now once all letters are selected - go to Effects - click 3D Effects - then click Inner Bevel -
*(Screen shot below shows you my settings, which you are welcome to use if you would like)*
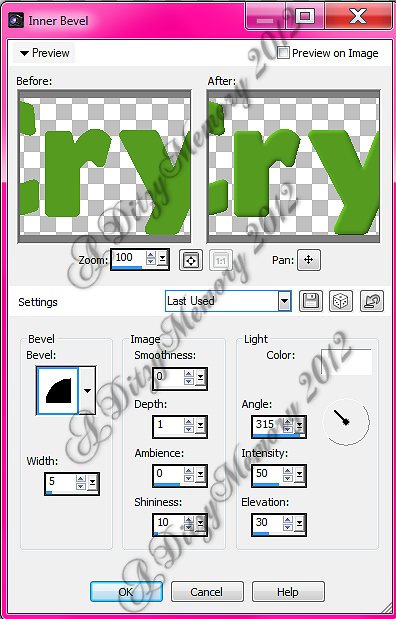
Then click Ok.
Now go to Selections - click Select None.
Now still on your Name layer -
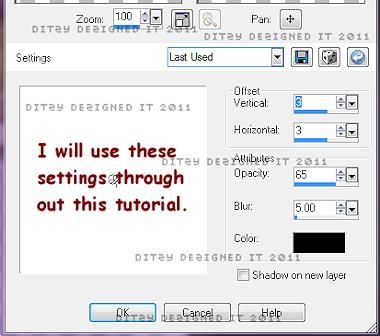
Go to Effects - click 3D Effects - then click Drop Shadow.
You are going to use the same settings as you have used through-out this tutorial.

Click Ok.
Now once you are happy with the placing of your elements & name
You will want to add the fact that you made the tag.
So click on your text tool, then find a small font, Pixelette works good for this, set your size to between 10 -13 pixels. Then click on your canvas - type out what you would like to say, like "Tag Made By ------Your name" or what you would like."
I tag my work with the phrase "A Ditzy Memory 2012" but please don't use that because you aren't me & probably aren't ditzy like me either lol...So think of something original that suits you :-)
Once everything is in place -
Go to your layers pallet -
Right click on any layer - then click Merge - then from the slide out menu click Merge Visible.
This will convert all your layers into one single layer.
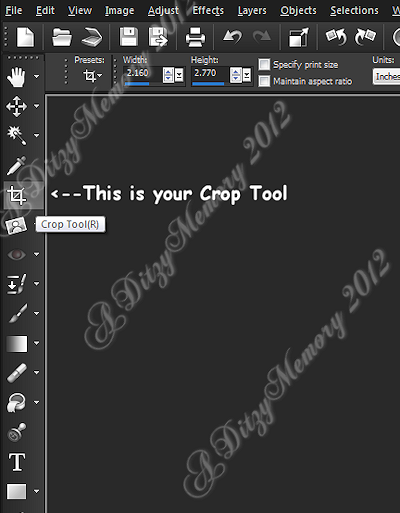
Now you will want to Crop off any access canvas that you did not use.
So go to your Tool pallet & click on your Crop tool - The screen shot below shows you where that is located & what the icon looks like...

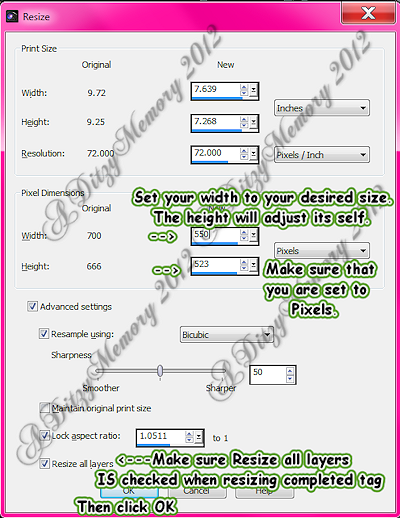
Once you have your canvas cropped, you may or may not want to resize your signature as a whole.
If you should choose to resize it -
Go to Image - click Resize
Now once this window opens you will make some changes compared to what you used to resize your elements.
Screen shot below shows you where to make those changes :-)
Once I resize a completed tag to a smaller size, I always do one more sharpen just to make it look nice & clear. Sometimes when you resize them smaller they tend to get a little blurry.
So if you would like to do this as well, do it the same way I had you do it with the elements.
Go to Adjust - click Sharpness - then click Sharpen.
Now all that is left is to save your tag.
Go to File - click Save As - then when your window opens, locate where you would like your tag to save on your computer - then click Save.
You have now completed this tutorial. If you have any questions please do not hesitate to email me.
Once you complete any tutorial posted on my blog I would love it if you would email me a copy of your design so that I may see it & display it on my blog as well :-)
♥
Monday, October 24, 2011
♥Shades Of November PTU♥
**This tutorial was written & posted by Ditzy Dezigns on October 24th 2011**
***Any resemblance to any other tutorial is purely coincidental & completely unintentional***
Here is what we will be making :


Supplies Needed :
Paint Shop Pro X2 (Any version should work)
Scrapkit - Shades Of November By Creative Scraps By Crys
Plugins Used :
Eye Candy 5 Impact - Gradient Glow (Optional)
Font Used :
Happy
Elements Used :
Fence
Lights
Tree
Flowers
Bush
Birdhouse
Vine
Owl
Fox
Butterfly
Bow2
Stardust
Lets Begin :
Start by opening a new 800 X 600 transparent canvas. (Don't worry you will crop your unused canvas off at the end of this tutorial)
Now open your Fence element - Copy & paste it as a new layer onto your canvas. Now re-size it to 75%. Use your move tool to position your Fence element to the center of your canvas.
Go to Effects - 3D Effects - click Inner Bevel
**You are welcome to use my settings below or your own**
***You will use this effect through out this tutorial, so once you have your settings set, you should only have to click on Inner Bevel then click ok. (Yes I know I have the image of the tree element in this screen shot lol, I forgot to take the screen shot when I applied it to the Fence element lol)***
Now click Ok.
Now go to Adjust - click Sharpness - then click Sharpen
Go back to Effects - 3D Effects - this time click Drop Shadow
**Again, you may use my settings or your own**
***You will also use these same settings all the way through out this tutorial, so after you have your settings set you should only have to go to Drop Shadow, wait for menu to open then click ok.)
Click Ok
Now open your Lights element - Copy & paste it as a new layer onto your canvas - then re-size it to 40%. Use your move tool to position your Lights element to the left side of your Fence element.
Adjust - Sharpness - Sharpen
Effects - 3D Effects - Drop Shadow (wait for menu to open, then click Ok. Same settings as before)
Now go to your layers pallet - right click on your Lights layer - then click Duplicate. Then go to Image & click Mirror. Now use your Move tool to adjust the position of your duplicated Lights element if needed.
Open your Tree element - Copy & paste it as a new layer onto your canvas - then re-size it to 50%. Position it to the left end of your Fence element. Now in your layers pallet - move your Tree layer down so it is directly under your Fence element.
Go to Effects - 3D Effects - Inner Bevel (Same settings as before, click Ok.)
Adjust - Sharpness - Sharpen
Effects - 3D Effects - Drop Shadow (same settings as before, click Ok.)
Back in your layers pallet - right click on your Tree layer - then click Duplicate. Now go to Image & click Mirror. Use your move tool to adjust the position of your duplicated Tree element to the right end of your Fence element.
Back in your layers pallet - right click on your duplicated Tree layer - then click Duplicate. Now use your move tool to position your 3rd Tree element to the middle of your Fence element. (See my tag above if needed)
(No need to add inner bevel, sharpen or drop shadow to your duplicated elements because you already applied those to your main element.)
Open your Flowers element - Copy & paste as a new layer onto your canvas, then use your move tool to position your Flowers element along the bottom of your Fence element.
Effects - 3D Effects - Inner Bevel (same settings, click Ok)
Adjust - Sharpness - Sharpen
Effects - 3D Effects - Drop Shadow (same settings , click Ok)
Open your Bush element - Copy & paste it as a new layer onto your canvas - then re-size it to 35%. Using your move tool - position your Bush element to the left end of your Fence element.
Effects - 3D Effects - Inner Bevel (same settings, click Ok)
Adjust - Sharpness - Sharpen
Effects - 3D Effects - Drop Shadow (same settings, click Ok)
Now go to your layers pallet - first move your Bush layer down so it is directly under your Flowers layer, - then right click on your Bush layer - then click Duplicate. Now go to Image & click Mirror. Then use your move tool and adjust the position of your duplicated Bush element to the right end of your Fence element.
Now open your Birdhouse element - Copy & paste it as a new layer onto your canvas -then re-size it to 35%. Use your move tool & position your Birdhouse element to your liking.
Effects - 3D Effects - Inner Bevel (same settings, click Ok)
Adjust - Sharpness - Sharpen
Effects - 3D Effects - Drop Shadow (same settings, click Ok)
Open your Vine element - Copy & paste it as a new layer onto your canvas - then re-size it to 35%. Use your move tool & position your Vine element to the left side of your Fence element, and place it along your Lights element on the left.
Effects - 3D Effects - Inner Bevel (same settings, click Ok)
Adjust - Sharpness - Sharpen
Effects - 3D Effects- Drop Shadow (same settings, click Ok)
Go to your layers pallet - right click on your Vine layer - then click Duplicate. Now go to Image & click Mirror. Use your move tool to adjust the position of your duplicated Vine element to the right side of your Fence element if needed.
Open your Owl element - Copy & paste it as a new layer onto your canvas - then re-size it to 10%. Use your move tool & position your Owl element to your liking.
Effects - 3D Effects - Inner Bevel (same settings, click Ok)
Adjust - Sharpness - Sharpen
Effects - 3D Effects - Drop Shadow (same settings, click Ok)
Now open your Fox element - Copy & paste it as a new layer onto your canvas - then re-size it to 20%. Now position your fox element to the right lower side of your Fence element.
Effects - 3D Effects - Inner Bevel (same settings, click Ok)
Adjust - Sharpness - Sharpen
Effects - 3D Effects - Drop Shadow (same settings, click Ok)
Now go to your layers pallet - right click on your Fox layer - then click Duplicate. Now go to Image & click Mirror. Use your move tool to position your duplicated Fox element to the left lower end of your Fence. (See my tag for example)
Open your Butterfly element - Copy & paste it as a new layer onto your canvas - then re-size it to 10%. Use your move tool & position your Butterfly element to the upper right of your tree elements.
Adjust - Sharpness - Sharpen
Effects - 3D Effects - Drop Shadow (same settings, click Ok)
Now go to your layers pallet - right click on your Butterfly layer - then click Duplicate. Now go to Image & click Mirror. Now using your move tool, adjust the position of your duplicated Butterfly element to your liking.
Now you will want to add your name & and credit information.
The settings I used for the name are :
Font : Happy
Size : 150 Pixels (this will depend on the length of your name)
Background Color : #800000
Foreground Color : Set to nul
Now apply your name & position it within your 2 fox elements.
Go to your layers pallet - move your Name layer down so that it is directly under both your Fox layers.
Now on your Name layer -
Go to Effects - 3D Effects - Inner Bevel (same settings click Ok.)
Now go to Adjust - click Add/Remove Noise - then click Add Noise, set to Uniform, 35, and make sure your Monochrome box IS checked, then click Ok.
Now go to Effects - click Plugins - then click Eye Candy 5 Impact - Gradient Glow
**You can use my settings below or your own.**
***I have included the color codes for the 2 colors I used***

Now click OK.
Then go back to Effects - click 3D Effects - Drop Shadow (Same settings, click Ok)
Now open your Bow 2 element - Copy & paste it as a new layer onto your canvas - then re-size it to 80%. Use your move tool & position your Bow2 element across your name, see my tag for example.
Then go to your layers pallet - move your Bow 2 layer down so it is directly below both of your Fox layers, but keeping it above your Name layer.
Then go to Adjust - Sharpness - Sharpen
Effects - 3D Effects - Drop Shadow
Now open your Stardust element - Copy & paste it as a new layer onto your canvas - then re-size it to 80%. Use your move tool to position your Stardust element to the left side of your tag.
Adjust -Sharpness - Sharpen
*Do not add Inner Bevel or Drop Shadow to this element*
Now go to your layers pallet - right click on your Stardust layer - then click Duplicate. Now go to Image & click Mirror.
Use your move tool to adjust your duplicated Stardust element to the right side of your tag if needed.
Make sure you have added any credit that needs to be added.
If you are happy with the placement of your name & elements, go to your layers pallet - right click on any layer - then click Merge - then click Merge Visible.
Now activate your Crop tool & crop off any access canvas that you did not use.
Once you have cropped your tag, you may or may not need to re-size your completed tag. If you choose to re-size your tag you might want to apply one more Sharpen to your tag.
Now all that is left is to save your tag as a PNG file & you have completed this tutorial!!♥
Sunday, October 16, 2011
♥Brewing Up Some Fun PTU♥
**This tutorial was written & posted by Ditzy Dezigns on October 16th 2011**
***Any resemblance to any other tutorial is purely coincidental & completely unintentional!!***
Here is what we will be making :

Supplies Needed :
Paint Shop Pro X2 (Any version should work)
Scrapkit - Brewing Up Some Fun @ Creative Scraps By Crys
Mask Of Choice
Plugins Used :
Eye Candy 4000 - Gradient Glow
Font Used :
Double Feature
Elements Used :
Paper 12
Element 32
Element 31
Element 2
Element 1
Element 3
Element 24
Element 25
Element 30
Element 21
Element 7
Element 15
Element 8
Element 20
Lets Begin -
Open a new 800 X 600 transparent canvas. (Don't worry you will crop it at the end of the tutorial, this just gives you extra space)
Open Element_32 - Copy & paste it as a new layer onto your canvas - then re-size it to 65%. Position this element to the center of your canvas.
Go to Adjust - click Sharpness - click Sharpen
Then go to Effects - click 3D Effects - then click Drop Shadow
(You can use my settings below or your own)
**See added note on screen shot**

Then click Ok.
Open your Element_31 - Copy & paste it as a new layer onto your canvas - then re-size it to 50%. Use your move tool & position this element to the center of your Element_32.
Adjust - Sharpness - Sharpen
Effects - 3D Effects - Drop Shadow (Same settings as above)
Open Element_2 - Copy & paste it as a new layer onto your canvas - then re-size it to 65%. Use your move tool to position this element to the left side of your Element_31.
Adjust - Sharpness - Sharpen
Effects - 3D Effects - Drop Shadow (Same settings as above)
Open Element_1 - Copy & paste it as a new layer onto your canvas -then re-size it to 55%. Use your move tool to position this element to the right side of your Element_31 as well.
Adjust - Sharpness - Sharpen
Effects - 3D Effects - Drop Shadow (same settings as above)
Open Element_3 - Copy & paste it as a new layer onto your canvas then re-size it to 65%. Use your move tool to position this element to the right side of Element_31.
Adjust - Sharpness - Sharpen
Effects - 3D Effects - Drop Shadow
Open Element_24 - Copy & paste it as a new layer onto your canvas - then re-size to 25%. Use your move tool to position this element to the left side of your Element_1.
Adjust - Sharpness - Sharpen
Effects - 3D Effects - Drop Shadow
Open Element_25 - Copy & Paste it as a new layer onto your canvas -then re-size it to 20%. Use your move tool to position this element to the top of Element_32.
Adjust - Sharpness - Sharpen
Effects - 3D Effects - Drop Shadow
Open Element_30 - Copy & paste it as a new layer onto your canvas - then re-size it to 20%. Position it to the right side of Element_1.
Adjust - Sharpness - Sharpen
Effects - 3D Effects - Drop Shadow
Open Element_21 - Copy & paste it as a new layer onto your canvas - then re-size it to 20%. Position it to your liking.
Adjust - Sharpness - Sharpen
Effects - 3D Effects - Drop Shadow
If you would like more than one of these elements - go to your layers pallet - right click on your Element_21 layer - then click Duplicate. Go to Image & click Mirror. Now position to your liking.
Open Element_7 - Copy & paste it as a new layer onto your canvas then re-size it to 70%. Then go to Effects - 3D Effects - Inner Bevel -

Then click Ok.
Now go to Effects - Plugins - Eye Candy 4000 - Gradient Glow

Then click on the Color tab - (Before clicking Ok)

Then click Ok.
Now go to Adjust - click Sharpness - then click Sharpen
Now Effects - 3D Effects - Drop Shadow (Use same settings you have been using)
Now using your move tool - position this element to the bottom of your canvas. (See my tag above)
Open Element_15 - Copy & paste as a new layer onto your canvas - then re-size it to 20%. Position to your liking.
Adjust - Sharpness - Sharpen
Effects - 3D Effects - Drop Shadow
Open Element_8 - Copy & paste it as a new layer onto your canvas - then re-size it to 20%. Then re-size it again to 40%. Position to your liking.
Adjust - Sharpness - Sharpen
Effects - 3D Effects - Drop Shadow (Same settings you have been using)
Open Element_20 - Copy & paste it as a new layer onto your canvas - then re-size it to 70%. Then re-size it again to 70%. Then go to Image - click Free Rotate - set it to Left 90.00 & click Ok.
Then go back to Image - click Free Rotate again this time set it to Right 30.00 & click Ok.
Now position it to the left side of your Element_7. (Halloween wordart)
Adjust - Sharpness - Sharpen
Effects - 3D Effects - Drop Shadow
Open Paper 12 - Copy & paste it as a new layer onto your canvas - then re-size it to 70%.
Go to your layers pallet - right click on your Paper 12 layer - click Arrange - Send To Bottom.
Now go to Layers - Load/Save Mask - click Load Mask From Disk.
Now choose a Mask of your choice.
Then click Load.
Now go to your layers pallet - right click on your Mask layer - click Merge then click Merge Group.
Now using your Move tool - position your Mask on your canvas to the left side. Go back to your layers pallet and right click on your Merged Mask layer - then click Duplicate. Go to Image & click Mirror.
Use your move tool to adjust the position of your duplicated Mask layer to your liking.
Now add your name & credit information -
The settings I used for the name are :
Font : Double Feature
Size : 55 Pixels (Depends on the length of your name)
Background Color : #55c4c3
Foreground Color : Set to nul
Now apply & position your name - once happy with placement go to your layers pallet - right click on your Name layer - then click Convert to Raster Layer.
Now go to Effects - 3D Effects - Inner Bevel

Then click Ok.
Now go to Adjust - click Add/Remove Noise - then click Add Noise

Then click Ok.
Now go to Effects - click Plugins - Eye Candy 4000 - Gradient Glow
Use the same settings you used for your Halloween wordart. (Element_7)
Now go to Effects - 3D Effects - Drop Shadow (Same settings as before)
Now if you are happy with the placement of your elements & name/credit information - go to your layers pallet & right click on any layer - then click Merge - then click Merge Visible.
Then activate your Crop tool - crop off any access canvas that you did not use.
Now you may or may not want to re-size your completed tag. If you choose to re-size make sure that you Sharpen your tag one last time.
Now all that is left is to save your tag as a PNG & you have completed this tutorial!!♥
Monday, October 10, 2011
♥This Is Halloween♥ PTU
**This tutorial was written & posted by DitzyDezigns on October 10th 2011**
***Any resemblance to any other tutorial is purely coincidental & completely unintentional!!***
Here is what we will be making :
Supplies Used :
Paint Shop Pro X2(Any version should work)
Scrapkit - This Is Hallowen @ Creative Scraps By Crys
Mask Of Choice
Plugins Used :
Eye Candy 4000 Gradient Glow (Optional)
Fonts Used :
Comic Scan (For RIP & 2011)
Cursif (For Name)
Elements Used :
26
15
16
13
14
5
46
31
33
47
2
56
58
68
Paper 8
Lets Begin :
Start by opening a new 800 X 600 transparent canvas. (Don't worry you will crop it at the end of the tutorial)
Now open Element_26 - Copy & paste it as a new layer onto your canvas - then re-size it to 75%. Position your element to the center of your canvas.
Adjust - Sharpness - Sharpen
Effects - 3D Effects - Drop Shadow
(You can use my settings or your own)
Click Ok.
Now open Element_15 - Copy & paste it as a new layer onto your canvas - then re-size it to 40%. Position it to your liking.
Adjust - Sharpness - Sharpen
Effects - 3D Effects - Drop Shadow (Same settings you used above)
Open Element_16 - Copy & paste it as a new layer onto your canvas - then re-size it to 40%. Position it to the right end of your Element_26.
Sharpen & apply a drop shadow.
Now go to your layers pallet -right click on your Element_16 layer - then click Duplicate. Now go to Image & click Mirror. Use your move tool to adjust the position if needed.
Open Element_13 - Copy & paste it as a new layer onto your canvas - then re-size it to 45%. Position it to your liking.
Sharpen & apply a drop shadow.
Element_14 - Copy & paste it as a new layer onto your canvas - then re-size it to 45%. Position it to your liking.
Sharpen & apply a drop shadow.
Open Element_5 - Copy & paste it as a new layer onto your canvas - then re-size it to 30%. Position it to your liking.
Sharpen & apply a drop shadow.
Open Element_46 - Copy & paste it as a new layer onto your canvas - then re-size it to 45%. Now position it to the right end of your Element_15.
Go to your layers pallet - move this layer down below your Element_16 layer.
Sharpen & apply a drop shadow.
Now back in your layers pallet - right click on your Element_46 layer then click Duplicate. Now go to Image & click Mirror. Use your move tool to adjust the position if needed.
Open Element_31 - Copy & paste it as a new layer onto your canvas - then re-size it to 15%. Position to your liking.
Sharpen & apply a drop shadow.
Open Element_33 - Copy & paste it as a new layer onto your canvas - then re-size it to 25%. Position to your liking.
Sharpen & apply a drop shadow.
Open Element_47 - Copy & paste it as a new layer onto your canvas - then re-size it to 15%. Position it to your liking.
Sharpen & apply a drop shadow.
Open Element_2 - Copy & paste it as a new layer onto your canvas - then re-size it to 30%. Position it to your liking.
Sharpen & apply a drop shadow.
Open Element_56 - Copy & paste it as a new layer onto your canvas - then re-size it to 85%. Position it to the center of your canvas. Now go to your layers pallet - move this layer under your Element_15 layer.
Sharpen & apply a drop shadow.
Open Element_58 - Copy & paste it as a new layer onto your canvas - then re-size it to 85%. Position it to the center of your canvas. Then in your layers pallet -make sure this layer is also under your Element_15 layer.
Sharpen & apply a drop shadow.
In your layers pallet - click on the very last layer in your layers pallet -
Open Paper8 - Copy & paste it as a new layer onto your canvas - then re-size it to 50%.
Go to Layers - Load/Save Mask - Load Mask From Disk- Choose your Mask of choice - then click Load.
Now go to your layers pallet - right click on your mask layer - then click Merge - then Merge Group.
Now move this layer down so that it is the last layer in your layers pallet.
Now right click on your Mask layer & click Duplicate. Then right click on your Duplicated Mask layer - then click Duplicate again. Each time position each one across your canvas.
Now click back on the top layer in your layers pallet -
Open Element_68 - Copy & paste it as a new layer onto your canvas - then re-size it to 80%.
Sharpen only!
Now using your text tool, add something on your grave stone. I used R.I.P. 2011
You can add what you wish.
The settings I used for this is :
Font : Comic Scan
Size : 30 Pixels
Background Color : #000000
Foreground Color : Set to nul
Now add your name, the settings I used for this are :
Font : Cursif
Size: 45 Pixels
Background Color : #e6430c
Foreground Color : Set to nul
Now once you have your name placed, go to your layers pallet -right click on your name layer - then click Convert To Raster Layer.
Now go to Effects - Plugins - Eye Candy 4000 - Gradient Glow
(You can use my settings below or your own)
Don't forget to click on your Color tab and change your color to #ffffff (White)

Click Ok.
Now apply a drop shadow to your name.
Now add any copyright/credits you need to add.
Once happy with your tag - go to your layers pallet - right click on any layer - then click Merge - Merge Visible.
Then activate your crop tool & crop off any access canvas that you did not use.
Now you may or may not want to re-size your tag, it is up to you and where you will be using it.
After I re-size I always add one final Sharpen. (This is optional)
Now all that is left is to save your tag as a PNG file & you have completed this tutorial!!♥
Monday, October 3, 2011
♥Finding Neverland PTU♥
**This tutorial was written & posted by Ditzy Dezigns on October 3rd 2011**
***Any resemblance to any other tutorial is purely coincidental & completely unintentional!!***
Here is what we will be making :
Supplies Needed :
Paint Shop Pro X2 (Any version should work)
Scrapkit -PTU Finding Neverland @ Creative Scraps By Crys
Mask Of Choice
Plugins Used :
Eye Candy 4000 - Gradient Glow (Optional)
Font Used :
Saginaw
Elements Used :
Frame 2
Paper 1
Paper 18
Element_13
Element_9
Element_1
Element_7
Element_4
Element_5
Element_6
Element_60
Element_52
Element_54
Element_14
Element_3
Element_11
Element_44
Element_40
Element_65
Element_26
Element_16
Lets Begin :
***Please Note - I will post any specific settings I use for this tutorial in a screen shot, or by explaining , you are more than welcome to use my exact settings if you so choose. That is why I put them here. So please do not hesitate to do so. :-) ***
Start by opening a new 800 X 600 transparent canvas.
Open frame 2 from your kit - Copy & paste it as a new layer onto your canvas. Then re-size it 50%. Now using your move tool center your frame 2 element in the center of your canvas.
Click on your Magic Wand tool to activate it - then using your Magic Wand, click on the inside of your Frame 2 element.
Now go to Selections - click Modify - then click Expand, set to 6 & click Ok.
Now open Paper 8 - Copy & paste it as a new layer on to your canvas. Then go to Selections - click Invert - then on your keyboard - press your Delete key 1 time. Then go to Selections & click Select None.
In your layers pallet - move your Paper 8 layer down so it is directly below your Frame 2 layer.
Then click on your Frame 2 layer - go to Adjust - click Sharpness - then click Sharpen.
Now go to Effects - click 3D Effects - Drop Shadow
Click Ok.
Now lets add some elements -
Open Element_13 - Copy & paste it as a new layer onto your canvas - then re-size it to 50%. Position this element within your Frame 2 element.
Go to your layers pallet - Move your Element_13 layer down so it is directly below your Frame 2 layer but keep it above your Paper 18 layer.
Now, click on your Eraser Tool to make it active - then you want to erase any parts of your Element_13 that are out past the width of your Frame 2 element. (See my tag for example if needed)
Now on your Element_13 layer - go to Adjust - Sharpness - Sharpen
Then apply a drop shadow, use the same settings you used on your Frame2 element.
Open Element_9 - Copy & paste it as a new layer onto your canvas - then re-size it to 25%. Using your move tool position your Element_9 within the inside of your Frame 2 element. (See my tag for reference if needed)
Now Sharpen & apply a drop shadow. (See above where to locate your Sharpen & Drop Shadow if needed)
Open Element_1 - Copy & paste it as a new layer onto your canvas - then re-size it to 25%. Use your move tool to position your Element_1 to the left side of your Frame 2.
Now go to Effects - 3D Effects - click Inner Bevel

Click Ok.
Sharpen & apply a Drop Shadow. (Same settings you have used above)
Open Element_17 - Copy & paste as a new layer onto your canvas - Re-size it to 35%. Position to the right side of your Frame 2. Then got o Effects - 3D Effects - Inner Bevel (Use the same settings you used for the element above.)
Now Sharpen & apply a drop shadow.
Open Element 11 - Copy & paste it as a new layer onto your canvas. Now re-size it to 50%.
Position it to the left side of your template. Then go to your layers pallet & move your Element_11 layer down so that it is below your Element 1, Frame 2 & Paper 18 layers.
Apply Inner Bevel, then Sharpen & apply a drop shadow.
Open Element_5 - Copy & paste it as a new layer onto your canvas - then re-size it to 30%. Use your move tool & position to the right side of your Frame 2..
Sharpen & apply a drop shadow.
Open Element 6 - Copy & paste it as a new layer onto your canvas - then re-size it to 25%. Position to the right side of your Frame 2 element. Sharpen & apply a drop shadow.
In your layers pallet - move your Element5 & Element 6 layers down so they are below your Element 7 layer. Then use your move tool to adjust them so that you can see them around your Element 7.
Open Element_60 - Copy & paste it as a new layer onto your canvas - then re-size it to 50%. Use your move tool to position to the bottom half of your tag to the left.
Sharpen & apply a drop shadow.
Go to your layers pallet - right click on your Element_60 layer - then click Duplicate. Use your move tool to position your duplicated Element 60 to the right side.
Back in your layers pallet - Move both of your Element 60 layers down so they are directly below your Element_1 layer.
Open Element_52 - Copy & paste it as a new layer onto your canvas - then re-size it to 60%. Position it to the bottom of your tag. (See my tag for reference if needed)
Open Element_54 - Copy & paste it as a new layer onto your canvas - then re-size it to 30%. Position it to the right side of your frame. Sharpen & apply a drop shadow.
Then go to your layers pallet & move your Element_54 layer down below your Element 5 & 6 layers.
Open Element_14 - Copy & paste it as a new layer onto your canvas - then re-size it to 50%. Go to Image - click Free Rotate ,set it to Left 90.00 & click ok.
Now using your move tool - position your Element 14 to the left side of your frame.
Sharpen & apply a drop shadow.
Now go to your layers pallet - move your Element 14 layer down so it is directly under your Element 1 layer.
Now right click on your Element 14 layer & then click Duplicate. Now go to Image & click Mirror.
Use your move tool to adjust the position of your duplicated element if needed.
Open Element_3 - Copy & paste it as a new layer onto your canvas - then re-size it to 15%. Go to Image & click Mirror. Now position your element 3 to the left side of your frame.
Sharpen & apply a drop shadow.
Then go to your layers pallet - right click on your Element_3 layer & click Duplicate. Then go to Image & click Mirror. Adjust the position of your duplicated element to the lower right side of your Frame2.
Open Element_4 - Copy & paste it as a new layer onto your canvas - then re-size it to 15%. Position it to the right side of your frame.
Sharpen & apply a drop shadow.
Now in your layers pallet - right click on your Element_4 layer - then click Duplicate.
Then go to Image & click Mirror. Then use your move tool to position your duplicated element to the lower left side of your frame.
Open Element_44 - Copy & paste it as a new layer onto your canvas - then re-size it to 40%. Then go to Image & click Mirror. Then use your move tool to position your element to the left side of your Frame.
Sharpen & apply a drop shadow.
In your layers pallet - Move your Element_44 layer down so it is under your Element_52 layer.
Open Element_40 - Copy & paste it as a new layer onto your canvas - then re-size it to 40%. Position it to the right side of your Frame.
Sharpen & apply a drop shadow.
In your layers pallet - move your Element_40 layer down so it is directly under your Element_52 layer.
Open Element_65 - Copy & paste it as new layer onto your canvas - then re-size it to 80%. Position it to your liking.
Now go to Effects - click Plugins - then click Eye Candy 4000 - then click Gradient Glow
Click Ok.
Now Sharpen & apply a drop shadow.
Open Element _26 - Copy & paste it as a new layer onto your canvas - then re-size it to 50%. Position it to the lower right corner of your Frame2.
Sharpen & apply a drop shadow.
Go to your layers pallet - right click on your Element_26 layer - then click Duplicate.
Now go to Image & click Mirror. Use your move tool to adjust the position if needed)
Open Element_16 - Copy & paste it as a new layer onto your canvas - then re-size it to 50%. Position it to the right side of your frame.
Sharpen but do NOT apply a drop shadow.
In your layers pallet - right click on your Element 16 layer - then click Duplicate. Now go to Image & click Mirror. Adjust the position of your duplicated element with your move tool if needed.
Now in your layers pallet - click on the very last layer -
Open Paper_1 - Copy & paste it as a new layer onto your canvas - then re-size it to 70%. Go to Layers - click Load/Save Mask - then click Load Mask From Disk - then ones your Mask window opens, choose a mask of your choice then click Ok.
Now in your layers pallet - right click on your Mask layer - then click Merge - then click Merge Group.
Now on your canvas - use your move tool & move your Mask to the left side of your tag. Then go back to your layers pallet & right click on your Mask layer - then click Duplicate. Now go to Image & click Mirror.
Adjust the position of your duplicated mask with your move tool so that it is on the right side of your frame.
Now add your name & credits
For my name I used :
Font : Saginaw
Size : 40 Pixels
Background Color : #6B4978
Foreground Color : Set to nul
Once you have your name applied to your canvas - go to your layers pallet & right click on your name layer - then click Convert To Raster Layer.
Now go to Effect s- Plugins - Eye Candy 4000 - Gradient Glow
Use the same settings you used before.
Now apply a drop shadow to your Name.
Once you are happy with the placement of your elements & name go to your layers pallet - right click on any layer then click Merge - then click Merge Visible.
Now activate your Crop tool - crop off any access canvas that you did not use.
Now you may or may not want to re-size your completed tag depending on where you will be using it.
Once you re-size your tag make sure you do one final Sharpen before saving.
Now save your tag as a PNG file & you have completed this tutorial!!♥
Subscribe to:
Comments (Atom)
About Me
- DitzyDezigns
- New York, United States
- Hiya Everyone! My name is Ronney, I have 3 wonderful teenagers, and have been married to my husband for 20 years. I LOVE to design signatures, tags & avatars, I design with PSP, and have been designing for over 2 1/2 years. I will be not only designing signatures, tags & avatars but will also be writing & posting tutorials as well. I will also be making some templates to share with you all as well. So I hope you enjoy and can use everything I have available on my blog :-) If you ever try any of my tutorials,please send me your completed designs and I would love to showcase it here on my blog!
♥I CT For♥


Blog Hop

Today's Date

Favorite Stores

♥Forums♥


My Pixels


♥My Avatars♥


