♥Ditzy's TOU♥
All of the tutorials written by me are of my own Ditzy imagination.
Do NOT copy or alter them in ANY way.
Do NOT copy & paste the tutorials to any website, forum or group.
Do NOT claim them as your own.
If you would like to show or share my tutorial do so by using a link to bring your members to my blog. However if you do please send me a courtesy email so that I know my tutorials are being used according to my TOU. Also if you would please send me a link to where you will be posting my link.
If you have done any of my tutorials I would LOVE to see the outcome of what you have made, so please email me OR you can leave me a link in my shout box so that I can see what you have made and display it on my blog for others to enjoy as well.
Other than that please have fun,and I hope that you enjoy all my tutorials!
Email me @ DitzyDezigns@hotmail.com
Email Me
I would love to see what you have made using any of my tutorials, so please feel free to email me at the address below.
DitzyDezigns@hotmail.com
Add Me On Facebook
Blog Archive
-
▼
2011
(152)
-
▼
October
(15)
- ♥Autumn Bouquet PTU♥
- ♥Trick Or Treat PTU♥
- ♥Autumn Colors PTU♥
- ♥Shades Of November PTU♥
- ♥Good Witch Or Bad Witch PTU♥
- ♥Happy Halloween PTU♥
- ♥Bubble Bubble PTU♥
- ♥Brewing Up Some Fun PTU♥
- ♥Spooky Sweet PTU♥
- ♥FYI♥
- ♥Emo Witch PTU♥
- ♥This Is Halloween♥ PTU
- ♥Let It Be Captured PTU♥
- ♥Finding Neverland PTU♥
- ♥Jaggedy Lantern FTU (Animated)♥
-
▼
October
(15)
Pages
Powered by Blogger.
Sunday, October 16, 2011
♥Spooky Sweet PTU♥
**This tutorial was written & posted by Ditzy Dezigns on October 16th 2011**
***Any resemblance to any other tutorial is purely coincidental & completely unintentional!!**
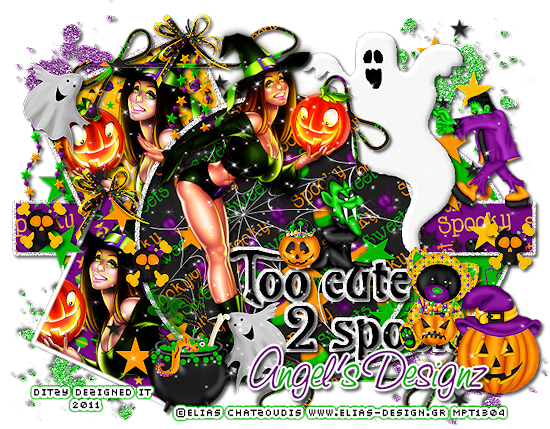
Here is what we will be making :
Supplies Needed :
Paint Shop Pro X2 (Any version should work)
Tube Of Choice - I used Elias Chatzoudis who is now available @ PTE (You will notice I have a MPT license # on my tag, that is because I purchased my tube when he was selling through MPT)
Scrapkit - Spooky Sweet by Angel's Designz
Template - Halloween Temp 1 -By Annu @ Creative Misfits Blog
Plugins Used :
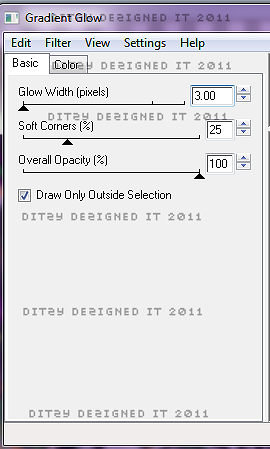
Eye Candy 4000 - Gradient Glow
Xero - Radiance
Font Used :
Saginaw
Elements Used :
Paper 3
Paper 1
Paper 2
Paper 4
Web
Star String
Kitty
Frankenstein
Dracular
Bow 1
Candy Bucket
Pumpkin
Skull2
Star Trail
Ghost
String
Cauldron
Splat 1 & 2
Sparkles
Lets Begin :
Open your Halloween Template 1 -
Go to your layers palelt - Delete the following layers :
Credit (only after you have thanked the designer of the template)
Raster 7
Raster 1
Raster 13
Raster 4
Copy Of Raster 8
Now go to your layers pallet - Click on your Raster 9 layer - go to Selections - click Select All - go to Selections again & click Float - then go to Selections again & click Defloat -
Now open Paper 3 - Copy & paste it as a new layer onto your canvas - then go to Selections - click Invert - then on your keyboard press your Delete key 1 time. Then go back to Selections & click Select None.
Go back to your layers pallet - & delete your original Raster 9 layer.
Now click on your Raster 6 layer - go to Adjust - Add/Remove Noise -then click Add Noise - set it to Uniform 100 & make sure your Monochrome box is checked then click Ok.
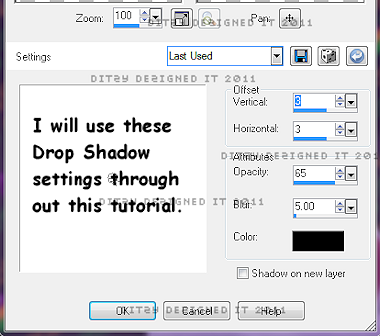
Now go to Effects - click 3D Effects - then click Drop Shadow.
You can use my settings below or your own.
**See added note on the screen shot below**
Now click Ok.
Now click on your Raster 2 layer - follow the same steps you did for your Raster 9 layer only use Paper 1 this time.
Now click on your Raster 3 layer - then add noise like you did on your Raster 6 layer. Then apply a drop shadow. (Same settings as above)
Click on your Raster 17 layer - go to Selections - Select All - Float - Defloat -
Open Paper 2 - Copy & paste it as a new layer onto your canvas - then go to Selections - click Invert - then on your keyboard press your Delete key 1 time.
Back to Selections & click Select None.
Then go to your layers pallet & delete your original Raster 17 layer.
Now in your layers pallet - click on your Raster 10 layer - Selections - Select All - Float - Defloat -
Open Paper 4 - Copy & paste it as a new layer onto your canvas - then go to Selections & click Invert - then on your keyboard press your Delete key 1 time.
Keeping this layer selected - open your Tube of choice - Copy & paste it as a new layer onto your canvas - re-size & position to your liking within the marching ants, once happy with placement - press your delete key 1 more time.
Go back to Selections & click Select None.
Now in your layers pallet - delete your original Raster 10 layer.
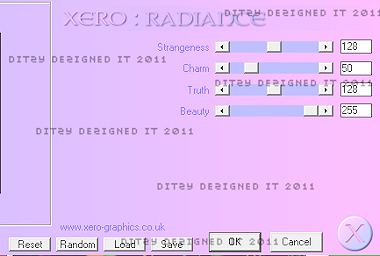
Still in your layers pallet - click on your Tube layer - then go to Effects - click Plugins - then click Xero - then click Radiance.
Then click Ok.
Now go to Effects - 3D Effects - Drop Shadow
Use the same settings as before.
Now in your layers pallet - click on your Frame 1 layer - go to Adjust - Add/Remove Noise - Add Noise - set to Uniform 100 & make sure your Monochrome box is checked then click Ok.
Now apply a drop shadow to your Frame 1 layer. (Same settings as before)
Now follow these same steps for your Raster 10 layer & your Frame 2 layer. Only this time on your Raster 10 layer - use Paper 7.
Now open your Full tube of choice - Copy & paste it as a new layer onto your canvas - then re-size it to 85% (if you are using the same tube. If you are using a different one adjust the size to your liking)
Now position your tube to your liking.
Go to your layers pallet - right click on your Tube layer - then click Duplicate - now go to Adjust - Blur - Gaussian Blur - set the Radius to 5.00 & click Ok.
Now go back to your layers pallet & change the Blend Mode from Normal to Overlay.
Then click on your Original full tube layer - and apply a drop shadow. (Same settings as before)
Now lets add some elements :
Open your Web element - Copy & paste it as a new layer onto your canvas - then re-size it to 70%. Position it to your liking.
Go to Adjust - Sharpness - Sharpen (You will do this for every element you re-size smaller)
Then apply a drop shadow (Same settings)
Open your Star String - Copy & paste it as a new layer onto your canvas - then re-size it to 30%. Position it to your liking.
Sharpen & apply a drop shadow.
Open your Kitty element - Copy & paste it as a new layer onto your canvas - then re-size it to 30%. Position to your liking. Sharpen & apply a drop shadow.
Open your Frankenstein element - Copy & paste it as a new layer onto your canvas - re-size it to 25%. Position it to your liking.
Sharpen & apply a drop shadow
Open your Dracula element - Copy & paste it as a new layer onto your canvas - then re-size it to 25%. Position to your liking. Sharpen & apply a drop shadow
Open your Bow 1 element - Copy & paste it as a new layer onto your canvas - then re-size it to 25%. Then position it to your liking. Sharpen & apply a drop shadow.
Open your Candy Bucket - Copy & Paste it as a new layer onto your canvas - then re-size it to 30%. Position it to your liking. Sharpen & apply a drop shadow.
Open your Pumpkin element - Copy & paste it as a new layer onto your canvas - then re-size it to 30%, then re-size it again to 50%. Position it to your liking. Sharpen & apply a drop shadow.
Open your Skull2 element - Copy & paste it as a new layer onto your canvas - then re-size it to 20%. Position to your liking.Sharpen & apply a drop shadow.
In your layers pallet - right click on your Skull 2 layer & click Duplicate. Position your duplicated Skull2 element to your liking.
Open your Star Trail - Copy & Paste it as a new layer onto your canvas - then position it to your liking.
Sharpen & apply a drop shadow.
Go to your layers pallet & duplicate this element 2 x's position each one to your liking.
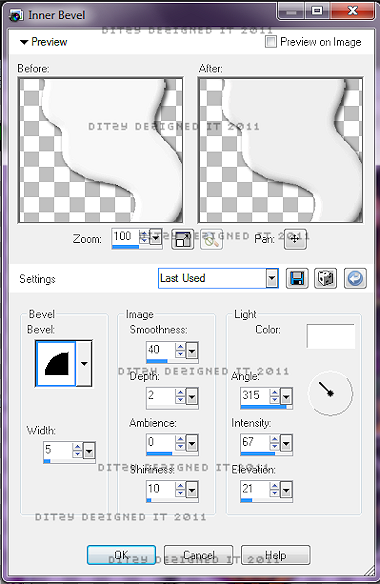
In your Layers Pallet - click on your Raster 11 layer - go to Effects - 3D Effects - Inner Bevel
Then click Ok.
Now apply a drop shadow to this layer.
Open your Ghost element - Copy & paste it as a new layer onto your canvas - then re-size it to 25%. Position it to your liking. Sharpen & apply a drop shadow.
Open your String element - Copy & Paste it as a new layer onto your canvas - then re-size it to 70%. Position at the top of your template. Sharpen & apply a drop shadow
Go to your layers pallet - right click on your String layer - then click Duplicate. Now go to Image & click Flip then go back to Image & click Mirror.
Now position your duplicated String element to your liking.
Open your Cauldron element - Copy & paste it as a new layer onto your canvas - then re-size it to 30%. Position it to your liking. Then Sharpen & apply a drop shadow.
Open your Splat 2 element - Copy & paste it as a new layer onto your canvas - then re-size it to 50%. Position to the upper left of your template. Now sharpen & apply a drop shadow.
In your layers pallet - right click on your Splat 2 layer - then click Arrange - then Send To Bottom.
Open Splat 1 - Copy & paste it to your canvas as a new layer - then re-size it to 50%. position to your upper right corner on your template. Then Sharpen & apply a drop shadow.
Now right click on your Splat 1 layer - click Arrange - Send To Bottom. (if it isnt already there)
Now in your layers pallet - right click on your Splat 1 layer - then click Duplicate. Now go to Image & click Flip. Then back to Image & click Mirror. This element should now be in the lower left corner.
Now still in your layers pallet - right click on your Splat2 layer - click Duplicate - then go to Image - click Flip. Then Image again & click Mirror. This element should now be in the lower right corner.
Now open your Sparkles - Copy & paste as a new layer onto your canvas - then re-size it to 85%. Now position it to the bottom of your template. Then in your layers pallet - right click on your Sparkle layer - then click Duplicate. Go to Image & click Flip.
Add your name & copyright information.
The settings I used for the name are:
Font : Saginaw
Size : 50 Pixels (Depends on the length of your name)
Background Color : #000000 (Black)
Foreground Color : Set to nul
Apply & position your name - then go to your layers pallet - right click on your name layer - then click Convert To Raster Layer.
Then go to Effects - Plugins - Eye Candy 4000 - Gradient Glow
Click Ok.
Now apply a drop shadow to your name layer.
Once you are happy with all your elements & name - go to your layers pallet right click on any layer - click Merge - then click Merge Visible.
Then activate your Crop tool & crop off any access canvas that you did not use.
Then re-size your completed tag if you wish, this will depend on where you intend to use it and what their size limitations are.
Then once you re-size you will want to do one final sharpen.
Now all that is left is to save your tag as a PNG file & you have completed this tutorial!!♥
Subscribe to:
Post Comments (Atom)
About Me

- DitzyDezigns
- New York, United States
- Hiya Everyone! My name is Ronney, I have 3 wonderful teenagers, and have been married to my husband for 20 years. I LOVE to design signatures, tags & avatars, I design with PSP, and have been designing for over 2 1/2 years. I will be not only designing signatures, tags & avatars but will also be writing & posting tutorials as well. I will also be making some templates to share with you all as well. So I hope you enjoy and can use everything I have available on my blog :-) If you ever try any of my tutorials,please send me your completed designs and I would love to showcase it here on my blog!
Labels
- Addictive Pleasures Tuts (35)
- Angel's Designz Tuts (10)
- Animated (26)
- Announcements (2)
- Awards (2)
- Beginner (17)
- Butterfly Blush Tuts (8)
- Cool Scraps Digital (2)
- Creative Intentionz (2)
- Creative Scraps By Crys (19)
- Ditzys Scrapkits (1)
- Forum Sets (1)
- FTU (6)
- Intermediate Level Tuts (3)
- Peekaboo Land (1)
- Peekaboo Land PTU (4)
- Peekaboo Land Tuts (1)
- Pimp My Tags With Scraps Tuts (14)
- PTU (131)
- Scappin Dollars Tuts (1)
- Scrappin Dollars Tuts (7)
- Scraps From The Heart Tuts (3)
- Scraps With Attitude (27)
- Tammy's Scraps (8)
- Updates (1)
- Wickedly Ditzy Scraps (1)




0 comments:
Post a Comment