♥Ditzy's TOU♥
All of the tutorials written by me are of my own Ditzy imagination.
Do NOT copy or alter them in ANY way.
Do NOT copy & paste the tutorials to any website, forum or group.
Do NOT claim them as your own.
If you would like to show or share my tutorial do so by using a link to bring your members to my blog. However if you do please send me a courtesy email so that I know my tutorials are being used according to my TOU. Also if you would please send me a link to where you will be posting my link.
If you have done any of my tutorials I would LOVE to see the outcome of what you have made, so please email me OR you can leave me a link in my shout box so that I can see what you have made and display it on my blog for others to enjoy as well.
Other than that please have fun,and I hope that you enjoy all my tutorials!
Email me @ DitzyDezigns@hotmail.com
Email Me
I would love to see what you have made using any of my tutorials, so please feel free to email me at the address below.
DitzyDezigns@hotmail.com
Add Me On Facebook
Blog Archive
-
▼
2011
(152)
-
▼
July
(13)
- ♥Beach Birds (Animated) PTU♥
- ♥Just An Update♥
- ♥Sunrise Summer (Animated) PTU
- ♥Cutie Patootie (Animated) PTU♥
- ♥Sleepy Time PTU♥
- ♦Beach Bum Girl (Animated) PTU♦
- ♥Special Day With Dad PTU♥
- ♥Sunny Dayz (Animated) PTU♥
- ♥Sea World PTU♥
- ♥Under The Sea PTU (Animated)♥
- ♥Groovy Chic PTU♥
- ♥Once I Had A Dream Forum Set PTU♥
- ♦Emolicious Forum Set PTU♦
-
▼
July
(13)
Pages
Powered by Blogger.
Sunday, July 17, 2011
♥Special Day With Dad PTU♥
**This tutorial was written & posted by DitzyDezigns on July 17th 2011**
***Any resemblance to any other tutorial is purely coincidental & completely unintentional!!***
Here is what we will be making :
Supplies Needed :
Paint Shop Pro X2 (Any version should work)
Scrapkit - Daddy's Special Day By Creative Scraps By Crys
Fonts Used :
Sweetheart Script Limited
Pixelette
Elements Used :
Grass
bbq
Frog2
Fishing Pole
Boat
Daddy
Wheel Barrow
Tree
Pond
Fence
House
Grass 2
Paper3
Lets Begin :
Start with opening a new 800 X 650 transparent canvas. (Don't worry you will crop it at the end of the tutorial)
Open your Grass 2 element - Copy & paste it as a new layer onto your canvas - then re-size it to 50%.
Using your move tool, position your Grass 2 element in the center of your canvas.
Now go to your layers pallet - right click on your Grass 2 layer - then click Duplicate.
Now use your move tool to position your Duplicated Grass 2 element to your liking.
Duplicate your Grass 2 layer again & position .
Now open your Pond element - Copy & paste it as a new layer onto your canvas - then re-size it to 40%. Position it using your move tool to the front of your Grass 2 elements.
Go to Adjust - click Sharpness - then click Sharpen.
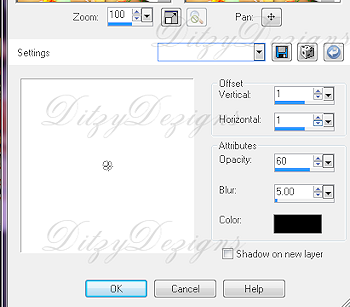
Go to Effects - click 3D Effects - then click Drop Shadow from slide out menu.
(You are more than welcome to use my settings below or your own, the choice is always yours.)
Click Ok.
Now in your layers pallet - duplicate each of your Grass 2 layers again , each time positioning them using your move tool , place them around your Pond element. (See my tag for reference.)
Open your Fence element - Copy & paste it as a new layer onto your canvas - then re-size it to 40%. Use your move tool & position your Fence element to the right side of your Grass2 elements.
Adjust - Sharpness - Sharpen.
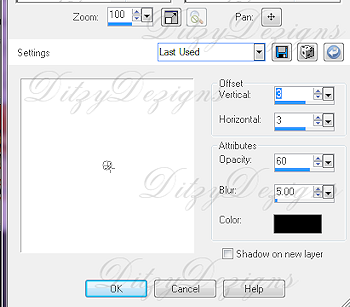
Apply a drop shadow, only this time up the settings just a bit.
(You can use mine or yours)
Click Ok.
Go to your layers pallet - move your Fence layer below ALL of your Grass 2 layers.
Open your House element - Copy & paste it as a new layer onto your canvas - then re-size it to 30%. Position it to the right side and place it in front of the end of your Fence on the right side.
Adjust - Sharpness - Sharpen
Apply a drop shadow. (Same settings you used for your Fence element)
Open your Wheel Barrow element - Copy & paste it as a new layer, then re-size it to 30%. Use your move tool & position your Wheel Barrow element in front of your house on the right.
Adjust - Sharpness - Sharpen
Apply a drop shadow. (Same settings as you used above)
Open your Tree element - Copy & paste it as a new layer onto your canvas - then re-size it to 60%. Use your move tool to position your Tree element to the left end of your Fence.
Adjust - Sharpness - Sharpen.
Apply a drop shadow.
Open your bbq element - Copy & paste it as a new layer onto your canvas - then re-size it to 30%. Use your move tool to position it to your liking.
Adjust - Sharpness - Sharpen
Apply a drop shadow.
Open your Fish Pole element - Copy & paste it as a new layer, then re-size it to 40%. Now position it so that it appears to be leaning up against your Tree element.
Adjust - Sharpness - Sharpen
Apply a drop shadow.
Open your Boat element - Copy & paste it as a new layer onto your canvas - then re-size it to 10%. Position it on your Pond element.
Adjust - Sharpness - Sharpen.
Apply a drop shadow.
Open your Daddy element - Copy & paste it as a new layer onto your canvas - then re-size it to 20%. Position it to your liking.
Adjust - Sharpness - Sharpen
Apply a drop shadow.
Now open your Grass element - Copy & paste it as a new layer onto your canvas - then re-size it to 30% , now position it along the bottom of your Fence element.
Go to your layers pallet & move your Grass element down so that it is just below ALL of your Grass 2 elements.
Adjust - Sharpness - Sharpen
Apply a Drop Shadow.
Now right click on your Grass layer & click Duplicate - now use your move tool & move your duplicated Grass element over to the right just a bit.
Now continue to duplicate your Grass element & position each one until you have covered entire length of the bottom of the Fence with the Grass elements.
Open your Frog 2 element - Copy & paste it as a new layer onto your canvas - then re-size it to 15%. Now use your move tool & position it to your liking.
Adjust - Sharpness - Sharpen
Apply a drop shadow.
Go to your layers pallet - then click on the very last layer at the bottom.
Now open Paper 3 - Copy & paste it as a new layer onto your canvas. Then re-size it to 80%.
Go to Layers - click Load/Save Mask - then Load Mask From Disk.
Choose your desired Mask, then click Load.
Now go back to your layers pallet - right click on your Mask layer then click Merge, then from the slide out menu click Merge Group.
Now right click on your Merged Mask layer - then click Duplicate.
Now right click on your duplicated Mask layer & click Merge - then click Merge Down.
Now re-size your Mask again to 80%. Position it to the left side of your Fence element .
Now go back to your layers pallet - right click on your Mask layer & click Duplicate. Then go to Image & click Mirror. Use your move tool to adjust the position of your Mask if needed.
Now add your name.
I used :
Font : Sweetheart Script Limited
Size : 80 Pixels
Background Color : #0064af
Foreground Color : Set to nul
Now once you have applied your name & positioned it to your liking, go to your layers pallet - right click on your name layer then click Convert To Raster Layer.
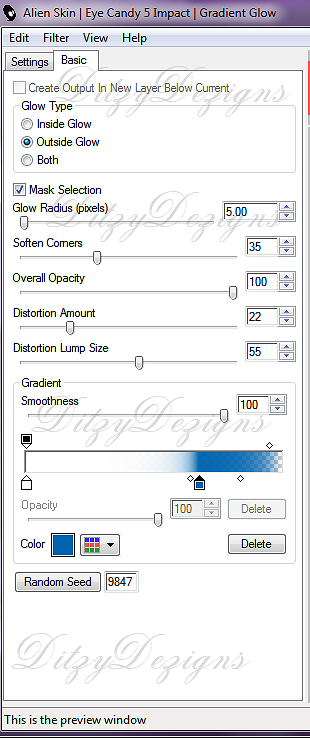
Now go to Effects click Plugins - then click Eye Candy 5 Impact - Gradient Glow.
You can use my settings below or your own. The colors I used are
1st Color - #ffffff (White)
2nd Color - #0064af (Same color you used for your name)
Click Ok.
Now apply a drop shadow to your name. I used the same settings that I used for my elements.
Now if you would like to add a special little phrase , now would be the time to do that. I added "A Special Day With Dad"
I used :
Font : Comic Scan
Size : 25 Pixels
Background Color : #000000
Foreground Color : Set to nul
Then I applied the same Gradient Glow that I used on my name.
Now add any credit or copyright information.
Go to your layers pallet - right click on any layer then click Merge - then click Merge Visible.
Now activate your Crop tool & crop off any canvas that you did not use.
Once you have cropped your tag, you may want to re-size it depending on where you will be using it.
Once you re-size your tag go to Adjust - click Sharpness - then click Sharpen.
Now all that is left is to save your tag as a PNG file & you have completed this tutorial!!♥
Subscribe to:
Post Comments (Atom)
About Me

- DitzyDezigns
- New York, United States
- Hiya Everyone! My name is Ronney, I have 3 wonderful teenagers, and have been married to my husband for 20 years. I LOVE to design signatures, tags & avatars, I design with PSP, and have been designing for over 2 1/2 years. I will be not only designing signatures, tags & avatars but will also be writing & posting tutorials as well. I will also be making some templates to share with you all as well. So I hope you enjoy and can use everything I have available on my blog :-) If you ever try any of my tutorials,please send me your completed designs and I would love to showcase it here on my blog!
Labels
- Addictive Pleasures Tuts (35)
- Angel's Designz Tuts (10)
- Animated (26)
- Announcements (2)
- Awards (2)
- Beginner (17)
- Butterfly Blush Tuts (8)
- Cool Scraps Digital (2)
- Creative Intentionz (2)
- Creative Scraps By Crys (19)
- Ditzys Scrapkits (1)
- Forum Sets (1)
- FTU (6)
- Intermediate Level Tuts (3)
- Peekaboo Land (1)
- Peekaboo Land PTU (4)
- Peekaboo Land Tuts (1)
- Pimp My Tags With Scraps Tuts (14)
- PTU (131)
- Scappin Dollars Tuts (1)
- Scrappin Dollars Tuts (7)
- Scraps From The Heart Tuts (3)
- Scraps With Attitude (27)
- Tammy's Scraps (8)
- Updates (1)
- Wickedly Ditzy Scraps (1)


0 comments:
Post a Comment