Don't Be A Pirate

My Blinkies

Add Me On Facebook
Protected


Blogs I Stalk


Awards :-)


Find Me At

Favorite Stamps


Wednesday, March 30, 2011
♥Pixie Dusk PTU♥
Here is what we are going to make :
**Please remember that my tutorials are made using my own Ditzy noggin, any resemblance to any other tutorials is purely coincidental**
Supplies Needed :
PaintShop Pro X2 (Any version should work)
Animation Shop
Eye Candy 4 > Gradient Glow
Scrapkit By Gina's Gems Scraps @ Scraps With Atittude
Pictures/Tube of Choice. (DO NOT use the same photo's I did they are my own personal photo's)
Font : 2 Moulin Rouge DNA Size 72 Color (#861982)
Sweetheart Script-Limited Size 35 Color (#c96ec6)
Elements Used :
Rock & Grass
Firefly Lights
Fence
Curled Grass & Lantern
Charming Wrap 2
Butterfly 2
Blue Bells 2
Lets Begin :
Open a new 800x650 transparent image.
First we are going to begin by making our frames, for this tag I needed just white frames so I decided to make my own.
Click on your Preshape tool and select your Rectangle tool, up top at your settings set your Width to 8.00, make sure Anti -Alias is checked, and your Meter limit is set to 15.
In your materials pallet, make your Foreground color White (#ffffff) and close of your Background color.
Now draw out your frame by left clicking your mouse and holding it while you move your mouse to make the frame, you will see the outline as you move your mouse. When you have the size you want your frames to me let go of your left mouse button. (You don't want your frames to small or to big, so a nice medium size is good.
Once you have your frame made, go to your layers pallet and right click on your frame layer, then click Convert to raster layer. Then go to Image, click on Free Rotate, set your settings to Left 20.00. click ok.
Now back in your layers pallet, click on your frame layer, right click, then click duplicate. On your duplicated layer go to Image, then click Mirror. This will put your second frame on the right side of your canvas, you can adjust it as needed.
Now get your magic wand, make sure in your layers pallet you are on the original frame layer, (The one to the left) and click inside your frame, then make a new raster layer.
Now open your picture or tube of choice , copy & paste it "INTO Selection". Now in your layers pallet move your picture/tube layer below your frame layer. On your picture layer go to Adjust, click on Sharpness, then click Sharpen, and then give your frame a drop shadow. (To add a drop shadow go to Effects, Then click on 3D Effects, then click Drop Shadow.)
Now follow the exact same steps above to put your second picture/tube into the other frame.
Once you have your photo's/tubes in place,
Open your Blue Bells 2 element, copy & paste as a new layer onto your canvas, then re-size it to 50%, now using your move tool move your Blue Bells 2 element to the left frame, then go to Image, click on Free Rotate, set your setting to Left 20.00. Then once you have it where you want it, go to your layers pallet, make sure you are on your Blue Bells 2 layer, right click, click duplicate then go to Image, click on Mirror, and then use your move tool to position it exactly where you want it.
Open your Fence element, copy & paste as a new layer on to your canvas, now position it in the center of your canvas. Give it a slight drop shadow.
Open your Rock & Grass element, copy & paste it as a new image, re-size it to 40%, then position so that it is at the left end of your fence. Now in your layers pallet make sure your on your Rock & Grass element , right click, then click duplicate. On the duplicated layer go to Image, then click Mirror. Use your move tool to position it at the right side of your fence.
Now open your Curled Grass & Lantern element, copy & paste as a new layer, re-size it to 70%, then again to 80%.Using your move tool position it to the left side of your fence, but so that it is even with the end of the fence. Go to your layers pallet on your Curled Grass & Lantern layer, right click, click duplicate, then go to image click on Mirror, and then using your move tool position your duplicated Curled Grass & Lantern element to the right so they are side by side. On both of your Curled Grass & Lantern layers go to Adjust, click Sharpness, then click Sharpen. Now add a drop shadow to both layers.
Now open your Butterfly 2 element, copy & paste it as a new layer onto your canvas, re-size it to 25%, position it where you would like it, I positioned mine on the Curled Grass & Lantern element. Once you have it where you want it, go to your layers pallet, right click on your Butterfly 2 element, and duplicate it, use your move tool and position it where you want it. You may also go to Image, click Mirror to have it turned a different way if you so desire. I duplicated mine 3 times for a total of 4 butterflies, and positioned them around the Curled Grass & Lantern elements. Once you have them where you want them, go back to your layers pallet, click on your top Butterfly 2 duplicated layer, then right click, click Merge ,then click Merge Down. Do this for all of the Butterfly 2 element layers until they become on layer. This will be what we will animated shortly. :-) Rename this layer Butterflies.
Now lets open our Firefly Lights, copy & paste them as a new layer onto your canvas, re-size them to 50%, position to the left side of your tag, then go to your layers pallet, and click on your Fireflies Lights if you aren't already on it, then right click, click duplicate, then on your duplicated layer go to Image, and click Mirror. Use your move tool if you need to to position it where you want it.
Now open your Charming Wrap 2 element, copy & paste it as a new layer onto your canvas, use your "Pick" tool and adjust your Charming Wrap 2 to the edges of your fence. So that it looks like it is a wrapped package :-)
Now lets add our name & copyright/credit information.
Once you have your name where you want it, go to your layers pallet, make sure you have selected your name layer, right click, click convert to raster layer, then go to Effects, scroll down to your plug-ins, click Eye Candy 4, then click Gradient Glow. Put your settings where you would like them and click ok.
Now if you want the extra wording like what I used, this is where I used the Sweetheart Script-Limited font, just type out what you want it to say, then convert to raster layer like we did above, then go to Effects, scroll down to your Plug-ins and go to Eye Candy 4 > Gradient Glow, and set it to your liking and click ok.
Give both your name & any other wording (other than your copyright info) a drop shadow.
**If you do not wish to animate you must crop your tag to get rid of any extra canvas that we did not use, and then in your layers pallet, right click on any layer, click Merge, then click Merge Visible. Make sure your layers are where they need to be, otherwise when you merge them something might end up in the wrong place** .
Save your tag as png.
If you wish to animate, lets continue :
Open your Animation Shop.
Then go back to your PSP
Now in your layers pallet, click on your Butterflies layer that we renamed earlier, go to Adjust, click Add/Remove Noise, then click Add Noise. Change your settings to Uniform , 30 and Monochrome is checked then click ok.
Now go to Edit, click "Copy Special" then on slide out menu click "Copy Merged".
Now go to your Animatoin Shop, right click and then click "Paste As New Animation".
Now go back to your PSP, click your undo button one time, then go to Adjust, click Add/Remove Noise, then click Add Noise, Only this time only change your noise setting to 35. Click Ok.
Then go to Edit, click "Copy Special" then on the slide out menu click "Copy Merged"
Now go to your Animation Shop, right click on the first frame we just put there, click "Paste" then click "After Current Frame"
Now go back to your PSP, click your undo button one time, then go to Adjust, click Add/Remove Noise, click Add Noise, then this time only change your noise setting to 40. Click Ok.
Go to your Animation Shop one more time, click on your second frame then right click on that same frame, click "Paste" then click "After Current Frame".
Now you want to View Animation, and if you are happy with it, all we need to do is crop our tag and save it!
So select your crop tool in Animation Shop, crop out any extra canvas that we did not use, be sure not to crop to close to your tag as you dont want to cut off elements or cut off your drop shadows.
Once you have your tag cropped you might want to re-size it, depending on where you are going to use it. If you need to re-size it in Animation Shop, go to Shift & s on your keyboard, then your re-size screen will open up, set it to where you need it then click ok.
Now save your tag as a gif file & your done!!
Thank-You so much for trying my tutorial, as always I would love to see what you have made using my tutorials, so please email them to me. Just click below to email !
((HUGS))
Ditzy
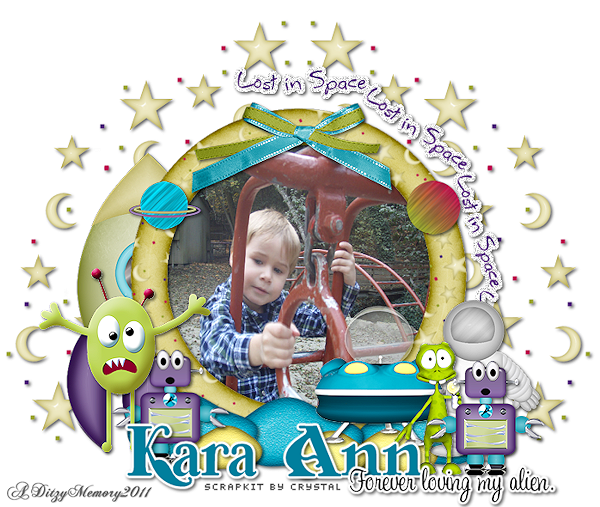
♥Lost In Space PTU♥
Here is what we are going to make :
**Please keep in mind that my tutorials are made from my own Ditzy noggin, any resemblance to any other tutorial is purely coincidental**
Supplies Needed :
PaintShop Pro X2 (Any version should work)
Eye Candy 4 >Gradient Glow
Fonts Used : 2 Moulin Rouge DNA & Sweetheart Script Limited
Scrapkit Lost In Space By Crystal @ Scraps By Crystal
Picture Of Choice (Do NOT use the same one I used) Thank-You Kara Ann :-)
Elements Used From Kit :
Frame 7
Bow 2
Alien 3
Alien
Rocketship
Astronaut
Moon rock
Wordart
Planet 3
Planet 2
Robot
Moon & Stars
Lets Begin :
Open a new 800x650 transparent image (Don't worry we will crop it later)
Open your Frame 7 , copy & paste as a new layer onto your canvas, Re-size it to 70%. Position in the middle of your canvas.
Now using your magic wand, click inside your frame.
Make a new raster layer, and copy & paste your picture "INTO Selection"
Then on your keyboard use your Ctrl & d keys to deselect.
On your picture layer go to Adjust, then click Sharpness, then click Sharpen.
Give your frame a drop shadow.
Open Bow 2, copy & paste as a new layer onto your canvas, re-size it to 70%, then position it at the top of your frame. Go to Adjust, click Sharpness, then click Sharpen.
Add a drop shadow to your bow.
Open Alien 3, copy & paste it as a new layer onto your canvas, re-size it to 40%, move your Alien to the left side of your frame, then go to Adjust, Sharpness, then click Sharpen. Add a small drop shadow.
Open your Moon & Stars element, copy & paste as a new layer onto your canvas, position it to the left side of your frame. Then in your layers pallet, move this layer all the way to the bottom making it the second layer from the bottom. Now right click on your Moon & Stars layer and click duplicate, now go to Image, click Mirror. Now position it where you need it on the right side of your frame.
Open your Rocket Ship element, Copy & paste it as a new layer onto your canvas, re-size it to 65%, position it to the right side of your tag. Go to Adjust, Click Sharpness, then click Sharpen. Give your Rocket Ship a drop shadow.
Open your Astronaut, copy & paste it as a new layer onto your canvas, re-size it to 45% and position it on the left side of your frame, and in your layers pallet you want to move your Astronaut layer below your Alien 3 layer. Now still on our Astronaut layer go to Adjust, click Sharpness, then click Sharpen. Give your Astronaut a drop shadow as well.
Now open your Moon Rock element, copy & paste it as a new layer, re-size it to 45%, position it in the front of your frame. Now go to your layers pallet and right click on your Moon Rock element layer, and then click duplicate, do this 2 x's for a total of 3 Moon Rock Layers. Position them all in the front of your frame. (Use my tag as example if you need to.)
Now lets open our Wordart , copy & paste it as a new layer onto your canvas, and using your move tool position it to the right of your frame. In your layers pallet move your Wordart layer down in the layer pallet so it is just above your Moon & Stars layers.
Open Planet 3, copy & paste as a new layer, re-size it to 15%, position on the left side of the frame some where in the middle area.
Now open your Planet 2 element, copy & paste it as a new layer onto your canvas, re-size it to 15%, and using your move tool again position your planet 2 element to the right side of your frame, towards the upper middle of your frame.
Lets open our Robot element now, copy & paste it as a new element, re-size it to 25%, using your move tool position it on the left side of your frame, then go to your layers pallet and move your Robot layer so it is above your moon rock layers but below your Alien layer.
Still on your Robot layer, right click, then click duplicate. Go to Image, then click Mirror. Position to the right of your frame . See mine for reference if you need to.
Now go to Adjust, click Sharpness, then click Sharpen. Add a drop shadow.
(If you want a white background on your tag, just click on the very last layer in your layers pallet, then active your Paint Bucket tool, and chose the color White (#ffffff) from your materials pallet then click the canvas, and it will put it in there for you.) If you want to leave it transparent you can do that as well.
Now it is time to add your name & credit/copyright information.
Once your name is added, go to Effects, click on Plug-ins, then Click on Eye Candy 4, then click Gradient Glow, and put your settings as you would like.
Now go to your layers pallet, right click on any layer, and then click Merge Visible.
Then you want to crop your tag to get rid of any space we did not use.
Once that is done, re-size your tag to your desired size.
Then go to Adjust, click Sharpness, then click Sharpen.
Save your tag as png!
Your Done!!
Thanks for trying my tutorial, if you make something using my tutorials please email it to me, I would love to see what you made!
((HUGS))
Ditzy
♥Whimsical Fairy PTU♥
Here is what we will be making :
**Please remember that my tutorials are from my own Ditzy noggin, any resemblance to any other tutorial is purely coincidental**
Supplies Needed :
PaintShop Pro X2 (Any version should work)
Animation Shop
Scrapkit Used : Pixie Wonderland TS By Laura's Designz @ Butterfly Blush
Tube Of Choice
I Used Cookies By LKDesigns
Font Used :Sweetheart Script-Limited
Eye Candy 5 Impact > Gradient Glow
Elements Needed From Kit :
Elements 12, 76, 91, 13, 3 , 22, & 43
Lets Begin :
Open a 800x650 new image, transparent
Click on your paint bucket tool , then select the color White (#ffffff) and click on your blank canvas, this will give you the white background which most times looks better with an animated tag.
Open Element 12, copy & paste it as a new layer, re-size it to 65%, position it on the center of your canvas.
Open Element 22, copy & paste it as a new layer, re-size it to 15%. Go to Image , click Mirror, and use your move tool to position this element to the right side of your pond.
Go to Adjust , click Sharpness, then click Sharpen.
Add a drop shadow to Element 22.
Now lets open Element 43, copy & paste it as a new layer, re-size it to 40%, use your move tool and position it to the left side of your pond. Go to Adjust , click Sharpness, then click Sharpen. Add a drop shadow.
Open Element 76, copy & paste as a new layer onto your canvas, re-size it to 65%. Now in your layers pallet move this layer to the bottom, just above your white background layer.
Still in your layers pallet, right click on your fence layer, duplicate it, then go to Image, Mirror and now use your move tool to position your fence so that most of it lines up with the other one.
The reason I duplicated and mirrored this element was because I wanted the end post on the other side as well.
Open Element 3, copy & paste as a new layer onto your canvas, re-size to 50%, position so it is behind your pond and mushroom house.
Now in your layers pallet, move this layer below all layers EXCEPT for your fence layer.
So keep it above your white background & fence layers.
Now still on your Element 3 layer, right click , click duplicate , go to Image, then go to Mirror, Keep doing this until you have approx. 4 trees.(Element 3) Now using your move tool spread them across the back of your pond.
Once you have 4 trees (Element 3) where you want them, go to your layers pallet, and click the 4th tree layer, right click , click merge, then merge down, continue to do this on all of the tree layers until they become on layer.Now go to Adjust, click Sharpness, then click Sharpen. Add a drop shadow.
Open Element 51, copy & paste as a new layer onto your canvas, re-size to 10%, Position on your tag to the left side by your mushroom house, in your layers pallet, right click on your Elements 51 layer and duplicate it and position it around the front of your pond. Do this 6 times to cover the entire pond.
Once you have all of them positioned right click on the top layer of the Element 51 layers, click Merge, then click Merge Down. Do this until ALL 6 become ONE layer. :-)
Once they are all on the same layer, go to Adjust, Sharpness, and then click Sharpen. Give a small drop shadow. Not to much. You don't want them jumping off the screen.
Open Element 13, copy & paste it as a new layer onto your canvas re-size to 15% then re-size again to 90%. Position so it looks like it is floating on the pond.
Go to your layers pallet, right click on your Element 13 layer, click Duplicate, and position it on your pond. Do this until you have the desired amount that you want.
***Now if you do not wish to animate your tag SKIP this part & move onto the next where it says "Ok lets continue" ***
Get your "Freehand Selection" tool, Now in your layers pallet, select your pond layer (Element 12)
Now back on your canvas, you need to outline the pink flower that is already on the pond, (not the ones we added earlier, if you need to you can close those flower layers off so you don't get confused)
Now with your Freehand Selection tool, settings to , Point To Point, Add (Shift) Feather 0, Smoothing 0.
Now click and outline around that flower on the pond (the pink one) Making sure that you end where you started, once you have it all outlined double click right where you ended, (If your marching ants disappear then you didn't stop where you started so you will have to outline it again :-(
K, so once you get the marching ants dancing around your flower , go to your layers pallet and make sure you are still on your pond layer, right click, then click "Promote Selection To Layer"
Now on your keyboard, select Ctrl & d to deselect. Now you have a seperate layer of just that flower.
So now on that Promoted Selection layer we just made in your layers pallet, move it up so that it is either right above or right below your Element 13 layers that we duplicated. (Meaning the other pink flowers)
Now starting with the top flower layer, right click , then click Merge Down, do this until ALL the pink flowers (Element13) including the one we Promoted To Layer, become one layer.
Once they are all one layer go to Adjust, Click Sharpness, then click Sharpen. Add a VERY light drop shadow. In your layers pallet rename this layer to "Flowers" so we know which layer to come back to , to animate it.
Ok lets continue :
Now open your tube of choice, I am using cookies by LKDesignz, , but you can use whatever you would like.
Copy & paste your tube of choice onto your canvas, re-size to 25% (Again this is for the tubes I used) Now using your move tool, position this tube down to the lower left corner of your pond but in front of your mushroom house. In your layers pallet right click on your tube layer, click duplicate, now on your duplicated layer go to Image, then click Mirror, now using your move tool and position your duplicated tube over to the lily pad that is in your pond. Re-size your second tube to 80%.
Now in your layers pallet, on each tube layer, right click and duplicate. So you will now have 4 tube layers. Go to the duplicated layer of EACH tube, go to Adjust, Click on Blur, then click Gaussian Blur, set to 3.00 then change your blend mode to overlay. (Remember do this for both of your duplicated tube layers.)
Now on your original tube layers which would be the bottom layer of each tube, give them a drop shadow.
Now it is time to add your name &
Credits/Copyright information.
Once you have your name added, you must convert that layer to a raster layer, so go to your layers pallet, on your name layer, right click and click Convert to raster layer.
Now go to Effects, scroll down to your plug-ins, then find Eye Candy 5 Impact > Gradient Glow. Settings of your choice. Click ok
Give your name a drop shadow.
If you wish not to animated you can stop here , be sure to save your tag!!
If you wish to animated, lets continue on :
In your layers pallet, click on your flowers layer, go to Adjust, Click Add/Remove Noise, then click Add Noise, Set your settings to Uniform, 30 Monochrome checked, click ok.
Now open your Animation Shop, Then go back to your PSP, on your canvas bar right click and click Copy Merged, now to back to your Animation Shop, right click, click Paste As New Animation. Now go back to your PSP, click your undo button 1 time. Go to Adjust > Add/Remove Noise> Add Noise, only change the noise setting this time to 35. Click Ok
Now right click on your canvas bar, click Copy Merged, go to your Animation Shop, right click on the frame we just put there, click Paste, then click After Current Frame.
Then go back to your PSP, click undo 1 time, go to Adjust>Add/Remove Noise, then click Add Noise, this time change the setting to 40. Click Ok.
Go to your Animation Shop one last time, click on the second frame then right click, click paste, then click After Current Frame.
Now you want to view your animation, if you are happy with it lets crop your tag to get rid of any extra canvas that we didn't use, then re-size to your liking and save as gif file!!
Thats it!
As always thank-you so much for trying my tutorial, If you would please send me anything you make using my tutorial as I would love to display it on my blog.
♥HUGS♥
Ditzy
Monday, March 28, 2011
*Spring Fairy* PTU
Here is what we are going to make :
***Please keep in mind that all of my tutorials are made using my own Ditzy noggin, any resemblance to any other tutorial is purely coincidental.***
Supplies Needed :
PaintShop Pro X2 (Any version will work)
Animation Shop
Eye Candy 5 Impact >Gradient Glow
Font Of Choice - I used 2 Moulin Rouge DNA
Size : 72
Color #ff3c8a
Scrapkit Called Spring Fairy By Rieka Rafita @ Scraps With Attitude
Elements Used :
Paper 10
Frame 2
Hill
Rainbow
Fairy 1 & 2
Mushroomhouse
Ribbon 1
Wordart 1
Flower 4
Bee
Sparkles 2
Leaves 1
Flower 1
Glitter Splash
Lets Begin :
Open a new image 800x650 (We will crop later)
Now open your Frame 2 element, copy & paste it as a new layer onto your canvas , re-size it to 75%.
Using your magic wand , click inside your frame, then go to Selections, then click Modify, then click Expand. Change the setting to 10.
Make a new raster layer.
Open Paper 10, Copy & paste it "INTO Selections". Now in your layers pallet move your paper layer below your frame layer.
Ctrl & d to deselect.
Then click on your frame layer & give it a drop shadow.
Open your Hill element, copy & paste it as a new layer, re-size it to 45%, and position it in your layers pallet so that the hill layer is below your frame layer but above your paper layer.
Now position it on your canvas so that it is where you want it.
Open your Rainbow element, copy & paste it as a new layer, re-size it to 50%. In your layers pallet move your rainbow layer so that it is below your frame & hill layer, but keep it above your paper layer.
On your Rainbow layer, go to Adjust, click Sharpness, then click Sharpen. Now add a drop shadow to your rainbow.
Open your Fairy 2 element, copy & paste it as a new layer, re-size it to 20%. Position it so it is on the right side of your hill, now go to Adjust, click Sharpness, then click Sharpen. Give your fairy 2 a drop shadow.
In your layers pallet make sure your fairy 2 layer is below your frame layer.
Now still in your layers pallet, click on your Fairy 2 layer, then right click, click duplicate, go to Image, then click Mirror, and either move it off to the side for now, or hide the layer by clicking the eye. We will be using this layer later in the tutorial.
Now open your Fairy 1 element, copy & paste it as a new layer, re-size it to 20%, then go to Image, click Mirror, then position it so that it is almost resting on the left side of your hill.
Go to Adjust, click Sharpness, then click Sharpen. Give your fairy 1 a drop shadow.
Now lets open our Mushroomhouse element, copy & paste it as a new layer onto your canvas, re-size it to 35% and position it in the lower right corner of your frame. Go to Adjust, click Sharpness, then click Sharpen, then add a drop shadow.
Open Ribbon 1 element, copy & paste as a new layer onto your canvas, position how you would like and then add a drop shadow.
Open your Wordart 1 element, Copy & paste it as a new layer onto your canvas, now re-size it to 50%, add a drop shadow and position it at the top of your frame.
Open your Flower 4 element, copy & paste it as a new layer onto your canvas, then re-size it to 50%, then resize it again to 80% 2 more times. Go to Adjust, click on Sharpness, then click Sharpen, then position it at the top right corner of your frame. Give your flower 4 and drop shadow.
Open your Bee element, copy & paste it as a new layer onto your canvas, re-size it to 10%, and position it on the inside of your frame. Go to Image, click on Free Rotate, then set it to Left 20.00. Now go to Adjust, click Sharpness, then click Sharpen, and give your Bee a small drop shadow.
Now lets open our Sparkle 2 element, copy & paste it as a new layer onto your canvas, then re-size it to 50%, Now in your layers pallet , right click on your Sparkle 2 layer and click Duplicate, then go to your duplicated layer and go to Image, then click Mirror then then Image again, then click Flip.
Open your Leaves 1 element, copy & paste as a new layer onto your canvas, re-size to 25%, position your leaves down by your mushroomhouse.
Right click on your Leaves layer (in your layer pallet) then click Duplicate, go to Image, click Mirror, then use your move tool to position your duplicated Leaves 2 layer . Now go to your layers pallet and make sure you are on your Leaves 2 duplicated layer, then right click, click Merge then click Merge Down. Now your Leaves layers are merged together go to Adjust, click Sharpness,then click Sharpen.
Give your merged leaves layer a small drop shadow.
Now unhide that duplicated Fairy 1 layer that we made earlier , and position it so that it appears to be ontop of the mushroomhouse.
Open your Fairy 2 layer again and copy & paste it as a new layer onto your canvas, re-size it to 25% and position it at the lower left of your frame. Now in your layers pallet move your second Fairy 2 layer so that it is behind both of your Leaves layers.
Open your Flower 1 element , copy & paste it as a new layer onto your canvas and re-size it to 15%, go to Adjust, click on Sharpness and then click Sharpen.
Add a drop shadow.
Now in your layers pallet, duplicate your Flower 1 layer a couple of times and place them all around your tag.
Now open your Glitter Splash element, copy & paste it as a new layer onto your canvas, now go to Image, click Flip. Now in your layers pallet, move this layer down in your layers pallet so that it is the second layer from the bottom.
Now still on your Glitter Splash layer, right click and click Duplicate, then go to Image, and click Mirror, then in your layers pallet make sure your duplicated Glitter Splash layer is active (click on it to activate it) then right click and click Merge, then click Merge Down..
Now right click on your merged Glitter Splash layer and duplicate it, then go to Image, then click Flip.
Now add your name & your copyright/credit information.
Crop your tag, if you wish not to animated your tag , then go to your layers pallet once your tag is cropped, click on any layer, then right click and then click Merge, on the slide out menu click Merge Visible.
Re-size your tag to your desired size.
Save as png!
If you wish to animate lets continue :
Once you have your name the way you want it, go to Effects > Plug-ins, Eye Candy 5 Impack, click on Gradient Glow and use the following settings ;

In your layers pallet click on your name layer, then get your magic wand , click inside each letter of your name. Once all letters are selected go to Effects > 3D >Inner Bevel and use these settings :
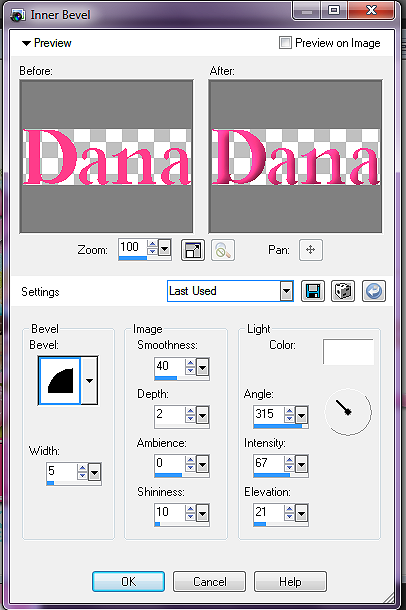
Click Ok.
Now open your Animation Shop, then go back to your PSP, Now keeping your letters selected go to Adjust, click Add/Remove Noise, then on slide out menu click Add Noise. Change your settings to Uniform, 35 and make sure that your Monochrome IS checked. Then click Ok.
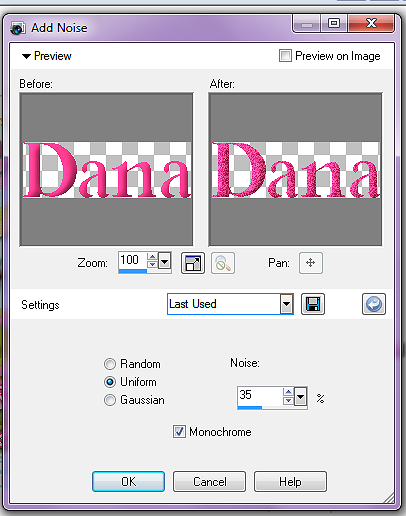
Now on your keyboard press your Ctrl & d to deselect,
In your layers pallet now click on your Ribbon 1 layer, then go to Adjust, click Add/Remove Noise, then click Add Noise from the slide out menu, using the exact same settings as we did for our name.
Click Ok.
Now go to Edit, Click "Copy Special" then on the slide out menu click "Copy Merged".
Now go to your Animation Shop, right click and click "Paste As New Animation".
Go back to your PSP, use your undo button OR hold your Ctrl key down while you press the letter Z 4 times. Stop where your letters are selected (with the marching ants)
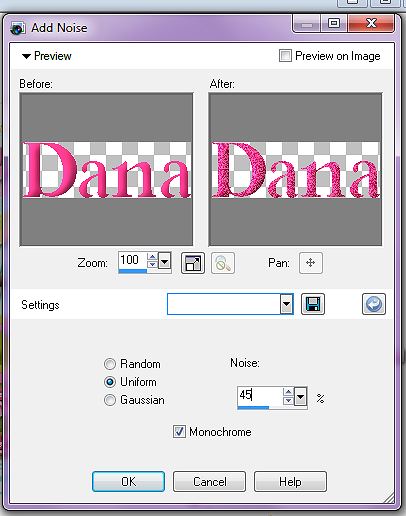
Now that will undo the last steps we did but we want to stop where the letters are selected and our Inner Bevel is already in place, so once you are to that point, go to Adjust, click Add/Remove Noise, then on slide out menu click Add Noise, now this time only change your Noise setting to 40.

On your keyboard press your Ctrl & d keys to deslect.
Then in your layers pallet now click on your Ribbon 1 layer again, then go to Adjust, click Add/Remove Noise, then click Add Noise, from the slide out menu, use the exact same settings we just used, keep your noise setting at 40 and click Ok.
Go to Edit, click on "Copy Special" then on the slide out menu click "Copy Merged'
Now go to your Animation Shop, and right click inside the frame we just put there, click Paste, then click AFTER CURRENT FRAME.
Now go back to your PSP, click your undo button 4 times, or use your Ctrl & tap the letter Z 4 times, remember to stop at the point where our letters are still selected and our Inner Bevel is still in place, now go to Adjust, click Add/Remove Noise, then click Add Noise. This time change your Noise setting to 45. click Ok.
On your keyboard press your Ctrl & d key to deselect your letters.
Then in your layers pallet now click on your Ribbon 1 layer again, then go to Adjust, click Add/Remove Noise, then click Add Noise, from the slide out menu, use the exact same settings to just used keeping your noise setting at 45. Click Ok.
Go to Edit, click "Copy Special" then on the slide out menu click "Copy Merged".
Go to your animation shop , and right click in the second frame and then click paste, then click AFTER CURRENT FRAME.
Now view your animation, if you are happy with it you will want to re-size your tag, to do that in Animation Shop press Shift & s on your keyboard, then your re-size screen will open up. Set to your liking.
Now save your tag as a gif file and your all set!!
Thank-You for trying my tutorial, and as always please email me anything you have made using my tutorials as I would love to showcase them on my blog!
♥Hugs♥
Ditzy
Sunday, March 27, 2011
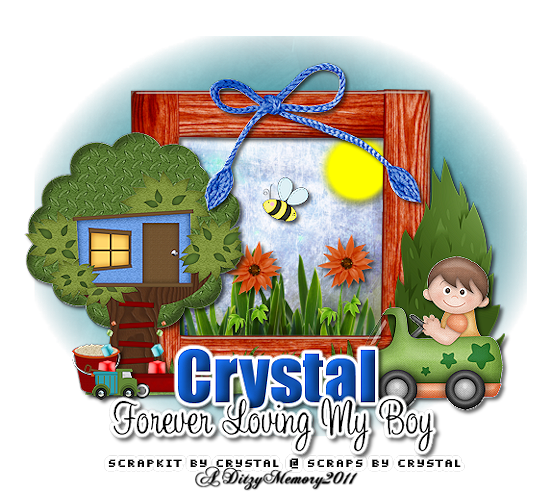
♥Forever Loving My Boy♥
Here is what we are going to make :
***Please keep in mind that all of my tutorials are made using my own Ditzy noggin, any resemblance to any other tutorial is purely coincidental.***
Supplies Needed :
PaintShop Pro X2 (Any version will work)
Mask Of Choice
Eye Candy 4 > Gradient Glow
Scrapkit Used Is "All Boy" By Scraps By Crystal
Elements Used :
Paper 6
Paper 11
Frame 1
Little Boy
Bow 2
Bush
Grass 2
Bee
Flower
Treehouse
Pail
Dump Truck
Wagon
Blocks
Lets Begin :
Open a new image 800x650 (Don't worry we will crop it later)
Open your Frame 1 , copy & paste it as a new layer, re-size it to 50%.
Get your magic wand tool, and click the canvas inside your frame.
Go to Selections, click Modify, then click Expand, change your setting to 10.
Now make a new raster layer,
Open Paper 6, copy & paste it "INTO Selection".
In your layers pallet move your paper 6 layer below your frame layer.
On your keyboard press "Ctrl & d" to deselect.
Now open your Little Boy element, copy & paste it as a new layer, re-size it to 25%, and position it in the lower right side of your frame.
Go to Adjust, click Sharpness, then click Sharpen.
Add a drop shadow to your Little Boy & Frame.
Open your Bow 2, copy & paste it as a new layer, re-size it to 45%, position your bow 2 so that it is at the top of your frame. Now go to Adjust, click Sharpness, then click Sharpen. Also give it a drop shadow.
Make sure in your layers pallet that your Bow 2 layer is above your Frame 1 layer.
Now lets open our Bush element, copy & paste it as a new layer, re-size it to 40%, using your move tool, position your bush element so that it is behind your little boy element. Now go to Adjust, click Sharpness, then click Sharpen.
In your layers pallet make sure your Little Boy layer is above your Bush layer.
Open your Bee element, copy & paste it as a new layer, re-size it to 10%. Position it on the inside of your frame. Go to Adjust, click Sharpness, then click Sharpen. Add a drop shadow. (If your Bee element is not showing up, make sure your bee layer is above all the other layers)
Now open your Flower element, copy & paste it as a new layer, re-size it to 25%. In your layers pallet move your flower layer below your frame layer.
On your flower layer go to Adjust, click Sharpness, then click Sharpen. Now add a drop shadow.
Once you have sharpened your element & added a drop shadow, go to your layers pallet, make sure you are on your flower layer, and right click , then click duplicate, now using your move tool, position your second flower where every you would like it.
Adjust, click Sharpness, then click Sharpen.
Add a drop shadow.
Open your Pail element, copy & paste it as a new layer onto your canvas, re-size it to 10%.
Position your pail so that it is in front of your Treehouse.
Go to Adjust, click Sharpness, click Sharpen.
Give your pail element a drop shadow.
Now lets open our Drump Truck element, copy & paste it as a new layer onto your canvas, re-size it to 10%. Now position your dump truck so that it is just in front of your pail element.
Go to Adjust, click Sharpness, then click Sharpen.
Add a drop shadow.
Open your Wagon element, copy & paste it as a new layer onto your canvas, re-size it to 25%, and position it in front of your tree just a touch to the right.
Go to Adjust, click Sharpness, then click Sharpen.
Add a drop shadow.
Open your Blocks element, copy & paste it as a new layer onto your canvas, re-size it to 10%, now position it so it looks like they are in the dump truck, now copy & paste your Blocks element again, re-size it again to 10%, only this time position your blocks so they look like they are sitting in your wagon.
Go to Adjust, click Sharpness, then click Sharpen, and add a drop shadow. Do this for BOTH of your Block elements.
Now you need to click on the last layer in your layers pallet,
Open Paper 11, copy & paste it as a new layer onto your canvas, go to Layers, click Load Save Mask, then on the slide out menu click Load Mask From Disc.
Choose your desired Mask.
Once you have your mask chosen, click Load.
In your layers pallet, right click on your paper layer, click Merge, then click Merge Group. Now re-size to 80%. Back in your layers pallet right click on your mask layer, click Duplicate then right click on your duplicated layer and click Merge Down. Now re-size your merged layers to 80%.
Now open your Grass 2 element, copy & paste it as a new layer onto your canvas, re-size it to 65%, and position your grass 2 element at the bottom of your frame. (See my tag for reference if needed)
In your layers pallet move your Grass 2 layer below your other layers but keep it above your frame layer.
Now, click on your brush tool, set your foreground color to #ffff00, Set your brush to your +Round 50 brush (this should of came with your psp). Size 75, Hardness 75, Step 10, Density 100, Thickness 100, Rotation 0, Opacity 100, Blend Mode Normal, Continuous Checked, Wet Look Paint UNchecked.
Now using your brush tool, click inside your frame at the upper right corner.
If you need to in your layers pallet move your sun layer down so it is under your frame and any other elements that are either covering it or hidden by it.
Now is time to add your name: ,
Font I Used : Impact
Size : 70
Color : #1155b5
Type out your name, then go to Effects, down to your plug-ins, then click on Eye Candy 4 > Gradient Glow.
Now add drop shadow.
Get your magic wand tool, and click inside each letter, once every letter is selected use your inner bevel effect.
See my settings below :
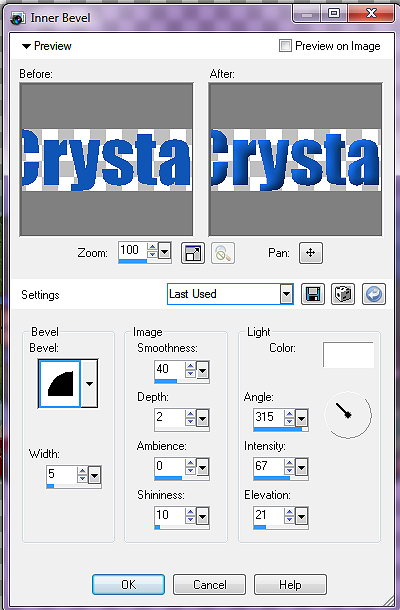
Click Ok.
On your keyboard, push Ctrl & d to deselect.
Now is time to add any saying you would like to add, I used "Forever Loving My Boy"
Font Used Is :Sweetheart Script-Limited
Size 40
Color : Black (#000000)
Now add any copyright/credits that need to be added.
Once you have all of the above completed, crop your tag, be careful that you don't crop to close to your tag and crop off any of your mask or elements.
Once your tag is cropped ,go to your layers pallet, right click and click Merge, then click Merge Visible.
Now re-size your tag, the settings for this part is totally up to what size you need your tag to be where ever you are going to use it. For my tutorial sample I used 550.
Once your tag is cropped and layers are all merged, go to Adjust, click Sharpness, then click Sharpen.
Now all that is left is to save your tag as png & your done!!
Thank-You for taking the time to do my tutorial, As always I would LOVE to see what you have made using my tutorials, so please email them to me, I would love to showcase them here on my blog!
Saturday, March 26, 2011
♥Emo Disco PTU♥
Here is what we will be making :
**Please keep in mind that all of my tutorials are made using my on Ditzy imagination, any resemblance to any other tutorial is purely coincidental**
*This Tag IS Animated*
Supplies Needed :
PaintShop Pro X2 (Any version should work)
Animation Shop
Eye Candy 4 > Gradient Glow
Alien Skin Xenofex 2
Tube Of Choice I Used - Zlata @ Pics For Design
Scrapkit Emolicious By : Tammy's Scraps
Tube Of Choice I Used - Zlata @ Pics For Design
Scrapkit Emolicious By : Tammy's Scraps
Elements From Kit Used :
Paper 9
Element 20
Element 16
Element 79
Element 22
Element 27
Element 18
Element 43
Element 29
Lets Begin :
Open a new image 800x650 with transparent background.
Open Element 43, copy & paste as a new layer on to your canvas, re-size it to 50%.
In your layers pallet right click on your Element 43 layer, click duplicate, and then go to Image, click Mirror. Position so they are now side by side.
Open Element 20, copy & paste it as a new layer on to your canvas, re-size it to 75%. Now using your move tool position it so that it is in the center of your Element 43 images.
Now get your magic wand tool, making sure you are on your film strip layer (Element 20) in your layers pallet, click inside all 4 big openings of your film strip. Now go to Selections, click on Expand, and set your number of pixels to 3, and click Ok.
Now open Paper 9, copy & paste as a new layer on to your canvas, position your paper so that it covers the entire film strip.
Go to Selections, click on Invert, then on your keyboard push your "Delete" key.
Now in your layers pallet move your paper layer so that it is BELOW your film strip layer.
Keep your film strip layer selected , now open your tube and copy & paste it as a new layer on to your canvas, re-size it to 50% (this depends on what your tube is , so adjust as needed) position your tube so that the face area is inside your first square of your film strip. Now hit "Delete" on your keyboard, Continue to do this until all 4 squares have some part of your tubes body in them, once you have all 4 filled you can then push "Ctrl & d" on your keyboard to deselect.
Now in your layers pallet, move your film strip layer ABOVE all 4 of your tube layers, click on the tube later that is directly below your film strip now and right click, then click Merge, then Merge Down, do this until all 4 of your tube layers have become one layer.
Now on your tube layer, go to Adjust, click Sharpness then click Sharpen, give this layer a drop shadow.
Also give your film strip (Element 20) a drop shadow as well.
Open Element 27 , copy & paste it as a new layer on to your canvas, position it so that it is in the center of your film strip, now in your layers pallet move your Element 27 layer to the bottom, but make sure it is above your 2 Element 43 layers. Now add a drop shadow to your Element 27.
In your layers pallet, right click on your Element 27 layer, then duplicate this layer 2 x's for a total of 3 layers.
Now rename those 3 layers as follows starting from the bottom, Disco 1, Disco 2 & Disco 3. Now close off Disco 2 & 3 layers. Click on Disco 1 layer, go to Effects, then plug-ins, go to Alien Skin Xenofex 2, then click on your Constellation , set your settings as follows :
Star Size : 2.00
Size Variation : 73
Edge Star Density : 1
Overall Star Density : 12
Overdrive : 100
Twinkle Amount : 17
Twinkle Rotation : 45
Background fill set to "Keep Original Image"
Random Seed : 1
Click Ok.
Now hide Disco Layer 1 and unhide Disco Layer 2, go to Effects, Plug-ins > Alien Skin Xenofex 2 > Constellation. Then click the "Random Seed Button 1 time and click Ok.
Now hide Disco Layer 2 and unhide Disco Layer 3, go to Effects > Plug-ins>Alien Skin Xenofex 2 >Constellation, then click the "Random Seed " button 1 time, and click Ok.
Now click on the top layer in your layers pallet, and then Open your tube again, copy & paste it as a new layer, re-size it to 75% and position it in the center of your film strip. Now in your layers pallet, move your tube layer BELOW your paper layer. Now get your eraser tool and erase any access tube that is showing below your film strip.
In your layers pallet, right click on your tube layer, click duplicate then on your duplicated layer go to Adjust > Blur > then Gaussian Blur, set to 3.00, then change your blend mode to "Overlay". Then on your original tube layer add a drop shadow.
Open Element 16, copy & paste as a new layer onto your canvas, then in your layers pallet move it to the top of your layers. Re-size it to 75%, and using your move tool position it so it is centered with your film strip, and add a drop shadow.
Open Element 79, copy & paste it as a new layer onto your canvas, re-size it to 30%, using your move tool again position it so that it is on the lower left corner of your film strip. Go to Adjust> Sharpness > then Sharpen and then give it a drop shadow.
In your layers pallet, click on your Element 22 layer, then right click , click duplicate, then go to Image, click Mirror, and using your move tool position it on the bottom right side of your film strip.
Now open Element 18, copy & paste it as a new layer onto your canvas, re-size it to 25%, use your move tool to position it at the top left corner of your film strip. Go to Adjust> Sharpness> then Sharpen. Now right click on your Element 18 in your layers pallet, then click duplicate, go to Image > then click Mirror. Use your move tool to position the element to the top right corner of your film strip,now add a drop shadow to both layers.
Now you can add your name & copyright/credit information.
Once you have all that added you need to crop your tag to get rid of any access unused canvas.
Let's Animated Our Tag :
Open your Animation Shop
Go back to your PSP, click on your Disco 1 layer (making sure that your Disco 2 & Disco 3 layers are hidden) , then click on the blue area at the top of your canvas, click Copy Merged, go over to your Animation Shop, right click and click "Paste As New Animation".
Go back to your PSP, hide Disco Layer 1 & unhide Disco Layer 2, copy merged, go to Animation Shop, right click on the first frame we just put there, click Paste, then "After Current Frame".
Go back to your PSP, hide Disco Layer 2, and unhide Disco Layer 3 , copy merged, then go back to your Animation Shop, right click on your second frame and click Paste, then click "After Current Frame"
Now view your animation, if you are happy with it re-size your tag, re-sizing at this point all depends on what size you need it for where ever you are going to use it. To re-size in Animation Shop, on your keyboard push "Shift & s" then type in your desired size.
Then remember to save your tag!!
♥Congratulations you have completed the tutorial!♥
As always if you do any of my tutorials I would LOVE to see what you have made, so be sure to send me a copy of your tag, I would love to display it on my blog. Email DitzyDezigns
♥Emolicious PTU♥
Here is what we will be making :
**Please keep in mind that my tutorials are made using my own Ditzy noggin, and resemblance to any other tutorial is purely coincidental.**

Supplies Needed :
PaintShop Pro X2 (Any version will work)
Animation Shop
Tube of choice, I used Zlata's work from Pics For Design
Scrapkit used is Emolicious From Tammy's Scraps
Elements Used :
Element 35
Element 29
Element 84
Element 15
Element 68
Element 43
Paper 11
Font Used For Name Is - Mail Ray Stuff
Size : 72
Color : #9c39cb
Lets Begin :
Open a new image, 800x650 transparent
Open Element 35 , copy & paste as a new layer on to your canvas, and re-size it to 65%.
Get your magic wand tool and click inside your frame, be sure to also click the canvas area where your ribbons on the frame are.
Now go to Selections, click Modify, then click Expand, set your setting to 20. Click Ok.
Now make a New Raster Layer, Open Paper 11, copy & paste it "INTO Selection".
Now on your keyboard, press "Ctrl & d" to deselect. Now in your layers pallet move your Paper 11 layer BELOW your frame layer.
Now give your frame layer a drop shadow.
Open Element 15 , copy & paste it as a new layer on to your canvas re-size it to 55%, and position it at the bottom of your frame and give it a drop shadow.
Now open your tube, copy & paste it as a new layer on to your canvas, use your move tool and position it so the face of your tube is in the center of your frame. In your layer pallet move your tube layer below your frame layer , now use your eraser tool and erase any excess tube that is showing on the outside of your frame at the bottom.
In your layers pallet, duplicate your tube layer, on your duplicated layer go to Adjust, click Blur then click Gaussian Blur. Set your settings to 3.00, click Ok.
Now change your Blend Mode to Overlay, and lower the opacity to 50.
On your original tube layer change the Blend Mode to Luminance (L) and give your original tube layer a drop shadow.
Open your full size tube, copy & paste it as a new layer on to your canvas, re-size it to 35% (this will depend on the tube you are using)Then,go to Image, click on Mirror, then position it on the right side of your frame. Then go to your full tube layer in your layers pallet right click on it, then click duplicate. Then on the duplicated layer go to Adjust, click on Blur, then click Gaussian Blur, set your setting to 3.00. Click Ok. Still on your duplicated layer, change your Blend Mode to "Overlay".
On the original tube layer give it a drop shadow.
Open Element 29, Copy & paste it as a new layer on to your canvas, re-size it to 50%. In your layers pallet move the Element 29 layer BELOW your frame layer but keep it above the close up tube layers.
Now back on your canvas, move the sparkles (Element 29) towards the top of your close up tube. (Use my tag as reference if needed).
Open Element 84, copy & paste it as a new layer onto your canvas, re-size it to 50%, position it on the left side of your frame, then go to Adjust, click on Sharpness, then click Sharpen and then add a drop shadow.
In your layers pallet, click on the last layer , then open your Element 68, copy & paste it as a new layer on to your canvas, using your move tool position it so that the bottom is sticking out from the lower left side of your frame. Then in your layers pallet click on your Element 68 layer, right click , click duplicate then go to Image, click Mirror, then go to Image again and this time click flip. Adjust the position of the duplicated element if you need to.
Open Element 43, copy & paste as a new layer on to your canvas , re-size to 85% , then in your layers pallet make sure your Element 43 layer is the last layer.
Click on your Element 68 top layer (in your layers pallet), then open Element 29, copy & paste as new layer, then go to Image, click on Free Rotate, select Left and set to 90.00. Click Ok.
Go to Image, click Mirror, then go to Image again, and click Flip.Adjust position if you need to.
Ok lets add our name & copyright/credits information at this time.
Font I used was Mail Ray Stuff, Size 72, Color #9c39cb
Now, Right click on your name layer, and click Convert To Raster Layer.
Go to Effects, go to your plug-ins, find your Eye Candy 4 plug-in, go to Gradient Glow, set the Basic settings to :
Glow Width : 4.00
Soft Corners : 25
Overall Opacity : 100
Make sure the "Draw Only Outside" box IS checked. Now on your Colors tab, select "Fat" and make sure your color selected is White (#FFFFFF)
Click Ok.
Add a drop shadow to your name, now get your magic wand tool, make sure in your layers pallet that your name layer is selected. Now on your canvas click inside each letter in then name. Once all letters are selected go to Effects, then select 3D ,then click "Inner Bevel". Use the following settings :

Click Ok. Then on your keyboard hit "Ctrl & d" to deselect.
Now crop your image, make sure all the layers in your layers pallet are where they need to be and right click on any layer and then click "Merge Visible".
Re-size your tag (on your keyboard hit "Shift & s")
Then go to Adjust, click Sharpness, then click Sharpen..
Then save your image as a png & your done!
Thank-You for choosing to do my tutorial, I hope you had fun. As always please send me anything you have made using my tutorial, I would LOVE to see it ♥ Email DitzyDezigns
Subscribe to:
Posts (Atom)
About Me
- DitzyDezigns
- New York, United States
- Hiya Everyone! My name is Ronney, I have 3 wonderful teenagers, and have been married to my husband for 20 years. I LOVE to design signatures, tags & avatars, I design with PSP, and have been designing for over 2 1/2 years. I will be not only designing signatures, tags & avatars but will also be writing & posting tutorials as well. I will also be making some templates to share with you all as well. So I hope you enjoy and can use everything I have available on my blog :-) If you ever try any of my tutorials,please send me your completed designs and I would love to showcase it here on my blog!
♥I CT For♥


Blog Hop

Today's Date

Favorite Stores

♥Forums♥


My Pixels


♥My Avatars♥